Jul 13, 2019 at 11:45 AM
(Merged)
No spark
1985 JEEP CJ7
Advertisement
Have you checked to see if the distributor shaft is rotating? Taken any voltage readings?

what is the voltage to the positive side of the coil??
roy
roy
Jul 13, 2019 at 11:45 AM
(Merged)
Advertisement
sorry i took so long - work/ uncle died/ daughter's birthday/ etc. just got in. mr. jeep's rear pinion seal has sprung a leak, looks like they'd last more than 38 years (at this pace, i'll never get time to replace it)
prestolite was a very crappily designed system
the wires entering the distributor are basically solid copper telephone wires (like about the size of what plugs into your house phone's body)
if this is not anchored well, it will shake around and break the wire(s)
i've seen this many times, especially w/ 6 cylinders, wires sorta just dangle, a 304 ain't as bad, the wires lay on the intake
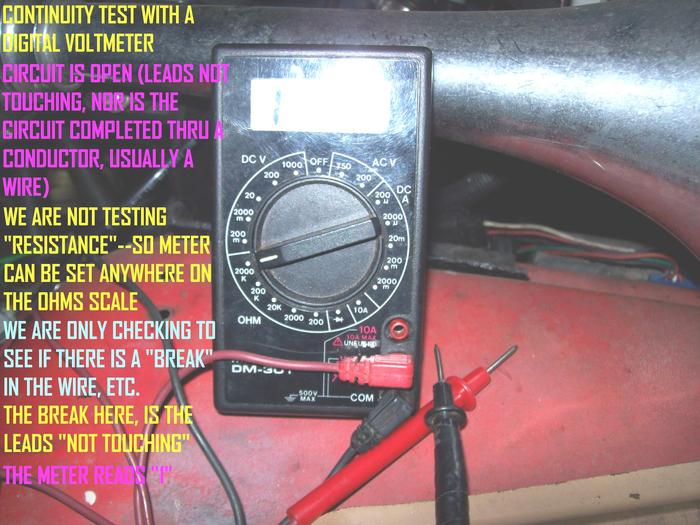
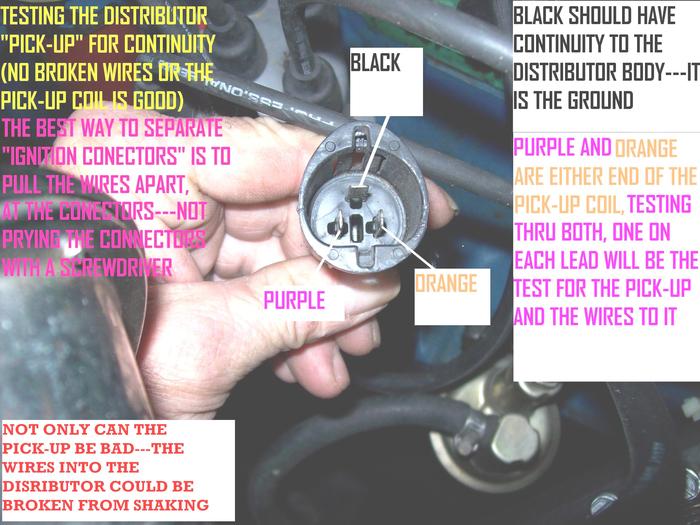
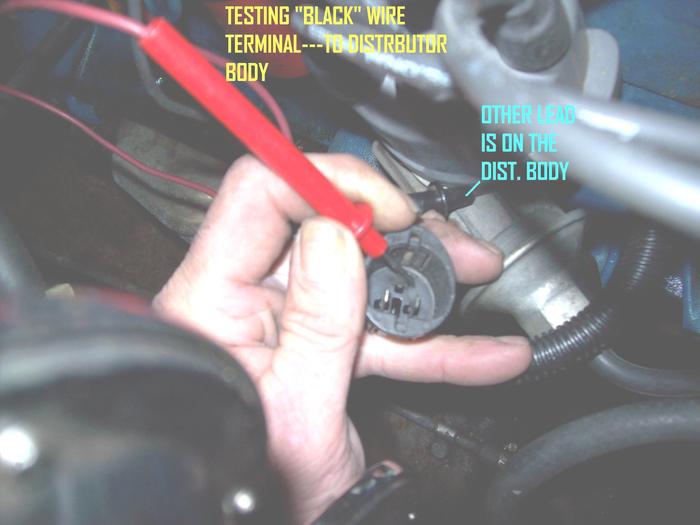
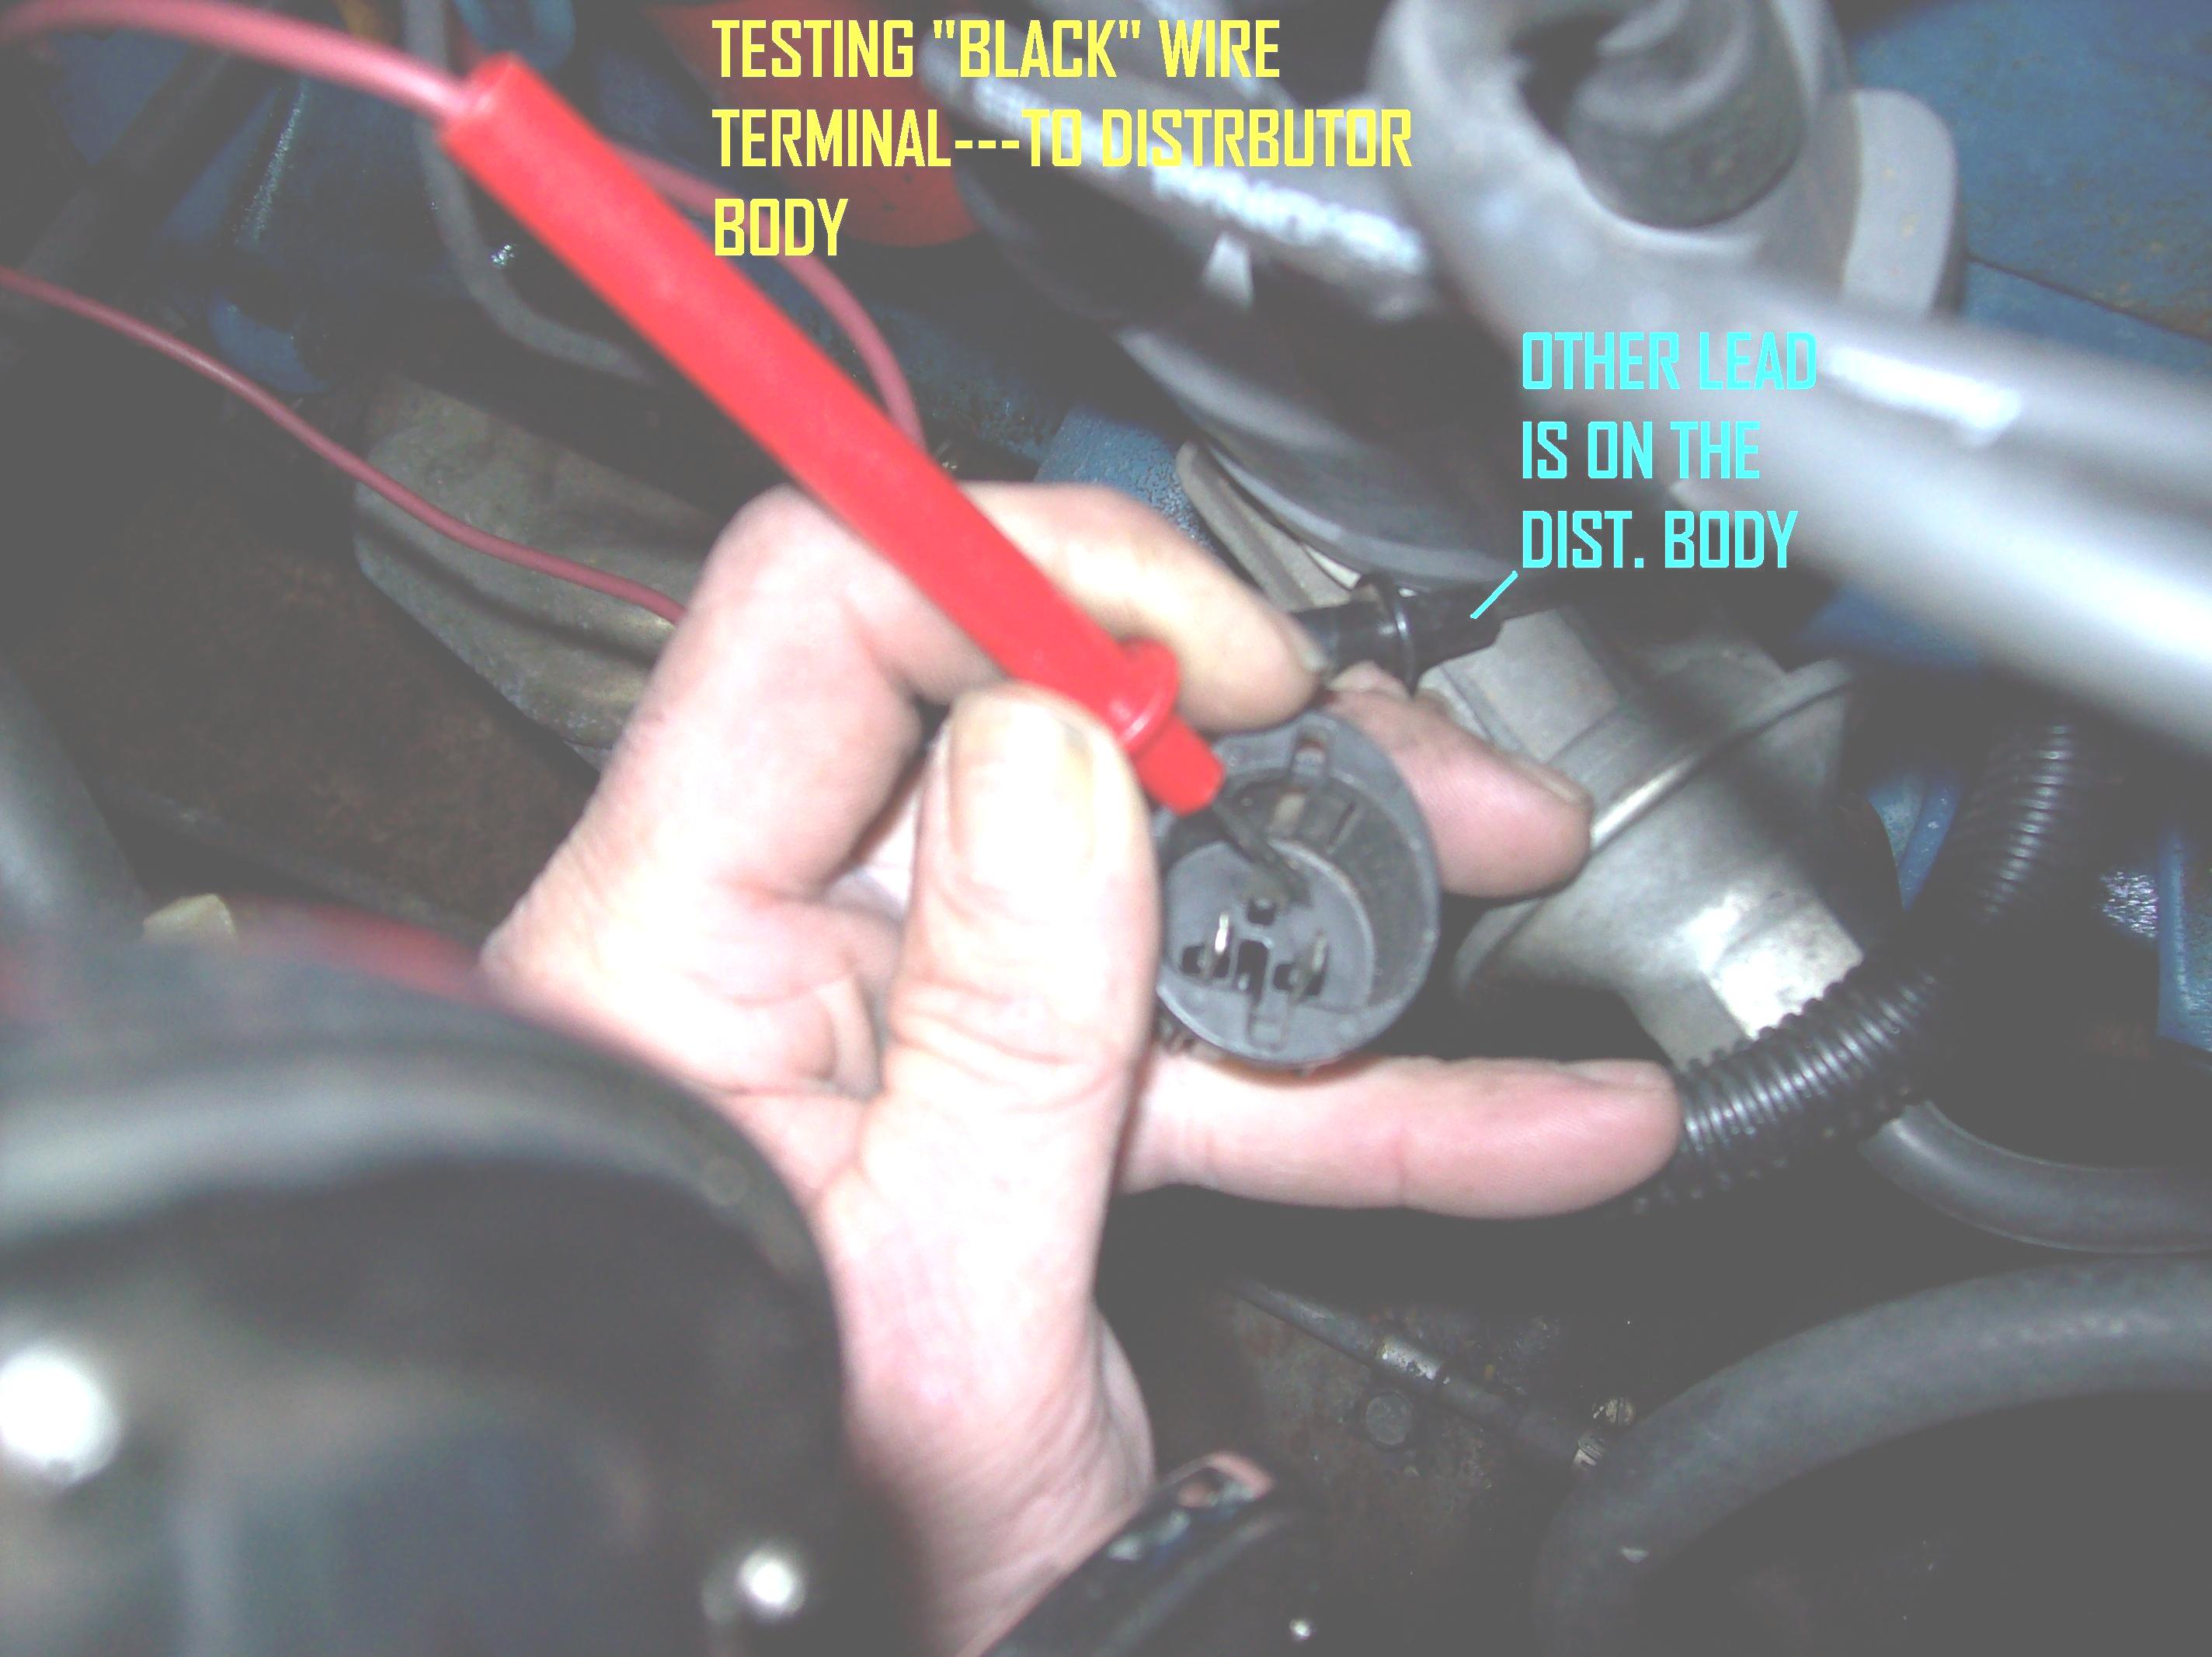
if you disconnect the plug, you can run a continuity test thru it to see if the wires complete the circuit
i upgraded to a motorcraft system (which was standard in '79 on up cjs)
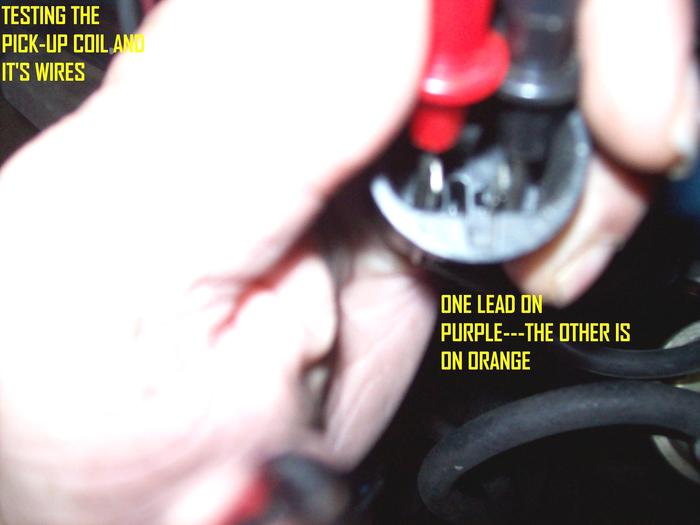
pic 1) this is my motorcraft distributor, it has 3 stranded wires into the distributor. test your 2 pins like i show for continuity (lost? i can explain that too)
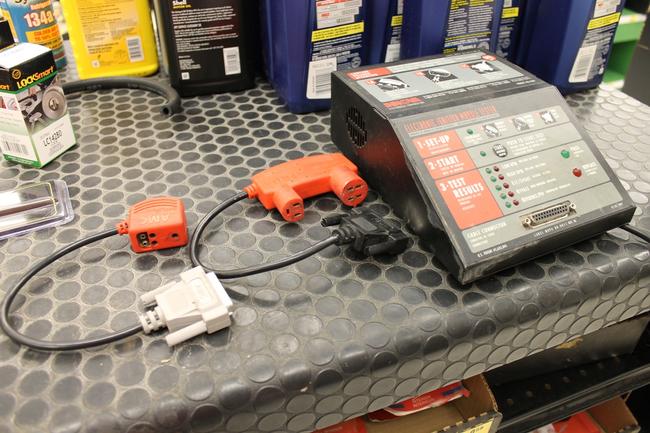
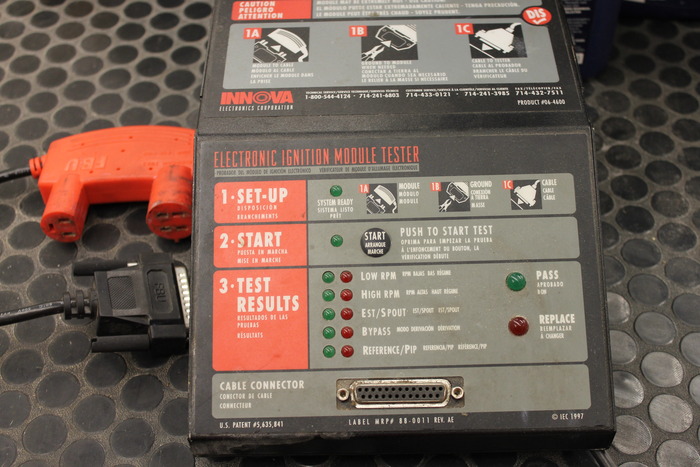
pic 2) you can have your ign module tested at a parts store, this happens to be advance auto parts' machine. i laid out 2 pigtails for this pic, the one next to the machine is to test a motorcraft module, the one to the left is for prestolite. run the test at least 5 time in a row, to insure the module is good, do the same for a new one, should it be needed, before you leave the store.
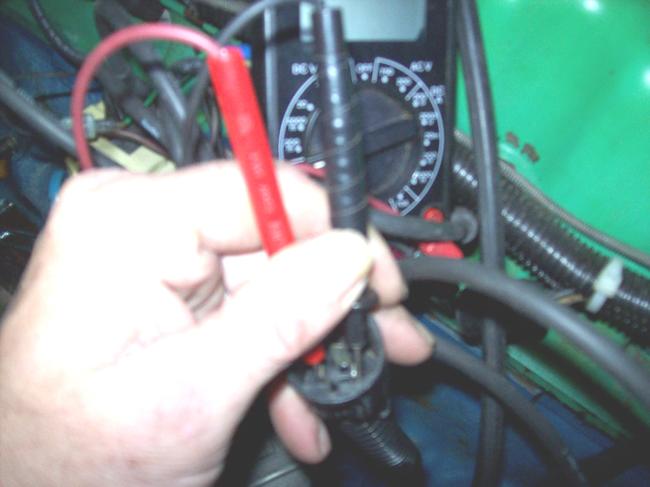
pic 3) key on, what do you have at the positive side of the coil?
if this ain't cutting it, i'll run you thru installation of the distributor again.
should you want to upgrade later to motorcraft, i can talk you thru it. as far as all of this "high speed" and "high dollar" ignition stuff, i have not seen any advantage over stock stuff and "regular jeepin", that stuff may do something special if you are racing.
the medic
prestolite was a very crappily designed system
the wires entering the distributor are basically solid copper telephone wires (like about the size of what plugs into your house phone's body)
if this is not anchored well, it will shake around and break the wire(s)
i've seen this many times, especially w/ 6 cylinders, wires sorta just dangle, a 304 ain't as bad, the wires lay on the intake
if you disconnect the plug, you can run a continuity test thru it to see if the wires complete the circuit
i upgraded to a motorcraft system (which was standard in '79 on up cjs)
pic 1) this is my motorcraft distributor, it has 3 stranded wires into the distributor. test your 2 pins like i show for continuity (lost? i can explain that too)
pic 2) you can have your ign module tested at a parts store, this happens to be advance auto parts' machine. i laid out 2 pigtails for this pic, the one next to the machine is to test a motorcraft module, the one to the left is for prestolite. run the test at least 5 time in a row, to insure the module is good, do the same for a new one, should it be needed, before you leave the store.
pic 3) key on, what do you have at the positive side of the coil?
if this ain't cutting it, i'll run you thru installation of the distributor again.
should you want to upgrade later to motorcraft, i can talk you thru it. as far as all of this "high speed" and "high dollar" ignition stuff, i have not seen any advantage over stock stuff and "regular jeepin", that stuff may do something special if you are racing.
the medic
Images (Click to enlarge)


Jul 13, 2019 at 11:45 AM
(Merged)
Yes it is rotating like it should. I am getting a little over 12 volts when the key is on.
Jul 13, 2019 at 11:45 AM
(Merged)
10.5 volts is what i believe i tested. i just had spark out of the distributor again for a few cranks, then gone. i don't get it.
Jul 13, 2019 at 11:45 AM
(Merged)
Sorry to here about your uncle :( . Thank you for the Info , I haven gotten a chance to do anything to the CJ because of work but you've give me some good ideas thank you, I'll let you know on Sunday (my day off) what I found again thank you all.
Images (Click to enlarge)

Jul 13, 2019 at 11:45 AM
(Merged)
I have so many pictures I cannot find yours in a hurry. I will continue to help you until the cows come home as long as you keep responding.
The Medic
The Medic
Images (Click to enlarge)


Jul 13, 2019 at 11:45 AM
(Merged)
If your distributor was not installed correctly
We can get into that later---i have lots of pics---and can give you some good ole rural route explaining
We'll even go into making sure your firing order is correct as well as checking your distributor pick up
I want to know what kind of non-stock modifications have been done to the ignition system?
........and the whole jeep?
Is your coil new?---where'd it come from?--part number?-----does it say "for external resistor" on it??????
Need to know ..................what engine you have???
Pics are nice to see what we are working on!
I'll hang with you till your jeep is like new again!
Keep responding here
I want you to test the distributor with continuity
Grab the wires on either side of the connector---pull (not jerk)---the connector should come apart (digging at it with a screwdriver usually won't do it)
I have much more!----other tests!
Do not buy nothing till we talk some junk.......i may can help you with lower costs
I'll be back on this evening after 20:30 hrs eastern time (must work so i can eat)
Your turn
The medic
Images (Click to enlarge)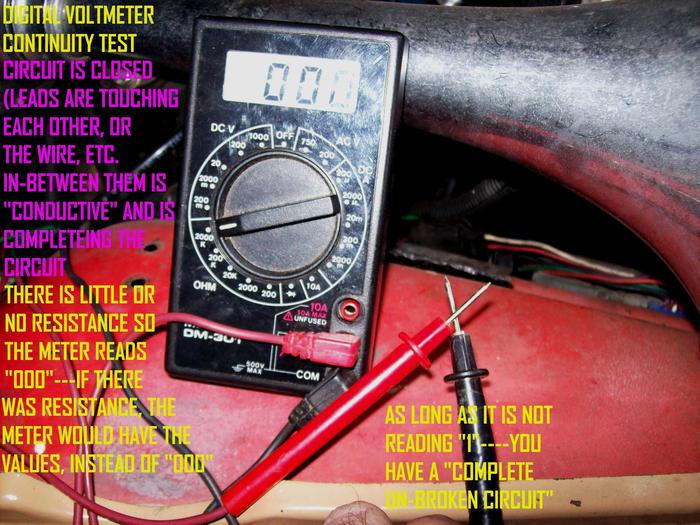


Jul 13, 2019 at 11:45 AM
(Merged)
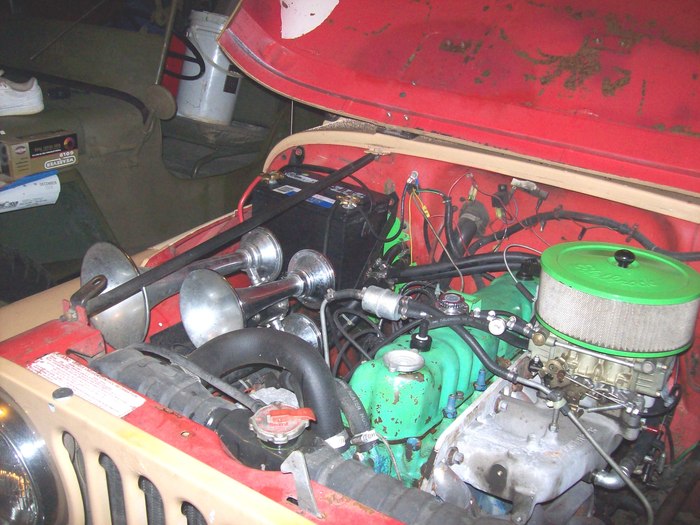
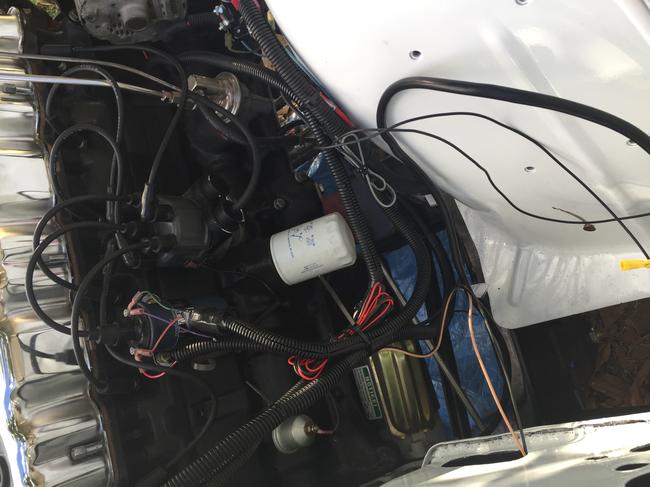
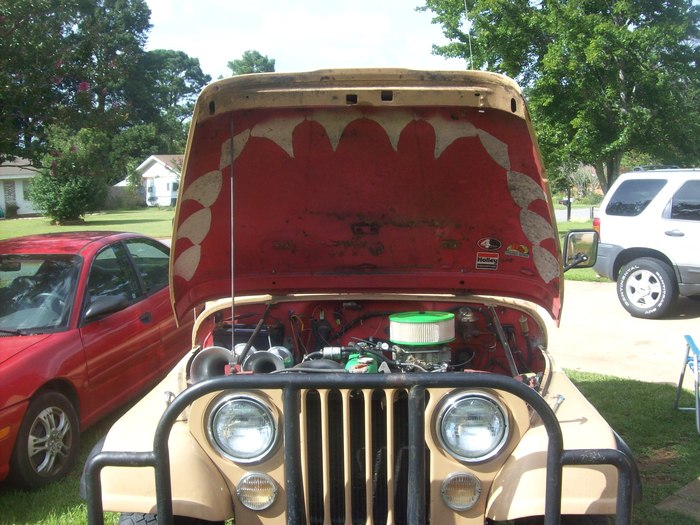
Send more engine pics with the breather off and hood against the windshield frame.
The whole jeep too!
See ya sunday!
The medic
The whole jeep too!
See ya sunday!
The medic
Images (Click to enlarge)

Jul 13, 2019 at 11:45 AM
(Merged)
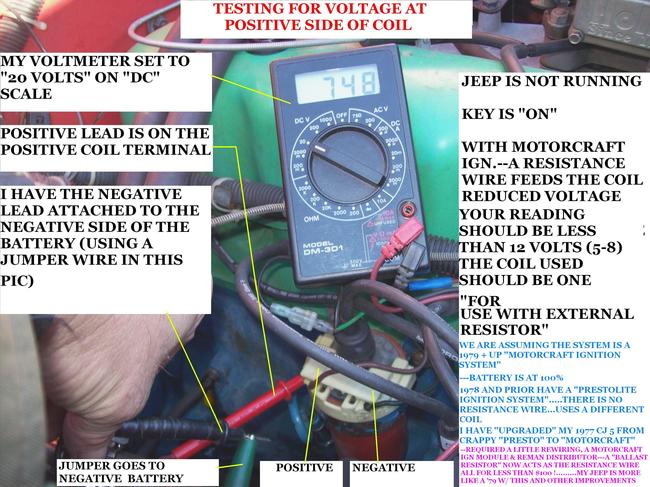
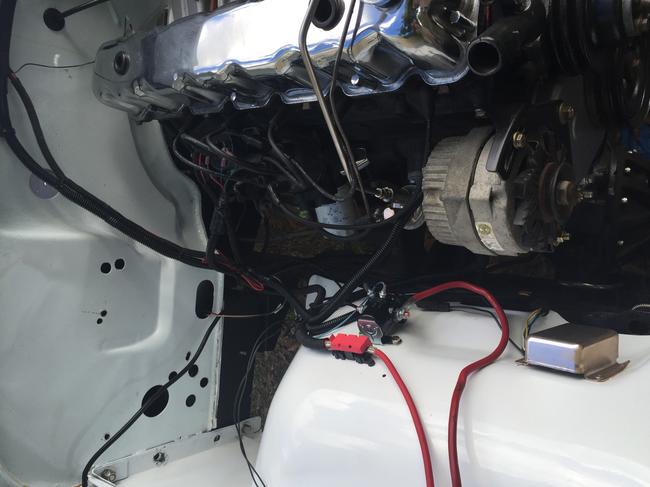
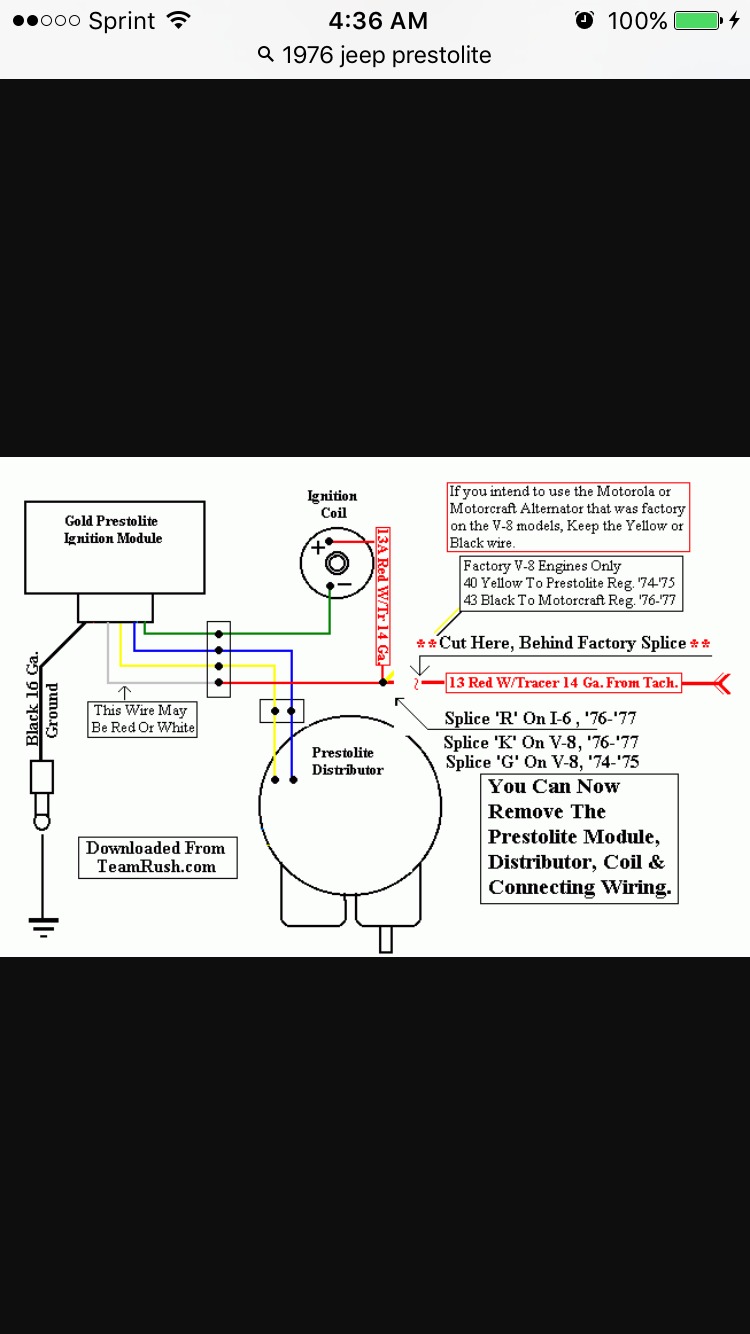
They seem to have had many spools of red wire to use up when they built your vehicle! To start with, check for 12 volts on the ignition coil's positive terminal, then see what you have for voltage on the negative terminal. If the 12 volts is missing, I will try to follow the diagram back to the source.
Jul 13, 2019 at 11:45 AM
(Merged)
ok re tested. key on connector removed from the top of the coil,i get 12.2 volts. connected to the coil 6.5 volts. during starting its only getting 9.5 volts. is that normal
Jul 13, 2019 at 11:45 AM
(Merged)
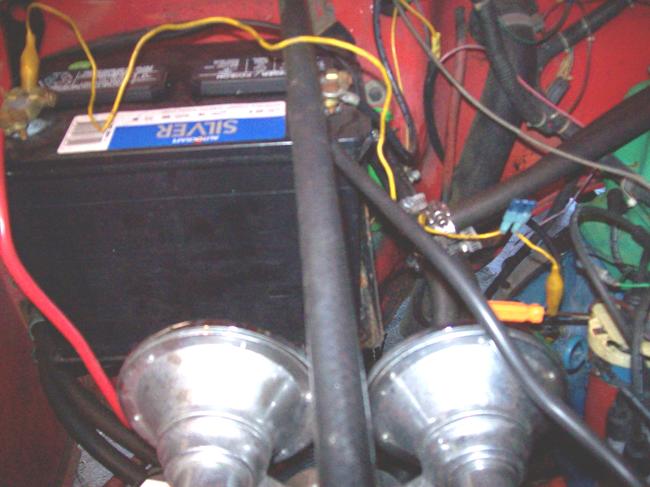
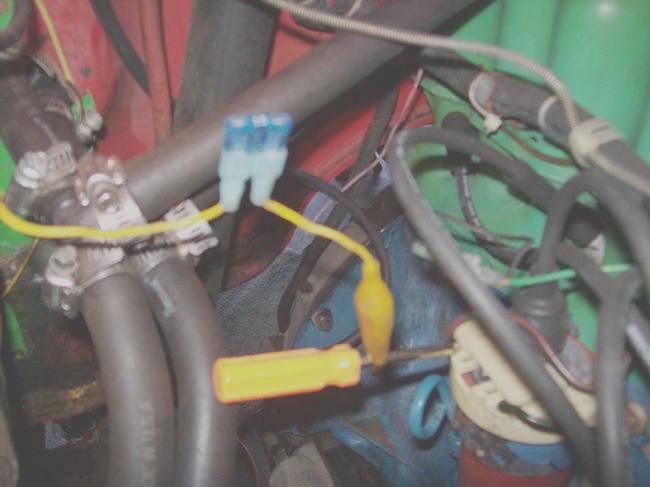
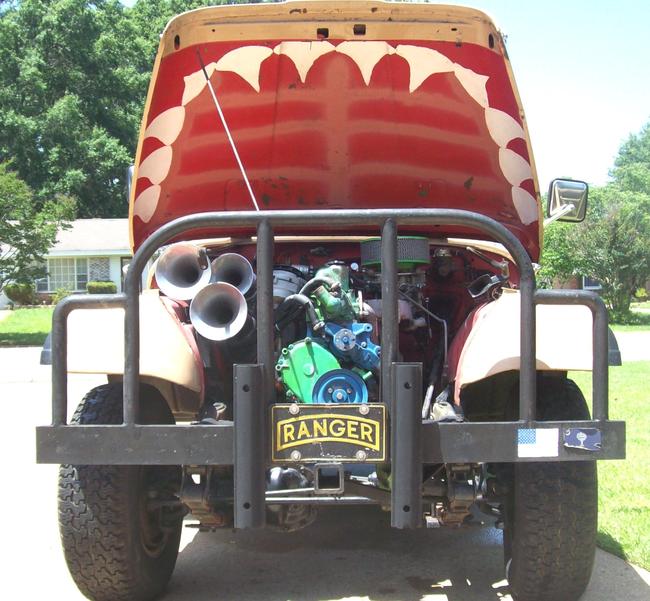
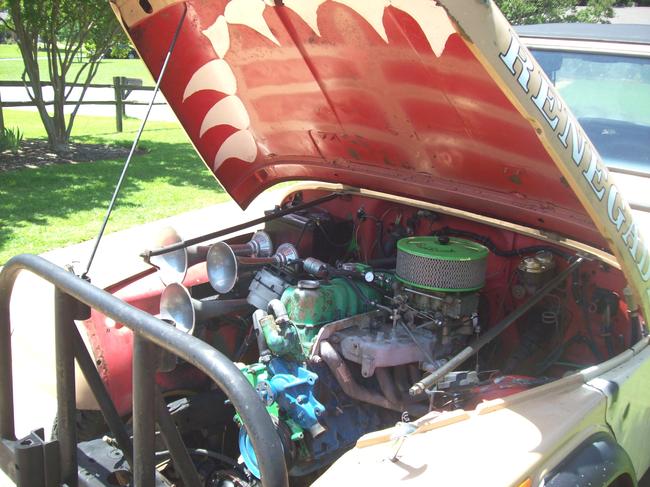
Some snap shots of the past 2 years
Images (Click to enlarge)


Jul 13, 2019 at 11:45 AM
(Merged)
I have checked the fuse. I will check the voltage on the negative side as soon as I can and let all of you know.
Jul 13, 2019 at 11:45 AM
(Merged)
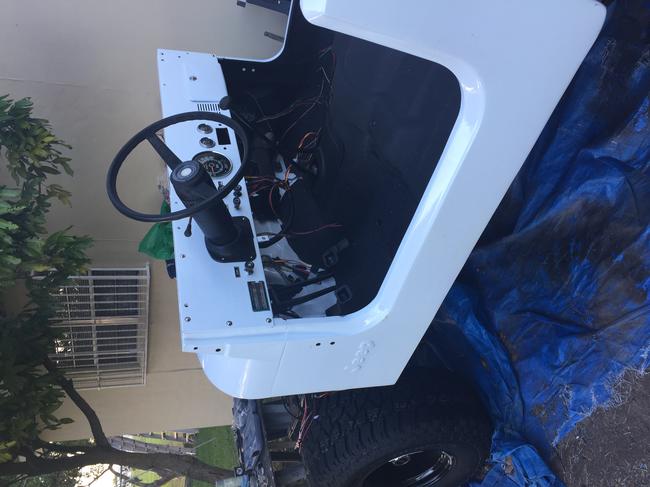
Hi. I jave read a few of your other responses in this forum and you know your stuff. I apreciate your time. I believe the distributor was instaled correctly. I even thought it was 180 out and pulled it and spun it 180. Still no spark past the distributor. Each and every time the coil fires.i checked the firing order, its on point. I got the jeep from my father who bought it about ten years ago. No mods were done by him but he did buy it as a salvaged title. It was belived that it had a blown exaust gasket but turned out to be the head gasket blew out the side. So i had the head done.when putting it back together noticed a very loose rocker arm. Tore it back apart come to find out had a bad cam and lifter. Replaced those along with a timing set and now will not fire. It ran before we took it apart minus the leak from the head gasket. Prior to doing the head and cam and timing i replaced the cap ,rotor, wirws and plugs. The coil is not new. But the pick up coil in the distributor is new. It has the 258 motor with the ford ignition system. Like i said before. It started fine prior to the repairs. This morning when i went to test i was getting spark to my plugs for a few cranks. Then tried again and nothing. But the coil still fired...
Image (Click to enlarge)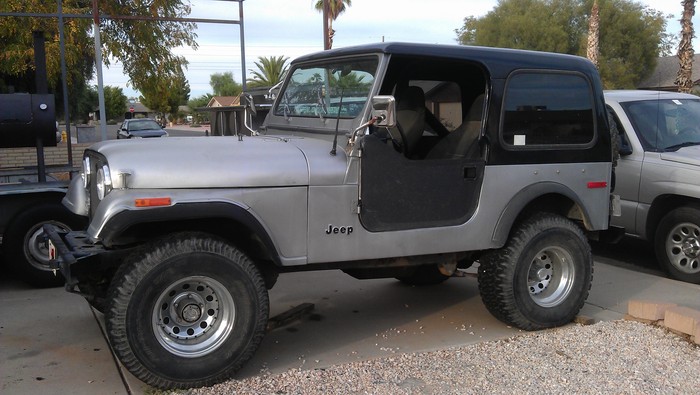

Jul 13, 2019 at 11:45 AM
(Merged)
The wiring kit you got, is it specifically for a '76 or does it include years above that, like a '79?
The reason i'm asking is
#1 if you had sent back a value on the positive side of the coil, we might know if it is a resistor wire or not (previous pic i sent)
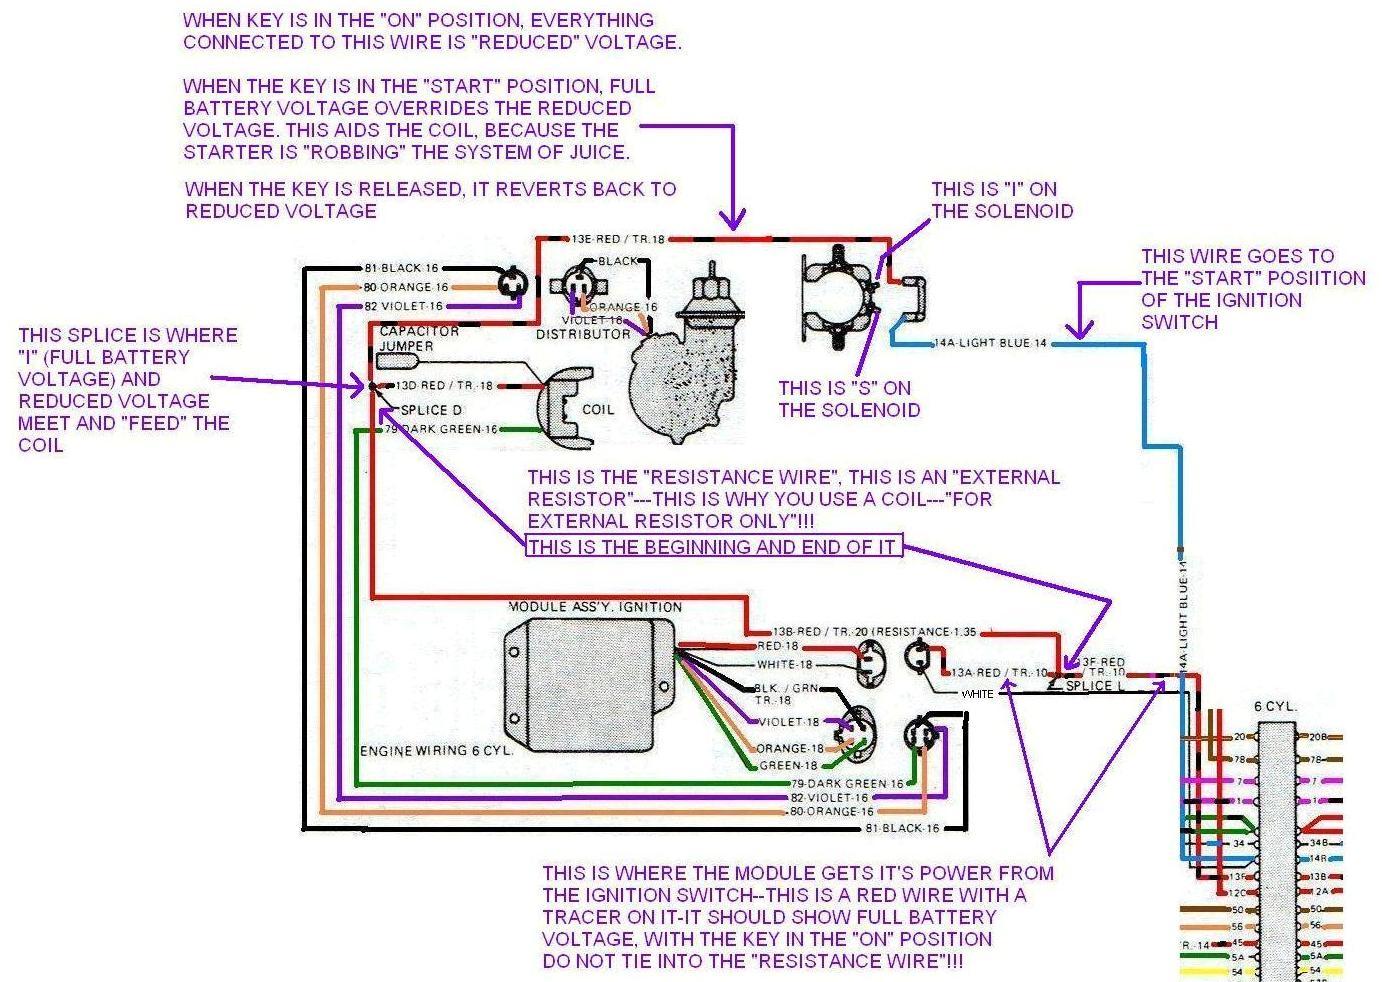
In '79, they went with the motorcraft sysyem, the wire from (basically the ign switch ) is a resistance wire. '76-'78 just had a regular wire. The coils for either system are different. Maybe you have double the resistance than you should have, if the "resistance wire" is in your new harness.
Pic 1) below is an excerpt from a '79
Pic 2) '79 and up coil
Pics 3 and 4) try this as a test. Positive battery post to positive coil. This would sorta bypass any resistance.
P.s, got mr. Rear pinion seal in about an hour ago! I'm good as new again!
The medic
The reason i'm asking is
#1 if you had sent back a value on the positive side of the coil, we might know if it is a resistor wire or not (previous pic i sent)
In '79, they went with the motorcraft sysyem, the wire from (basically the ign switch ) is a resistance wire. '76-'78 just had a regular wire. The coils for either system are different. Maybe you have double the resistance than you should have, if the "resistance wire" is in your new harness.
Pic 1) below is an excerpt from a '79
Pic 2) '79 and up coil
Pics 3 and 4) try this as a test. Positive battery post to positive coil. This would sorta bypass any resistance.
P.s, got mr. Rear pinion seal in about an hour ago! I'm good as new again!
The medic
Images (Click to enlarge)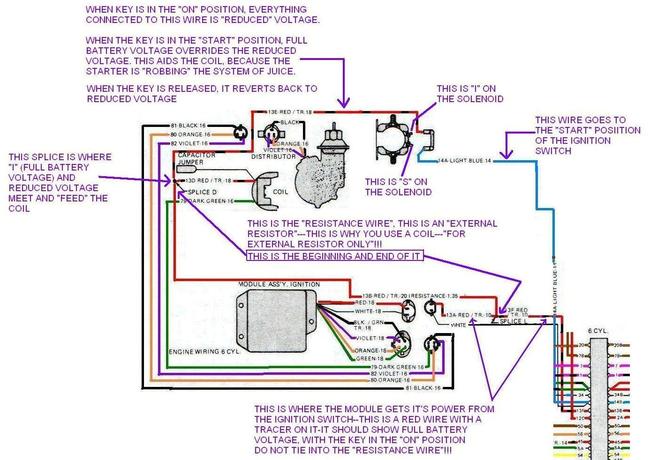


Jul 13, 2019 at 11:45 AM
(Merged)
Maybe review the distributor installation?
https://www.2carpros.com/questions/1978-jeep-cj5-engine-wont-start/page/5
How about that module? Read this;
https://www.2carpros.com/questions/1981-lincoln-mark-vi-would-car-run-fine-idol-park-stop-key-turned-off
On to the coil, check out this link.
https://www.2carpros.com/questions/84-jeep-cj7-cranks-but-wont-run/page/3
Is this mostly the OEM or have your changed things.
Send left/right over head pictures of your engine compartment.
Your turn,
The Medic
Image (Click to enlarge)

Jul 13, 2019 at 11:45 AM
(Merged)
Wont let me upload multiple pics from my phone
Jul 13, 2019 at 11:45 AM
(Merged)
The text on that coil pic was meant for a '79 on up jeep guy!
The medic
The medic
Jul 13, 2019 at 11:45 AM
(Merged)
It is all original replacement parts nothing performance. I am just trying to get it to run.
Jul 13, 2019 at 11:45 AM
(Merged)
Motor
Image (Click to enlarge)

Jul 13, 2019 at 11:45 AM
(Merged)
My year is a 1976 , and yes the wiring kit is for that year it's the painless 10150. When I order the coil ,plug wires,cap and rotor,plug wire were for that year 1976.
Images (Click to enlarge)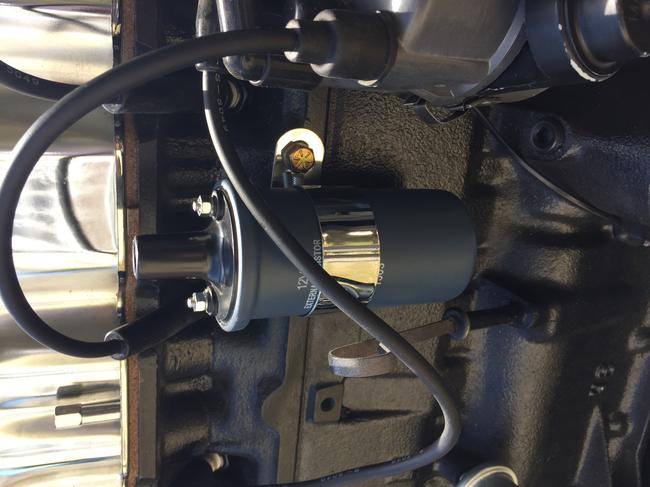


Jul 13, 2019 at 11:45 AM
(Merged)
It is all original replacement parts.
Images (Click to enlarge)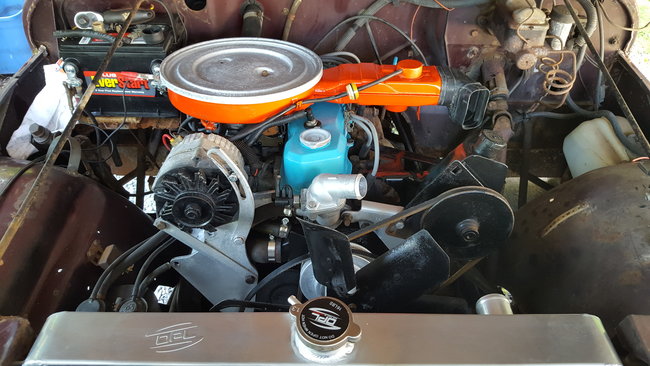


Jul 13, 2019 at 11:45 AM
(Merged)
Coil and distributor
Image (Click to enlarge)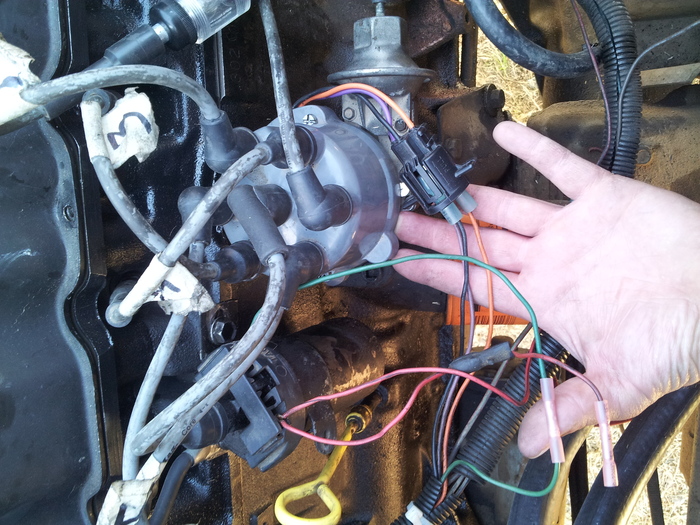

Jul 13, 2019 at 11:45 AM
(Merged)
This exactly what I have
Image (Click to enlarge)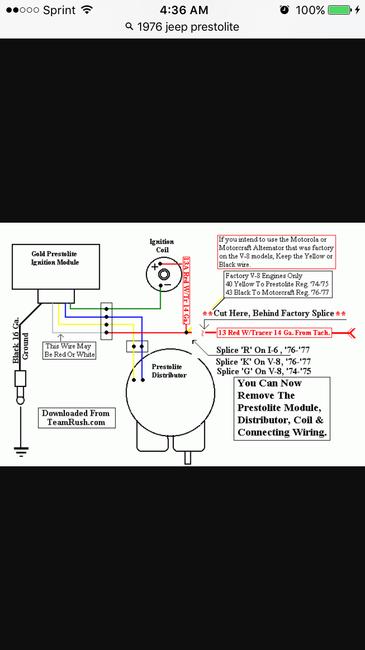
Jul 13, 2019 at 11:45 AM
(Merged)
Positive the distributor is in right?
Correct coil?
Tested the new module at the auto parts store?
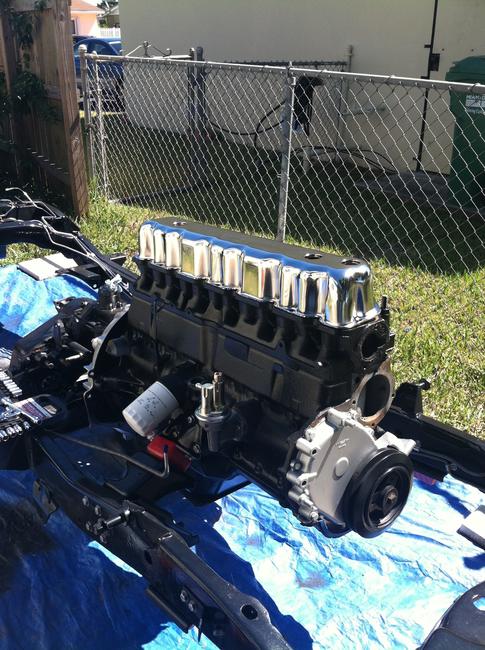
Under the hood looks well taken care of!
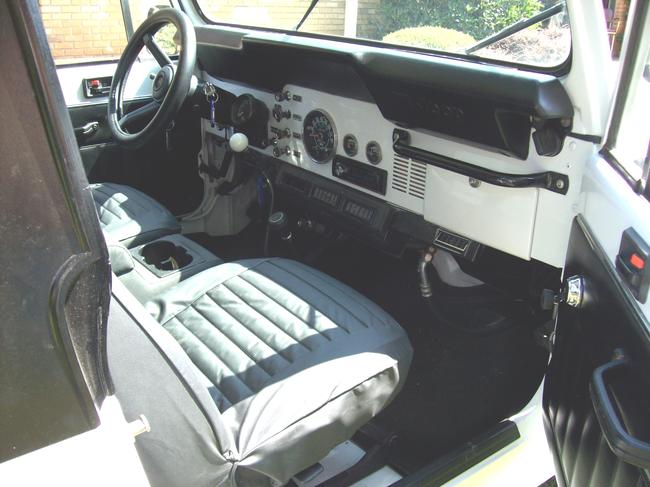
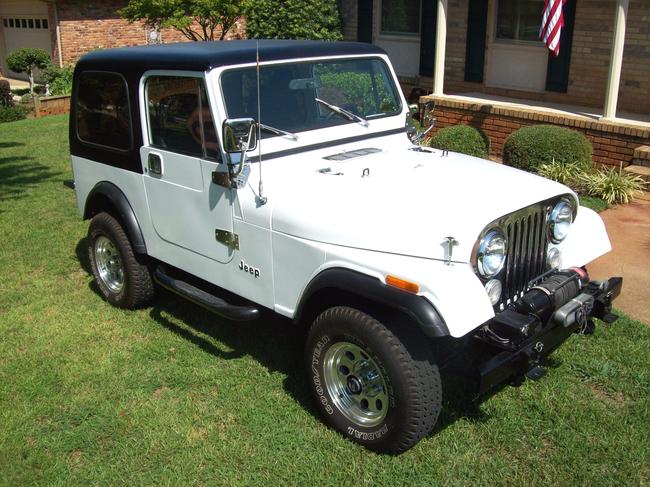
Let’s have a picture of the Jeep too!
The Medic
Correct coil?
Tested the new module at the auto parts store?
Under the hood looks well taken care of!
Let’s have a picture of the Jeep too!
The Medic
Image (Click to enlarge)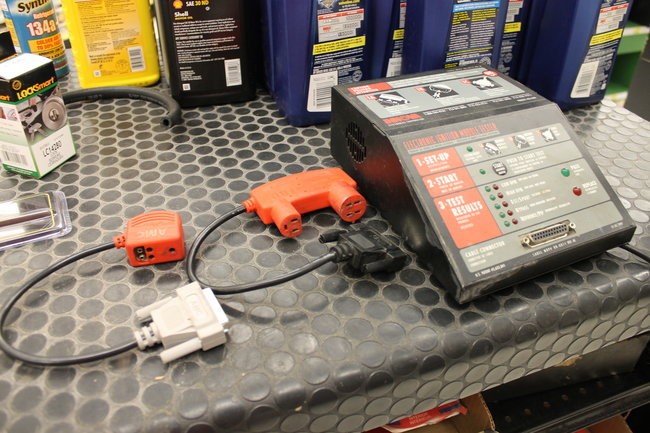

Jul 13, 2019 at 11:45 AM
(Merged)
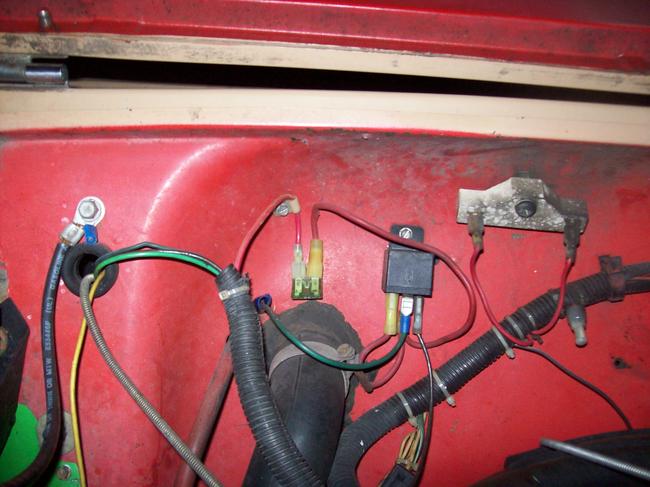
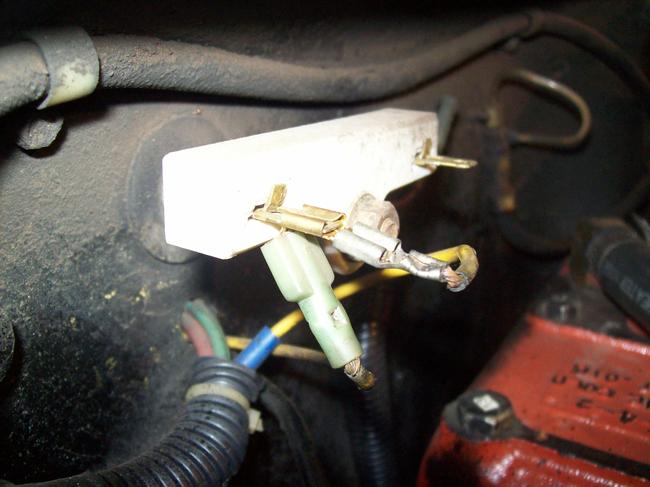
the problem was prior to that mess of wires coming from the distributor. those happened while trying to fix this firing problem. broke the connector to the distributor and broke a wire of of the coil connecter. replaced the connector to the coil with s factory one
Jul 13, 2019 at 11:45 AM
(Merged)
Maybe a this is a review but these are good!
Class 1
Http://www.youtube.com/watch?v=5a2x9msslqy
Class 2
Http://www.youtube.com/watch?nr=1&v=fhx1yxvyimg&feature=endscreen
Now
If we got carried away bumping the starter - this way (below) will cut out possible "going too far with the timing marks
Now that david and chad told you how
Let's do it to slow motion
Hide your keys/chock your wheels/ go to neutral
Remove #1 spark plug
Stick it back in , maybe 2 threads (instead of using your thumb)
Rotate the engine with a wrench or ratchet (not the starter)
Clockwise as viewed from the grill
When you hear the "hiss" coming by #1 plug=-=-=stop! ( a friend may be helpful to hear this at #1 (as the other cylinders hiss internally (usually fainter) when you rotate the engine
Now, we are on compression stroke on #1 cylinder (piston is still coming up)
We ain't up yet!
Ever so slowly rotate the engine (cw) till your timing mark (line) lines up with zero!
Stop!!!
I have found that using the starter for the "bumpage" usually results in "overrunning" the marks, compression kicks it back, etc.
Then you mistakenly rotate on around 180 degrees from where you should be (not sayin' bad things, but if you are new to this, it's an ez mistake!)
Ok, back to our slow-motionage!
Now look at the rotor button
It should be facing the "mark" you put on the 'stributor
.......or which ever tower you chose to be #1 (textbook or not)
The engine/ cam/ crank don't care which one it is!
As long as you were at tdc, you placed #1 spark plug wire on "that tower" (the one that rotor is pointing to)
And your 1-5-3-6-2-4 firing order starts there- and runs the sequence clockwise (looking down on the 'stributor cap)
Installing it "textbook" cuts down on confusion later on, as you may have forgotten the "deal"- simply hooking it all up like it shows in the book will make it ezier in 8 months! (but you gotta install it textbook now!)
Lets hears some info!
The medic
Jul 13, 2019 at 11:45 AM
(Merged)
I'm sending "david and chad" to give you a hand
Listen to them real good---especially the part about installing a distributor that has been removed and the engine was turned over
Class 1
Http://www.youtube.com/watch?v=5a2x9msslqy
Class 2
Http://www.youtube.com/watch?nr=1&v=fhx1yxvyimg&feature=endscreen
If you did not mark the body of the distributor and the engine, you are gonna need a timing light and the "exact" procedure in setting the timing (might have to disconnect a wire or vacuum line while timing)
One of these is very helpful for doing it right
Http://www.2carpros.com/questions/2007-ford-taurus-tune-up
I'm glad to see you have a 258!
What's all of the splicing at the 'stributor?
Keep on replying
The medic
Jul 13, 2019 at 11:45 AM
(Merged)
Somehow i lost the 1st lines of the last answer
Voltage at the pos side of the coil w/ key on?
Continuity test thru the distributor connector?
Did you try a jumper from pos battery to positive coil?
(then the answer above was supposed to start)
The medic
Voltage at the pos side of the coil w/ key on?
Continuity test thru the distributor connector?
Did you try a jumper from pos battery to positive coil?
(then the answer above was supposed to start)
The medic
Images (Click to enlarge)

Jul 13, 2019 at 11:45 AM
(Merged)
lets say the timing was off, wouldn't i still get spark from the distributor?
Jul 13, 2019 at 11:45 AM
(Merged)
Hello sir sorry for the delay.. I haven't had a chance to work on the cj( work????) I have seen the you tube vid you sent. As far as the TDC I have set it right on how ever I'm off tomorrow and I'll Doublecheck it Again. This is what I'm having problems with if I stick a screwdriver in the center of the coil and ground next to the engine their spark but if I plug in the coil wire that runs to the center of the distributor. I've also bought a new set of plug wires to test as well. But as always I do appreciate very much the support and I will advise you tomorrow with the results happen thank you.
Jul 13, 2019 at 11:45 AM
(Merged)
in trying to fix the no spark issue. replaced the connector at the top of the coil and broke a wire on the connector that goes to the distributor.
Jul 13, 2019 at 11:45 AM
(Merged)
I'm right here might near every evening
Take your time
Then answer all of my questions!
The medic
Take your time
Then answer all of my questions!
The medic
Image (Click to enlarge)

Jul 13, 2019 at 11:45 AM
(Merged)
You did install the timing gears perfectly?
No doubt the marks were lined up ----- as per pics you looked at in a manual?.......if this step is wrong......it will not do right unless you go back in!
You said it has not busted off and run at all....after the timing set ?
I got more testing for you---just wanna stay on top of what's going on----no need in doing all of this .........then backtracking
Do you have an advance auto parts in your region?
Is the 'stributor in by david and chad standards?
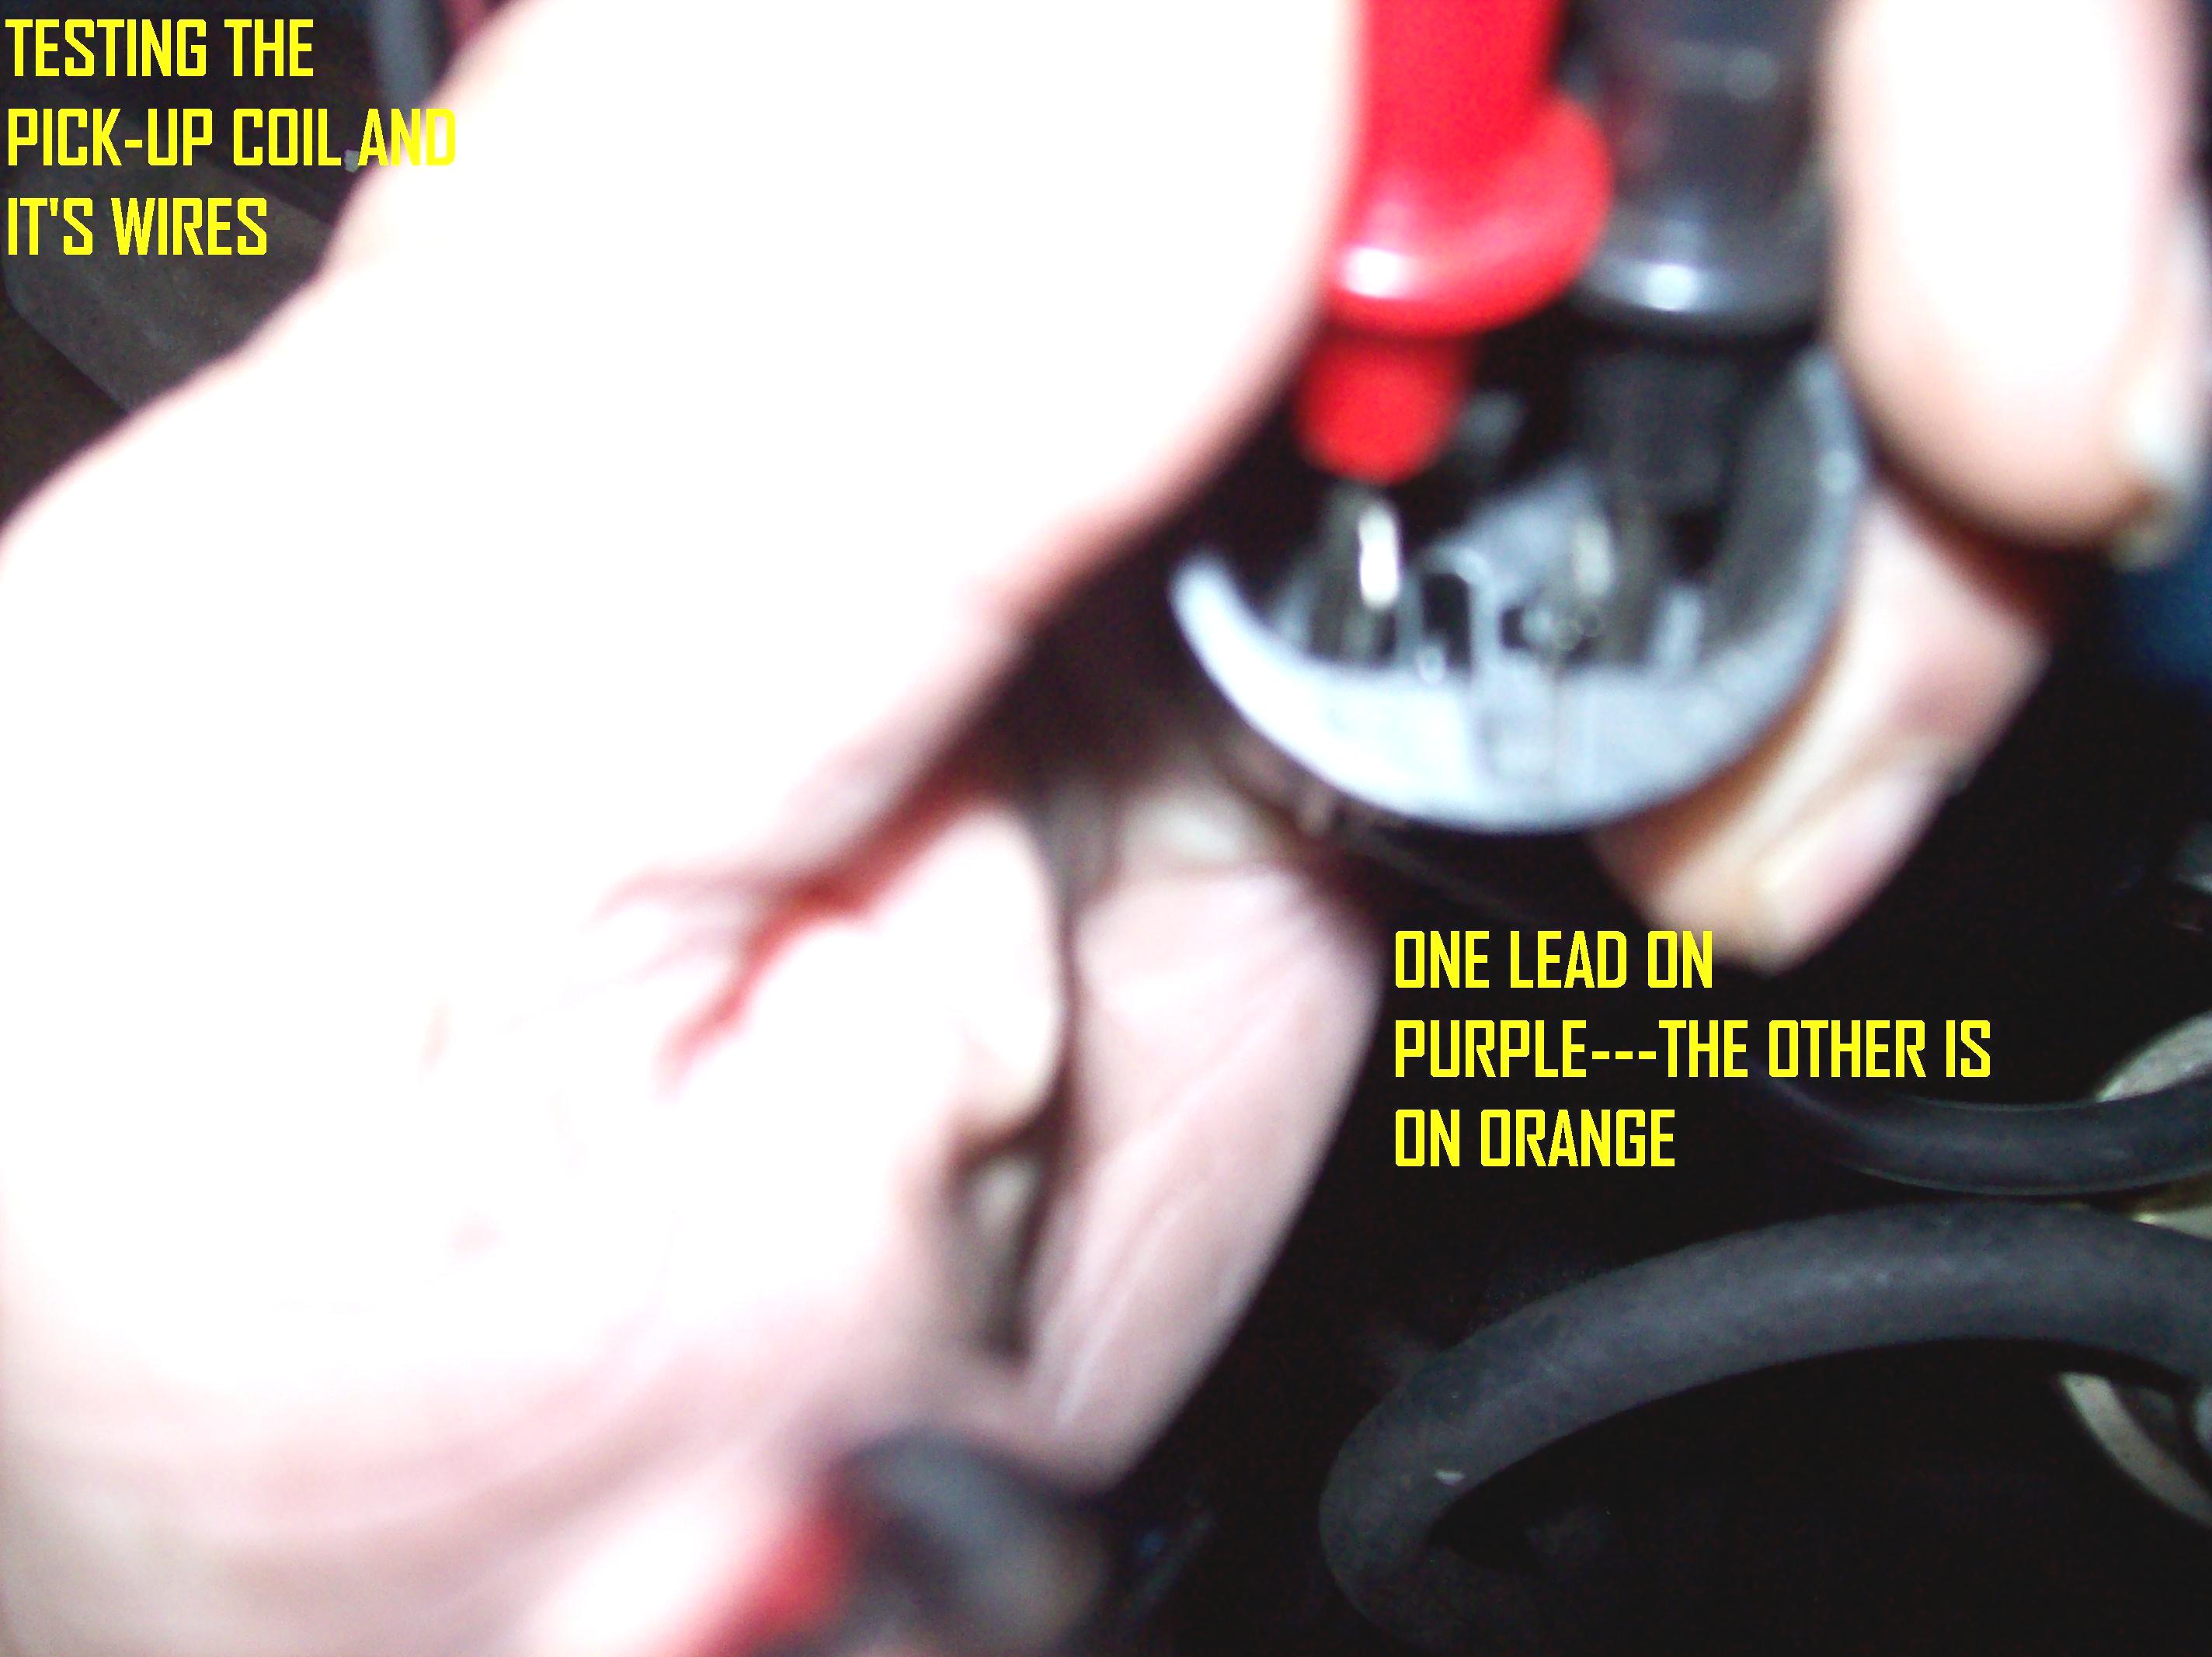
Pickup in dist. Tested good.......that's good!
The medic
No doubt the marks were lined up ----- as per pics you looked at in a manual?.......if this step is wrong......it will not do right unless you go back in!
You said it has not busted off and run at all....after the timing set ?
I got more testing for you---just wanna stay on top of what's going on----no need in doing all of this .........then backtracking
Do you have an advance auto parts in your region?
Is the 'stributor in by david and chad standards?
Pickup in dist. Tested good.......that's good!
The medic
Jul 13, 2019 at 11:45 AM
(Merged)
OK I'm sending you a picture of the coil in the painless wiring kit came a ballast resistor my vehicle never had that before installed should I add it ?
Images (Click to enlarge)

Jul 13, 2019 at 11:45 AM
(Merged)
timing set was installed correctly. i did find tdc and re installed the distributor again so that my rotor starts on number one cylinder. i get power to my coil, i get power to my distributor but no spark coming out of the distributor. i changed the pick up coil inside the distributor thinking that might be the problem. still no fire out of the distributor.
Jul 13, 2019 at 11:45 AM
(Merged)
Ok it's Wednesday here's the latest. Bought a new set of plug wires Bingo I have spark to all the plugs????. Now it did attempt to start I poured fuel in to the Carb to prime it up. I'll get working on the fuel delivery tomorrow and let you know how it gos. Thanks
Jul 13, 2019 at 11:45 AM
(Merged)
I gotta send you away
I need answers to my questions (like advance auto).....i know you do too...bear with me!
Remove your ignition module
The correct connector is laying beside it.........'cause i put it there myself!
Test this puppy 5 to 7 times
If it fails onceyou need another one
When you get the new one........by gosh test it too!!!!
I really tore thru my wiring for 2 days, when it still would not fire up.................i only cried when no one was looking................... A friend suggested that i go back and test my new............bad.........module!
The module you get should have "blue" plastic where the wires come outother colors are for other applications
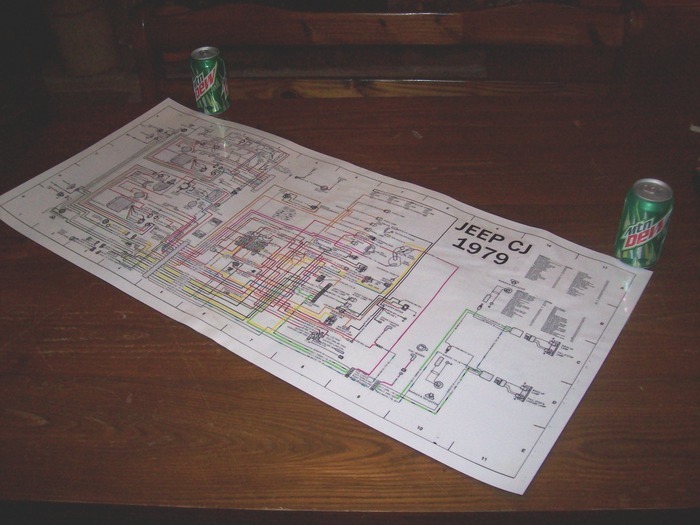
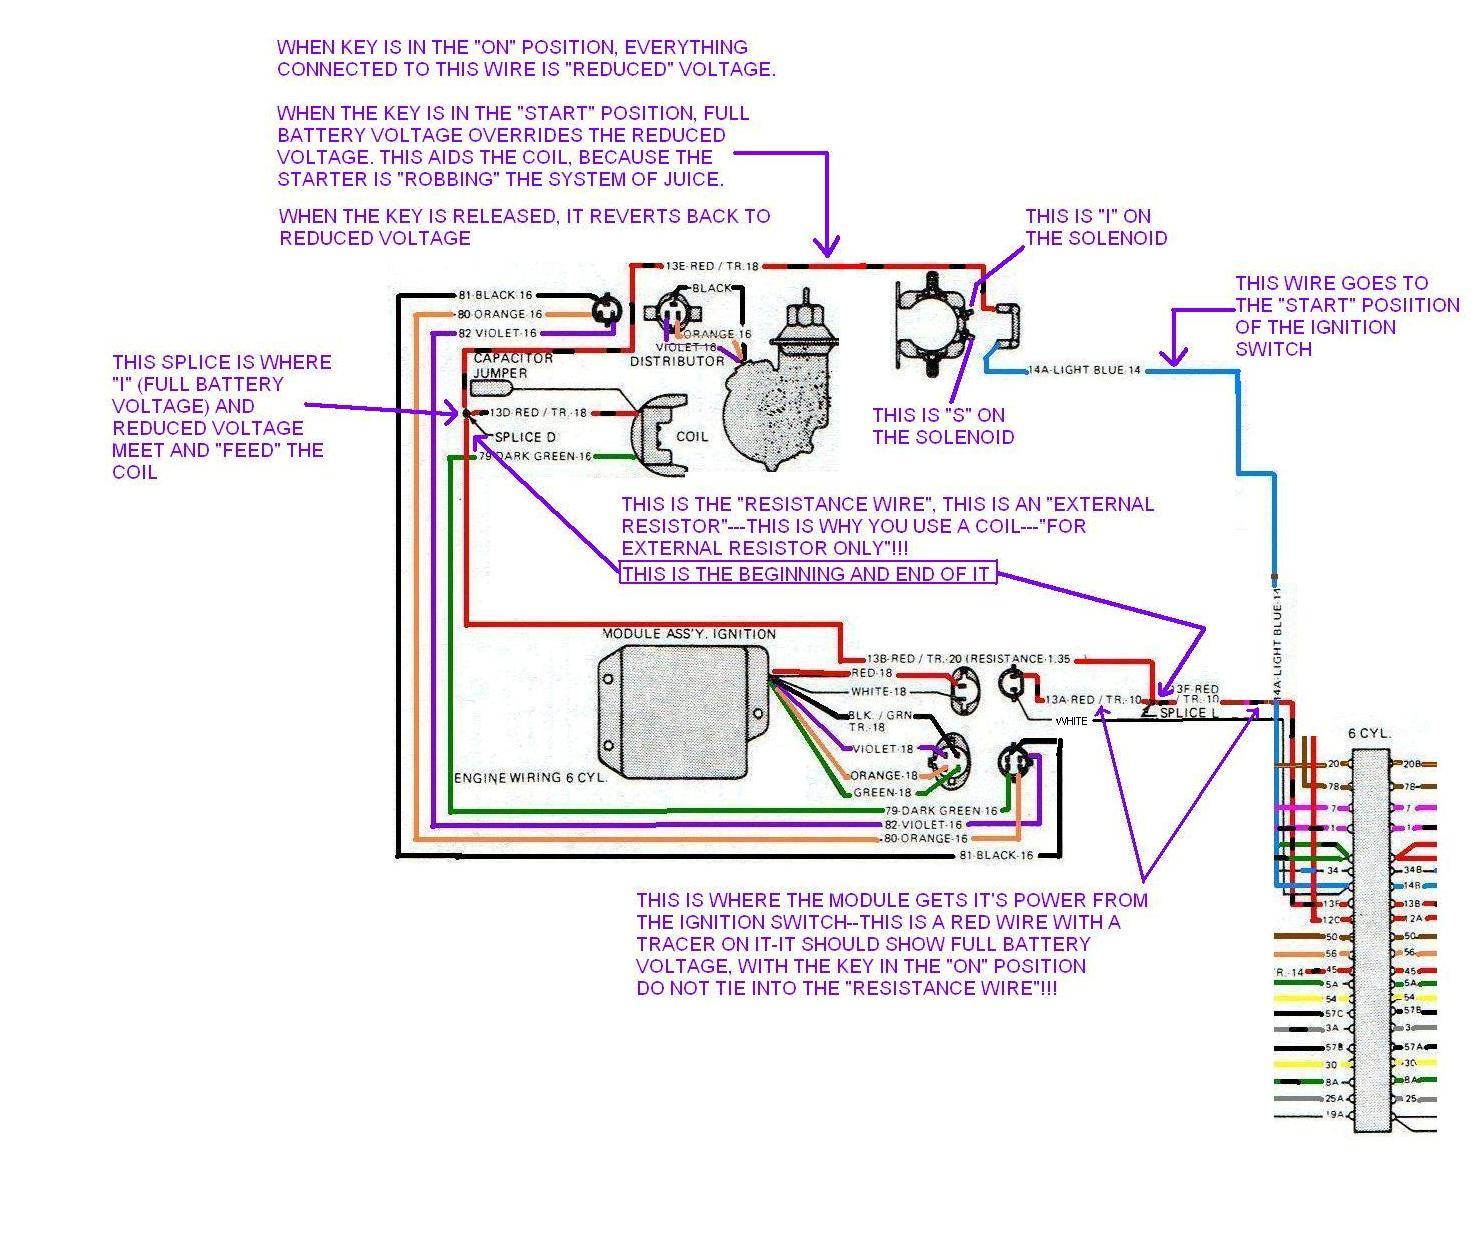
Since i don't know where you are----here's part of the '79 wire diagram that i scanned, painstakingly colored in microsoft paint, blew up, and laminated for my garage wall if it's too late to go to the parts store--you can look it over
As far as saving on parts......this is how to do it at advance auto parts online---pay online---pick up at store.............."a124" worked today.........see my answer in this link
https://www.2carpros.com/questions/1998-chevrolet-cavalier-there-constant-drain-on-battery-about-300-ma-now-after/page/5
That'll knock off $10 on an ign module
You do have a timing light and a dwell/ tach to time it once we get him running?
Your turn
The medic
I need answers to my questions (like advance auto).....i know you do too...bear with me!
Remove your ignition module
The correct connector is laying beside it.........'cause i put it there myself!
Test this puppy 5 to 7 times
If it fails onceyou need another one
When you get the new one........by gosh test it too!!!!
I really tore thru my wiring for 2 days, when it still would not fire up.................i only cried when no one was looking................... A friend suggested that i go back and test my new............bad.........module!
The module you get should have "blue" plastic where the wires come outother colors are for other applications
Since i don't know where you are----here's part of the '79 wire diagram that i scanned, painstakingly colored in microsoft paint, blew up, and laminated for my garage wall if it's too late to go to the parts store--you can look it over
As far as saving on parts......this is how to do it at advance auto parts online---pay online---pick up at store.............."a124" worked today.........see my answer in this link
https://www.2carpros.com/questions/1998-chevrolet-cavalier-there-constant-drain-on-battery-about-300-ma-now-after/page/5
That'll knock off $10 on an ign module
You do have a timing light and a dwell/ tach to time it once we get him running?
Your turn
The medic
Images (Click to enlarge)


Jul 13, 2019 at 11:45 AM
(Merged)
Now
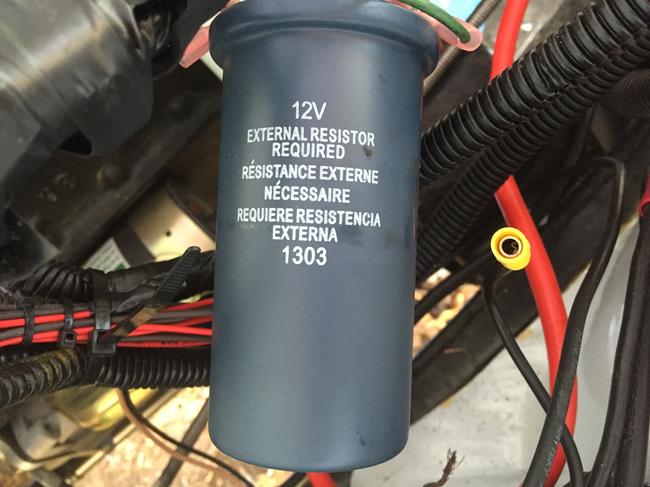
This would be the oe coil for prestolite, it does not need external resistance (also has a lifetime warranty)
Http://shop.advanceautoparts.com/p/carquest-by-bwd-ignition-coil-e30p/5240212-p?navigationpath=l1*14923%7cl2*15034%7cl3*16064
They have another one for $18 (1 year warranty)
The one in your pic does require the ballast resistor to be installed, (this would also be what you need if you switch over to motorcraft)
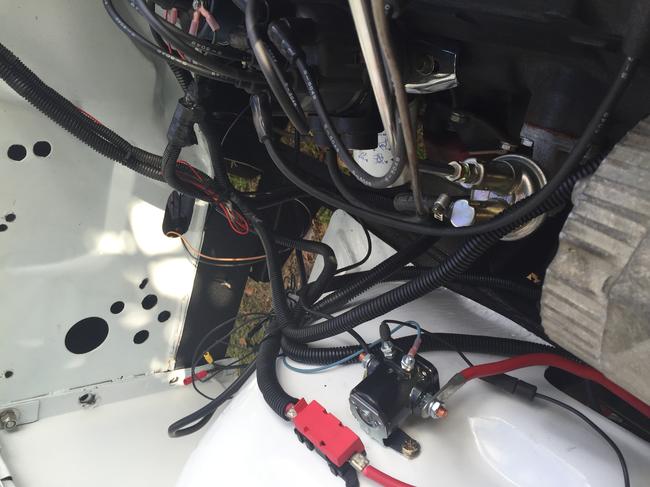
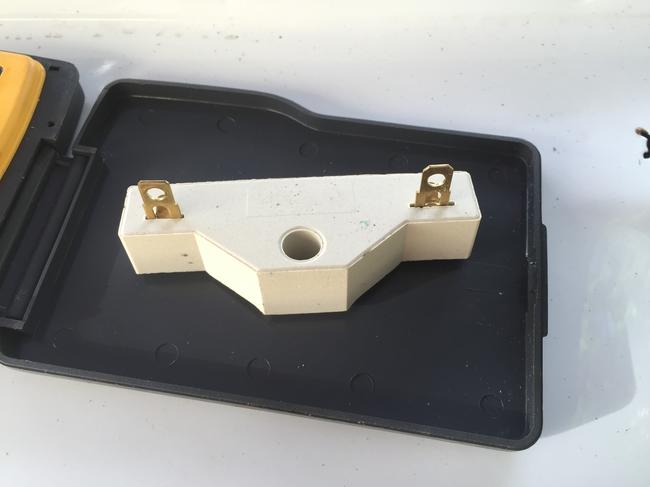
Pic 1) is of my ballast resistor (should it ever burn out) you can "get by" temporarily to get you home, by connecting the wires together, bypassing the ballast resistor)
pic 2) i used a piggy back, this way nuthin' gets cut and is reusable, should i need to connect the wires together
Once you get the ballast resistor on and everything hooked up, turn the key on and tell me what the voltage is on the positive side of the coil.
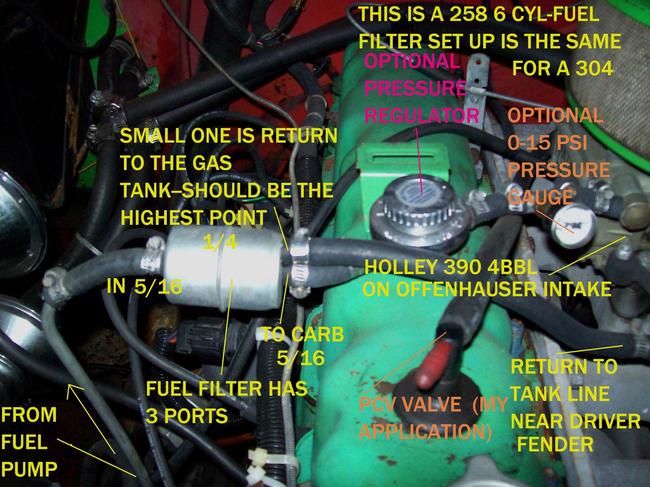
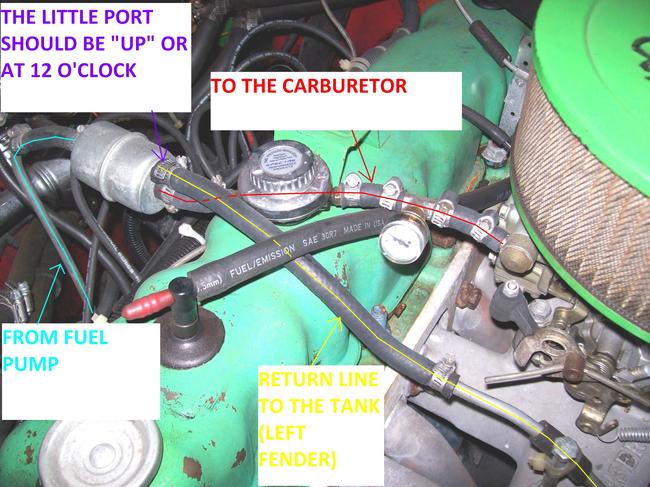
Pic 3 and 4) this is the correct way that the fuel lines connect, i have replaced my steel lines with new ones, except i used a tubing bender to "tidy up" the looks, the originals sort went over and under stuff they just made things look crappy.
The mini pressure gauge and regulator are not necessary, but are useful so you can see the actual pressure, it does pulsate as the fuel pump pumps. They're also a good conversation piece
Your fuel pump will fill the carb bowl pretty darn quick if you feed the carb maybe 2 teaspoons of gas down the carb throat moments before you attempt to start your jeep (dumping some down now is not gonna do nuthin' 'cept evaporate)
The medic
This would be the oe coil for prestolite, it does not need external resistance (also has a lifetime warranty)
Http://shop.advanceautoparts.com/p/carquest-by-bwd-ignition-coil-e30p/5240212-p?navigationpath=l1*14923%7cl2*15034%7cl3*16064
They have another one for $18 (1 year warranty)
The one in your pic does require the ballast resistor to be installed, (this would also be what you need if you switch over to motorcraft)
Pic 1) is of my ballast resistor (should it ever burn out) you can "get by" temporarily to get you home, by connecting the wires together, bypassing the ballast resistor)
pic 2) i used a piggy back, this way nuthin' gets cut and is reusable, should i need to connect the wires together
Once you get the ballast resistor on and everything hooked up, turn the key on and tell me what the voltage is on the positive side of the coil.
Pic 3 and 4) this is the correct way that the fuel lines connect, i have replaced my steel lines with new ones, except i used a tubing bender to "tidy up" the looks, the originals sort went over and under stuff they just made things look crappy.
The mini pressure gauge and regulator are not necessary, but are useful so you can see the actual pressure, it does pulsate as the fuel pump pumps. They're also a good conversation piece
Your fuel pump will fill the carb bowl pretty darn quick if you feed the carb maybe 2 teaspoons of gas down the carb throat moments before you attempt to start your jeep (dumping some down now is not gonna do nuthin' 'cept evaporate)
The medic
Images (Click to enlarge)


Jul 13, 2019 at 11:45 AM
(Merged)
DIAGRAM DID NOT SHOW---HERE IT IS
THE MEDIC
THE MEDIC
Image (Click to enlarge)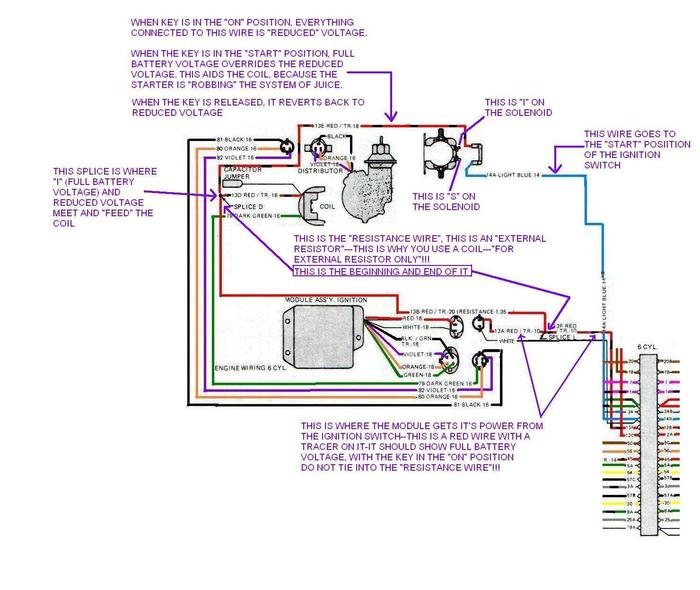
Jul 13, 2019 at 11:45 AM
(Merged)