Is this normal for a crankshaft on a 1MZ-FE engine?

1998 TOYOTA SIENNA
199,000 MILES • 3.0L • 6 CYL • 2WD • AUTOMATIC
Avatar
SIENNAWISE
  • MEMBER
  • 69 POSTS
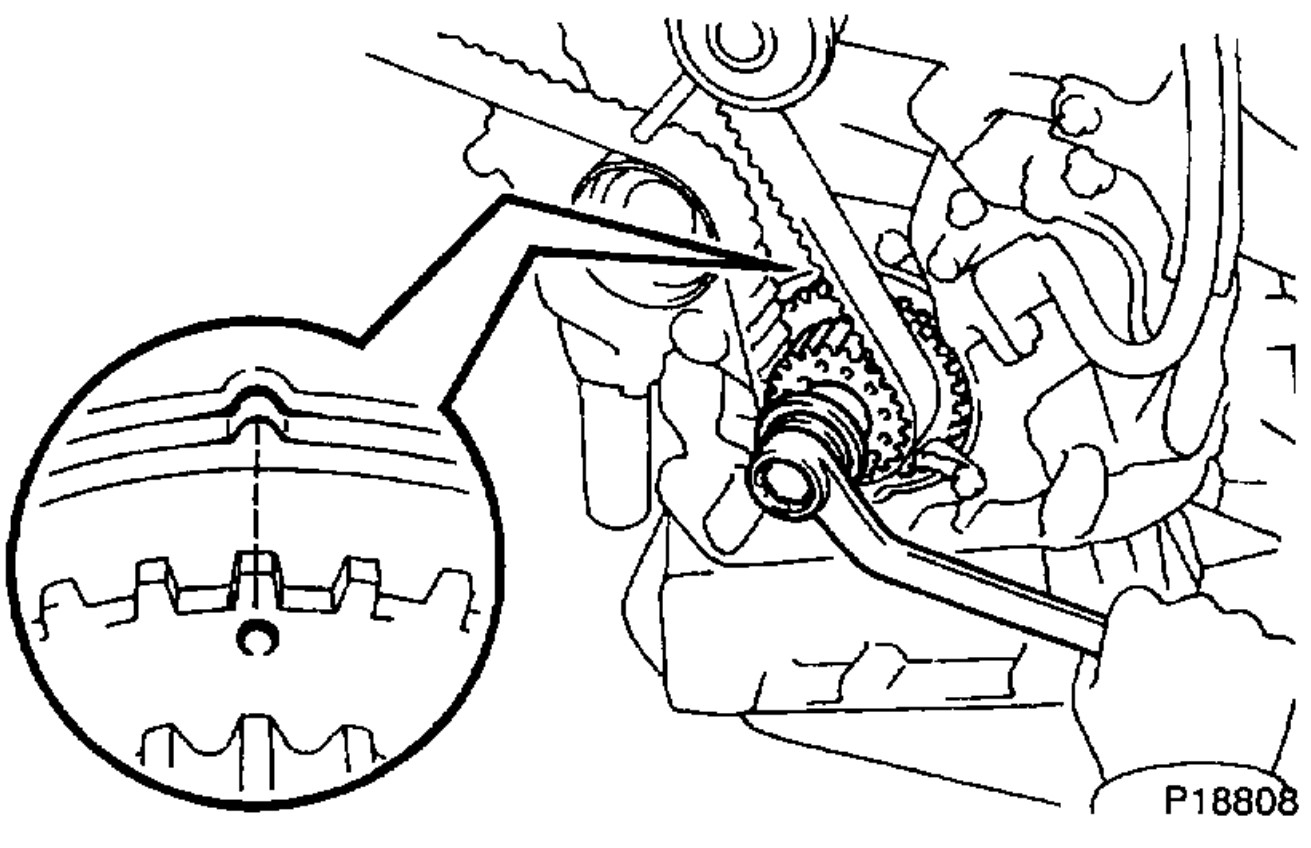
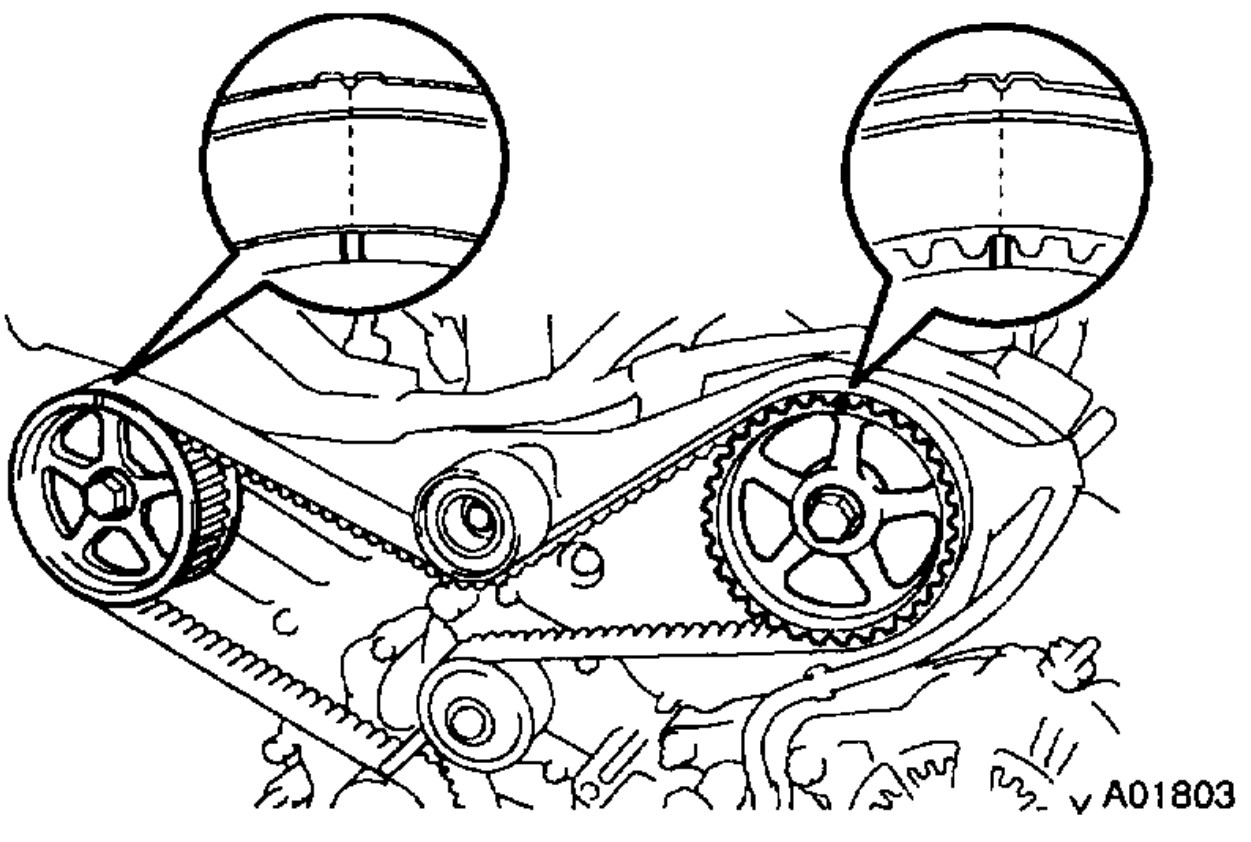
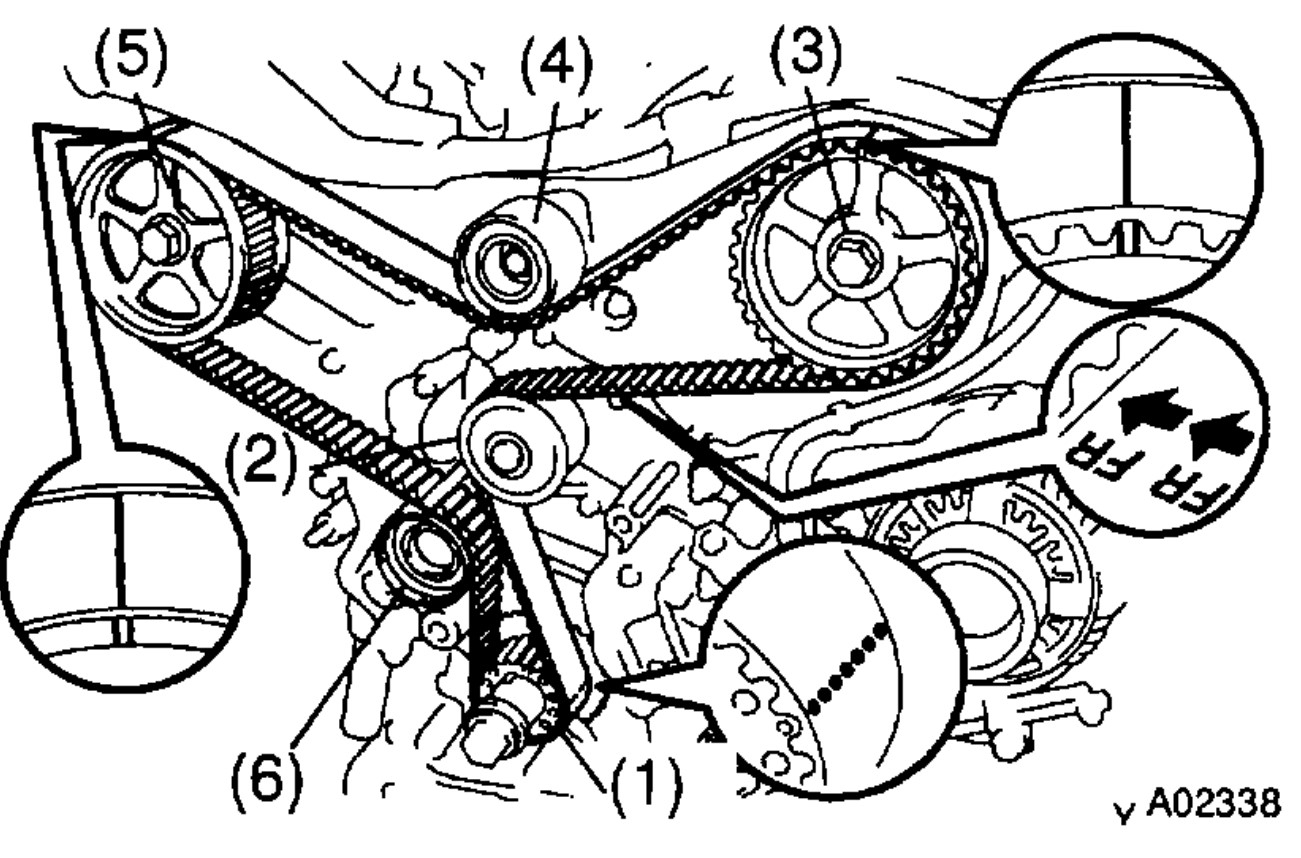
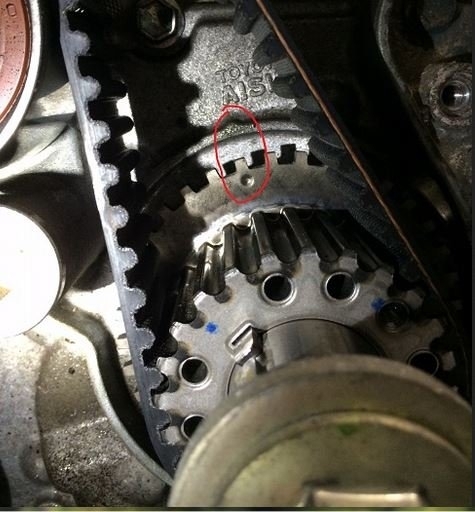
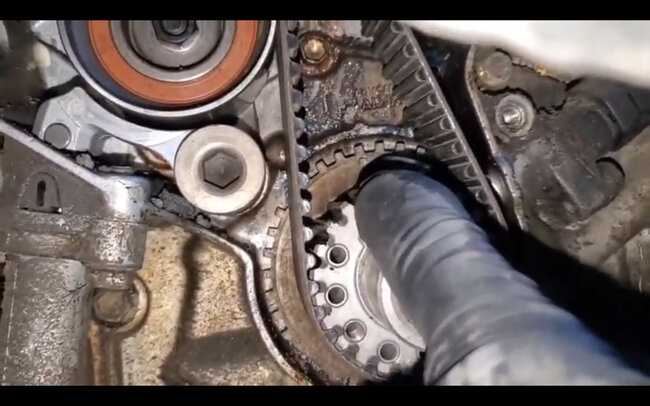
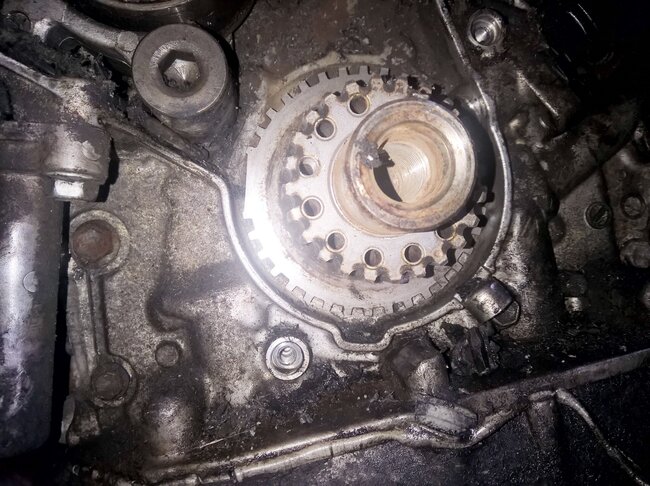
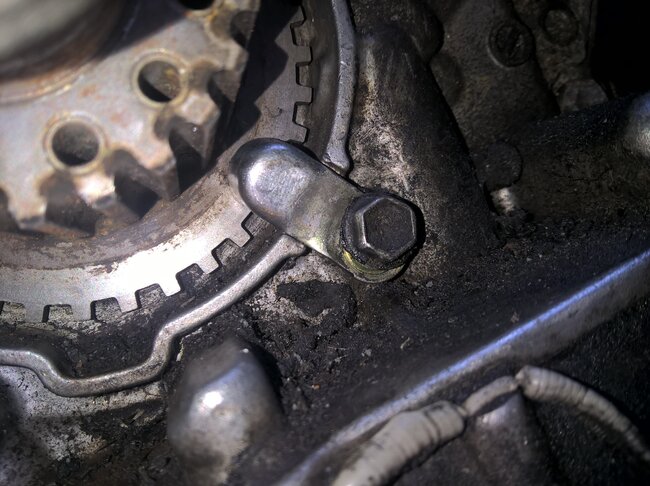
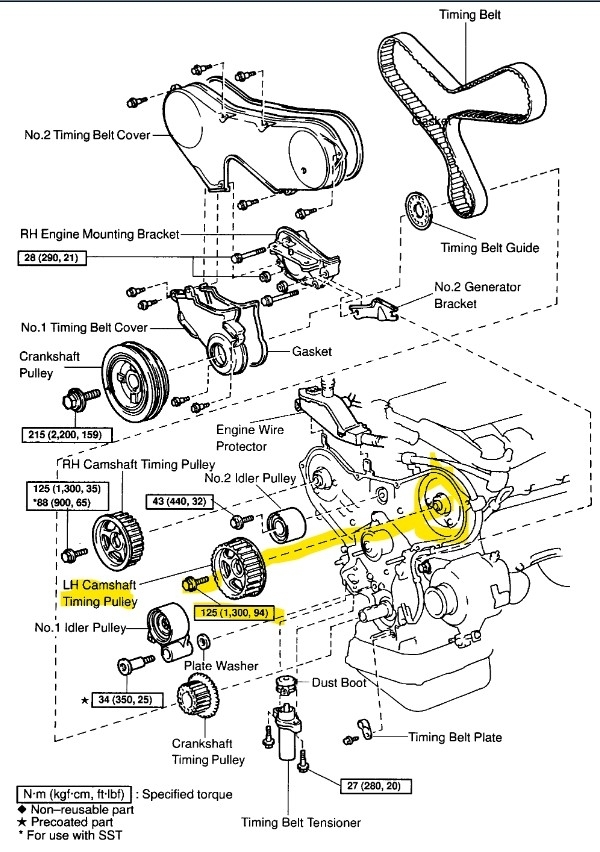
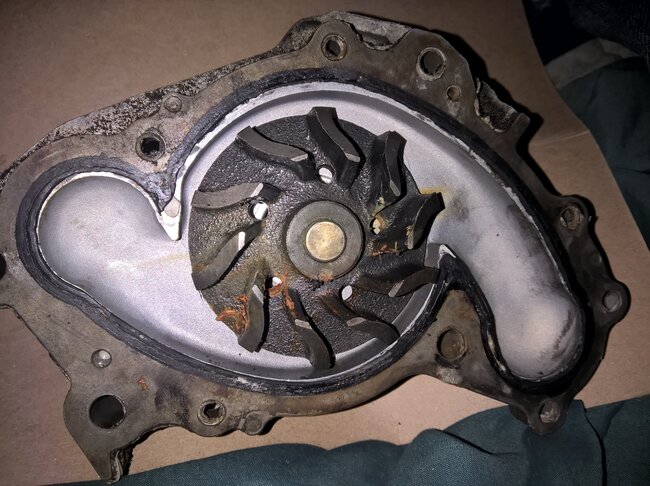
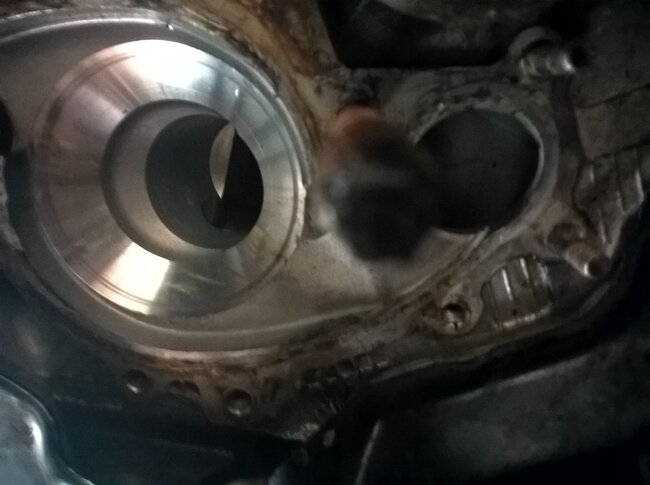
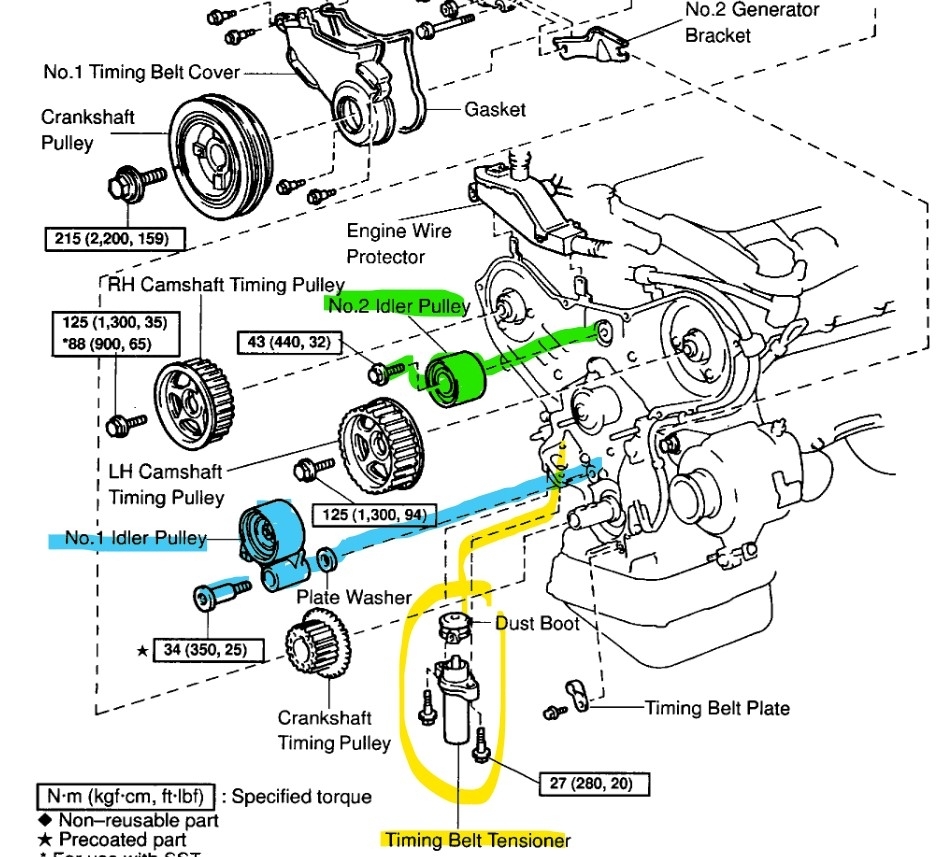
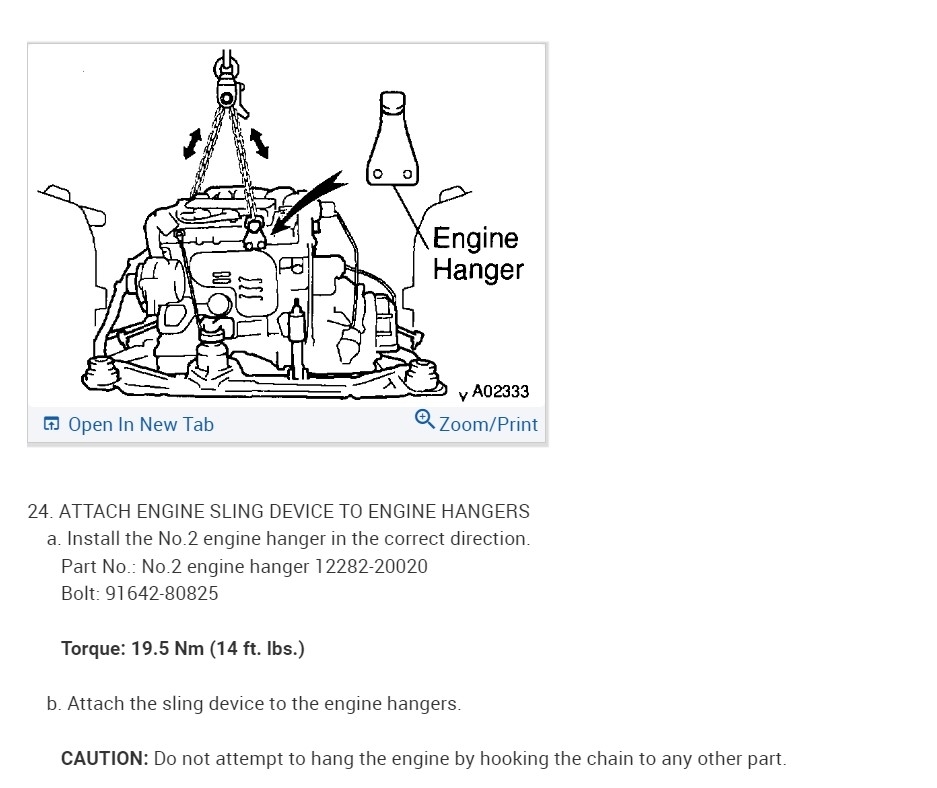
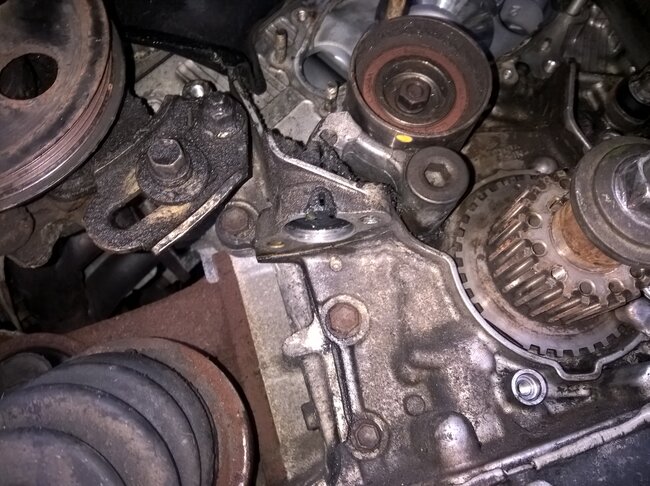
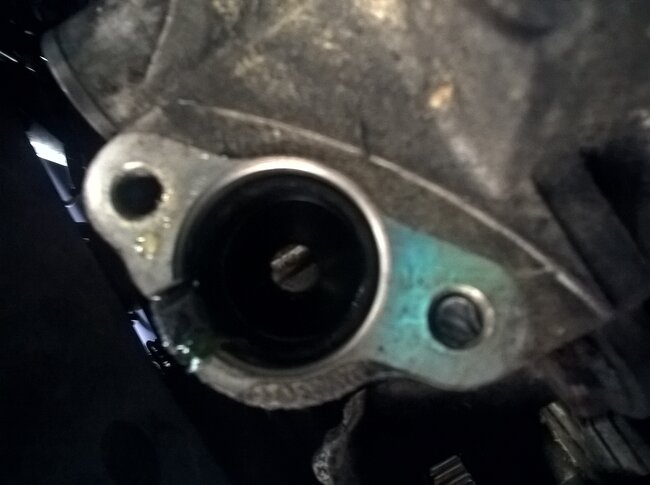
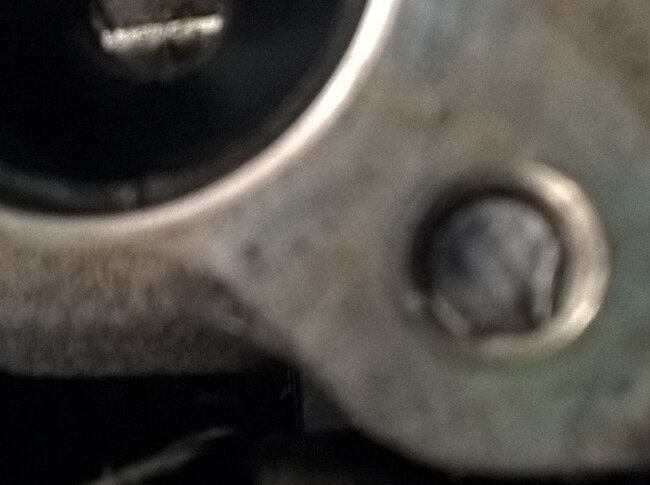
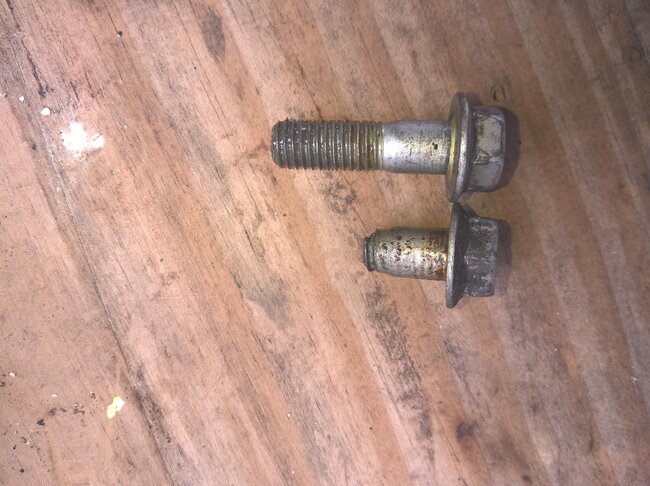
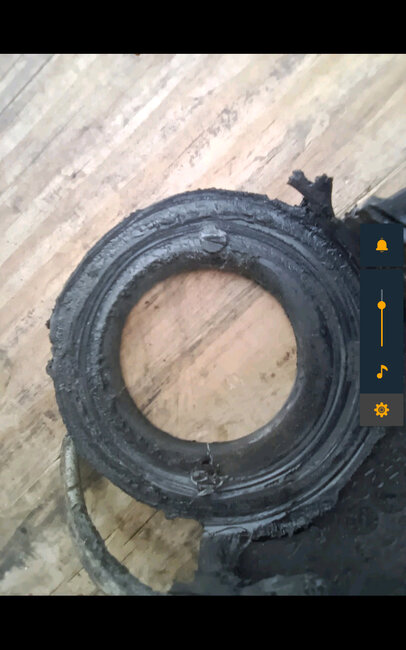
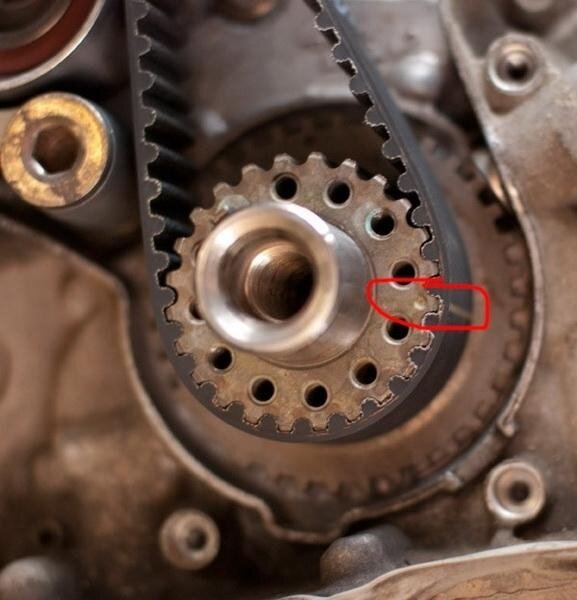
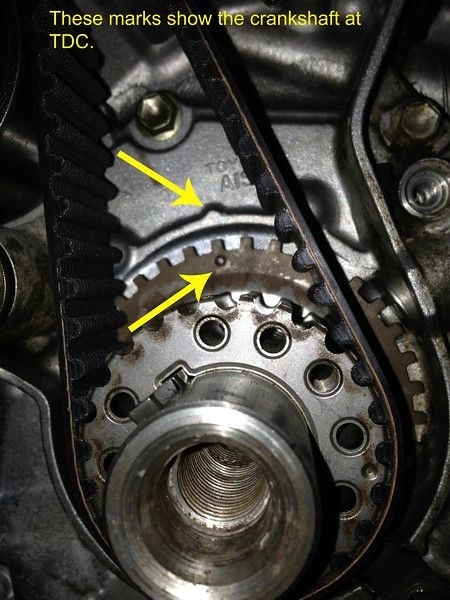
So, my timing belt broke at a slow speed and I've slowly been DIY with the help of Siennachat and YouTube videos being that it's a non-interference engine also referred to as freewheeling, I'm not expecting any serious issues but if you look at my photo, as well as the first photo looks like the same situation, the lower teeth of the teeth of the crank don't appear geared with upper teeth the timing marks are there but it looks like the upper gear is missing, as you can see in a photo of the lower cover part of the belt was wound several times behind the lower cover and tore up the lower timing cover the balancer was not damaged, could it have been damaged like the crankshaft itself, when the belt broke, or is it possible I have a replaced after market block that it was already missing before the belt broke? Is this gear that's missing part of the block and I have to replace the block now, or is the crankshaft that needs to be replaced? Either way I'm screwed. I hope that's not the case. The last Second to last photo is what it should look like I need to know if there is any concern about the crankshaft gear or I can just move on with the water pump replacement and timing belt till than I can't move on. Thanks
Original question posted here but no replies so far: https://www.toyotanation.com/threads/is-this-normal-on-a-1mz-fe-crankshaft.1754399
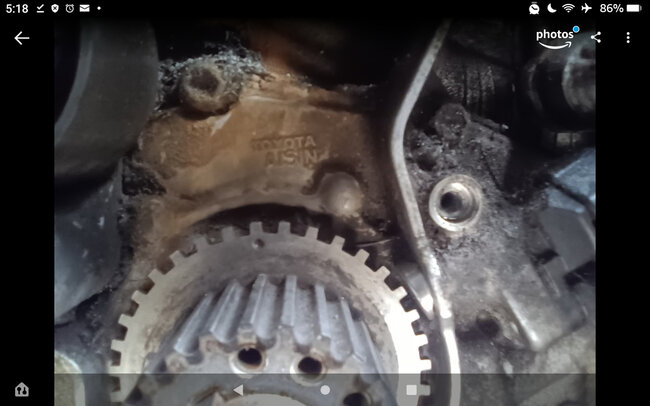
Apr 1, 2023 at 10:55 AM
Advertisement
Avatar
AL514
  • CERTIFIED EXPERT
  • 5,462 POSTS
Hello, it looks like you have it correct. The mark on rear trigger wheel looks lined up. Will post service info showing the correct marks for the crankshaft and the camshafts. If you clean up the area on the engine block where it says Toyota, the mark will be easier to see.
Just make sure when putting the new belt on that you get any slack in the belt on the side/area where the tensioner is, so the tensioner takes up the slack and none of the cams move.
A trick that can help is when you have the timing belt marks lined up on each cam with the mark on the belt, using tie wraps to temporarily hold the belt on the camshaft sprockets helps a lot. Are you replacing the tensioner or idler pulleys? And need the torque specs for either?
That small mark on the front crankshaft gear is to line up with the timing belt line as seen in the 3rd diagram. It shows all the timing marks. Here's the torque specs for the water pump. 4th diagram.
Here are the rest of the timing belt installation specs and details.
Apr 1, 2023 at 2:45 PM
Avatar
SIENNAWISE
  • MEMBER
  • 69 POSTS
I appreciate what you are saying and providing but I know the timing marks are right and how to proceed, my concern lies with the difference between my crankshaft and the ones in the photos not matching with the upper and lower teeth if that makes sense?
Apr 1, 2023 at 3:18 PM
Advertisement
Avatar
AL514
  • CERTIFIED EXPERT
  • 5,462 POSTS
The 1st and 4th picture are your crankshaft gear correct? And the 3rd looks like one showing where the mark is supposed to be lined up. When you say upper and low teeth of the gear, what kind of difference are you seeing? They look fine to me from what I can see in the pictures. Is there something wrong with the lower teeth that is not visible in the photos?
Unless you're referring to the photo with the arrows pointing to the mark on trigger wheel and the crankshaft at TDC.
Apr 2, 2023 at 9:49 AM
Avatar
SIENNAWISE
  • MEMBER
  • 69 POSTS
Actually the 1st picture is mine, the 3rd picture was supposed to be the different one, but it is also like mine the 4th picture Is like mine, I mixed up the 3rd picture of what I believe is the way it's supposed to look like I'm including it now. (You should be able to notice the difference right away it's got a red oval marking it) between the two I posted and this one I presume all are 1MZ-FE but the one I'm including now may not be or perhaps it was the interference engine before Toyota changed it to non? If it helps the picture was shared with me on Siennachat and was part of this discussion on Toyotanation Reffering to "crankshaft toning wheel" https://www.toyotanation.com/threads/1mzfe-cam-lobe-orientation-in-tdc.1631982/page-2 I was jist watching yet another video
onYoutube and froze a frame from https://youtu.be/2EEp_QCDWjY and captured it and I'm starting to think what is seen in the picture is nothing more than a trick of lighting ill upload or so you can see. That said id you look at the next photo which is from endeavor auto https://youtu.be/QSeyg-pb_8o there clearly is at 7:12 something there not a trick of lighting. If I have any other related questions should I ask you or should I post a new question?
Thanks for your help.
Apr 2, 2023 at 11:19 AM
Avatar
AL514
  • CERTIFIED EXPERT
  • 5,462 POSTS
All the 1998 Sienna's have the 3.0liter 1MZ-FE engine, even all 3 sub models CE, LE, XLE. That posting is all over the place, The small mark on the trigger wheel for the crankshaft position sensor is where it should be, lined up with that hump you have circled. The marks on the timing belt are there to get everything where it should be after releasing the tensioner. With the 3 timing marks, (1 on the crank, and 1 on each cam,) the number 1 piston is at Top Dead Center on its compression stroke. Once the belt is on and everything is lined up, the tensioner is released, you rotate the crankshaft 2 rotations, and recheck the camshaft marks, they should be lined back up. That whole post on that forum looks to be confusing people more than anything. These are all 3 timing marks. There is no other engine for this year listed in the service info. All 3 sub models have the same timing marks, same engine. 1998 is the first year the Sienna is listed, there isn't anything for 97'.
Apr 2, 2023 at 12:27 PM
Avatar
SIENNAWISE
  • MEMBER
  • 69 POSTS
Okay, so there is nothing there that's missing good, on a related subject I recognized a gold-colored metal covering part that is in the lower right quadrant of the crankshaft got bent out of shape by the belt. I just learned c from a video. It's the belt retainer and has to be taken off to take belt off so obviously I will have to take it off before I put the new belt on and then put it back on. I took it out and straightened it as well as I could put it back and it seems the sprocket can move freely, hopefully this is, okay? I'll upload a picture of what it looked like before I straightened it out and one of it straightened.
Apr 2, 2023 at 1:45 PM
Avatar
AL514
  • CERTIFIED EXPERT
  • 5,462 POSTS
Once you get the timing cover back on and the harmonic balancer back on, then the crankshaft bolt in, the crankshaft gear will be held in place by the rest of that. This is a diagram of the belt guide.
Apr 2, 2023 at 4:06 PM
Avatar
SIENNAWISE
  • MEMBER
  • 69 POSTS
Thanks I think I see how that works, now I have a new problem I can't get the water pump out (interestingly at least to bolts to the water pump were loose which makes me wonder if it already replaced?) without taking the back timing cover off and just like with the crankshaft bolt I fought, I finally got it off using the bump starter trick, I'm fighting the front camshaft bolt and can't budge it, I'm using a camshaft holding tool and breaker bar. I'm not a big guy and I'm thinking I'm going to need one or someone with an air ratchet. All I have is a lousy harbor freight 1/2-inch electric. I can't even fit.
Apr 2, 2023 at 5:21 PM
Avatar
AL514
  • CERTIFIED EXPERT
  • 5,462 POSTS
It looks like that back timing cover is supposed to come off for access to the water pump, but there's something to think about, if that camshaft bolt breaks off, for whatever reason it is going to open up a whole new can of worms. I've had cam bolts that would never come out, even on a brand-new cylinder head. I've had the cam holder tools break on me. So, if you think the water pump has been done already and it's not leaking. I would leave it. Unless you can get one cam sprocket off and get behind the back timing cover, semi out of the way, I'm not sure how much room that would give you. But you don't want to break the cam bolt's head off. That would leave you having to drill it out or more likely have to replace the cam. The cam bolts are not as strong as the crankshaft bolt. I just don't want to see you in a situation that can go from bad to really bad. It looks like the drive side cam is 94ft lbs torque and only 65ft lbs for the other cam.
It's possible that the engine has been apart before, and that's why you're having to fight with bolts. Trying an air impact gun might work, but a breaker bar is how it will break off. 94ft lbs isn't so much, you should be able to do that by hand. Just be careful.
Apr 2, 2023 at 6:06 PM
Avatar
SIENNAWISE
  • MEMBER
  • 69 POSTS
I can sure appreciate what you are saying and your concern about the bolt breaking off, unfortunately before the timing belt broke, I was already leaking coolant only when the engine was off and cold, so that was a sign that it wasn't the thermostat, and more likely the water pump or seal, it never over heated I conferred with a local mechanic from my parents church and he said so long as I keep refilling the coolant I could drive it so that's why I did, but I just an epiphany, I mentioned there were a couple bolts that seemed loose on the pump, I just did a quick search and that happened to a guy after a build 2 bolts backed out and coolant started leaking, so it's possible that's why it was leaking, not the pump or seal but that bolts being loose would make it so it's not sealed right? How the heck could have those bolts gotten loose, do they require Permatex on them? Testing it, I figure is as simple as tightening it up, adding fluid and seeing if it leaks overnight, since that's what's it's been doing with the engine off and cold. I suppose I could just skip the pump, just buy a new belt kit minus the pump, if I can find one since most come with the pump and go that route and hope for the best. I'm not concerned about seals and what not, I don't expect to keep the van for another year.
Apr 2, 2023 at 7:13 PM
Avatar
AL514
  • CERTIFIED EXPERT
  • 5,462 POSTS
Yeah, I would definitely tighten up the bolts and 2 nuts for the water pump if they're loose. That tells me that someone else has been in there already and obviously didn't torque things to spec. That would explain why the cam bolt is so tight too. But instead of taking a chance of breaking that cam bolt. Tighten up the water pump bolts, here's the spec on them, it is the 4 bolts and 2 nuts, and the torque spec only being 53in lbs, so it's not that tight at all. The real test to see if it will leak is to either put it all back together and run it and the coolant system will pressurize when it gets up to operating temperature. Or Auto Zone and other auto parts stores actually rent out tools, so you could rent a coolant pressure test kit and pressurize the system up to about 15psi and see if it leaks that way, that is about the max you want to get the pressure up to. Any more than that and you risk the heater core leaking or hoses. So, you could do it that way, that will prevent you having to take the whole thing apart again if it does happen to leak. The coolant pressure kit is just a pump that hooks onto the radiator cap opening, or reservoir, wherever you fill the coolant. And it has a pressure gauge on it. You just pump it up the 15psi and check for leaks. It has different fittings for different vehicles. That is probably your best option. The bolts for the water pump can come loose from normal engine vibration, especially if they were not torqued correctly to begin with. Then if the pump does leak, take things from that point. Is it the driver side cam bolt that is giving you the trouble?

https://www.2carpros.com/articles/radiator-pressure-test

https://www.2carpros.com/articles/car-is-leaking-coolant
Apr 3, 2023 at 12:42 PM
Avatar
SIENNAWISE
  • MEMBER
  • 69 POSTS
The cam bolt giving me trouble is the front one vs the back one I don't know if that's the driver side. So, I'm sorry to say but I think the water pump is shot, after tightening up the 4 bolts and 2 nuts I don't have a torque wrench need to get one, tried to not over tighten, anyway it didn't take long to figure out where its leaking from, I added coolant and as soon as I did that it started leaking from right behind the water pump pulley, weep hole? If that's what that is I took some video and uploaded it, looks like I'm going to have no choice but to change the pump, by the way for what it's worth, last summer I took it to a repair shop, and they ran a pressure test and it failed. I'm going to have to find a way to break that over torqued cam bolt without breaking the head. Thanks
Apr 3, 2023 at 2:55 PM
Avatar
AL514
  • CERTIFIED EXPERT
  • 5,462 POSTS
Yeah, that's looks like the weep hole, the internal seal must have failed. I see that cam is on Bank 2 towards the front of the vehicle, that is the one that is torqued to 94ft lbs. It looks like that number 3 timing cover is the rear one, they should have designed it differently. Having to remove the cam sprockets to get a water pump out seems extreme. If that cam bolt starts to move, try spraying something behind the cam sprocket onto the whatever section of the bolt that might be exposed, if you can get something on the threads it will help.
Apr 3, 2023 at 5:01 PM
Avatar
SIENNAWISE
  • MEMBER
  • 69 POSTS
I looked at the diagrams and I see what you mean just to clarify the rear cam sprocket has to come out to access the water pump. Yes, seems extreme. If I can get the cam bolts off and sprockets I might as well do the seals too.
Apr 3, 2023 at 5:42 PM
Avatar
AL514
  • CERTIFIED EXPERT
  • 5,462 POSTS
Yeah, the entire rear timing cover needs to come out, considering most of the water pump is exposed already, their design is frustrating. I know how difficult some of these can be. Hopefully things go okay for you. I'm not sure if you have the valve covers off, but there might be something more to hold on to under the valve cover. Some camshafts have square sections where you can get an open-end wrench on the camshaft for a better hold. I'll look through service info some more for you and see if there's anything else helpful. It's not clear if there are square sections on these cams, I'm looking for some parts images.
Apr 3, 2023 at 5:53 PM
Avatar
SIENNAWISE
  • MEMBER
  • 69 POSTS
No, I haven't got the valve cover off, I'm not comfortable with anything related to the valves or the cover, I once replaced a valve gasket on an old Datson but that's the only experience I have, if there is no other way, I will take the cover off otherwise I'm not bold enough to. Interestingly in this video https://youtu.be/JMa1EoRMSxs at around 5:20 he's able to cheat the water pump out without taking out the rear cam sprocket.
Apr 3, 2023 at 6:20 PM
Avatar
SIENNAWISE
  • MEMBER
  • 69 POSTS
Update, got the bolt to break water pump is out no sign of gasket photos attached.
Apr 6, 2023 at 5:24 PM
Avatar
AL514
  • CERTIFIED EXPERT
  • 5,462 POSTS
I can see the gasket; did you get a new one yet? It will come with a gasket, just be sure to clean the mounting surfaces off really good, and don't get any oil on the new gasket. Torque spec is 53in lbs for the water pump bolts and nuts. Check that there isn't any coolant in the oil before starting the vehicle too.
Apr 7, 2023 at 1:08 PM
Avatar
SIENNAWISE
  • MEMBER
  • 69 POSTS
No I've held off until I had everything off, good thing I have, as you know I was able to get someone stronger to break the camshaft bolt, ironically while loosening the inner tensioner bolt the one on the left the bolt broke, sheared off leaving most of it in, so if you put your finger up to the hole it lays flat, my first thought is to easy it out with a bolt extractor but I found a post https://www.toyotanation.com/threads/belt-tensioner-bolt-broke.428207 on Toyota Nation same thing happened to a Corolla owner he was told he needs to remove the engine to drill the bolt out since there is no room for even an angle drill, I hope this isn't the case for Sienna any thoughts or suggestions?
Apr 7, 2023 at 5:44 PM
Avatar
AL514
  • CERTIFIED EXPERT
  • 5,462 POSTS
Was it the number 2 idler pulley in the diagram, the upper one with the center bolt? It's difficult tell you without really seeing how much room you have, which I'm sure is not much because of the engine being sideways in the engine compartment. Unfortunately, service info has the engine being lowered out the bottom with much of the sub frame being removed along with the suspension. I'm not sure if it's possible, but if you can angle the engine up on the left side to be able to drill that bolt out. Most engines do come out when bolts like that break. I only thing I can think of is using a 90degree air ratchet to try drilling it out. Pulling this engine is more work than you want to get into. Plus, it looks like you'll need a lift to do it as well. Real sorry this happened, it was a worry from the beginning.
Apr 7, 2023 at 7:05 PM
Avatar
SIENNAWISE
  • MEMBER
  • 69 POSTS
No, it wasn't the number 2 idler pulley' it's the one of two bolts that connect the timing belt tensioner. The bolt is on the inward left side of the tensioner. The tensioner came out, but I can't put a new one in until I get that remaining bolt out. I probably would have to rethread it, if the thread is damaged trying to remove it. A right angle might have enough space, it's but in a couple videos it looks like the bolt loosens to the right not left, in my case I was loosening it to left, So now I've confirmed that at least one of the bolts is left a left handed thread in the video it looks look they are both left handed. I just wish I had known or realized they were left-handed threads. How was I able to remove one but the other one broke?
Apr 7, 2023 at 8:53 PM
Avatar
AL514
  • CERTIFIED EXPERT
  • 5,462 POSTS
Are you referring to the 2 bolts that go in from the bottom of tensioner itself? Not either of the round pulleys? It looks like the pulley for the tensioner takes a 10mm Hex wrench. But there is nothing that says anything is opposite thread.
Apr 8, 2023 at 10:51 AM
Avatar
SIENNAWISE
  • MEMBER
  • 69 POSTS
Yes, that's the one, I confirmed Its reverse thread at least on the right hole I tried to put the good bolt in the empty hole, and it will only go in counterclockwise, I think it's possible the engine mount or is that on the oil pump? Was changed and that's why it's reverse thread?
Apr 8, 2023 at 2:59 PM
Avatar
AL514
  • CERTIFIED EXPERT
  • 5,462 POSTS
The bolt holes look to be part of the oil pump assembly, but there isn't any place that states one bolt would be reverse thread, I supposed it could be an aftermarket oil pump, but that still doesn't make much sense of a design. But since those bolts are straight up and down, drilling one out should be easier. But there isn't any close up pictures of the tensioner bolts.
Apr 8, 2023 at 5:14 PM
Avatar
SIENNAWISE
  • MEMBER
  • 69 POSTS
As for being reverse thread, every video I've watched the ratchet moves to the right to loosen and in one video to tighten it moved to the left for both bolts, and thread on the bolt looks to be left, a very important detail Toyota left out, so I guess it's the original oil pump and it's just that the threads are reversed , yes drilling out with an extension should be easy hammering a center punch may be a problem, at the moment I think I only have left handed bits, how would that work to drill? I don't think it would drill a hole forward and can't go in reverse, risk of tightening it even more. I'm attaching photos.
Apr 9, 2023 at 12:09 PM
Avatar
AL514
  • CERTIFIED EXPERT
  • 5,462 POSTS
Just going over your pictures here close up, so is it the bolt hole closest to the engine block that broke? Comparing the 2 bolts it's hard to tell what thread they are with so much missing off of that one. So, from the bottom up, you're saying the front bolt hole doesn't tighten turning it to the right? I've been going through service info and have not seen anything like that. Considering what it holds, you would think that would be something specifically noted in there. It still looks like a tough one to drill out, but if you can get a smaller bit started first so you have a pilot hole to keep the next bit straight is what I would try. By the time you get the center of that drilled out, there won't be much of the bolt left. I can see how small it is compared to the other bolts in the block. Looks like maybe a 10mm. But as for the thread direction right now, I would just try to get started with a small bit and take it from there., You don't want to damage anything, Such a bad design. I would expect more from Toyota, but anyway. Zoomed in the bolts look like the end thread is correct being tightened to the right, even the full one on the left, I have the picture straight up and down, if I were to twist either of those, I'd need to go right to thread it in. If you have a nut that will fit on there, that would give you a clear answer, The way those threads are at an angle down on the left side, now I'm looking for a bolt here. On normal right-hand tightening, the threads will be angled down on the left side. I'm trying to post a picture for you here. I'm not sure if it's the picture or not, but the broken bolt looks a little different, that might just the picture though.
Granted this is just a screw but it's the correct thread, just a bit easier to see, but how the threads are angled down on the left side, that's what I see, at least that's what I think I see on the unbroken bolt.
You won't tighten that bolt anymore, the broken section must be rusted in there, drilling out the center will reveal some of that. Then just increase bit size until you can get an easy out in there, or it starts to move. Spray something for the rust while doing it, some penetrating oil, which will help to save the bit too, but drill slow, if you go too fast with drilling out metal bolts, you'll just burn the bits up quick.
Apr 9, 2023 at 1:27 PM
Avatar
SIENNAWISE
  • MEMBER
  • 69 POSTS
Yes, it's closest to the block and 10mm. I appreciate your help and due diligence, after seeing the videos and only being able to put the bolt back in reverse, I have to treat it as reverse thread, that's why I'm going to try what this fellow did when he ran into a reverse thread bolt he broke off on a miter saw https://youtu.be/ytEOAqXZamk used a hex socket and it came out smooth as butter, yesterday I sprayed PB Blaster and will let it sit until tomorrow. I will center punch it so I can get a good pilot hole and then drill it slowly I will try to ratchet it out to the right, if it doesn't budge than its to the left bit in would expect it to loosen to the right, as you said I can't tighten it anymore so not much risk. I'm confident it should work.
Apr 9, 2023 at 2:37 PM
Avatar
AL514
  • CERTIFIED EXPERT
  • 5,462 POSTS
Well, it looks like it would just spin out the top, isn't there a hole at the top of those threaded areas? But I think you have a good plan. If you keep spraying each day until you get to drilling it that will help a lot, letting it soak overnight each time. Hope it goes well, if it happens to be reverse thread, let me know, I'll send a message to All Data, maybe they will correct the service info.
Apr 9, 2023 at 2:43 PM
Avatar
SIENNAWISE
  • MEMBER
  • 69 POSTS
Yes, I think there is a hole at the top so either direction it's going to come out I'll know soon enough. will let you know.
Apr 9, 2023 at 8:05 PM
Avatar
SIENNAWISE
  • MEMBER
  • 69 POSTS
Hi, I don't know if you are still following this post, but try as I may, I couldn't extract the bolt, I did however drill a hole through next to it, had to fil!.it with steel. stik, I'm leaving it to one bolt and hoping for the best, water pump and timing belt are installed, turned crank 4 times marks lining up, all that's left.to.do is put parts back, torque, add coolant and hope for the best, one thing though when being towed to home base the tow strap towing me from the front got caught under the passenger tire and suddenly coolant spilled out. Any idea what that could have been? It was suggested a hose but i can't see any separation or tears. Also, what's the best way to go about testing for a leak? can I just add water or concentrated coolant so I don't lose a whole bottle of coolant? Thanks
Apr 26, 2023 at 4:49 PM
Avatar
AL514
  • CERTIFIED EXPERT
  • 5,462 POSTS
Well, with the towing strap, the only way to know is to do a pressure test, you might find that it hit the radiator fins and cracked something in that area, they are pretty fragile. But you can rent a coolant system pressure kit from AutoZone, or other places might rent tools as well. The kit comes with different fittings for radiators and a pump with a gauge on it. So, you just fill up the system, pump it up to about 15psi, I believe the max you want to go on a cooling system is 18psi, but 15 is usually enough to find a leak. That is about where the system will be when it's up to operating temperature. Thats unfortunate about the tensioner bolt. I don't think that will hold for very long, the pressure on the tensioner is pretty high, but I think changing the oil pump out is the only way to remedy that situation now. I can't think of any other way to secure that other side. I hope for the best though. For the pressure test you can use water, you'll just need to drain it out later and add 50/50.
Apr 26, 2023 at 6:06 PM
Avatar
SIENNAWISE
  • MEMBER
  • 69 POSTS
So, if it hit a fin or cracked something I will have to replace the radiator now, I just had it replaced last year brand new, I hope it's a hose clamp lose or something simple like that, I'll have to see about doing a pressure test. As for the bolt I don't know if I mentioned this, but a fellow Sienna owner has been driving his with one bolt 5 years now since a mechanic broke the bolt when installing a new tensioner so you never know, I'm thinking since I drilled a whole thought the mount to see if I can put a thinner bolt through with a nut
for added measure, but I don't drive daily and I'm not planning on keeping the van for another year. I don't think I will replace the oil pump unless it's leaking or bad, I just put some Permatex 90-minute gasket maker on it since the old gasket was deteriorated. Anyhow I should have it all back together by Monday I hope and then I'll have to deal with the radiator leak, for what it's worth at least the water pump. Won't leak anymore.
Apr 27, 2023 at 8:14 AM
Avatar
SIENNAWISE
  • MEMBER
  • 69 POSTS
Well, I just checked the radiator again and it doesn't look like there is anything exposed to damage, no fins anywhere to be seen. I did notice a hose not fully in place so I'm going to correct that and see what happens.
Apr 27, 2023 at 10:41 AM
Avatar
AL514
  • CERTIFIED EXPERT
  • 5,462 POSTS
The tow strap might have just hit a coolant hose, it's difficult to tell until it's under some pressure. The Permatex was a good idea, that stuff can handle quite a bit. I was also thinking about the hole you drilled in the side. Since that hole is not part of the actual engine block, and only the oil pump, (meaning it can be replaced in the future) you could try a self-tapping screw and see if it will help put some support on that underside where the broken bolt should be. If you can find that right size self-tapping screw. I know it's kind of a hack, but at this point if you're not planning on keeping the van that much longer. Just trying to think of anything you can do besides replace the oil pump. I know you just want to get this thing done. And btw on the tool rental at AutoZone, its actually free, you just have to give them the money in case you don't return the tool. Once you return it, they give you all your money back. As long as it's not damaged obviously. But I forgot to tell you that part.
Apr 27, 2023 at 2:43 PM
Avatar
SIENNAWISE
  • MEMBER
  • 69 POSTS
Well, as soon as I get the engine running the cooling system will be under pressure, so that's one to test it, I understand those tool loaners the auto stores have are free, it's getting to the store the problem as I don't have another vehicle and it's in walking distance. For what it's worth and probably won't hold I pita zip tie, your self tapping screw idea is good, but wouldn't the head have to be as big as the hole of the tensioner or would I just pit a really big washer on it? I have sheet metal screws, one of them should do the trick. By way what's the procedure to remove a broken bolt on a mounted water pump? Thanks
Apr 28, 2023 at 10:20 AM
Avatar
AL514
  • CERTIFIED EXPERT
  • 5,462 POSTS
I was just thinking a small self-tapping screw in the hole you already drilled, or whatever you think will help secure it or at least help hold the tensioner a bit more. Did a bolt break on the new water pump? It really depends on what you can fit into the area of the broken section on the bolt. I try to get them out by soaking it in penetrating oil over night and drill, then try to get an extractor in the drilled hole. Some kits actually come with a drill bit that drills in the opposite way, then using a regular drill bit to try to spin what's left of the bolt out. There is never an easy way, especially when space is limited.
This video might help, he uses some techniques with a hammer and punch on the edge of a broken bolt in an engine block, might be helpful somewhat. I hope.

https://www.youtube.com/watch?v=x_ky5JVxtqU
Apr 28, 2023 at 4:14 PM
Avatar
SIENNAWISE
  • MEMBER
  • 69 POSTS
I was able to use a machine self-tapping screw it snugged up tight, so I will just leave it at that. Yes I borrowed a torque wrench it was set to 71 ft lbs when it's supposed to be 71 inch lbs, so it's in a tight spot I thought tondrill and EZ out but it just seems too much of a hassle given the tight location and nit hacing an angle drill, and given my track record with bolt extraction I'm liable to make it worse. The bolt was hardly tight when it broke since after I over torqued it yesterday, I backed it off with a small driver and when I went to tighten it, that's when it broke, I doubt there is much torque on it and as far I've seen no rust. So, I put a dab of jbweld on the end of the sheared head put it in and held it with a little of the gasket stuff. I will let it cure and see if maybe I can loosen it if the jbweld holds up if not, I can try sealing it up with the gasket stuff and use a 7psi low pressure cap, apparently that's worked for others in a similar situation. Since I don't drive much and I don't plan on keeping the van too much longer I figure that's the best way to go. I also realized that since the bolt goes through the pump into the block I wouldn't be able to take the pump out without extracting the bolt, quite a predicament.
Apr 28, 2023 at 9:38 PM
Avatar
AL514
  • CERTIFIED EXPERT
  • 5,462 POSTS
Okay, I see what happened, yes considering how far you are along with the job, if that bolt was threaded into the water pump as well as into the block, which would be a difficult one to get out. With older higher mileage vehicles, a lot of things tend to break. I do hope everything holds up for as long as you keep the vehicle. And in this industry every job seems to be a learning experience.
Apr 29, 2023 at 4:05 PM
Avatar
SIENNAWISE
  • MEMBER
  • 69 POSTS
Yes, that's the case unfortunately the jb weld idea didn't work, so i put the gasket maker on and now i need to get a low PSI cap, well I'm almost done I got everything back together except for some reason the power steering belt won't go on, tried it with the old belt same thing I was thinking maybe it's the balancer pulley, the only thing is that I used the bolt to push the pulley back on if that makes sense. I guess I can start it without the PS belt to test but I will have to the take the serpentine belt off since the PS belt is still on the balancer pulley loose. Any thoughts?
Apr 30, 2023 at 5:30 PM
Avatar
AL514
  • CERTIFIED EXPERT
  • 5,462 POSTS
Do you have both of the power steering pump bolts free enough to move and adjust the pump position? The Harmonic balancer should really only seat in one position. I would put the belt on the crank first then the PS pump last. The lower bolt on the pump is the adjusting bolt.
Apr 30, 2023 at 7:48 PM