Aug 31, 2020 at 11:12 AM
(Merged)
ABS is coming on? - Brake pedal judder?
2010 CHEVROLET SILVERADO
Advertisement
Antilock brakes sometimes comes to work even on dry pavement works okay on ice cover with somewhat more extra pressure . Pull the 60 amp brake fuse @ ABS light comes on @ can lock up brakes . It's got me stumped .
When you pull the fuse, you disable the ABS system and make it standard brakes, that is why the light is on and they will lock up. Has the light ever come on when it is malfunctioning? Does it do this over bumps or train tracks? A scan of the ABS system may be in order to see if the computer saw a failure and stored a code
Aug 31, 2020 at 11:12 AM
(Merged)
Advertisement
Brakes problem
1995 Chevy Silverado V8 Four Wheel Drive Automatic
When coming up to a stop, I go to press the brakes and my pedal won't want to go down. There is a sort of "ree" sound and I almost can't stop at all. I have to press down on it with all my weight and it will jerk to a stop, but the pedal still won't go down. Or, I have to let my foot off the pedal, press down until it starts doing it again, take my foot off and etc. It doesn't do it all the time and my ABS light isn't always on. What is going on and how do I fix it?
Aug 31, 2020 at 11:12 AM
(Merged)

It sounds like the ABS is actuating. First, check the wiring to the sensors. If they are good, make sure the sensor and startor is clean. If they are caked with dirt, it could cause the ABS to actuate. Also, if you can, have the computer scanned to see why the ABS light is on. It should point you in the right direction.
Let me know what you find.
Joe
Let me know what you find.
Joe
Aug 31, 2020 at 11:12 AM
(Merged)
Changed the brake pads and rotors on all four wheels. Changed front hubs that came with new speed sensors installed. Brakes work great except at very low speeds. Like 1-4 mph. Pedal gets hard and pushes back as well as a growling noise. Shortly after the repair the ABS lamp and brake lamp turned on simultaneously. No fluid leakage. Checked ABS DTC’s and found that it has a Code C0265. I understand that repairs are needed but immediately after the brake service? It never occurred before the brake and hub replacement.
Aug 31, 2020 at 11:25 AM
(Merged)
Hello,
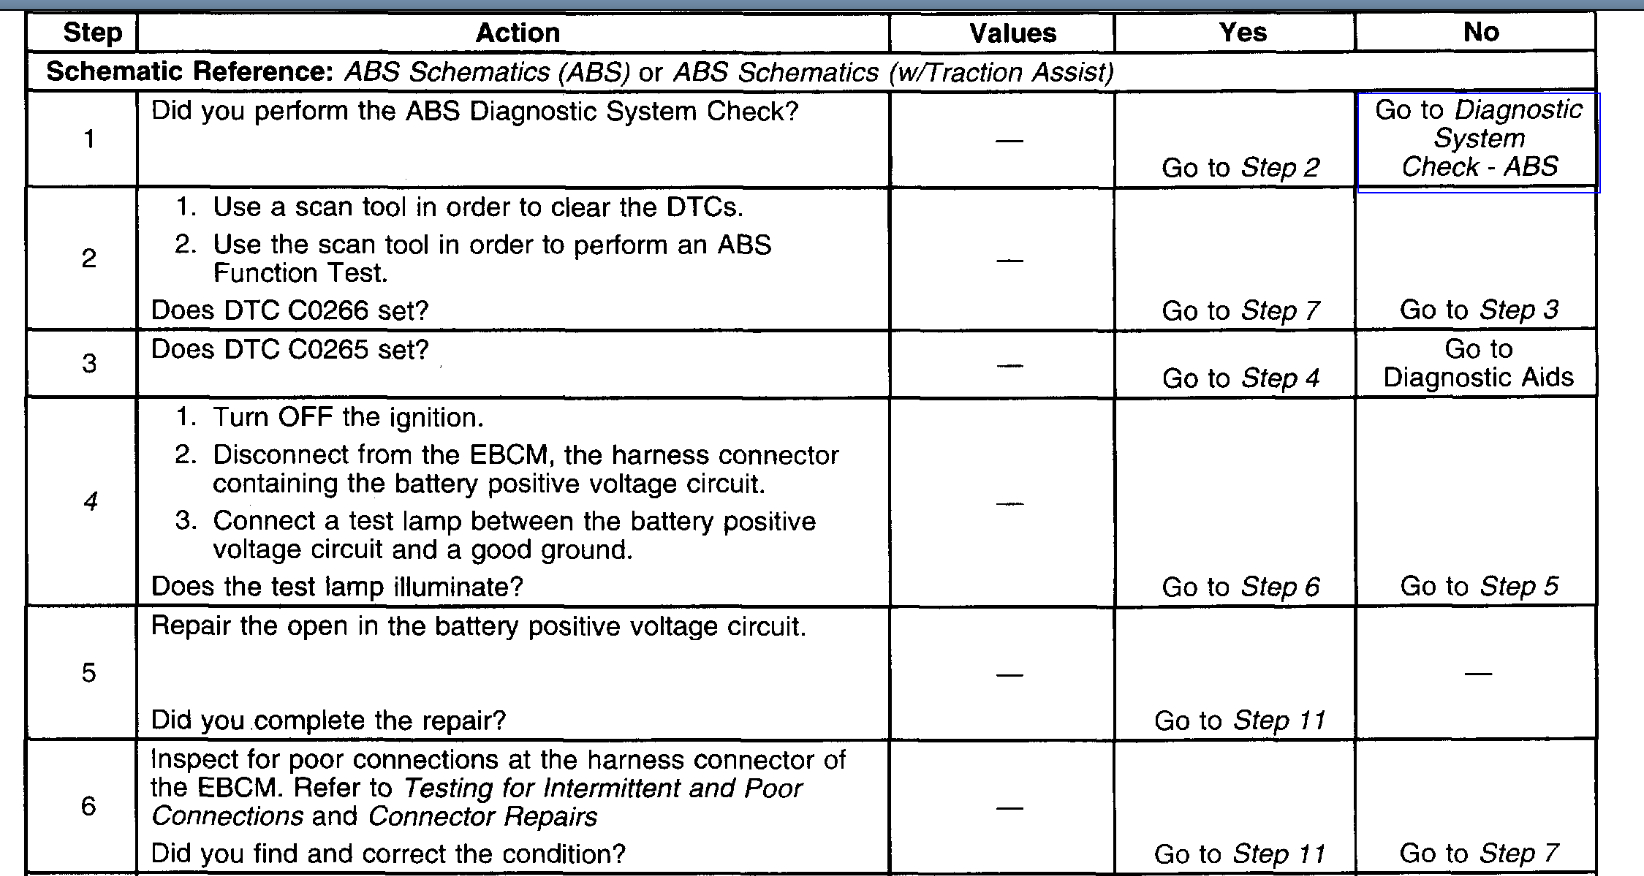
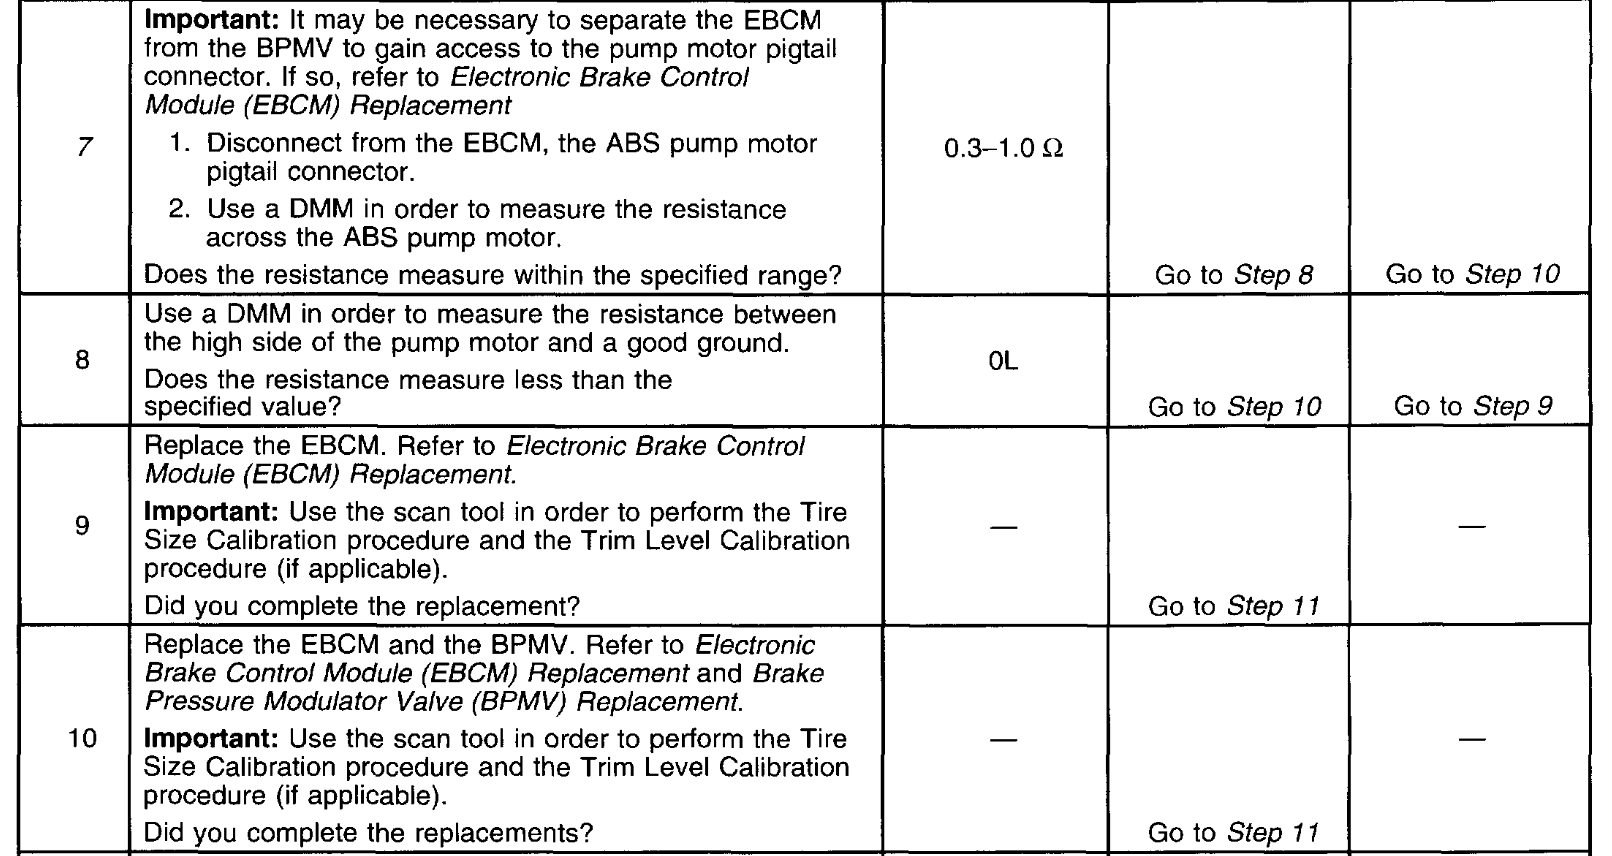
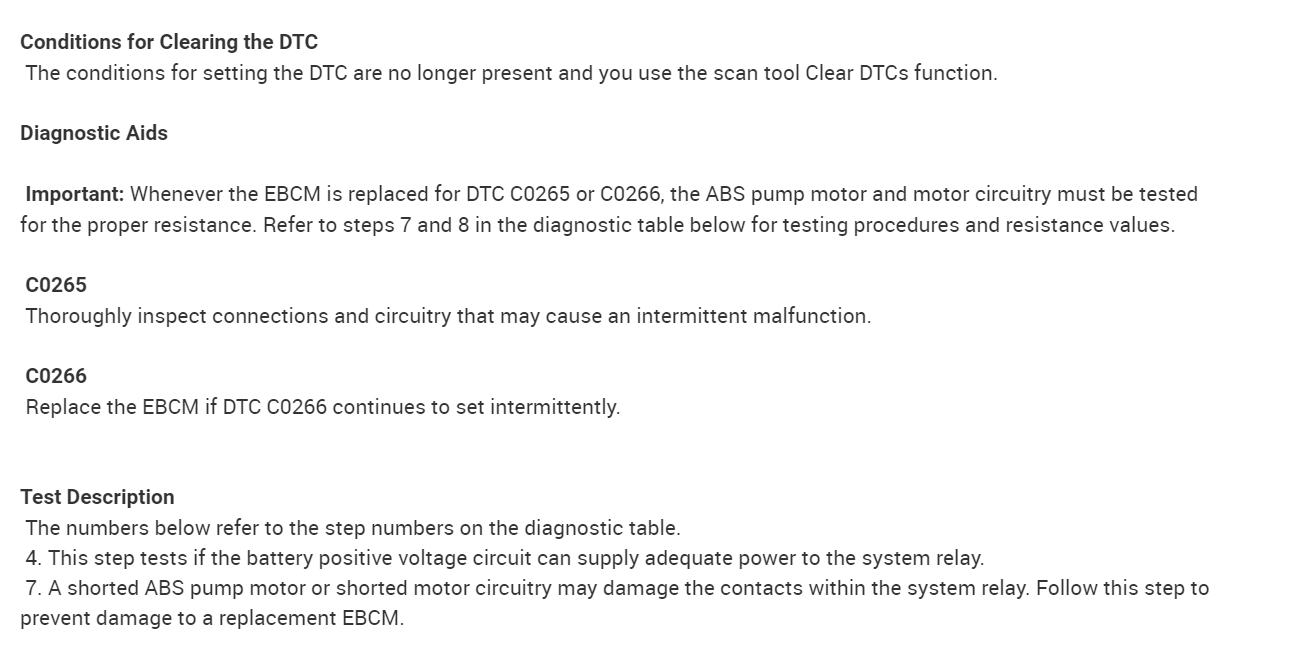
In the diagrams down below I have included the factory diagnostic troubleshooting guide for your vehicle for Direct Trouble Code (DTC) C0265. Please go through this guide and get back to us with what you are able find out for your vehicle's problem.
Thanks,
Alex
2CarPros
In the diagrams down below I have included the factory diagnostic troubleshooting guide for your vehicle for Direct Trouble Code (DTC) C0265. Please go through this guide and get back to us with what you are able find out for your vehicle's problem.
Thanks,
Alex
2CarPros
Images (Click to enlarge)


Aug 31, 2020 at 11:25 AM
(Merged)
the anti-lock brakes engage when the vehicle is going very slow (walking speed), as when coming to a stop. wheels are turning (without lock-up), and there is no reason for the anti-lock mechanism to engage. this is more than just annoying because while the brakes are rapidly pulsating, the vehicle is not stopping. for example, while creeping along and turning into a parking spot, the anti-lock brake mechanism began pulsation of the brakes, preventing the depression/actuation of the brake pedal, which disallowed the vehicle to slow down. i barely missed scraping the car parked in the adjacent spot, because i expected the vehicle to slow down and stop. i removed the fuse for the anti-lock brake system, and that prevented the problem from reoccurring (hydraulics work good), but the cruse control stopped working. i do not care about not having anti-lock brakes, but i do value, and want the cruse control. what is your recommendation on dealing with this. no ABS error codes in computer.
Aug 31, 2020 at 11:25 AM
(Merged)
The wheel speed sensors on GM trucks generate rather wimpy signals to start with, and anything that reduces that even more will make it look to the computer like that wheel stopped turning. In response the ABS kicks in to try to get that wheel turning again. On most truck brands the ABS stops activating below 3 - 7 mph, but even when they still do, most don't reduce stopping distances like on GM vehicles. The purpose of anti-lock brakes is actually only to maintain steering control, not shorten stopping distances, but most vehicles DO stop quicker when the ABS kicks in.
I assume you have four-wheel anti-lock brakes, not rear-wheel, and it's a 1500. GM has had a common problem where rust builds up between the hub and wheel speed sensor. That pushes the sensor away from the tone ring which weakens the already weak signal. Many people think they solve the problem by replacing the speed sensor, which will work, but the better fix is to remove the two front sensors and clean the rust off the mounting surfaces on the hubs, and to clean off any rust or metal filing on the end of the sensor.
If there was an electrical problem with a sensor, typically a broken wire, that would be detected by the computer which would set a diagnostic fault code, turn the system off, and turn the yellow warning light on to tell you. That hasn't happened so we can assume electrically the sensors are okay. They just aren't generating a solid signal. Anything that generates a voltage generates a smaller voltage as the speed decreases. That's why you get the false activation only at lower speeds. As the problem gets worse, the false activation will occur at higher and higher speeds.
Aug 31, 2020 at 11:25 AM
(Merged)
Thank you very much!
Aug 31, 2020 at 11:25 AM
(Merged)
Brakes problem
2000 Chevy Silverado V8 Four Wheel Drive Automatic 200k+ miles
My 2000 Silverado has given me 200,000+ miles and I can't complain. Recently my ABS light started coming on intermitently and I get a hard vibration/chattering noise from the ABS motor area. Wheel speed sensor is good, connections are clean, nothing seems loose.
Dealer says my ABS module is "going bad" - modules either work or don't work in my experience.
Any ideas what could be causing this?
Aug 31, 2020 at 11:25 AM
(Merged)
If this only happens at low speed stops,(like in a parking lot) it is probably corrosion buildup under the front speed sensors. If it is just at random, it could be the module going out. Yes, they can have intermittent failures. You should monitor the front wheel speed data on a scan tool when the fault occurs. Look for the signal to drop out on one of the sensors.
Aug 31, 2020 at 11:25 AM
(Merged)
1st time here,hello my abs has begun acting up & it does not always happen but on dry roads just before I stop the ABS will kick in any T.S.B's out or your thoughts? thank you Gene.
Aug 31, 2020 at 12:18 PM
(Merged)

Subject:
Antilock Brake (ABS) Activation At Low Speeds (Clean Wheel Speed Sensor Mounting Surface)
Models:
2002-2006 Cadillac Escalade, Escalade EXT
2003-2006 Cadillac Escalade ESV
1999-2006 Chevrolet Silverado
2001-2006 Chevrolet Suburban, Tahoe
2002-2006 Chevrolet Avalanche
2003-2006 Chevrolet Express
1999-2006 GMC Sierra
2001-2006 GMC Yukon, Yukon Denali, Yukon XL, Yukon Denali XL
2003-2006 GMC Savana
2003-2006 HUMMER H2
Supercede:
This bulletin is being revised to provide additional warranty information. Please discard Corporate Bulletin Number 03-05-25-007B (Section 05 - Brakes).
Condition
Some customers may comment on ABS activation at low speeds, usually below 8 km/h (5 mph). Upon investigation, the technician will find no DTCs set.
Cause
The cause of this condition may be an increased air gap between the wheel speed sensor and the hub reluctor ring due to rust and debris built up on the sensor mounting surface.
Correction
Measure AC voltage and clean the wheel speed sensor mounting surfaces.
1. Raise and support the vehicle. Refer to Lifting and Jacking the Vehicle in the General Information sub-section of the Service Manual.
2. Disconnect both the front wheel speed sensor connectors at the frame and harness.
3. Place a Digital Volt Meter (DVM) across the terminals of each wheel speed sensor connector.
4. Rotate the wheel clockwise approximately one revolution per second. The minimum reading should be at least 350 ACmV's. If the reading is less than 350 ACmV's, remove the wheel speed sensor. Refer to the applicable Wheel Speed Sensor Replacement procedure in the ABS sub-section of the Service Manual.
5. Plug the wheel speed sensor bore in order to prevent debris from falling into the hub during service.
6. Clean the wheel speed sensor mounting surface using a wire brush, sand paper, emery cloth, scotch brite, or other suitable material. Be sure to thoroughly clean the wheel speed sensor surface. There should be no rust or corrosion.
7. Check the sensor head to determine if it has been warped/distorted due to the corrosion build up or other causes. Check the mounting surface on the sensor head for flatness by placing it on the edge of a metal machinists scale or other suitable straight edge to measure the flatness. Check the sensor for flatness in multiple (minimum 3) positions/directions. If the sensor head is distorted, replace the sensor.
8. Apply (spray) two thin coats of the specified rust penetrating lubricant (corrosion inhibitor) to the complete sensor mounting surface on the bearing hub. Allow to dry for 3-5 minutes between coats. Use ONLY Rust Penetrating Lubricant, P/N 89022217 (Canadian P/N 89022218).
9. When the corrosion inhibitor is dry to the touch (about 10 minutes), apply a thin layer of bearing grease to the hub surface and sensor 0-ring prior to sensor installation. Use ONLY Wheel Bearing Lubricant, P/N 01051344 (Canadian P/N 993037).
10. Install either the original sensor or a new one in the hub. Ensure that the sensor is seated flush against the hub. Refer to the applicable Wheel Speed Sensor Replacement procedure in the ABS sub-section of the Service Manual.
11. Place the DVM across the sensor terminals and recheck the voltage while rotating the wheel. The voltage should now read at least 350 ACmV's.
this was a common problem on these vehicles.
Aug 31, 2020 at 12:18 PM
(Merged)
occasionally when i apply the brakes, if feels like the anti-lock is kicking in. this is happening on dry pavement.
Aug 31, 2020 at 12:20 PM
(Merged)
If the ABS light is off, are you turning the wheel as this happens? If yes, check hub/wheel bearings for play.
Aug 31, 2020 at 12:20 PM
(Merged)
I had the same issue with my 2000 3/4 ton. The problem was that the ABS sensor, which is located at each front wheel bearing assembly (only one side caused the problem) was going "Out of range" due to corrosion. It was a simple fix (ie no money). What happened/happens is that the ABS sensor (which is a magnet in a plastic housing), the item is bolted to the wheel bearing housing, and if you live in an area that uses salt on the roads will cause corrosion. Rust will begin to form on the top of the wheel bearing (between the housing and the sensor). That little bit of rust will push the sensor up and the magnet will not read the toothed ring gear inside the wheel bearing housing. There is one bolt (8mm I think) that retains the sensor, take it off and carefully twist and pull the sensor straight up out of the housing. When it is out, put a cotton ball in the hole and use a knife or other instrument to scrape the rust off the housing (the cotton ball is to keep the rust from falling in the open hole of the wheel bearing). Once you get the big chunks of rust off, use a wire brush to clean the area real well. Put a film of grease on the outside of the sensor (that goes into the hole), take the cotton ball out and re-insert the sensor back into the hole. Affix the retaing bolt and (after you put the wheel back on) take it for a test ride. You will say..."Holy monkey-butt, that was easy and cheap". It worked for me.
Aug 31, 2020 at 12:20 PM
(Merged)
[quote:207e8a261a="merlin2021"]If the ABS light is off, are you turning the wheel as this happens? If yes, check hub/wheel bearings for play.[/quote:207e8a261a]
The light is off, and it happens when the wheels are straight.
The light is off, and it happens when the wheels are straight.
Aug 31, 2020 at 12:20 PM
(Merged)
[quote:221c336acb="Quagmire86"]I had the same issue with my 2000 3/4 ton. The problem was that the ABS sensor, which is located at each front wheel bearing assembly (only one side caused the problem) was going "Out of range" due to corrosion. It was a simple fix (ie no money). What happened/happens is that the ABS sensor (which is a magnet in a plastic housing), the item is bolted to the wheel bearing housing, and if you live in an area that uses salt on the roads will cause corrosion. Rust will begin to form on the top of the wheel bearing (between the housing and the sensor). That little bit of rust will push the sensor up and the magnet will not read the toothed ring gear inside the wheel bearing housing. There is one bolt (8mm I think) that retains the sensor, take it off and carefully twist and pull the sensor straight up out of the housing. When it is out, put a cotton ball in the hole and use a knife or other instrument to scrape the rust off the housing (the cotton ball is to keep the rust from falling in the open hole of the wheel bearing). Once you get the big chunks of rust off, use a wire brush to clean the area real well. Put a film of grease on the outside of the sensor (that goes into the hole), take the cotton ball out and re-insert the sensor back into the hole. Affix the retaing bolt and (after you put the wheel back on) take it for a test ride. You will say..."Holy monkey-butt, that was easy and cheap". It worked for me.[/quote:221c336acb]
Thanks.. I'll give that a try.
Thanks.. I'll give that a try.
Aug 31, 2020 at 12:20 PM
(Merged)
Let us know how you made out with the repair.
Aug 31, 2020 at 12:20 PM
(Merged)
[quote:3a5505b7e2="Quagmire86"]Let us know how you made out with the repair.[/quote:3a5505b7e2]
Well it did work, but now the abs light is on.... any suggestions ? It was a little harder than i expected, the dirt road I live on is hell on brakes. I had to heat the calipers to break the bolts loose.
Well it did work, but now the abs light is on.... any suggestions ? It was a little harder than i expected, the dirt road I live on is hell on brakes. I had to heat the calipers to break the bolts loose.
Aug 31, 2020 at 12:20 PM
(Merged)
Well...using a torch on calipers is not a good idea. seal may be leaking, is the red brake light on?
And if you followed the other guys advice, you may have damaged the sensor, grab an OHM meter, unplug the sensor from the harness and take a reading, I think yours should be about 2300 ohms, but I'll see if I can find the spec...
And if you followed the other guys advice, you may have damaged the sensor, grab an OHM meter, unplug the sensor from the harness and take a reading, I think yours should be about 2300 ohms, but I'll see if I can find the spec...
Aug 31, 2020 at 12:20 PM
(Merged)
Can you put it on a code reader and find out what code it is showing? It may be a short or open code on the sensor (may be the plastic housing got cracked during procedure). I feel silly asking, but you did re-connect the ABS sensor back into the wiring harness right? (Assuming you disconnected it at any time during your previous maintenance). I'm at work right now and can't give you the restistance reading on my sensor.
Oh, and I agree with merlin2021...heating a caliper is scetchy at best. In my younger days, I did that and ended up exploding the re-inforced rubber line that attaches to the caliper...yeah...my head was in the wheel well when it happened...very, very loud (ouch). :}
Oh, and I agree with merlin2021...heating a caliper is scetchy at best. In my younger days, I did that and ended up exploding the re-inforced rubber line that attaches to the caliper...yeah...my head was in the wheel well when it happened...very, very loud (ouch). :}
Aug 31, 2020 at 12:20 PM
(Merged)
Here's the scoop on whell speed sensors:
DTC C0221, DTC C0222, DTC C0223, DTC C0224, DTC C0225, DTC C0226, DTC C0227: WHEEL SPEED SENSOR CIRCUIT MALFUNCTION 1. Perform diagnostic system check. See DIAGNOSTIC SYSTEM CHECK under DIAGNOSIS & TESTING. After performing diagnostic system check, go to next step. 2. Install scan tool. Turn ignition on. Drive vehicle at speeds greater than 20 MPH. Recheck DTCs. If DTC resets, go to next step. If DTC does not reset, problem is intermittent. 3. Raise and support vehicle. Disconnect wheel speed sensor harness connector. Using a DVOM, check resistance of wheel speed sensor. If resistance is 700-2000 ohms, go to next step. If resistance is not 700-2000 ohms, go to step 8. 4. Manually spin wheel as fast as possible. Using a DVOM, measure AC voltage generated by sensor as wheel spins. If voltage reading is greater than 100 mV, go to next step. If voltage reading is not greater than 100 mV, go to step 8. 5. Check for poor connections at wheel speed sensor harness connector. Repair as necessary. After repairs, go to step 10. If connections are okay, go to next step. 6. Disconnect wheel speed sensor harness connector. Check circuit for open, short to ground, short to voltage or shorted together. Repair as necessary. After repairs, go to step 10. If circuit is okay, go to next step. 7. Check for poor connections at EBCM harness connector. Repair as necessary. After repairs, go to step 10. If connections are okay, go to step 9. 8. Replace wheel speed sensor. After replacing sensor, go to step 10. 9. Replace EBCM. After replacing EBCM, go to next step. 10. Using scan tool, clear DTCs. Operate vehicle at speeds greater than 20 MPH. Recheck DTCs. If DTC resets, go to step 3. If DTC does not reset, system is okay.
DTC C0221, DTC C0222, DTC C0223, DTC C0224, DTC C0225, DTC C0226, DTC C0227: WHEEL SPEED SENSOR CIRCUIT MALFUNCTION 1. Perform diagnostic system check. See DIAGNOSTIC SYSTEM CHECK under DIAGNOSIS & TESTING. After performing diagnostic system check, go to next step. 2. Install scan tool. Turn ignition on. Drive vehicle at speeds greater than 20 MPH. Recheck DTCs. If DTC resets, go to next step. If DTC does not reset, problem is intermittent. 3. Raise and support vehicle. Disconnect wheel speed sensor harness connector. Using a DVOM, check resistance of wheel speed sensor. If resistance is 700-2000 ohms, go to next step. If resistance is not 700-2000 ohms, go to step 8. 4. Manually spin wheel as fast as possible. Using a DVOM, measure AC voltage generated by sensor as wheel spins. If voltage reading is greater than 100 mV, go to next step. If voltage reading is not greater than 100 mV, go to step 8. 5. Check for poor connections at wheel speed sensor harness connector. Repair as necessary. After repairs, go to step 10. If connections are okay, go to next step. 6. Disconnect wheel speed sensor harness connector. Check circuit for open, short to ground, short to voltage or shorted together. Repair as necessary. After repairs, go to step 10. If circuit is okay, go to next step. 7. Check for poor connections at EBCM harness connector. Repair as necessary. After repairs, go to step 10. If connections are okay, go to step 9. 8. Replace wheel speed sensor. After replacing sensor, go to step 10. 9. Replace EBCM. After replacing EBCM, go to next step. 10. Using scan tool, clear DTCs. Operate vehicle at speeds greater than 20 MPH. Recheck DTCs. If DTC resets, go to step 3. If DTC does not reset, system is okay.
Aug 31, 2020 at 12:20 PM
(Merged)
At low speeds, the brakes grab and the ABS system kicks in - almost seeming like the brakes are failing and the truck slowly grabs to a stop. Any idea on what can cause this failure/problem? I've checked the brake pads, rotors and everything on the visual.
Thanks.
Thanks.
Feb 23, 2021 at 9:19 AM
(Merged)
You need to remove the front ABS sensors and clean the mounting surfaces with a wire brush. Re-install the sensors. If it still happens, you will have to replace the sensors.
Feb 23, 2021 at 9:19 AM
(Merged)