Troubleshooting Air Conditioner Not Working

2003 MERCEDES BENZ C230
140,000 MILES • 1.8L • 4 CYL • RWD • AUTOMATIC
Advertisement
Avatar
KEVINM01
  • MEMBER
  • 63 POSTS
Yeah, so I checked and my car and it has the factory hose clamps as you described rather than the worm clamps shown in the pic (#80). So it's a good thing you told me about that.
I'm hoping that I only have to take the top one off to get the air filter housing out. I see a bolt #140 holding the bottom air filter #100 to its gasket #110. How does that part come off...will it just slide out once bolt is out? I don't see a clamp or anything.
Aug 27, 2020 at 6:23 PM
Avatar
STRAILER
  • CERTIFIED EXPERT
  • 53,854 POSTS
Yes it will slide off and outward from the boot. Nice work getting the images. We will get this problem fixed yet!

Let me know how it goes.
Aug 27, 2020 at 6:23 PM
Advertisement
Avatar
KEVINM01
  • MEMBER
  • 63 POSTS
I'm thinking of installing a new battery in the car, ahead of the starter replacement. Do you know if it will need be reprogrammed at MB dealership after installing a new battery?


Aug 27, 2020 at 6:23 PM
Avatar
KEVINM01
  • MEMBER
  • 63 POSTS
My current battery is around 5 1/2 years old.
Aug 27, 2020 at 6:23 PM
Avatar
STRAILER
  • CERTIFIED EXPERT
  • 53,854 POSTS
No you can just install the new battery, if it is over 5 year old that is a good place to start.

Here is how to test a battery

https://youtu.be/oHTbC73FAgU

and how to replace

https://www.youtube.com/watch?v=oQrfCZy5nJg

Let me know

Aug 27, 2020 at 6:23 PM
Avatar
KEVINM01
  • MEMBER
  • 63 POSTS
I used a load tester to do a load test. Came back that the battery is good, but for some reason after charging battery to 12.6-12.7V it drops back down to 12.4. That charger I was using shows "Capacity Low" even at 12.6V
Aug 27, 2020 at 6:23 PM
Avatar
KEVINM01
  • MEMBER
  • 63 POSTS
I mean drops back to 12.4 in like a 1-2 minutes. And stays there. Confused about the results.
Aug 27, 2020 at 6:23 PM
Avatar
STRAILER
  • CERTIFIED EXPERT
  • 53,854 POSTS
Can you start a new post for the starter problem so we can get other experts on this?
Aug 27, 2020 at 6:23 PM
Avatar
KEVINM01
  • MEMBER
  • 63 POSTS
Oh ok, I thought you might want to be interested in what happens as the troubleshooting progresses
Aug 27, 2020 at 6:23 PM
Avatar
STRAILER
  • CERTIFIED EXPERT
  • 53,854 POSTS
Hey Kevin,

I just wanted to have two separate subjects since its two different problems, I should have said something earlier. But no biggy, lets continue, turn the headlights on and see if they stay bright for more then 30 mins, if not the battery is junk
Aug 27, 2020 at 6:23 PM
Avatar
KEVINM01
  • MEMBER
  • 63 POSTS
Took the battery to a shop and they did a professional test, battery is good. So plan now was just to take out the starter, and take it to a shop for them to test it. If it's bad, I'll install the new unit. Or should I test something else first?
Aug 27, 2020 at 6:23 PM
Avatar
STRAILER
  • CERTIFIED EXPERT
  • 53,854 POSTS
Yep the starters go out in those cars about this mileage here is a replacement for you.

http://www.amazon.com/Bosch-SR0824X-Remanufactured-Starter/dp/B009J5E9MW/ref=sr_1_11?ie=UTF8&qid=1464383091&sr=8-11&keywords=2003+mercedes+benz+c230+starter

Let me know how it goes
Aug 27, 2020 at 6:23 PM
Avatar
KEVINM01
  • MEMBER
  • 63 POSTS
Alright, so here's whats happened since my last update on the starting problem:

After some seriously painstaking work managed to get the starter out. I took it to my local autoparts store for a professional bench test. The test confirmed that the starter was fried--the starter would not even turn (so maybe problem in the starter solenoid).

So I already had a new unit on hand, and again, after some serious labor, managed to get the new starter unit in. Once that happened, car starter right up! It's like it never had a problem!

So I gotta give you credit, you were spot on on this one!
Aug 27, 2020 at 6:23 PM
Avatar
KEVINM01
  • MEMBER
  • 63 POSTS
I was worried my steering would be off balance, but I had locked the steering wheel and tied it down with the seat belt, prior to removing the coupler. I drove around on the interstate for about an hour, and the steering seems

There are a couple of difficult parts on the starter removal/reinstallation:

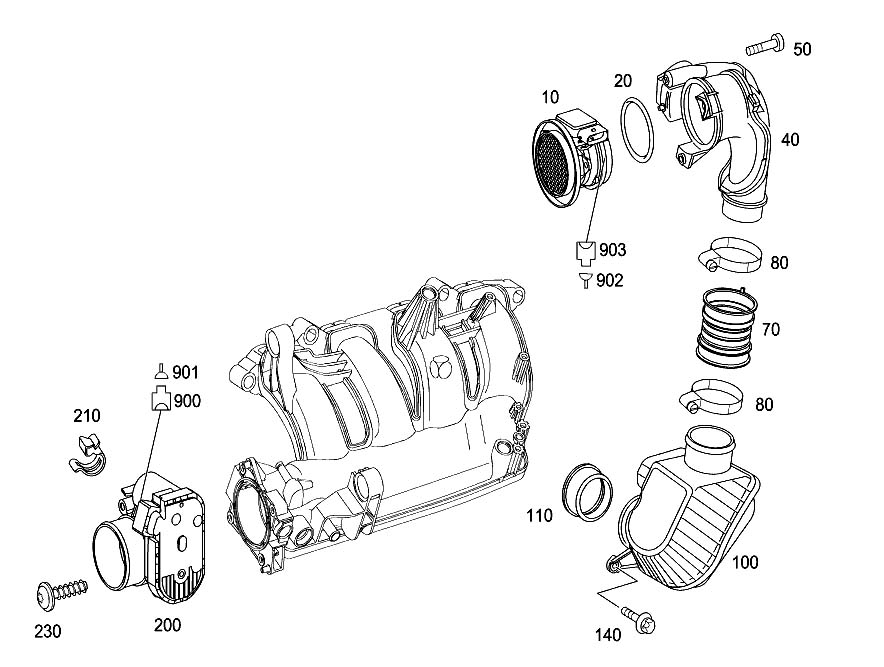
1) getting the lower bolt on the intake muffler (the belly of the muffler is in the way) I had to use a 1/4" extension to access it, but it took a long time to get it off.

2)getting the main power supply off the solenoid. it has a protector on it. i had to cut it off, before being able to get the clips off to remove it. but you can't fit a socket/wrench on the nut without getting that protector off. you'd probably have to remove the supercharger to get it off intact. the power supply cord sits towards the passenger side on the other side of the solenoid, so you can't see it when you are taking it out or putting it back in. I unbolted the starter first, before taking off the lead, because I couldn't see it.

3) repositioning the power supply to the solenoid back when putting back the starter, and getting it to fit into its position. hooking the power supply back up to the solenoid is difficult, because it's a tight space. I had to simultaneously put the lead on as I positioned the starter, because otherwise you wouldn't get it on there and get the wire in the right place. and if it's in the wrong place, then the intake muffler doesn't fit back in.

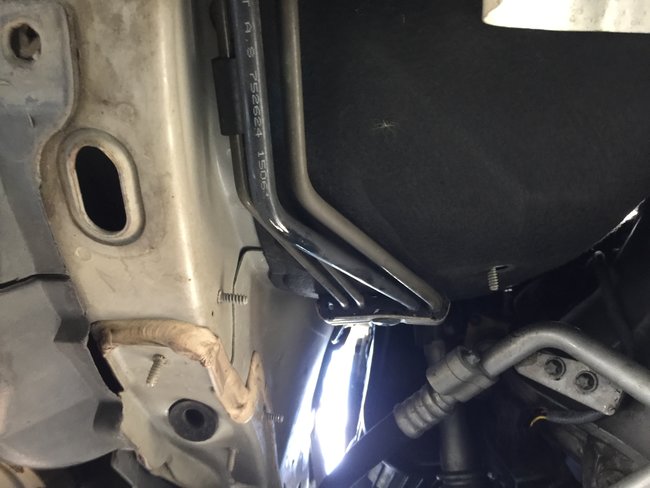
4)removing the steering coupler, very tight space, and you need two wrenches socket, cause there's a bolt on one side and a nut on the other side.

5)dealing with the factory hose clips. there's a learning curve for using the tool to get the clips to do what you want them to.
Aug 27, 2020 at 6:23 PM
Avatar
KEVINM01
  • MEMBER
  • 63 POSTS
You can see the unusual shape of the main power supply to the solenoid. If installed incorrectly, then the cable is in the way of the starter or intake muffler. It's tough getting it back on. It's even harder if you put the protective plastic back on the elbow of that cable.
Aug 27, 2020 at 6:23 PM
Avatar
STRAILER
  • CERTIFIED EXPERT
  • 53,854 POSTS
Have you tried installing the battery cable before bolting the starter up?
Aug 27, 2020 at 6:23 PM
Avatar
KEVINM01
  • MEMBER
  • 63 POSTS
Yeah I already got it all in place on Saturday, I was just explaining the difficulty. The cable is not long enough to put it on all the way first, it required placing the cable as I was placing the starter back at the same time. But once you are up there, you can't see what you are doing with your hands. And then the cable head, which is shaped like a bent letter 'D' is also difficult to deal with, because it kept trying to sit on the flat side.
Aug 27, 2020 at 6:23 PM
Avatar
KEVINM01
  • MEMBER
  • 63 POSTS
So on my AC issue, my scan tool showed today that my refrigerant pressure has dropped down from 6-7 bars to 1 bar. Tried looking with my UV light to spot the dye (we previously put dye), couldn't spot anything. Any ideas?
Aug 27, 2020 at 6:23 PM
Avatar
MHPAUTOS
  • CERTIFIED EXPERT
  • 31,937 POSTS
There may be a leak in the evaporator so you may not see any dye, do you have access to an electronic sniffer? you can probe down the vents to see if it will detect refrigerant there.
Aug 27, 2020 at 6:23 PM
Avatar
KEVINM01
  • MEMBER
  • 63 POSTS
no, i dont have one. i'll have to pick one up. i'll let you know what i find.
Aug 27, 2020 at 6:23 PM
Avatar
KEVINM01
  • MEMBER
  • 63 POSTS
Ok, so I got a new manifold gauge set, and took the pressures. The Low Side was like 10 psi and the high side was 0 psi. So I added some freeon after which the compressor actually turned on, and then the Low Side pressure got up to around 70 psi while the High Side was somewhere around 60 psi. I estimate that I added around 20-22 oz of freeon. So there should be in the system, whatever was in there initially, plus that 20-22 oz.

I was afraid to add too much at the risk of overcharging. The highest pressure I recorded was 80 psi at the Low Side, and lower than that at the High Side.

What do you think is going on with these pressures?
Aug 27, 2020 at 6:23 PM
Avatar
STRAILER
  • CERTIFIED EXPERT
  • 53,854 POSTS
It sounds like the compressor is no good buddy, if it was working you would see more of a difference in the pressure readings,

Here is a video showing the repair, I did it myself so I can tell you it will take a bit but if you stick to it you can make it happen.


https://youtu.be/_pBoAA87gHI

Let me know how it goes

Best, Ken
Aug 27, 2020 at 6:23 PM
Avatar
KEVINM01
  • MEMBER
  • 63 POSTS
Ok, but what about this leak? I got the sniffer thing from my local parts store, but the sniffer was too big to get inside the vents. I feel like I would have to remove the vents to actually get it near the evaporator. But AT the vents themselves, it wasn't reading anything even at the highest sensitivity.

The sniffer did go off in front of the condenser, though. I put it at different parts of the condenser and it seemed to go off each time. Is that normal? Also, when I put the sniffer probe to the compressor, it didn't go off. It also didn't go off at the hoses.

The part that I can't get to, is the evaporator. So I don't know its condition--all I know is the temperature tends to be 40-50C (100-120F) as per the scan tool.

So what do you think? Don't I need to find the leak before replacing the compressor...or what's the recommended approach?


Aug 27, 2020 at 6:23 PM
Avatar
STRAILER
  • CERTIFIED EXPERT
  • 53,854 POSTS
I would check in the evaporator drain tube to check the evaporator leak, but what concerns me is the pressure problem.
Aug 27, 2020 at 6:23 PM
Avatar
KEVINM01
  • MEMBER
  • 63 POSTS
Can you point out the tube to check? http://www.mbpartsworld.com/showAssembly.aspx?ukey_product=7631671&ukey_assembly=1083530

Aug 27, 2020 at 6:23 PM
Avatar
MHPAUTOS
  • CERTIFIED EXPERT
  • 31,937 POSTS
Can't see it on that pic, but there will be a small drain tube to allow condensed water that forms on the evaporator to drain away, there will be a small tube through the floor or the lower part of the fire wall at or near the evaporator housing.
Aug 27, 2020 at 6:23 PM
Avatar
KEVINM01
  • MEMBER
  • 63 POSTS
Ok, I really hadn't the slightest clue what you were telling me to look for. Are you talking about #432 in the picture?

If so, how do I access that?
Aug 27, 2020 at 6:23 PM
Avatar
STRAILER
  • CERTIFIED EXPERT
  • 53,854 POSTS
it is part 432, install the leak detector in there
Aug 27, 2020 at 6:23 PM
Avatar
KEVINM01
  • MEMBER
  • 63 POSTS
I couldn't find it
Aug 27, 2020 at 6:23 PM
Avatar
MHPAUTOS
  • CERTIFIED EXPERT
  • 31,937 POSTS
You will have to locate the outlet under the car, the pic will give you an indication to it's location you will probably only see a rubber grommet with a small rubber hose protruding only about 2-3 mm
Aug 27, 2020 at 6:23 PM
Avatar
KEVINM01
  • MEMBER
  • 63 POSTS
I mean you've seen a C230 and you see the diagram...where specifically do you think it comes out? I've looked under the vehicle, I don't see anything.

In my opinion, it either comes out on top of the transmission directly. Or it drains onto something else, which drains out of the car.

There's no visible opening that I can see under the vehicle that is THAT hose. But I'd be interested to hear where you think it is.
Aug 27, 2020 at 6:23 PM
Avatar
KEVINM01
  • MEMBER
  • 63 POSTS
Do you know what this oval opening is? I saw that. But that was the only thing I saw.
There's a hose that drains outside of the windshield to the bottom of the car. I also saw that one.

But no visible evaporator drain hose.
Aug 27, 2020 at 6:23 PM
Avatar
MHPAUTOS
  • CERTIFIED EXPERT
  • 31,937 POSTS
Have not seen one first hand but all cars with A/c must have a drain tube for the condenser, most are quite evident when looking under a car, if you can't locate it, may be drop into your local dealer and they can point it out to you.
Aug 27, 2020 at 6:23 PM
Avatar
KEVINM01
  • MEMBER
  • 63 POSTS
Alright, I'm just gonna replace the compressor to see if we can get the refrigerant to actually circulate.
So I'm gonna go ahead and replace the condenser as well, since it's full of debris and since its recommended maintenance with the compressor replacement.

So I know manufacturer calls for 1 oz oil with drier replacement, and 4 oz of oil with the new compressor unit. But after I put in the new parts, and evacuate, won't I pull that oil out of the system?

Also what do you think about getting an AC flush before replacing the parts? Is that necessary?

Aug 27, 2020 at 6:24 PM
Avatar
MHPAUTOS
  • CERTIFIED EXPERT
  • 31,937 POSTS
If there is debris in the condenser it will be right through the system, the evaporator will be effected and there will be debris in the lines, i have not seen many success stories with flushing, i am wondering if you will be chasing a dream here, you could be spending a lot of money for no result, there is no guarantee that all the debris will be removed and you only need a tiny piece of flake debris to clog the TX valve any debris in the system can spell disaster again.
Aug 27, 2020 at 6:24 PM
Avatar
KEVINM01
  • MEMBER
  • 63 POSTS
I've not actually removed the condenser or any part of the AC system. So I don't know what is actually running through it internally. I mean debris externally.

You said a bunch of stuff together, so I just want to clarify, do you mean that A/C flushes in general are not successful?

Also, on my other question....if you take car to a shop and have the refrigerant evacuated......and then install new parts of the AC system such as the compressor and AC dessicant and add oil.....but then you hook up a 3 CFM pump and evacuate the air and moisture out of the system again...won't the oil that you put in get sucked out or not?
Aug 27, 2020 at 6:24 PM
Avatar
MHPAUTOS
  • CERTIFIED EXPERT
  • 31,937 POSTS
Modern A/C evacuation systems, measure the oil removed and you can replace it when re charging, i thought that you may have been concerned with internal debris from a A/C comp failure, this type of failure is fairly catastrophic for the remainder of the A/C system and often a flush will not do enough to remove all debris from the remainder of the system.
Aug 27, 2020 at 6:24 PM
Avatar
KEVINM01
  • MEMBER
  • 63 POSTS
So what solution are you proposing? In your video, you guys just replaced the A/C compressor. I didn't see you replacing other components.
Aug 27, 2020 at 6:24 PM
Avatar
KEVINM01
  • MEMBER
  • 63 POSTS
I was only going to do the initial evac in a shop, prior to replacing any parts. Then I was going to replace parts. And do an evac with my own 3 CFM pump and manifold gauges at home to get moisture and air out of the system, before refilling with refrigerant. My question is...doesn't that remove oil from the system?
Aug 27, 2020 at 6:24 PM
Avatar
KEVINM01
  • MEMBER
  • 63 POSTS
BTW...the comp hasn't seized completely. I know when it is seized on the Denso unit, the cap should fall off. That hasn't happened yet. Also, when hooked up to diagnostics, it shows that the compressor comes ON, just at a low efficiency. And of course, the manifold pressure gauges are showing equal Low Side/High Side pressures.
Aug 27, 2020 at 6:24 PM