Apr 14, 2020 at 8:04 PM
Rack and pinion removal
1991 HONDA ACCORD
Advertisement
Haha noted, will do; planning to buy tube nuts and a bending tool tomorrow; yes, I agree. I was just about to finish up the job and was tightening the lines with a flared handheld wrench, when that happened I was shocked. I’ve contacted them but waiting on response. thank you, this has turned into quite the project.

It has been quite a project. I honestly feel really bad you have to do it again. When the supplier finally contacts you, let him know the part was faulty and it never should have happened. You may want to indicate that you have this type of work in the past and never had an issue. Let them know that you planned to use them as a supplier when parts are needed again in the future, but are concerned of product quality.
Between you and me, it never should have broken. You did nothing wrong. Now if you told me you had a 24" breaker bar on it with an additional 4' pipe for leverage, then I would say it's your fault. LOL But that's not the case.
Please feel free to let me know if I can help you in any way.
Take care,
Joe
Apr 14, 2020 at 8:27 PM
Advertisement
Yes, I agree, 1 in 1,000,000 odds. Thank you, I was able to get this rack out in about 10 minutes and think I can get the new one in (after lines are set up) in about 30 minutes or so. Even though this was annoying I definitely learned the tricks to doing this job and thank you for your tips as well.
Apr 14, 2020 at 8:37 PM
You are very welcome. Interesting how much easier things get the second time. You take care and when you get the new rack, let me know.
By the way, a 10 minute removal is really impressive. I would hire you in a minute!!!
Take care and when it comes, let me know.
Joe
By the way, a 10 minute removal is really impressive. I would hire you in a minute!!!
Take care and when it comes, let me know.
Joe
Apr 14, 2020 at 8:43 PM
Purchased a rack from a local spot and sent other one into where I ordered it. new rack is mounted and new lines have been installed. only thing left would be to connect wheel to shaft, install lines, and wrap it up. bought a torque wrench for when I tighten lines.
Apr 18, 2020 at 12:56 PM
Ended up getting "new" lines from another car at a junk yard.
Apr 18, 2020 at 1:20 PM
Actually, I'm glad to hear you replaced the lines. It sounds like you are almost finished. I'm sure it went faster the second time, but I'm sure it was frustrating you had to do it again.
Did the supplier of the first rack that broke give you any trouble?
Joe
Did the supplier of the first rack that broke give you any trouble?
Joe
Apr 18, 2020 at 7:54 PM
Thank you. luckily the ones I had to replace weren’t too bad to do; got them from the junkyard for $3.00 a piece. Yes, I got rack in fairly quick and believe I have it centered. I got a torque wrench for when I install lines. I was reading that for the torque wrench I have to make sure the wrench is at a 90 degree angle when torquing the lines, is that correct?
Apr 18, 2020 at 8:57 PM
What type of torque wrench did you get? Is it something that can go over the steel lines and onto the nut? If possible, could you take a pic of it and upload it so I can see what you are working with?
Here are what I have. Nothing as far as 90°.
6. Connect the four lines to the valve body unit, using flare nut wrenches.
A: From pump: 14mm wrench 38 N-m, 3.8 kg-m, 28 lb-ft
B: To oil cooler: 12mm wrench 13 Nm, 1.3 kg-m, 9 lb-ft
C: To reservoir: 17mm wrench 29 Nm, 2.9 kg-m, 21 lb-ft
D: To power steering speed sensor: 12mm wrench 13 Nm 1.3 kg-m, 9 lb-ft
Let me know.
Joe
Image (Click to enlarge)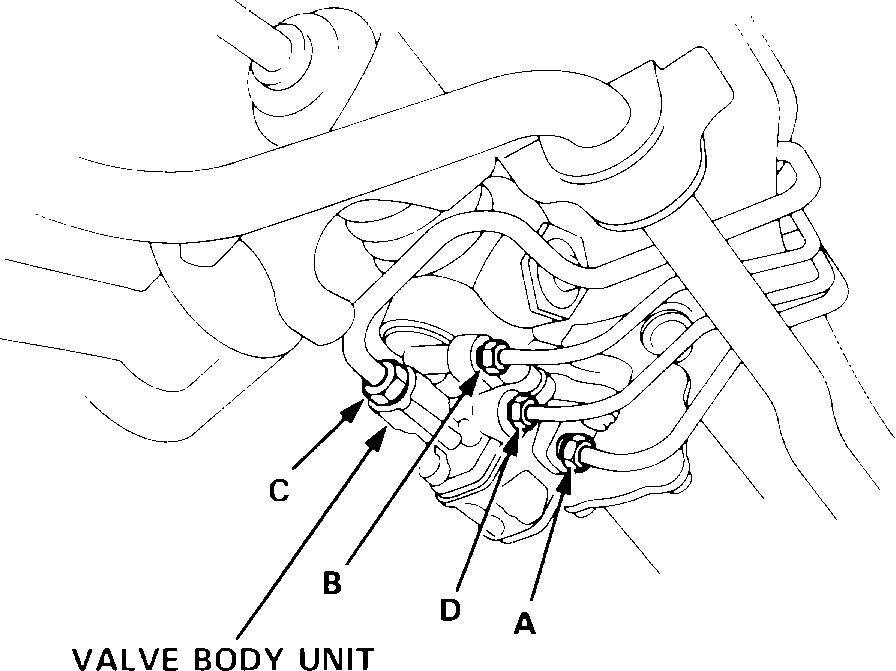

Apr 18, 2020 at 10:13 PM
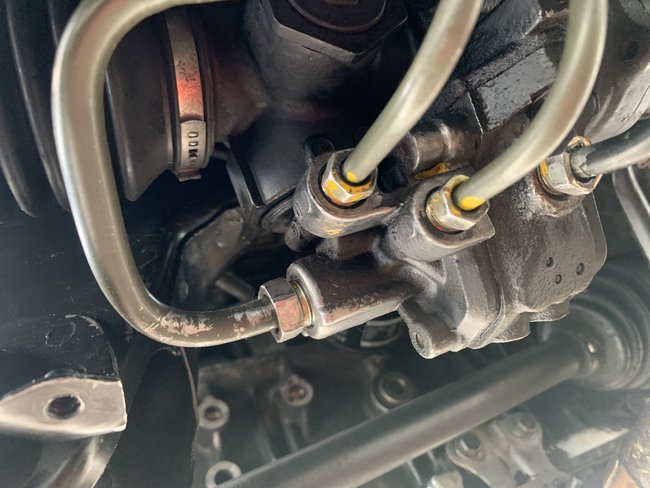
Here is the torque wrench and set of flare that I am using; I got the lines hooked up for the most part but don’t want to force anything; tried to get torque wrench onto the lines and flare nut but very difficult to get onto the flare but itself. Any tips? I don’t want to over-tighten.
Image (Click to enlarge)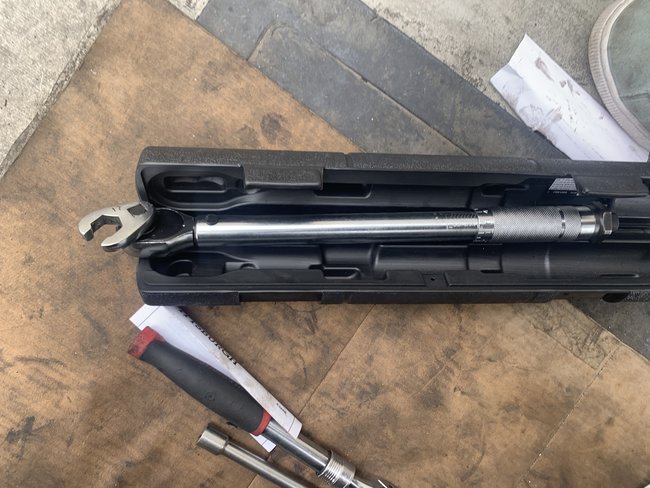

Apr 19, 2020 at 12:27 PM
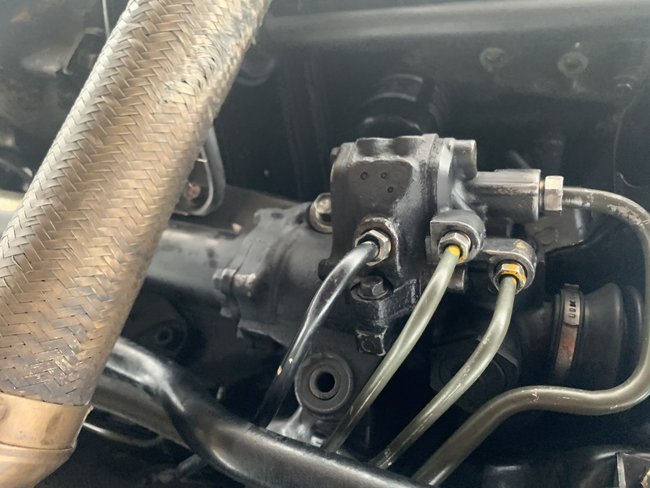
The lines currently.
Image (Click to enlarge)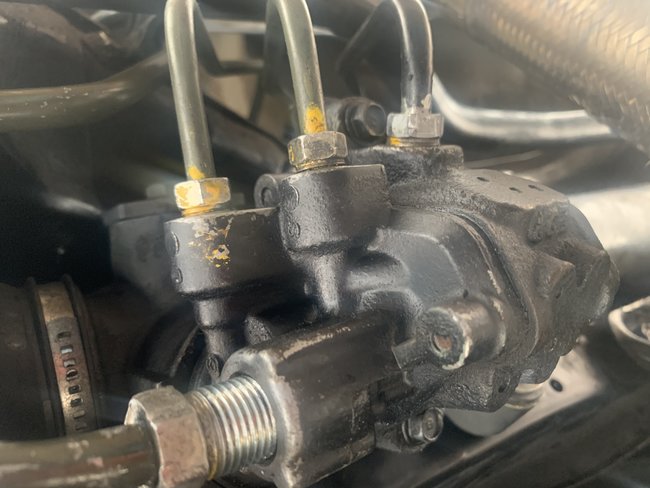

Apr 19, 2020 at 12:27 PM
Waiting until tomorrow to get the 17 mm line installed, for some reason it was giving me some trouble as it didn't line up directly with hole where it threads into like the other lines, kind of have to pull on it a bit and hold it straight to start threading the flare nut. Any tips? I don't want to mess up anything.
Video (Click to enlarge)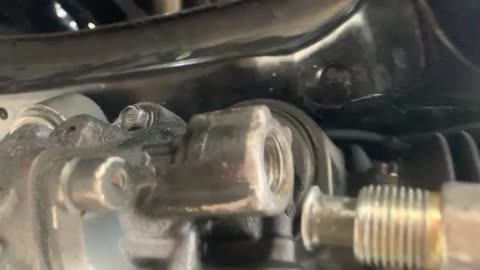
Apr 19, 2020 at 2:13 PM
Hi,
That looks great so far. As far as the one you are having trouble with, what I do is this. Take the fitting and push it so the pipe (flare) is touching and none of the steel pipe is pushed through. Then try to start the threads. When the pipe goes in first and you try to then start the fitting, it is real easy not to be straight.
I did watch the video and it is slightly on an angle. Try what I said above while you try to angle the threaded fitting so it's straight. You'll get it.
Joe
Apr 19, 2020 at 7:32 PM
Awesome, thank you for all your help and tips. I will definitely try what you said tomorrow and believe that should do the trick.
Apr 19, 2020 at 7:47 PM
You are very welcome. Let me know what everything is together and make sure you bleed the system before starting the engine. Simply, fill the power steering reservoir, have the front wheels off the ground, and turn the steering from lock to lock several times. Check the fluid level and refill and do it until the level stops dropping in the reservoir. Once that happens, start it and see how it works.
Take care,
Joe
Take care,
Joe
Apr 19, 2020 at 8:00 PM
I believe I have gotten the line to thread in and have been able to turn it with the flare nut wrench, but it does take a bit of force to turn it. can you please confirm I am doing this correct? everything appears fine but I want to double check before continuing.
Video (Click to enlarge)
Apr 20, 2020 at 11:33 AM
In the video there is a little bracket with rubber that holds this 17 mm line, should I remove it? Because I believe it is putting pressure on the line in one direction. in the video before this last one, you can see the line is angled a bit down and I believe it is due to that little bracket.
Apr 20, 2020 at 12:02 PM
Got the line in more and I made sure to release the pressure on the bracket then once it was in, I tightened the bracket; working on getting tie rods on but need new fitting for zerk.
Image (Click to enlarge)
Apr 20, 2020 at 1:44 PM
I believe the lines are good to go. Tightened them and made sure there was no pressure against them, installed the outer tie rods, then filled the system, turned from side to side, ran the car and continued the turning from lock to lock. Checked the lines at the time, no leaks. Let the car sit, went back to check, no leaks again, lines are dry as a bone which is awesome and looked at the reservoir and fluid is clear, no bubbles.
Image (Click to enlarge)
Apr 20, 2020 at 6:38 PM
Excellent job!!! I wish I had people that worked as neatly as you. Everything looks great. Is everything back together and working properly now?
Joe
Joe
Apr 20, 2020 at 8:48 PM
Thank you, couldn’t have done it without your help. Going to also do an oil change on Friday along with replacing the rear upper control arms. The only things left to do would be to install that exhaust hanger bracket, the cover for the lines, the steering joint cover, and I need to get a cotter pin on the right tie rod. I torqued the castle nut to spec but the nut is blocking the hole. What would I do in this case? Tighten more or?
Apr 20, 2020 at 9:08 PM
Just tighten it a slight bit more until you can insert the cotter pin. It is important that pin is installed.
Joe
Joe
Apr 20, 2020 at 9:54 PM
Tie rods are done and lines continue to remain dry which is awesome. Going to get new set of tires Friday and installing new battery tomorrow. I was going to change the oil today but realized some oil on the oil pan again and it appears the oil pan gasket needs to be replaced but I want to replace the whole pan itself. Do you happen to have any diagrams and steps for removing and replacing the oil pan? Also unsure what type of sealant I should buy and which areas to apply it on the new pan and gasket.
Apr 22, 2020 at 7:35 PM
Hi,
Glad to hear about the rack. As far as the oil pan, yes. However, and I hate to ask, I need you to start a new link. We are trying to keep each thread specific to one topic. I hope you understand. I will watch for it and hopefully I will get it to help you.
Take care,
Joe
Glad to hear about the rack. As far as the oil pan, yes. However, and I hate to ask, I need you to start a new link. We are trying to keep each thread specific to one topic. I hope you understand. I will watch for it and hopefully I will get it to help you.
Take care,
Joe
Apr 22, 2020 at 8:34 PM
Not a problem, I totally understand; thank you once again for all your assistance through this job. :)
Apr 22, 2020 at 8:49 PM
You are very welcome, and good job!!
Joe
Joe
Apr 23, 2020 at 5:40 PM
Thank you. I put the wheels on and got the car of stands however I notice that if I turn the wheel a bit to the right then the wheels are perfectly straight. In this case would I disconnect the shaft from the wheel and turn the rack a bit to get it straight and then reconnect shaft to joint?
Apr 23, 2020 at 6:03 PM
Hi,
You can certainly give that a try. Otherwise, it can be done by having it aligned. The steering wheel center is off and that can be taken up by adjusting the tie rods. (if that makes sense). LOL
Joe
You can certainly give that a try. Otherwise, it can be done by having it aligned. The steering wheel center is off and that can be taken up by adjusting the tie rods. (if that makes sense). LOL
Joe
Apr 23, 2020 at 6:38 PM
Awesome, thank you; I will wait for alignment shop to do it :)
Apr 23, 2020 at 6:59 PM
You are very welcome. Take good care of yourself.
Joe
Joe
Apr 23, 2020 at 7:37 PM