REMOVAL AND INSTALLATION
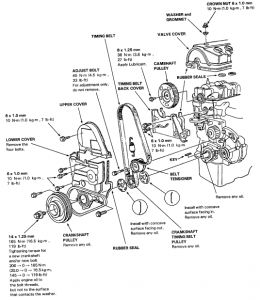
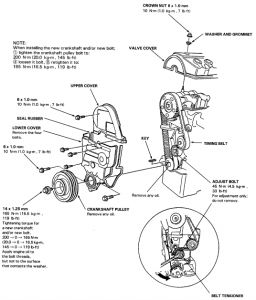
Timing Belt Illustrated Index
NOTE:
*Before removing, mark direction of rotation.
*Refer procedure for positioning crank and pulley before installing timing belt.
*When installing the new crankshaft and/or new bolt, tighten the crankshaft pulley bolt to: 200 Nm (20.0 kg-m, 145 lb-ft), loosen it, then retighten to: 165 Nm (16.5 kg-m, 119 lb-ft)

Positioning Crankshaft Before Installing Timing Belt
NOTE:
*To set the crankshaft to TDC, install the timing belt guide plates, timing belt drive pulley, timing belt lower cover, crankshaft pulley, and crankshaft pulley bolt.
*Install the timing belt with the No. 1 piston at TDC (Top Dead Center) on the compression stroke
*If pulley bolt broke loose while turning crank, retorque it to: 165 Nm (16.5 kg-m, 119 lb-ft)
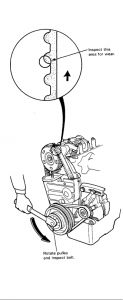
Timing Belt Inspection
NOTE:
*Replace belt if oil soaked.
*Remove any oil or solvent that gets on the belt.
*If pulley bolt broke loose while turning crank, retorque it to: 165 Nm (16.5 kg-m, 119 lb-ft)
Replacement
NOTE: Inspect the water pump after removing the timing belt
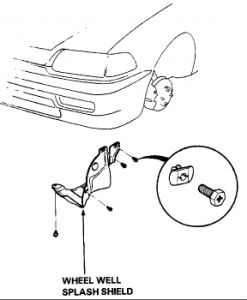
1.Remove the wheel well splash shield.
2.Remove the power steering pump (standard for some types).
3.Remove the A/C compressor adjust pulley with bracket and the belt (standard for some types).
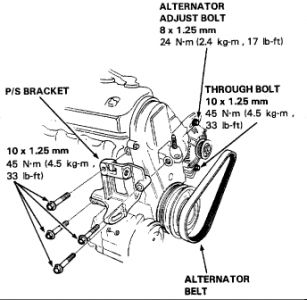
4.Remove the power steering bracket.
5.Loosen the alternator adjust bolt and through bolt, then remove the belt.
6.After installation, adjust the tension of each belt.
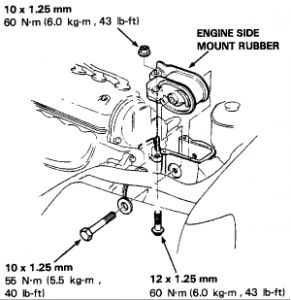
7.Remove the engine support bolts and nut, then remove the side mount rubber.
8.Remove the valve cover.
9.Remove the special bolt, then remove crankshaft pulley.
NOTE: When installing the new crankshaft and/or new bolt; tighten the crankshaft pulley bolt to: 200 Nm (20.0 kg-m, 145 lb-ft), loosen it, then retighten to: 165 Nm (16.5 kg-m, 119 lb-ft)
10.Remove the timing belt upper cover and the lower cover.
11.Loosen the adjust bolt, then remove the timing belt.
12.Install in the reverse order of removal; adjust the valve timing.
13.Carry out timing belt tension adjustment.
Tension Adjustment
CAUTION: Always adjust timing belt tension with the engine cold.
NOTE:
*Inspect the timing belt before belt tension adjusting.
*Tensioner is spring-loaded to apply proper tension to the belt automatically after making the following adjustment:
1.Set the No.1 piston at TDC.
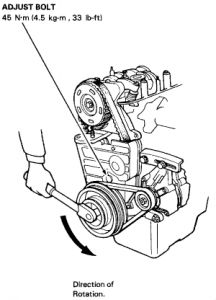
2.Loosen, but do not remove the adjust bolt.
3.Rotate crankshaft counterclockwise 3-teeth on camshaft pulley to create tension on timing belt.
4.Tighten adjust bolt.
5.If pulley bolt broke loose while turning crank, retorque it to: 165 Nm (16.5 kg-m, 119 lb-ft)
NOTE: Put transmission in gear and set parking brake before retorquing pulley bolt.
https://www.2carpros.com/kpages/auto_repair_manuals_alldata.htm
Jan 5, 2020 at 5:48 PM
(Merged)