Cranks but will not start

1998 LEXUS GS 300
200,000 MILES • V6 • 2WD • AUTOMATIC
Avatar
CHRISTA DICKSON
  • MEMBER
  • 148 POSTS
Okay about three weeks ago now I was driving along and the car acted like it ran out of gas while approaching a stop sign. Since then all I have been able to do is crank the car repeatedly. I have gotten it to start for a second or two but it bothers right out and shuts off immediately it will not turn over and run. It has got a new battery filled it up with gas actually pulled the fuel pump out of the fuel tank verified it works seems like it is getting fuel pressure because when I pulled the hose off it was pressurized from the fuel pump. I have also taken an inline spark tester and tested all six cylinders for spark which was not easy because it is an inline six how to take off the throttle body, but I did it and all six cylinders are getting spark. I have also replace the crankshaft position sensor and the mass airflow sensor because a couple weeks ago it was pulling a code for the mass airflow sensor the guy at AutoZone said to clean it. So I did with mass air flow sensor cleaner reset it in the code never came back. When this happened the check engine light was not on so it is not pulling any codes to my knowledge. Today I did buy another mass air flow sensor and put it on hoping that maybe that would fix the issue, but it did not help. What to check next would be greatly appreciated.
Nov 3, 2018 at 6:14 PM
Advertisement
Avatar
JACOBANDNICKOLAS
  • CERTIFIED EXPERT
  • 110,175 POSTS
Hi and welcome to 2CarPros.com.

If you have spark, either there is a timing issue, low compression, or the fuel pressure too low. Based on how it happened and how you described it, my first suspect is fuel pressure. Even if there appeared to be pressure, it may be too low.

Here is a link that discusses common causes of a crank and no start condition:

https://www.2carpros.com/articles/car-cranks-but-wont-start

A quick way to determine if it is fuel related, see if it will start for a couple seconds with starting fluid. If it does, the problem of fuel related.

Here are general directions for testing fuel pressure:

https://www.2carpros.com/articles/how-to-check-fuel-system-pressure-and-regulator

Here are the directions specific to your vehicle for testing pressure. All attached pictures correlate with these directions. Also, fuel pressure specifications are included on the directions.

FUEL PRESSURE TEST
INSPECTION

CHECK FUEL PRESSURE
(a)Check the battery positive voltage is above 12 V.
(b)Disconnect the negative (-) terminal cable from the battery.

(c)Remove the union bolt and 2 gaskets, and disconnect the fuel inlet hose from the fuel pipe support.

NOTICE:
- Put a shop towel under the fuel pipe support.
- Slowly loosen the union bolt.

(d)Install the fuel inlet hose and SST (pressure gauge) to the fuel pipe support with the 3 gaskets and SST (union and adapter).
SST 09268-45014 (092684119O, 90405-06167)

Torque: 29 N.m (300 kgf.cm, 21 ft.lbf)

(e)Wipe off any splattered gasoline.
(f)Connect a LEXUS hand-held tester to the DLC3.
(g)Measure the fuel pressure.

Fuel pressure:
301-347 kPa (3.1-3.5 kgf/sq. cm, 44-50 psi)

If pressure is high, replace the fuel pressure regulator. If pressure is low, check these parts:
- Fuel hoses and connections
- Fuel pump
- Fuel filter
- Fuel pressure regulator
(h)Disconnect the LEXUS hand-held tester from the DLC3.
(i)Start the engine.
(j)Measure the fuel pressure at idle.

Fuel pressure:
301-347 kPa (3.1-3.5 kgf/sq. cm 44-50 psi)

(k)Stop the engine.
(l)Check that the fuel pressure remains as specified for 5 minutes after the engine has stopped.

Fuel pressure: 147 kPa (1.5 kgf/sq. cm, 21 psi) or more

If pressure is not as specified, check the fuel pump, pressure regulator and/or injectors.
(m)After checking fuel pressure, disconnect the negative (-) terminal cable from the battery and carefully remove SST to prevent gasoline from splashing.
SST 09268-45014
(n)Reconnect the fuel inlet hose to the fuel pipe support with 2 new gaskets and the union bolt.

Torque: 29 N.m (300 kgf.cm, 21 ft.lbf)

(o)Reconnect the negative (-) terminal cable to the battery.
(p)Check for fuel leaks.

_________________________________

Let me know if this helps or if you have other questions.

Take care,
Joe
Nov 3, 2018 at 8:06 PM
Avatar
CHRISTA DICKSON
  • MEMBER
  • 148 POSTS
I am having a hard time finding the union bolt. Can you please explain the location and what is around it? Please
Nov 4, 2018 at 8:34 PM
Advertisement
Avatar
JACOBANDNICKOLAS
  • CERTIFIED EXPERT
  • 110,175 POSTS
See picture 2 it shows the union. It is on the top of the engine near fuel rail.
Nov 5, 2018 at 5:21 PM
Avatar
CHRISTA DICKSON
  • MEMBER
  • 148 POSTS
Okay, I am sorry I thought I found it underneath the car and a friend told me I was wrong and to hook up the gauge underneath the fuel pressure regulator is that correct? It is off the fuel rail on the top, so I am unclear on which is right. Please let me know ASAP as I have already rented the gauge. Thanks
Nov 6, 2018 at 7:55 PM
Avatar
JACOBANDNICKOLAS
  • CERTIFIED EXPERT
  • 110,175 POSTS
Hi again. It should be on the top.
Nov 7, 2018 at 4:03 PM
Avatar
CHRISTA DICKSON
  • MEMBER
  • 148 POSTS
If you could possiable circle it in a photo or tell me what is around it so i can locate it correctly differnt sources keep telling me differnt things its even more confusing help would greatly be appriciated
Nov 8, 2018 at 2:00 PM
Avatar
JACOBANDNICKOLAS
  • CERTIFIED EXPERT
  • 110,175 POSTS
I believe I can see it in your sixth picture. It is blurry, but it appears to be on the left side. First, remove the plastic cover on top the engine. Then you will see the injector rail and the injectors. At the end of the fuel rail is where the union is located. I found a better picture. See if it helps.
Nov 8, 2018 at 7:23 PM
Avatar
CHRISTA DICKSON
  • MEMBER
  • 148 POSTS
Okay, I am pretty sure your talking about underneath the damper, correct? I hooked it up there and got no reading at all . Just trying to verify I did it correctly. I know the fuel pump did work when I pulled it out and hooked up to battery. Any suggestions on where to go from here?
Nov 10, 2018 at 8:22 AM
Avatar
JACOBANDNICKOLAS
  • CERTIFIED EXPERT
  • 110,175 POSTS
It sounds like you did it right. If the pump did not run when you hooked it up directly to a battery, it is bad and needs replaced.

Here are the directions for removing and replacing the pump. You are lucky it has an access port. On most vehicles, the tank needs removed. All attached pictures correlate with these directions.
________________________________

REMOVAL AND INSTALLATION
REMOVAL

CAUTION: Do not smoke or work near an open frame when working the fuel pump.

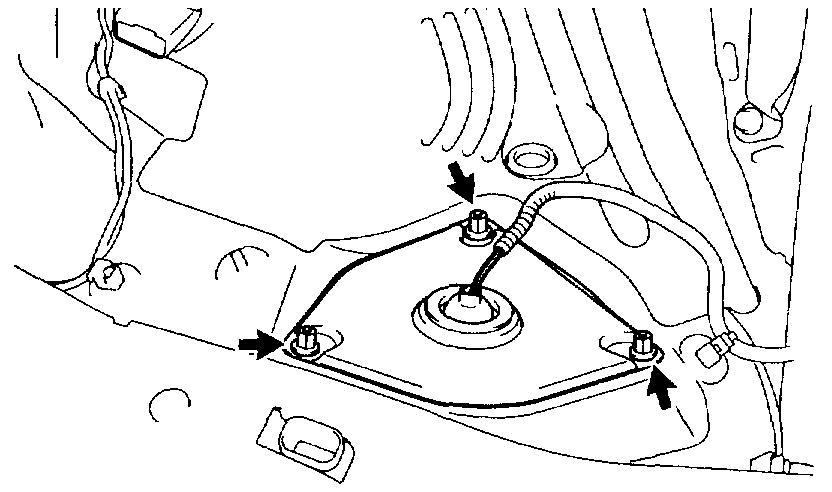
1. REMOVE REAR SEAT CUSHION
2. REMOVE FLOOR SERVICE HOLE COVER
Remove the 3 cap nuts and service hole cover.
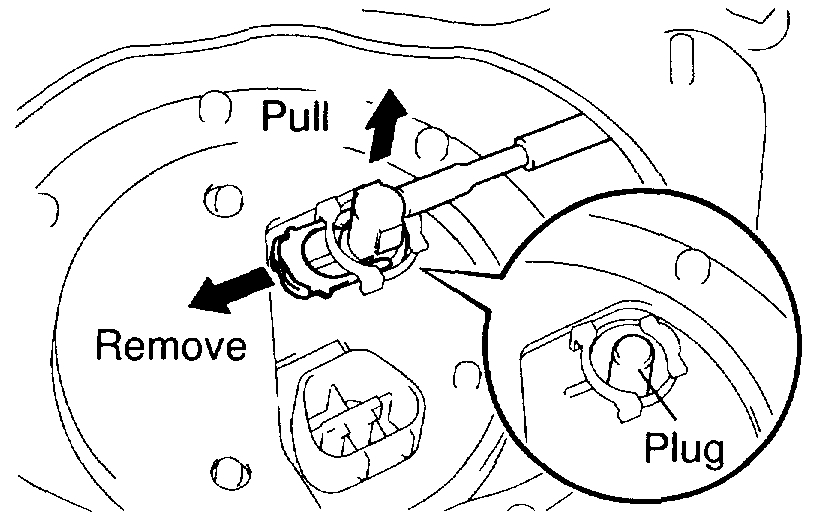
3. DISCONNECT FUEL PUMP & SENDER GAUGE CONNECTOR
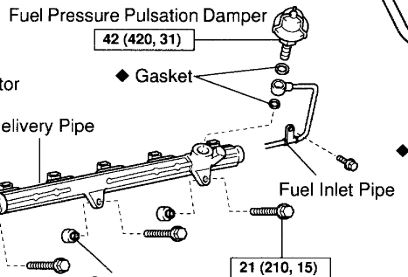
4. DISCONNECT FUEL TANK MAIN TUBE (FUEL TUBE CONNECTOR) FROM FUEL SECTION PLATE

CAUTION:
- Perform disconnecting operation of the fuel tube connector (quick type) afier observing precaution.
- As there is retained pressure in the fuel line, prevent it from splashing inside the vehicle compartment.
(a)Remove the tube joint clip.
(b)Pull out the fuel main tube.
(c)Plug the port of the fuel suction plate with a clean rubber cap.
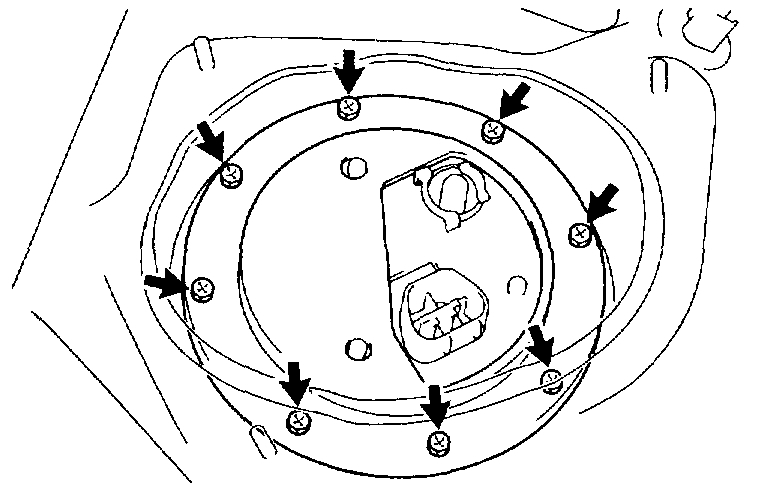
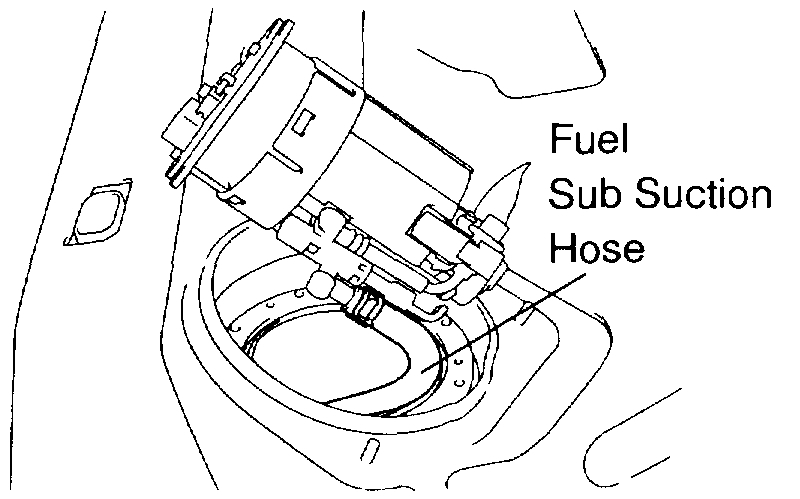
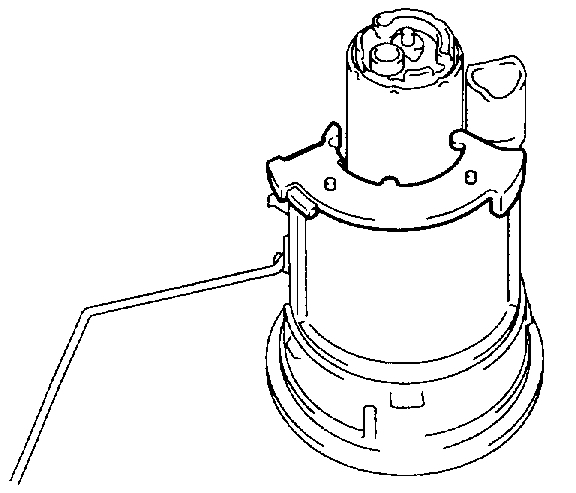
5. REMOVE FUEL PUMP AND SENDER GAUGE ASSEMBLY FROM FUEL TANK
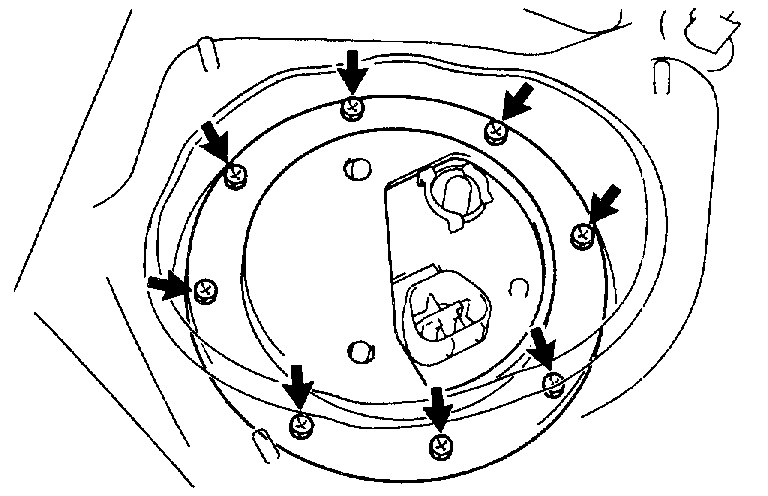
(a)Remove the 8 bolts and fuel tank vent tube set plate.
(b)Lift up the fuel pump and sender gauge assembly, and disconnect the fuel sub suction hose from the fuel return jet tube and remove the fuel pump, sender gauge assembly and gasket.
6. REMOVE NO.2 FUEL SUCTION SUPPORT
7. REMOVE FUEL PRESSURE REGULATOR AND FUEL RETURN JET TUBE ASSEMBLY
8. REMOVE FUEL SUCTION FILTER
(a)Remove the clip.
(b)Pull out the suction filter.
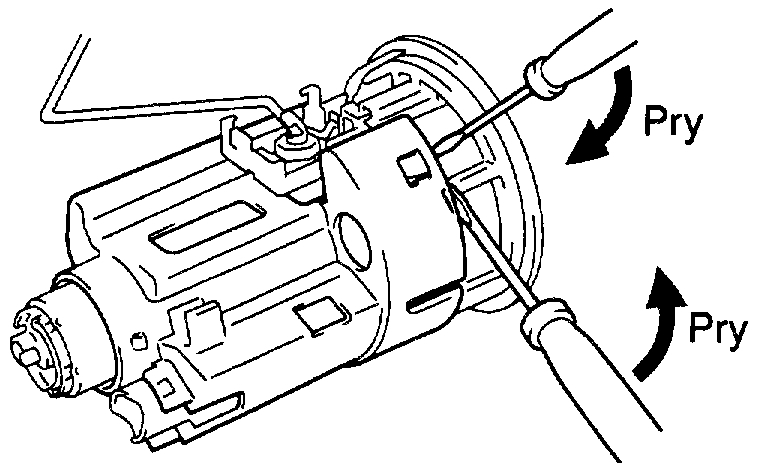
9. REMOVE NO.1 FUEL SUCTION SUPPORT
(a)Using 2 screwdrivers, disconnect the 4 snap claws from the claw holes and remove the fuel suction support.

NOTICE: Be careful not to damage the suction support and suction plate.
(b)Remove the No.2 fuel filter cushion.
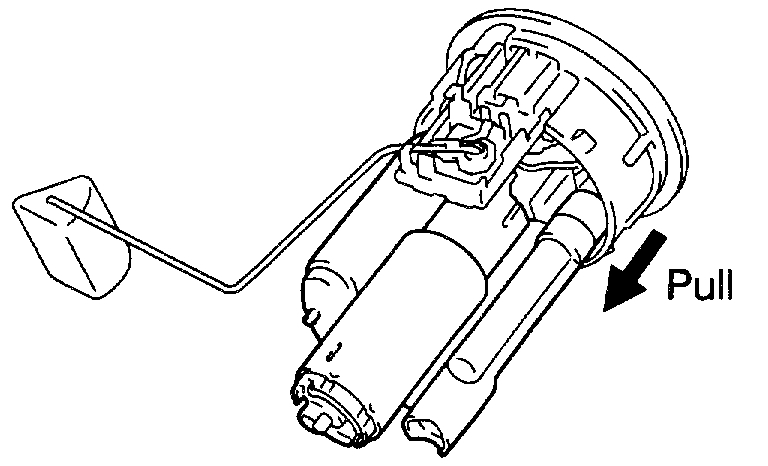
10. REMOVE FUEL FILTER AND FUEL PUMP ASSEMBLY
(a)Disconnect the fuel pump connector from the fuel pump.
(b)Pull out the fuel filter and fuel pump assembly.
(c)Remove the No.1 fuel filter cushion.
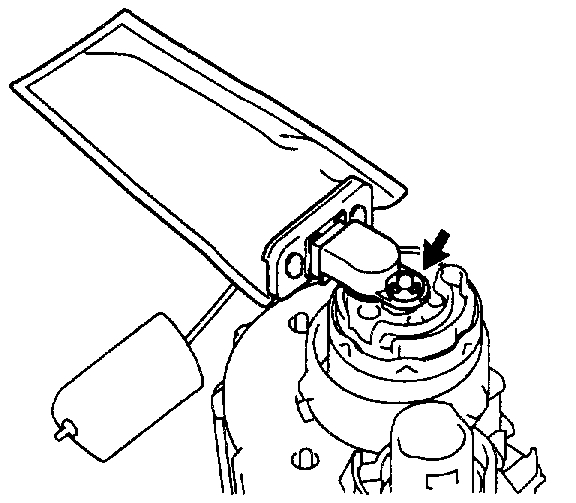
(d)Remove the O-ring from the fuel poet of the fuel suction plate.
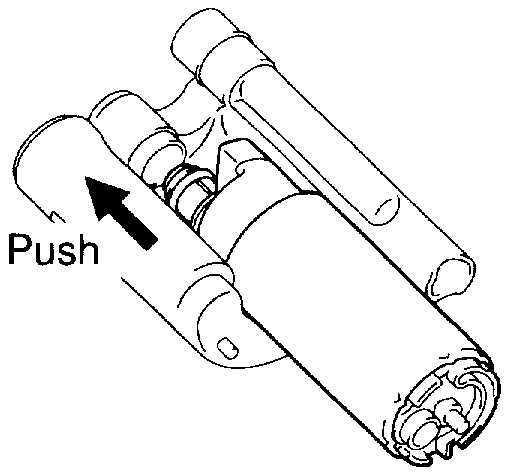
11. REMOVE FUEL PUMP FROM FUEL FILTER
Pull out the fuel pump.


INSTALLATION
1. INSTALL FUEL PUMP TO FUEL FILTER
Push in the fuel pump.
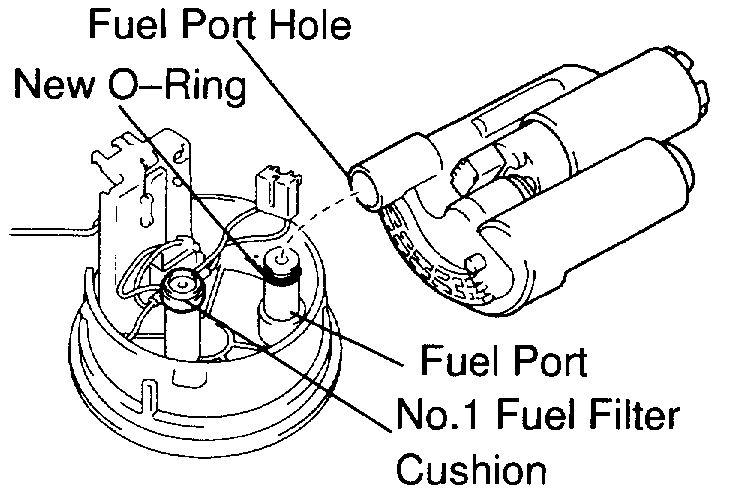
2. INSTALL FUEL FILTER AND FUEL PUMP ASSEMBLY
(a)Install the No.1 fuel filter cushion to the fuel suction plate.
(b)Apply a light coat of gasoline to a new O-ring and install it to the fuel port of the fuel suction plate.
(c)Align the fuel port of the fuel suction plate with the fuel port hole of the fuel filter.
(d)Push in the fuel filter.
(e)Connect the fuel pump connector.
3. INSTALL NO.1 FUEL SUCTION SUPPORT
(a)Install the No.2 fuel filter cushion the fuel filter.
(b)Push the fuel suction support, and attach the 4 snap claws to the claw holes.
4. INSTALL FUEL SUCTION FILTER
Install the suction filter with a new clip.
5. INSTALL FUEL PRESSURE REGULATOR AND FUEL RETURN JET TUBE ASSEMBLY
6. INSTALL NO.2 FUEL SUCTION SUPPORT
7. INSTALL FUEL PUMP AND SENDER GAUGE ASSEMBLY TO FUEL TANK
(a)Install a new gasket to the fuel suction plate.
(b)Connect the fuel sub suction hose to the fuel return jet tube.
(c)Attach the fuel pump and sender gauge assembly to the fuel tank.
(d)Install the fuel tank vent tube set plate with the 8 bolts.

Torque: 3.5 N.m (36 kgf.cm, 31 in.lbf)

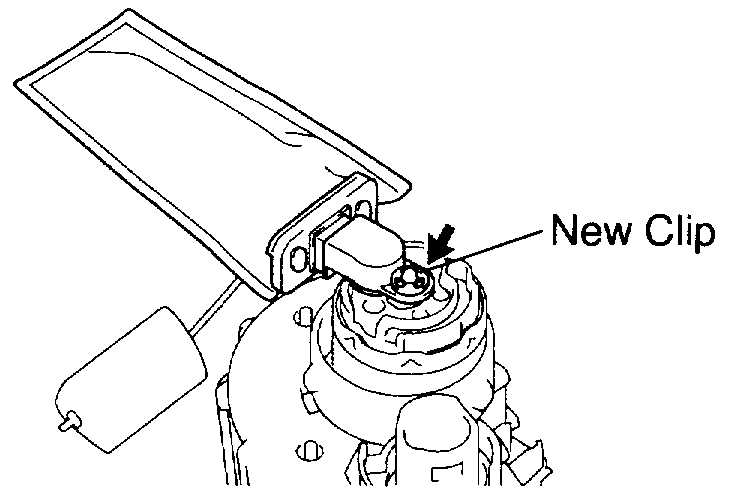
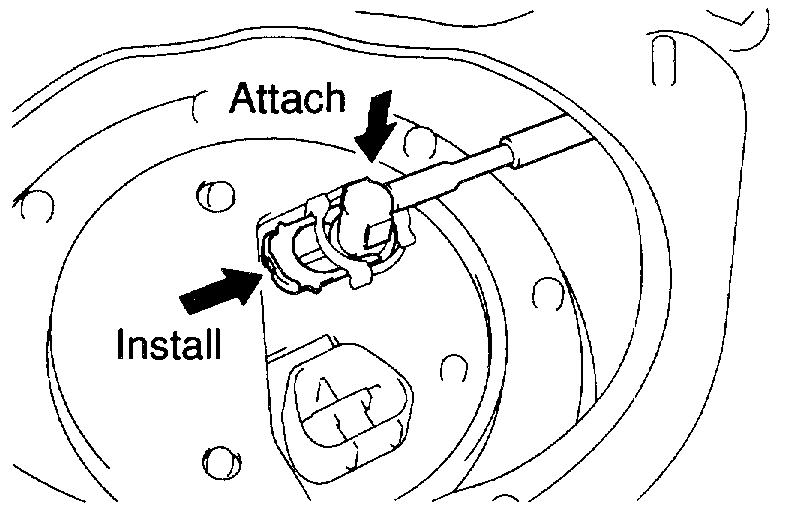
8. CONNECT FUEL TANK MAIN TUBE (FUEL TUBE CONNECTOR) TO FUEL SUCTION PLATE
(a)Attach the fuel tube connector to the port of the fuel suction plate.
(b)Install the tube joint clip.
9. CONNECT FUEL PUMP & SENDER GAUGE CONNECTOR
10. CHECK FOR FUEL LEAKS
11. INSTALL FLOOR SERVICE HOLE COVER
Install the service hole cover with the 3 cap nuts.
12. INSTALL REAR SEAT CUSHION

____________________________

I hope this helps. Since you did try running power directly to the pump and it failed to run, it must be bad. I also recommend replacing the fuel filter while it is apart.

Let me know how things work out for you or if you have other questions.

Take care,
Joe
Nov 10, 2018 at 7:03 PM
Avatar
CHRISTA DICKSON
  • MEMBER
  • 148 POSTS
I did pull out fuel pump and it works fine. As soon as I hooked it up to battery it started pumping fine with out problem. Fuel sock also did not look dirty. So I do not understand what the problem is. I have gotten it to turn over once or twice but immediately makes a putting sound and shuts off within a second or two. I am so frustrated do not know what else to try. What do think next fuel pressure regulator or camshaft sensor? I have already done crank did not help.
Nov 12, 2018 at 6:26 PM
Avatar
JACOBANDNICKOLAS
  • CERTIFIED EXPERT
  • 110,175 POSTS
Oh, I thought you said it did not run when you ran power to it. Regardless, what was the fuel pressure when tested?
Nov 12, 2018 at 7:39 PM
Avatar
CHRISTA DICKSON
  • MEMBER
  • 148 POSTS
Okay, I did pull out the pump and hooked it up to a battery it ran fine no problem. That is the first thing I checked because I figured that is what it would be but no the pump worked. When I hooked up the gauge I got no reading of fuel pressure at all. Could it be the fuel regulator on the back fuel pump assembly or cam sensor? I have already changed crank sensor, MAF sensor and because of some friends advice went ahead and changed the o-rings on the fuel injectors. This what I have done so far. Also, all cylinders are getting spark. I have gotten it to start for a second with starter fluid a couple times, but shuts off right away. Rpm's do not seem to be doing anything. I have also noticed if that helps.
Nov 13, 2018 at 5:16 AM
Avatar
DANNY L
  • CERTIFIED EXPERT
  • 5,648 POSTS
Hello, I am Danny.

I agree with Joe. What was the fuel pressure reading? Just because you heard the fuel pump making sound does not mean it is working at full output. Put a fuel pressure tester on it. It should be between 44-50 PSI. I have attached a tutorial showing what is involved. Just adding my two cents and hope this helps. Thanks again for using 2CarPros.
Danny-

https://www.2carpros.com/articles/how-to-check-fuel-system-pressure-and-regulator
Nov 13, 2018 at 5:39 AM
Avatar
CHRISTA DICKSON
  • MEMBER
  • 148 POSTS
I am sorry you guys are misunderstanding I appreciate the responses though. I pulled fuel pump out and hook it up to 12 volt battery and it did work correctly it started pumping no problem whatsoever so that works fine. But when I hooked up fuel pressure gauge I got no reading at all. Any suggestions on where to go from here? Would the regulator on the fuel pump assembly cause that? Anyway to test?
Nov 19, 2018 at 4:16 AM
Avatar
JACOBANDNICKOLAS
  • CERTIFIED EXPERT
  • 110,175 POSTS
Hi and welcome back.

The regulator can cause high pressure not low, but you still should be getting something. Here are the recommendations for low pressure. It includes the fuel filter. Also, are you certain the pump is turning on when you turn the key to start the car? Please keep in mind, although the pump ran and pumped fuel out of the vehicle does not mean it is producing enough pressure even to show on the gauge.

Fuel pressure:
301-347 kPa (3.1-3.5 kgf/sq. cm, 44-50 psi)

If pressure is high, replace the fuel pressure regulator. If pressure is low, check these parts:
- Fuel hoses and connections
- Fuel pump
- Fuel filter
- Fuel pressure regulator

Can you hear the pump turn on now that it is in the vehicle? Are you certain there are no pinched or kinked fuel lines?


Let me know.

Nov 19, 2018 at 5:49 PM
Avatar
CHRISTA DICKSON
  • MEMBER
  • 148 POSTS
Okay, so I went ahead and replaced the pump and got it to turn over even though it shut off, it did not stay running but I am on the right track with that. I had two questions, can you please help with one is the cam sensor a circled it on the first picture? It is at a weird angle and I broke the old one trying to get it out then two more at the junkyard. So I am wondering if there is a certain trick. I do not want to break the new one I have to getting it back in or what am I doing wrong. The second question is, what is the hose that comes out of the top of the valve cover? I have not circled in the second picture called I accidentally broke the plastic and I need to get it replaced. It also does not want to seem to come out. Is there a certain tricks that or do I just need to be more aggressive with it? Please let me know. Thank you, I appreciate your help.
Nov 29, 2018 at 4:49 PM
Avatar
JACOBANDNICKOLAS
  • CERTIFIED EXPERT
  • 110,175 POSTS
Hi and welcome back.

The cam sensor is held in by two bolts. Once the bolts are removed, it should pull straight out. Here are the directions specific to your vehicle:

___________________

REMOVAL

1. DRAIN ENGINE COOLANT
2. REMOVE OIL DIPSTICK AND GUIDE FOR ENGINE
3. REMOVE OIL DIPSTICK AND GUIDE FOR A/T
4. REMOVE AIR INTAKE CHAMBER
5. REMOVE VACUUM CONTROL VALVE SET AND NO.2 VACUUM PIPE
6. REMOVE NO.3 TIMING BELT COVER
7. DISCONNECT HOSES AND ENGINE WIRE
(a)Disconnect the air assist hose from the intake manifold.
(b)Disconnect the water bypass hose (from the water outlet) from the throttle body.
(c)Disconnect the 2 ground terminals from the intake manifold.

HINT: At time of the installation, place refer to the following item. Tighten so that each calking part should inside.

(d)Disconnect these connectors:
- Throttle position sensor connector
- 6 injector connectors
- Camshaft position sensor connector
- Knock sensor 2 connector
- Starter connector
(e)Disconnect the engine wire clamp from the clamp bracket on the intake manifold.
(f)Remove the 3 nuts, and disconnect the engine wire protector from the intake manifold.

8. REMOVE FUEL PRESSURE PULSATION DAMPER
9. REMOVE PS PUMP REAR STAY

Torque: 39.2 N.m (400 kgf.cm, 29 ft.lbf)

10. REMOVE INTAKE MANIFOLD ASSEMBLY


11. REMOVE CAMSHAFT POSITION SENSOR
Remove the 2 bolts and camshaft position sensor.

Torque: 9.0 N.m (90 kgf.cm, 80 in..lbf)

INSTALLATION
Installation is in the reverse order of removal.

____________________________________

As far as picture 2, I cannot tell what I am looking at. Can you get a closer picture of the part the hose came from?

I can tell you, there is a really good chance you are referring to the positive crankcase ventilation (PCV) valve. If that hose is disconnected, you are going to have a bad vacuum leak and most likely, it will cause the engine to stall.

Look at picture 2 and see if you can tell if that is what you are referring to.

Take care,
Joe
Nov 29, 2018 at 5:43 PM
Avatar
CHRISTA DICKSON
  • MEMBER
  • 148 POSTS
Yes, that is it, thanks. Also if by chance you had a diagram of how to connect this part it, is under the throttle body and trying to remember how it was seated. I have to do all of that to put new cam sensor back in correctly?
Nov 29, 2018 at 6:30 PM
Avatar
JACOBANDNICKOLAS
  • CERTIFIED EXPERT
  • 110,175 POSTS
Hi:
I believe that is the engine oil dipstick tube. In the picture, the end that is sticking up should have an o-ring on it to prevent leaks. Make sure to lubricate the o-ring with oil prior to installing it into the engine. That end will go to the engine. The other end will bolt up top. I have attached the best picture I could find. It shows the part and has lines going to where the bolts are placed.

As far as the PCV, if you do not repair that, either the engine will not stay running or will run really bad. That is a big vacuum leak without it connected. Feel free to ask if you have questions.

Also, the directions for removing the sensor are extreme. If you are able to access it without doing one of the steps, you should be fine.

Let me know the results or if you have other questions.

Take care,
Joe
Nov 29, 2018 at 7:47 PM
Avatar
CHRISTA DICKSON
  • MEMBER
  • 148 POSTS
Having a hard time getting this cam sensor in with out breaking. Also the metal piece goes to some hoses underneath throttle body I am just not sure exactly how.
Nov 30, 2018 at 2:41 PM
Avatar
JACOBANDNICKOLAS
  • CERTIFIED EXPERT
  • 110,175 POSTS
Hi:

I watched the video. It should go right in. Make sure there is nothing blocking it from seating. Also, step back and determine what is hitting that is not allowing you to get the right position. It is something stupid, I can almost guarantee it. Also, compare the new sensor to the one you replaced. Make certain it is exact.

I will be on here for awhile yet tonight, so I will keep checking for your reply. Let me know what you find.

Also, you mentioned about a hose under the intake. Can you upload which hose you are referring to?

I have to tell you. Up to this point, it looks like you have done an excellent job. I have people working for me that are not that organized and neat about things. Just do not get frustrated, try again, step back and think what could be preventing you from getting it, and I bet you figure it out. There really is no trick. When installing it, try to turn it back and forth while applying light pressure.

I will keep my eye open for your reply.

Joe
Nov 30, 2018 at 8:02 PM
Avatar
CHRISTA DICKSON
  • MEMBER
  • 148 POSTS
Still cannot get cam sensor all the way in. Got it almost all the way at least and the hoses under throttle body I do not think I have ran correctly because it started the rpm's surged very high then stalled, lol. I hope you can get a clear understanding if which hoses from the video. Thanks
Dec 1, 2018 at 6:53 PM
Avatar
JACOBANDNICKOLAS
  • CERTIFIED EXPERT
  • 110,175 POSTS
Hi Christa, it is Joe:

Your video is fine, but I cannot be sure what I am looking at. I am sorry However, lets try this a different way. Attached, I have put a total of four pictures. The first three are an exploded view of the top of the engine including the intake and all components. The last picture is of the evap system (vacuum routing). Take a look through that and see if you can identify any of the specific parts. The first three pictures are actually of the same schematic in the manual. I had to break it into there otherwise, you would not have been able to read it. I made sure to overlap each picture so you can see where it continues. If something is not clear or you need verification, let me know.

Also, did you compare the sensor to the original one? It should fully seat. Since you got it in that far, it should seat. I am questioning if it is different that the original one.

Let me know.

Joe
Dec 1, 2018 at 7:52 PM
Avatar
CHRISTA DICKSON
  • MEMBER
  • 148 POSTS
Got it started the other day and turned around after getting a ticket and was super happy. anyways i parked it the right direction turned it off and back to square one it is just cranking again. Something was draining battery so replaced the alternator after it tested bad and replaced battery. that no long a probably reading 12 volts no problem on multi-meter i needed to replace app ( accelerator pedal position sensor) because it was pulling a code for that i got a good deal on the entire throttle body with the apps and other two sensors on front attached off of another gs300 exactly like mine off of the 5 mile app. that is what i put on . any suggestions on what do to next?
Dec 24, 2018 at 7:54 AM
Avatar
JACOBANDNICKOLAS
  • CERTIFIED EXPERT
  • 110,175 POSTS
Hi Christa:

Is it still pulling the same code with the new parts?
Dec 24, 2018 at 5:58 PM
Avatar
CHRISTA DICKSON
  • MEMBER
  • 148 POSTS
It is not pulling any codes at all when i hook it up to scanner, but still wont crank. it will sputter and act like it wants to but will not. I am so frustrated i could scream.
Dec 30, 2018 at 2:42 PM
Avatar
JACOBANDNICKOLAS
  • CERTIFIED EXPERT
  • 110,175 POSTS
Okay, if you were here with the car, these are the things I would do and most likely in this order.

1) pull a couple spark plugs to see if they are wet or dry. If wet, suspect too much fuel pressure, bad coolant temperature sensor, pressure regulator problem, sticking injectors.

2) Check and confirm fuel pressure is within the manufacturer's specs.

3) If pump pressure was within spec, confirm a good hot spark to the plugs. Also, if you have a live data scanner, confirm a constant signal from the crankshaft position sensor while cranking.

4) Next, with a live data scanner, confirm the coolant temp sensor is accurate and not sending bad information to the PCM.

5) If in number 1 I found the plugs were dry, I would test for an injector pulse to confirm they are working.

6) If everything checks good, I would most likely remove O2 sensors to make sure I don't have a plugged exhaust.

Will the engine start if you use starting fluid? Also, were you able to get the cam sensor to seat properly? That works in conjunction with the crankshaft position sensor for engine and injection timing.

Let me know.

Joe

Dec 30, 2018 at 3:07 PM
Avatar
CHRISTA DICKSON
  • MEMBER
  • 148 POSTS
Hi, thanks i do not have either scanner you mentioned. would it be a option to rent one? I did notice the oil smelled a little like gas i am thinking a stuck fuel injector, but would that cause a no start? And to fix i am assuming replacing the injectors then an oil change should be sufficient? I will take the plugs out and let you know tomorrow what i find on those.
Jan 5, 2019 at 9:54 PM
Avatar
JACOBANDNICKOLAS
  • CERTIFIED EXPERT
  • 110,175 POSTS
Before replacing the injectors, I would first confirm the fuel pressure isn't too high. A bad regulator can cause it. Are you able to upload a picture of where you are seeing the leak?

Let me know what you find with the plugs. And yes, if it is dumping fuel, I would change the oil once you get this resolved.

Joe
Jan 5, 2019 at 10:55 PM
Avatar
CHRISTA DICKSON
  • MEMBER
  • 148 POSTS
Yes, they were wet and in way too tight. broke one trying to get it out. also started for a second with starter fluid.
Jan 6, 2019 at 1:27 PM
Avatar
JACOBANDNICKOLAS
  • CERTIFIED EXPERT
  • 110,175 POSTS
Hi Christa:

If they are wet, either the plugs have a weak spark, the fuel pressure is too high, or the injectors are bad. However, it is odd that all would go at the same time. That leads me to believe either pressure is too high or the spark is weak.

With that in mind, check to see if the spark is a hot blue snapping spark. Also, check the pressure.

Let me know.

Joe
Jan 6, 2019 at 7:33 PM
Avatar
CHRISTA DICKSON
  • MEMBER
  • 148 POSTS
On second inspection they were dry. it was just wet around the plugs I cleaned them up and changed them. I do not have a live data scanner and O'riellys said they do not rent them. so is there anything i can do further without having to buy 100 scanner?
Jan 9, 2019 at 2:50 PM
Avatar
CHRISTA DICKSON
  • MEMBER
  • 148 POSTS
I am defiantly smelling gas in oil not sure why or what that means.
Jan 9, 2019 at 3:03 PM
Avatar
JACOBANDNICKOLAS
  • CERTIFIED EXPERT
  • 110,175 POSTS
Hi Christa:

If you smell gas in the oil, then too much is getting put into the cylinders or the plugs are getting a hot enough spark to burn it. What happens is the raw fuel makes its way past the rings and into the oil.

Is there any reason to suspect a low compression issue?

Joe
Jan 9, 2019 at 7:41 PM
Avatar
CHRISTA DICKSON
  • MEMBER
  • 148 POSTS
I tested a injector with noid light and got nothing. No flash. what would cause this?
Jan 12, 2019 at 2:47 PM
Avatar
JACOBANDNICKOLAS
  • CERTIFIED EXPERT
  • 110,175 POSTS
Hi, Christa. I feel bad you are having so much trouble. I am going to do my best at trying to explain how this works.

First, on these vehicles, there should be power to each injector at all times. If you check, you will see a black/white wire going to each. That should have power with the key on. What happens is this. The power control module (PCM) provides a ground to each injector at specific times to complete the circuit. First, check if there is power to the black/white wire. If there is, then we may have a problem with the PCM. However, if there isn't power, I recommend checking a couple fuses. There is a 5 amp fuse on the driver's side junction box for the ignition. Check that and check the 25 amp EFI fuse in the engine room relay box. I have attached pictures for you to see. Also, I did my best to highlight the wires in question.

One last thing, check to make sure the ground in the engine area (black/white) wire is good and wasn't damaged. See the last picture I attached.

Do this and let me know what is found.

Take care, Joe
Jan 12, 2019 at 3:46 PM
Avatar
CHRISTA DICKSON
  • MEMBER
  • 148 POSTS
Okay, will a damaged wire to one injector cause a no start? Though i am just trying to clarify. If one injector would cause it not to start would it just run bad or not run at all? Just curious and and i will do that tomorrow. it has been pretty cold out and i do not have a garage.
Jan 12, 2019 at 4:52 PM
Avatar
JACOBANDNICKOLAS
  • CERTIFIED EXPERT
  • 110,175 POSTS
Welcome back:

Take a look at picture 1. Note that all the injectors are tied into the black and white wire. If the wire is damaged before it gets to the injector, none will work.

Stay warm and let me know what you find,.

Joe
Jan 12, 2019 at 10:00 PM
Avatar
CHRISTA DICKSON
  • MEMBER
  • 148 POSTS
There is no picture attached?
Jan 14, 2019 at 1:40 PM
Avatar
JACOBANDNICKOLAS
  • CERTIFIED EXPERT
  • 110,175 POSTS
I'm sorry about that. Here it is.
Jan 14, 2019 at 5:48 PM