Intermittent carburetor backfiring on both sides

1968 CHEVROLET CAMARO
123,000 MILES • 7.4L • V8 • 2WD • MANUAL
Advertisement
Avatar
STEVE W.
  • CERTIFIED EXPERT
  • 15,113 POSTS
The pump cam goes between the plastic bushing the spring goes over and the screw simply goes through the plate and screws into it. The spring doesn't ride on it, it goes over the bushing. The screw for the pump cam is part 171. The cam is part 172 and goes behind the yellow linkage lever. The cam then moves the pump link 168 which goes over the stud sticking out of the baseplate. That link is what moves the pump. The screw is shown in the second image. The pump cam is behind the throttle linkage.


The only different parts between the 4150 and 4160 is the metering system on the secondary's. The rest are all the same. The 4160 uses the plate in yellow in the third image. The 4150 uses a block just like the primary side circled below it.
May 5, 2021 at 11:11 PM
Avatar
CITYGUYUSA
  • MEMBER
  • 86 POSTS
It's hard to follow what you're saying so let me rephrase. My 1st pic shows the lever that rides on top of the throttle cam spring. You can see it laying on top. The 2nd picture shows me moving the throttle to all but full open to show how that lever moves and you can see the lever is right above the throttle plate above the 1st screw position. The 3rd picture shows you the extent that the lever can go to at full throttle. It barely reaches screw position 1 and can't even get to screw position 2.

The last 2 pictures are the where the metering plates sit against the throttle body. They will have cardboard gaskets applied to them. There are quite a few imperfections here I'm not sure how important that is or isn't but before I cover them over...

I have some sticky parts like the primary plates on the bottom get caught on the rusty edge when you're at idle. Should I use silicone spray to help lubricate them or something else?

The paperboard gaskets for the fuel bowls and other places should I use something other than tightening to hold them? Whoever built this thing had adhered the gaskets in place. They seemed like they were using an adhesive it didn't seem like RTV because it had soaked into the layers of the paperboard. Then all those tiny little circles that go around all the screw connections those will need something to hold them.

So that screw that you IDd on the drawing, 171, I would never in a million years figure that to go into the throttle plate besides that it's no where near it and in fact appears to go with the plastic cam, 172, and it's 3 holes although it's really just hanging out there in no where land.
May 6, 2021 at 6:37 PM
Advertisement
Avatar
STEVE W.
  • CERTIFIED EXPERT
  • 15,113 POSTS
That lever is the accelerator pump arm. It should ride on the pump cam which you don't have installed. It doesn't ride on the spring. The cam goes between the spring, it's bushing and the throttle arm. The two screw holes circled in the face of the throttle lever are where the cam is attached. It looks like the parts in the second picture and is adjustable to tailor how much fuel is added when you step on the throttle. Without it the pump arm doesn't move and you get a massive flat spot and stalling when you hit the gas.
These show it better.
https://www.youtube.com/watch?v=k-Nx5HEzvlY
https://www.youtube.com/watch?v=ep_dTRTSGPI

With it in place the pump lever should start moving the second the throttle moves off idle. Then you adjust it to inject whatever amount of fuel needed to make up for the air increase as the throttle opens. The idea is to match the extra fuel injected to the amount of time it takes for the fuel to transfer through the jets inside the carb when you hit the throttle. If you don't have it right you get a stumble, which can be from both excess fuel or not enough.

For the gaskets they are installed dry. The OE gaskets sometimes had a layer of high tack sprayed on them to hold them in place for assembly but it isn't needed. Keep any type of RTV gasket maker away from the carb. Especially inside it. RTV isn't fuel friendly and tiny bits get free and plug jets and fuel passages. Those marks won't cause any issues.

The Holley carbs are designed to be tunable to match what the engine needs. When they are dialed in fully they can make it seem like it's fuel injected. So can the OE QJet, but the QJet takes more practice and knowledge of how to adjust it than a Holley and the parts are not as easy to find.
Lots more info on them.
https://www.youtube.com/watch?v=xscWLSpB5Go
https://www.youtube.com/watch?v=aV-xYXPf4TI
May 7, 2021 at 2:12 AM
Avatar
CITYGUYUSA
  • MEMBER
  • 86 POSTS
We are talking different things kindof. These both came from the videos you told me to look at. If you look at the first one the lever is riding on cam which is screwed into the back of the throttle plate which is on the inside edge of the throttle return spring. If you look at the 2nd one their throttle plate is turning further than mine. You can see the cam retaining screw is at the top when they rotate their throttle with the accelerator lever riding on the cam which I was saying the spring because I hadn't put the actual cam back on yet. The last picture is mine. When I rotate my throttle, the path of that secondary lever of the throttle hits the throttle body. Follow the red line. That inner throttle piece rides on the throttle cam on the other side of the spring from the plastic cam. There's a screw that kind locks it in place from passing yet another piece of that throttle assembly that rides against the throttle body. The 4th pic is just so you can see the lever that I'm talking about and how it's shaped. Then the last shows the screw at the bottom that just sticks through the backside of the lever and prevents it from moving past the level that is against the throttle body which is hard to see. But the red mark that's horizontal is just suggesting how the screw sticks through the back of that lever. I know it's not accurate.

I don't know where that cam was initially I seem to recall it hanging by a rod. I don't remember unscrewing it and the screw was partially sticking out of the cam which I would have screwed in or left out. Just weird.
May 7, 2021 at 9:48 PM
Avatar
STEVE W.
  • CERTIFIED EXPERT
  • 15,113 POSTS
In your last picture the cam is not installed, neither is the accelerator pump lever. Until you assemble the entire carb nothing is going to fit correctly. Then the linkage needs to be set once it's together. I don't see the secondary trip on yours either, that is the heavy link between the primary and secondary shafts that is adjusted to open them at full throttle.
May 8, 2021 at 2:43 AM
Avatar
CITYGUYUSA
  • MEMBER
  • 86 POSTS
I didn't take new pictures. All I want to know is how that Kickdown is supposed to work. I don't have an automatic. And no matter what I add or take away is going to solve the problem of the Kickdown hitting the side of the throttle body. It doesn't move from side to side only front to back.
May 8, 2021 at 1:42 PM
Avatar
STEVE W.
  • CERTIFIED EXPERT
  • 15,113 POSTS
It looks like it's in the wrong place. The kick down mounts farther over on the carb body but only for a Ford. The GM kickdown mounts to the throttle lever itself but it's only used with an automatic. You shouldn't need it for your manual car. Just the accelerator pump. When you first got this car did it run okay with no issues?
May 8, 2021 at 7:48 PM
Avatar
CITYGUYUSA
  • MEMBER
  • 86 POSTS
It ran fine until the environmental upgrade and then it came back a total mess.

I understand that I don't need it but it's hitting the throttle body as per the picture which is preventing the throttle from being able to go past that point which prevents the throttle plate from being able to open 100%.
May 8, 2021 at 11:16 PM
Avatar
STEVE W.
  • CERTIFIED EXPERT
  • 15,113 POSTS
It should be removable. However it sounds like whatever they did as an upgrade wasn't. What exactly did they do?
May 8, 2021 at 11:18 PM
Avatar
CITYGUYUSA
  • MEMBER
  • 86 POSTS
Are you talking about the transmission kickdown or the environmental upgrade?

I've figured it out. The baseplate was rotated. Everything else has tabs and pins to ensure you put it in correctly but the baseplate can go on either direction although there may be pins missing because the gasket is supposed to hook onto 2 pins but there's no 2 pins to hook onto and I noted on the main metering plate there is a cracked off pin.

How are you supposed to know which circular gasket goes with what? Or even screw because they don't give you any of that information. No sizes, no numbers, no nothing. I think Holley sucks.
May 9, 2021 at 8:28 PM
Avatar
STEVE W.
  • CERTIFIED EXPERT
  • 15,113 POSTS
The upgrade that they did. It went in running okay came out running bad. It's possible it is something that can be compensated for in tuning.

It sounds like someone has mistreated that carb in the past. It should have locator pins on it. They don't label much of it because of the modular design, you need to match up the parts to the particular carb you have. You can build the carbs up or down to match the engine it's on.
May 10, 2021 at 6:14 AM
Avatar
CITYGUYUSA
  • MEMBER
  • 86 POSTS
They're sending plastic rings that aren't entirely flat to go with the float bowl screws. I can't imagine that's going to work well when they had a some kind of thin paper that bent to the shape before. I think the fuel bowls are done but I'm not sure about the floats. They talk about setting them but I don't see anyway to set them they are what they are. I have center floats, neoprene I suspect, they have 2 screws and only fit one way no adjustment that I see. Then the needle would ride up and down on the height of the float but no way to set that until it's got gas.

Should I build it down to a 660?
May 10, 2021 at 1:24 PM
Avatar
STEVE W.
  • CERTIFIED EXPERT
  • 15,113 POSTS
Setting the floats is normally done with the carb assembled and on the engine, That compensates for any tilt or angles caused by the engine mounting. I would keep it as close to what it ran good at before. The plastic will deform as needed to seal. Just don't crank down on the screws, you want the seals to seal and that's about it, I've seen people assemble them and have the gaskets squeezed out like they were liquid sealer. One thing to check on the float bowls, be sure the face of the throttle body and the float bowls is flat. I generally do that using a piece of glass or polished granite like a surface plate. The easy trick is to use a marker and coat the edge where the seal rides, now lay that surface on the glass and see if it rubs all the way around. It's rare that one isn't but it could happen.
May 10, 2021 at 2:17 PM
Avatar
CITYGUYUSA
  • MEMBER
  • 86 POSTS
I showed you the pics of the surface.. I didn't check for flat I was more concerned with the divest around the port holes and the odd edges but just off the top of my head they didn't look especially flat but I'll run a steel edge over it.

Since the needle valves are replaced hard to say where they were before there wasn't any way to mark them. Like I said they're center hung floats 2 screws and 2 screw holes nothing to adjust except the height of the needle valve.

What about reducing the cfm or isn't that possible? How would you even do that put sleeves in the ports and replace the metering blocks?
May 10, 2021 at 4:17 PM
Avatar
STEVE W.
  • CERTIFIED EXPERT
  • 15,113 POSTS
CFM is determined by the venturi size and the bores in the carb main body. If you want to drop the CFM it's easier to just replace the entire carb as you would be replacing most of it anyway. However with a vacuum secondary you can usually get away with a slightly larger CFM than needed. That is because it doesn't just toss them open like a mechanical system and for most of the time you are running on the primary side until you climb on the throttle, then it will open the secondary side but only until the vacuum diaphragm equalizes. So if the engine can only create a vacuum up to say 645 CFM of flow, that's as far open as the secondary's will open. If it can pull up to 680 then they will open until the flow matches. That is why most street carbs will run vacuum on the secondary side. All of the OEM 4 barrels use a vacuum system for that reason. As for carb sizes, the Q-jets came in 4 different flow rates, the lowest being 600 cfm the upper end was 850 but a majority pre 1972 were 750 CFM. After 1972 they were 800 for most applications and that was small blocks up to the 525. The vacuum secondary is what allowed that, just like the Holley you have.

May 10, 2021 at 7:49 PM
Avatar
CITYGUYUSA
  • MEMBER
  • 86 POSTS
I came across a set of directions to set the valve and the float except you have to do the them in reverse order well because why would they even have them in order?

For the valve, the "bottom of the valve",
whatever that means (Does it include the pin? Who knows? Their instructions leave a lot to be desired!) is supposed to line up with the bottom of the site plug. Why not just mark a line in the bowl? If I assume they're talking about the actual body and not the moving pin you can't get the float into place with the valve in place.

When you put the float in you're supposed to hold the fuel bowl upside down and center the float by bending it. Needless to say I can't get my fingers or anything else behind that float to even attempt bending it so it won't rise above the level of the screws. This is absolutely asinine thinking whoever came up with these ideas. Why not just manufacture it so it sits where they want it that would make way more sense. Whoever built it initially didn't see a need to bend the floats and yet I'm suppose to figure out how?
May 10, 2021 at 10:04 PM
Avatar
STEVE W.
  • CERTIFIED EXPERT
  • 15,113 POSTS
There are a couple of styles of float bowl, the non adjustable are commonly used on the marine carbs but they will work on the street as well. To adjust them you flip the bowl upside down, hold it level with the gasket surface vertical like the picture. Then you check the level. you want the float parallel across the body so the blue lines are the same. Then the float should be level with the screw heads like shown. If you need to adjust them I generally note where they set, then pull the float and bend the tang that moves the needle. Then try again. if it sets level then it's close enough. The adjustable needle makes this all much easier but you have the other type so you need to do it with the bowls off. It works, but it's messier with it on the car and full of fuel.
May 11, 2021 at 12:56 PM
Avatar
CITYGUYUSA
  • MEMBER
  • 86 POSTS
I do have adjustable valves. The more you screw them in the sooner the stop filling the bowl. My float has a single piece of metal that goes from the back of the float to the pin that it rotates on. That piece is sliced into 3 separate pieces. The outer 2 are just flat but the middle has camel's hump coming up to meet the valve I suppose. I just turned the valve so it prevents the float from rising to the top showing the screws in the upside down position.

Is that reasonable? I think the effect would be the same right? Seems like they should have measurements in the bowl. Holley is trying to have the needle close before the float hits the top. A million other ways to do this better. Same thing mechanics say about car design. They could have built it in a way that you don't have to hold a wrench with your toes.
May 11, 2021 at 1:46 PM
Avatar
STEVE W.
  • CERTIFIED EXPERT
  • 15,113 POSTS
As a dry baseline with the adjustable seats you start with the bowl inverted, then screw in the seat until the float is level and just above the screws. Then once it's on the car with fuel in it you adjust it so that on level ground with half a tank of fuel you get just a few drops of fuel out of the sight plugs. That is the baseline wet setting and will get you close enough. Then you determine if you need to adjust it more based on what you are using the car for.
If you are drag racing for instance you might want a lower fuel level to keep fuel from exiting the vent on the primary side under hard acceleration. Once you get the carb together and back on that is when you can really start adjusting it to exactly what your engine needs. Usually most of that is done on the primary side as that is what you run on about 80 percent of the time. Oh, one big thing to check as you were having issues before, check the fuel pressure at the carb inlet. Excess pressure will overfill the bowls and cause a rich mix. The elevation you are driving at can change things as well because the air pressure difference will change the mix.

I missed what they did to fix the emissions, also depending on where you live you likely don't need to meet any standards other than having a functional PCV valve.
May 11, 2021 at 4:40 PM
Avatar
CITYGUYUSA
  • MEMBER
  • 86 POSTS
No emissions that I'm aware of. I'd be exempt even if I did because of the low mileage. So what you're saying is I did the right thing with the valves and the floats and that they don't need to be bent?

I'm not planning anytime at the track. I just like to enjoy driving it if I ever can again. I don't want anymore under hood explosions which would lead to having to go through this again. I know a lot of times people say you can fix this with timing but I' don't think I have a timing issue I have a too hot issue.

Background. We've had some incredibly hot summers the last few years hanging out in the upper 90's for weeks on end and that I think was largely responsible for my 50 year old brass and copper radiator to perspire. I'd no sooner have one leak fixed and another would start. We tried to save it but it just wasn't possible. I had been reading about the new aluminum radiators and how they were so much better at dissipating heat with fewer rows and not having to hear the roar of my mechanical fan was just a huge plus to replace it with an electric fan. But what no one would tell me or even admit to was that very few 454BB were able to stay cool with a 16" electric fan and a shroud that prevented any extra air flow from coming through. And no matter how many people I asked that had done their own cars over or had them professionally done no one would tell me how well their cooling system worked or what they used to cool it. Which means they could just be someone else's cars that they have no clue about or they didn't really do them themselves. Most of the posts I've read are about this same problem being able to cool them with an electric setup. I've learned lots about it and I'm convinced it's largely in the radiator being blocked by the shroud and a weak fan on top of that with pushers having no place to blow. I think initially I may just put the mechanical back on with the new radiator to see how that goes because believe it or not when I had the radiator replaced they didn't clean out the stop leak from the old leaky radiator before they dropped in a brand new radiator. I was pissed. That was the end of my 18 year mechanic. I never had such terrible service from him in my life. He used to be incredible and he's restored old Ford pickups, scooters, motorcycles, he has his own setup at home so he really enjoys it but this was a fuck up.

One day I was running about 225 just 3 blocks from home. I was worried. I had never seen it that high before. Well I made it home of course once it was turned off there was still a lot of heat to remove on a 95+ degree day and the fan only ran for like 30 seconds and shut off. I was expecting a little more action from that electric fan like running and shutting off over and over on whatever cycle but there was no more. My mechanic hadn't said anything at all about not cooling well or anything to even let me know that I'd better watch my temperature. Even when I had the first A/C system put in they weren't happy with the cooling using the old mechanical fan. They ended up pulling a trick by using a lower degree thermostat. Some people say that it doesn't do what you think an others seem to think it's a solution. It seemed to work for a couple years until the radiator just gave up.

After the new radiator was in it was so nice to hear again. I could hear the roar of my mufflers a much nicer sound than the fan blowing. One day after I had been vandalized it was like the middle of winter and very cold and foggy and I was out with a friend trying to get some estimates on fixing the interior when I started to notice there didn't seem to be any heat when I was running the defroster. What I came to find out was that the Vintage Air system I bought shut off the heat when you turned on the defrost. I never heard of such a thing. I contacted Vintage Air and I was told that I needed to buy a $50 part. At the time I just didn't have the money and so I contacted the CEO and told them my problem and he offered to replace the entire system for their newer system that was run by servos. I wasn't exactly sure why I needed servos but this guy was being incredible nice and offering to pay for the install. My gut reaction was that it took almost 12 years to flush the first system out because you don't use the car that much to begin with and there was some kind of a refrigerant leak that we just couldn't find. Finally with the service writer and me both on our backs under the car we finally saw the dye coming from the Schrader valve. Every year I was replacing refrigerant. What a difference but it took 12 years to find it. The other problem was the A/C was on or off which I had thought was a control issue. I had them put a switch on the compressor that I could turn on and off. I was thinking there was some type of granularity problem that I couldn't move the slider in a small enough range that it was shutting off the compressor and instead of changing the temperature. Turns out there was NO HEAT at all if you had the A/C on you couldn't adjust the temperature at all. You were frozen or burning up your only 2 choices. Again this was all weighing on my mind about replacing a system that I just figured out. I told the CEO my concern and I asked if it would be OK to think about it for a few days. Certainly he said you just let me know. I was having a hell of a time convincing myself. I finally pulled the trigger and the bullet was shot right into my car. It drove home OK but when I went to shut it off it started dieseling which it had only ever did once on a very hot day but it was far from hot. There was a cloud of smoke surrounding the car while it was running that made your eyes burn and smelled just horrible of gas. But nothing they did should have caused this. I called the "installers" and left a message that night and said it was coming back that something was wrong. They called me later that next day saying the only thing they could find was that the fan regulator had lost it's settings and should be replaced and there was a wire that had come loose from the fan controller, I needed a tune-up (which I had just done the year before) and my timing was all screwed up, I had a weak battery, I needed a new thermostat (which had just been replaced with the new radiator). Really? They weren't admitting anything. I had a list of things like not keeping the car warm inside and running incredible rich, and there was a light that had stopped working and on and on with what seemed like little things but even the hose that came out of the car to get rid of the water was left laying on my headers and literally burnt off. The installer told me that he took some wire under the dash that had multiple drops and he rewired it (who asked him to?) They lied right to my face about some wires I asked him to run while the heater box was out magically they appeared with hanging over the master cylinder like so obvious that I couldn't have missed them but the oil pressure sender I asked him to put in he decided didn't work so he took it back out and left nothing and didn't even mention that he took it out. But he takes it upon himself to re-wire my car? I told him a million times if he had any questions to call me because i knew how the thing was put together. They had answers for everything I needed a new fan controller and I needed all new plugs, I needed to buy a new alternator and the list went on and on and I new that alternator was all but brand new. It wasn't the 37amp one that came with the car.

I realized they weren't capable of fixing this because they were installers I could have installed it following the directions (as long as Holley didn't write them). By the time I was done arguing and getting no where a storm had rolled in. It was a terrible thunderstorm and the car was under full load with everything running including the new A/C to defrost the windows and every time I would hit a red light the car would go dead. The weather had changed drastically from upper 90's to upper 50's overnight. Well the car wasn't dying when I stopped after the temperature change but it was fussy at best.

Imagine it worked fine when it went in and when it came back I could barely keep it running. None of it made sense until I had disconnected the A/C pusher fan which was just blowing air against the radiator but there was no place for the air to go because of the way the shroud was made to be tight up against the back of the radiator which got me thinking about how restricted this air flow was in relation to my old mechanical fan and shroud. Even if the electric fan was able to blow 3000 cfm it still was only accessing less than 40% of the radiators surface. I either had to redesign the shroud or put the old mechanical fan back in.

A funny thing happened while I was looking over various things I happened to be out making a test run and the car wanted to stall at the light. I jumped out quickly and disconnected that pusher fan and the car sprang back to life. Well that was interesting. When I got back home I was following the wiring for the pusher fan and found that the relay was shorted from the control side to the action side well that would explain a lot but not why they didn't find this problem when they hooked up the new fan. I also found out that the fans were reversed. The main fan was running with the A/C and the pusher was running constantly cooling the car and they denied that too. OMG, This is exactly why I didn't want to replace the system. The worst possible outcome is now in my lap because no one will touch it because they don't want to be blamed.

I have chronic pain so it takes me forever and a day to be able to fix or even find out what needs fixed. You wouldn't happen to be close by south central PA would you?

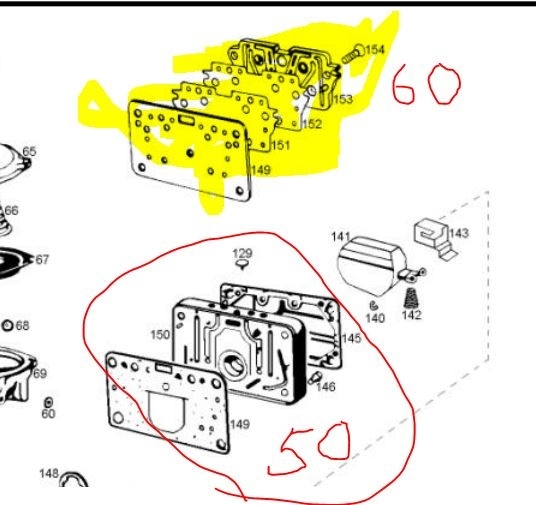
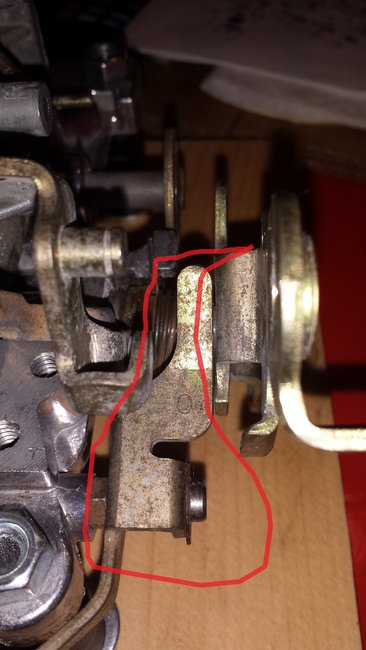
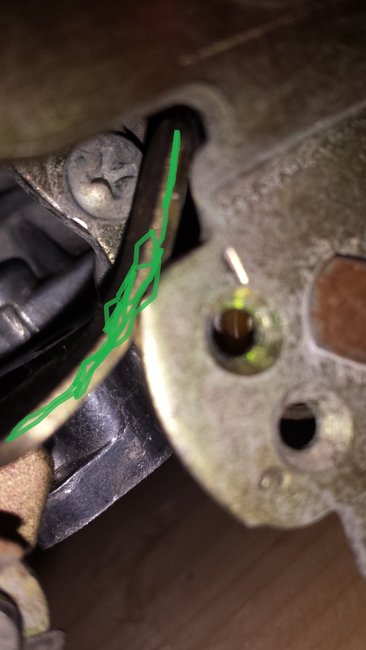
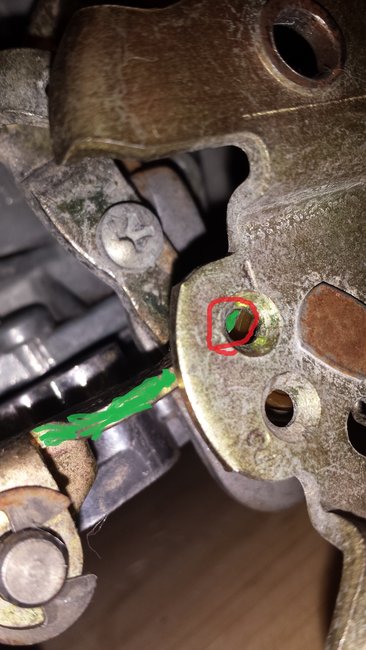
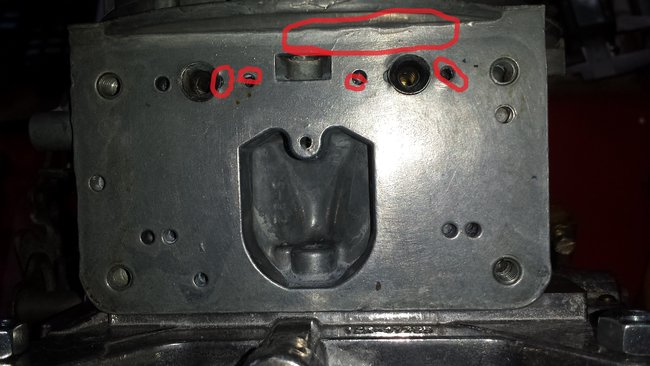
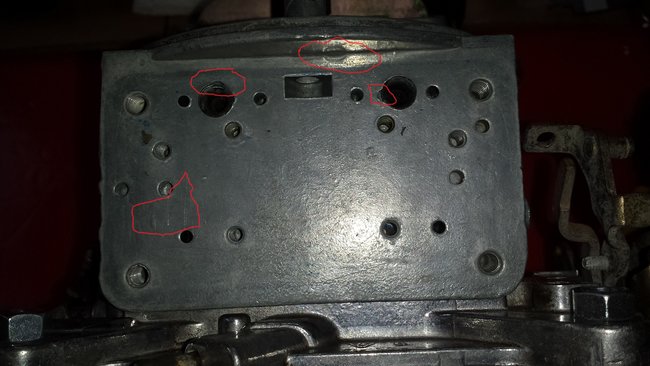
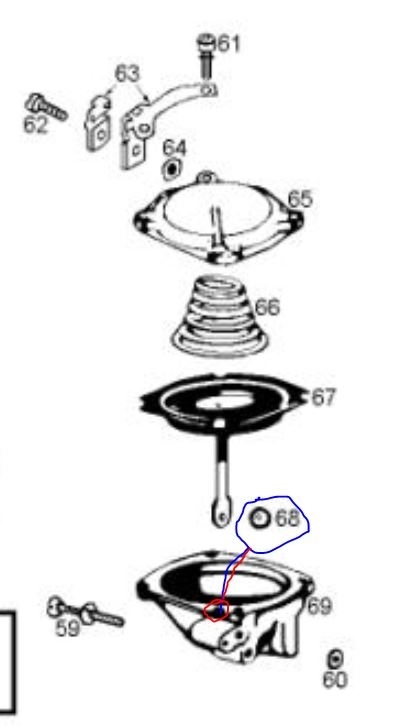
Anyway the first major problem is to get the car running normal. Then it has to be able to cool itself again. I have a couple ideas in mind but first off this carb has to get done and then I have to go the through the plugs and probably replace them or at least clean them because this event is what caused all this carbon fouling and the last thing I want to do is put the carb in only to have it explode yet again under the hood and be back to square one. I know the snorkel air cleaners used to put what looked like a sieve in the snorkel to stop explosions although how that worked I don't know. There is also the A/C solenoid method to shut the choke plate or maybe I can fool the electric choke into closing the plate?
May 11, 2021 at 7:47 PM
Avatar
STEVE W.
  • CERTIFIED EXPERT
  • 15,113 POSTS
Backfires are commonly from timing issues not from the carburetor. As for the cooling problem, a good 4 core radiator and the OE mechanical fan and shroud will do the job as long as the system is clean, you might need a small electric if you set in stop and go traffic but the stock system shouldn't have an issue. I would say you had a cascade of issues that all triggered at once. As for the repairs I would get the carburetor on the engine, Then take a look at the ignition system to be sure it's in time. It also sounds like you are running the OE alternator which is not able to cope with the heavier load, that is common as the older cars ran very small electrical systems compared to modern cars. You can get alternators that will put out more current and can keep up, but first let's get the engine running.
May 12, 2021 at 6:18 AM
Avatar
CITYGUYUSA
  • MEMBER
  • 86 POSTS
I know you have a lot to read but you're not reading it correctly causing you to have to revisit and worse me having to retype it. I do it myself sometimes.
It's easy to guess and most of the time we're okay. However; what I said was that I didn't have the original 37 amp alternator that I had replaced it (with a 100 amp). My point was I could reply to all their BS because I knew what I had done and when I did it and I knew it wasn't dieseling in cold weather and when it came back it did that everytime the car was shut off.

Just so we're clear I get backfiring out of either side every minute or so which is a newer problem that followed the dieseling which ended in explosion because the only way I could stop the dieseling was to flood it out and that ended in an underhood explosion smoke pouring out the hood and all. That's why I brought up about the dieseling fixes as it would have carried on for quite some time. I think its better to have something in place and not need it than to resort to flooding it.

The car worked fine when I dropped it off the first time. It wasn't overheating in the cold. I flushed the radiator twice and I cleaned out the gas as my supplier of non-ethanol had changed suppliers and I suspected a tank of bad gas as well. Then I found the short on the relay to the pusher fan which allowed the car to run without dying at each light or stop sign. and then the reversed fans and that was were I stopped in winter.

That wire that he chopped I wonder if maybe that was a switched 12 going to the pertronix and the carburetor choke?
May 12, 2021 at 2:17 PM
Avatar
STEVE W.
  • CERTIFIED EXPERT
  • 15,113 POSTS
Okay, missed the 100 amp. Your description sounds like one of two things, running hot would cause both of those issues, but how it's getting hot could be timing related, if it's running and advancing too far it will run hotter, and if the carburetor is running lean in the normal driving range it will get hot. Add in even a small amount of blockage in cooling and you get to where you were. As for the wire, if it was for the choke it would have held the choke closed as the electric opens it as it warms up. I would get it to at least start. Then check what the timing is doing, it's rare but the pertronix unit could be causing an issue.

Have you pulled the plugs out yet? If not, pull them and post a close up of each plug. Even after setting they should show if it was running hot and lean.
May 12, 2021 at 5:36 PM
Avatar
CITYGUYUSA
  • MEMBER
  • 86 POSTS
Back to the carburetor. I'm being instructed to install the accelerator check-valve pin into the secondary. I don't see any place to drop it on the secondary which has no metering block but a plate which may have nothing to do. I only have 1 pin which I'm guessing should go to the primary?

No, I don't have the plugs out yet. I need to get my neighbor to help me replace the hood springs. I've been relying on a piece of wood. I have the springs I just need to get them in and I don't have the strength.
May 12, 2021 at 9:49 PM
Avatar
CITYGUYUSA
  • MEMBER
  • 86 POSTS
My understanding of the Pertonix is it either works or it shuts off unless it's wired incorrectly - well before someone goes under your dash and all's working and then all's not working what are you going to do?
May 12, 2021 at 9:52 PM
Avatar
STEVE W.
  • CERTIFIED EXPERT
  • 15,113 POSTS
The pin goes in the primary side unless you have a double pumper style carb that has dual accelerator pumps. With vacuum secondary's that is almost impossible.
That is how they are supposed to work, but if an internal part in the electronics fails all bets are off. It's one of the reasons why I normally go with a custom curve HEI unit. Drop it in place, add a switched power and wire it up. One thing to check on a 69 would be the switched power. Most points cars had a dual circuit for the ignition coil. When the key is in the start position the coil and points got full battery power to help with the voltage drop from the starter. Then once the engine was running and the ley dropped back to the run position the power went through a length of resistance wire to the coil and that dropped the voltage back to about 6 volts so the points lasted longer. If that wire is still in place or someone reconnected it you could have some interesting issues from low voltage to the system. I would think it was removed but I'm not the one who did the work on it.
You mentioned PA, ever watch Pine Hollow auto on you tube? Ivan is a real sharp mechanic who likes a challenge. Not sure if he would be interested in taking on a vintage car though.
May 12, 2021 at 10:23 PM
Avatar
CITYGUYUSA
  • MEMBER
  • 86 POSTS
So in my rebuild kit I got 2 gaskets for meter blocks and one that matched the shape of the secondary plate. I used the one shaped like the plate not understanding why you would use a gasket that wouldn't be properly pressed against the throttle body. The plate comes with those odd screws. Then when I was looking for something else I saw them attach their plate to a full gasket. What the heck is the plate sized gasket for if not for putting between the plate? If I had a full-sized metering block I'd have used the full size gasket.am I right on this?
May 14, 2021 at 1:51 AM
Avatar
STEVE W.
  • CERTIFIED EXPERT
  • 15,113 POSTS
There should be a plate gasket, but on some carburetors that gasket is part of the full sized gasket used to seal the bowl and others it's a different piece. The kits usually include a few different parts to match what your particular carburetor uses. Plus there are some updates they did through the years so they include those parts as well.
May 14, 2021 at 6:17 AM
Avatar
CITYGUYUSA
  • MEMBER
  • 86 POSTS
Just to verify you are saying that you think I choose the correct gasket for use on the secondary plate?

I got the electric choke on but I'm not sure if there's a linkage issue or something. I can't seem to move it at all unless I first open the throttle.

The red cam also shows a silver ball in the end (perhaps used for weight?) mine has a hole but no metal ball. The metal triangle that holds the spring on is broke I think it's copper so I guess I could solder it.

My instructions told me to put the choke together but as I recall I have to do the secondary accelerator because there's a screw that goes under the choke that you can't get at once it's done.
May 14, 2021 at 9:50 PM
Avatar
STEVE W.
  • CERTIFIED EXPERT
  • 15,113 POSTS
The choke is correct in needing the throttle to release it. That is why you need to step on the gas at least once in a carbureted vehicle, that "sets the choke" by releasing it so it can close on a cold start. Then once it warms up the electric, manifold or exhaust heated pull off system holds it open. Some carburetors also have a vacuum choke pull off that will modulate the choke using vacuum passing through a temperature valve on the thermostat housing. You also will adjust that once you have it installed. The linkage bar can be bent to close it tighter but it shouldn't be needed, you don't really want the choke to seal the inlet off because it does need some air to go past it to atomize the fuel and in the event the choke were to stick you could still move the car around. Once you get it installed you will adjust the cover to keep the choke on for the correct amount of time based on the way the engine warms up and the climate you have. Colder area likes the choke to stay on longer as a general rule.

The gasket depends on what it had originally. Some used a gasket for the metering block and bowl as one piece, some used a similar gasket with the metering plate, Others used two gaskets for the plate, one for the plate and another for the bowl, as long as the holes all line up and it seals either one should work.

The broken part sounds like the choke cap retainer, looks like the picture? If yes you can get them as replacement parts. They simply push the cover in solid to keep crud out of the housing.

Video was a good idea.
May 15, 2021 at 9:54 AM
Avatar
CITYGUYUSA
  • MEMBER
  • 86 POSTS
It's not copper. It that metal they use to frame out consumer electronics it may not solder. It is the retainer for the choke spring housing.
May 15, 2021 at 12:21 PM
Avatar
CITYGUYUSA
  • MEMBER
  • 86 POSTS
Avatar
CITYGUYUSA
  • MEMBER
  • 86 POSTS
I'm trying to do the vacuum secondary. First which hole does the ball go into? The top or the bottom top or side? Should I put Vaseline on the edges of the diaphragm to help seal it?
May 15, 2021 at 1:30 PM
Avatar
STEVE W.
  • CERTIFIED EXPERT
  • 15,113 POSTS
That retainer is the fancy version of the one I posted Holley used both as well as a wire version. It's actually just cad plated steel but I would say replace it, they are cheap.
That spring isn't really a spring, it's a bi-metal strip that heats up and pulls the choke open as it heats. The terminals on the outside go to a good ground and a switched power.

The ball is there to pull it down, if yours is missing replace the cam with the correct one for the application.

The check ball goes in the lower section of the secondary diaphragm housing, then the diaphragm and spring then the cover.
No on the vaseline it should seal on its own.
May 15, 2021 at 3:24 PM
Avatar
CITYGUYUSA
  • MEMBER
  • 86 POSTS
I presume you're telling me to drop the ball in the top of the bottom, not into the side of the bottom?
May 15, 2021 at 3:34 PM
Avatar
STEVE W.
  • CERTIFIED EXPERT
  • 15,113 POSTS
The ball goes inside the housing in the vacuum port that attaches to the carb body. There will be a gasket, then the passage goes into the secondary housing and makes a right turn and comes up through the diaphragm and into the top cover. The ball goes in the upturned section right under the diaphragm. The check ball passage will have a round hole with a notch in one side. The idea of the ball is that it slows the rate that the secondary's can open. It's one of the trial and error parts in that carb. Some engines need it and some don't. If the engine needs it you will know because the engine will bog as the fuel flow won't keep up with the increase in air through them and you get a big flat spot and lean mix. The ones that don't need it will run just fine. Most of the OE Holley carbs that came on GM engines don't have it.

May 15, 2021 at 4:25 PM
Avatar
CITYGUYUSA
  • MEMBER
  • 86 POSTS
This connection between the throttle and the secondary plates doesn't do anything at all. I wouldn't think this is just for looks.
May 15, 2021 at 4:35 PM
Avatar
STEVE W.
  • CERTIFIED EXPERT
  • 15,113 POSTS
It will when the carburetor is actually working and creating vacuum and the choke is on.
May 15, 2021 at 5:17 PM
Avatar
CITYGUYUSA
  • MEMBER
  • 86 POSTS
This is the 3rd time I've written this. Which way does the secondary plate attach? Like in the video or flipped around so like 180 degrees. It connects either way.
May 15, 2021 at 7:21 PM
Avatar
CITYGUYUSA
  • MEMBER
  • 86 POSTS
Can't find what Holley calls a therm housing clamp on any website except in a complete electric choke setup kit for $70.00.
May 15, 2021 at 7:25 PM