caliper with no pads and a badly damaged rotor, how to remove the damaged brake rotor?

1998 BUICK LESABRE
255,000 MILES • 3.8L • 6 CYL • 2WD • AUTOMATIC
Avatar
ALPHAA10
  • MEMBER
  • 232 POSTS
I was given this Buick as a gift, but did not realize the condition of its passenger front caliper and rotor until too late to save it. Now, I am left with a caliper with no pads and a badly damaged rotor. Both will be replaced, but first, I must remove the damaged caliper and rotor.

As you can see in the attached photos, there is not much left to work with. Although I have replaced caliper and rotor assemblies before, this has become a challenge.

First, the caliper, itself, appears to have been installed without the two slider bolts which thread into the ends of the sliders. As you can see from the photo, only a hole is left on each slider end, where the bolts (15mm?) belong. I have drawn an arrow where each of the two holes is visible.

Second, the severely damaged rotor (see photo) cannot be removed without removing the caliper assembly. Although I have searched as carefully as possible with my fingers in the dim light (and despite using a flashlight) I cannot find the two bolts which hold the caliper to its frame. If you need another photo, i can repost within 24 hours of reading your message.

This is my first brake work with this car, so feel free to correct any misunderstanding you find in my description.

Please review the caliper photo and suggest where I should find the two bolts. If you have the ability to mark the photos with a bit-map editor like Windows Paint, and draw a circle or arrow to the likely spot, that may help.
Nov 30, 2024 at 8:13 AM
Advertisement
Avatar
STRAILER
  • CERTIFIED EXPERT
  • 53,854 POSTS
Na, the rotor looks fine! (kidding). lol that is a good one! I would look down inside the slider pin bolt holes and the head of the bolt should be down in there. You can't see it because of the caliper, pad and rotor wear, can you take more images please? You don't see this very often.
Nov 30, 2024 at 12:14 PM
Avatar
ALPHAA10
  • MEMBER
  • 232 POSTS
Thanks, Ken, I needed an uplifting moment-- this has been frustrating.
Yes, I'll try to post some photos tomorrow (Sunday). The photos, despite the indirect lighting, turned out surprisingly clear.
The diagrams you sent should help me orient my search.
Thanks for being there, compadre.
BG
Nov 30, 2024 at 11:34 PM
Advertisement
Avatar
STRAILER
  • CERTIFIED EXPERT
  • 53,854 POSTS
Yep, you are welcome, have a great week, talk to you soon!
Dec 1, 2024 at 10:31 AM
Avatar
ALPHAA10
  • MEMBER
  • 232 POSTS
When I began my photo session this afternoon, working outside, the sun was too low on the horizon for a revealing photo of the caliper area. Will try again tomorrow, under better lighting, and post the new photos ASAP.
BTW-- I did look inside each caliper slider, and inside (a short distance) is a hex recess socket. My concern is simply, shouldn't there be a bolt at the end of the slider tube, at the very tip? That area appears to have a few machine threads, though I did not touch it with a screwdriver tip, to determine threads are actually present.
BTW-- Has 2CarPros changed its website? I noticed a Facebook login prompt that I had not seen before. And the diagrams you sent as attachments had disappeared, even after I logged out and then relogged. Do you know what is happening with (1) the website and (2) your attachments?
Dec 1, 2024 at 6:11 PM
Avatar
STRAILER
  • CERTIFIED EXPERT
  • 53,854 POSTS
There is no nut at the end of the slider bolt, just the Allen wrench, I believe it is 3/8. We did not change our website, so I am not sure what is going on.
Dec 2, 2024 at 9:42 AM
Avatar
ALPHAA10
  • MEMBER
  • 232 POSTS
Ken, as I recall, you provided diagrams or other graphics to help me orient my search for the two bolts. When I checked your previous message this morning, the attachments were missing. Could you post them again? Thanks.
Dec 2, 2024 at 10:02 AM
Avatar
STRAILER
  • CERTIFIED EXPERT
  • 53,854 POSTS
Sure, here are the caliper replacement instructions. Check out the images (below). Please let us know what happens.
Dec 2, 2024 at 10:15 AM
Avatar
ALPHAA10
  • MEMBER
  • 232 POSTS
To be continued.
Dec 2, 2024 at 10:31 PM
Avatar
STRAILER
  • CERTIFIED EXPERT
  • 53,854 POSTS
lol, sounds good.
Dec 3, 2024 at 9:56 AM
Avatar
ALPHAA10
  • MEMBER
  • 232 POSTS
Today, I was out working on the car and managed to understand the caliper "problem "well enough to plan my next move-- to buy a 9mm / 3/8-inch hex socket wrench to remove the caliper slider bolts that will permit removal of the caliper from the caliper bracket. It's all downhill (in a good sense) from there.
The next challenge is using the torque wrench with accuracy, though someone told me, all I have to do is tighten the bolts with as much force as I can apply, and that should be enough.
Working alone, I am going to use the "gravity" bleed method and (almost)) completely replace the original brake fluid. My brake fluid will come from a new, unopened container.
Dec 5, 2024 at 6:03 PM
Avatar
STRAILER
  • CERTIFIED EXPERT
  • 53,854 POSTS
I would not over tighten these bolts and use the torque specs above. The gravity bleed works well so there is no problem there. Let me know if you need anything else.
Dec 6, 2024 at 9:43 AM
Avatar
ALPHAA10
  • MEMBER
  • 232 POSTS
You notice, I quoted a nameless somebody who meant his comment facetiously, I am sure. Over-tightening should be avoided at all costs, as anyone who has been through that will attest.
BTW-- I want to be sure of the terms used in your spec sheet. Is the 38 foot-pound spec applied to the slider bolts' hex socket? How would I attach a torque wrench to an L-shaped hex socket wrench? Or do I need to buy a socket with a hex male end?
Dec 6, 2024 at 11:05 AM
Avatar
STEVE W.
  • CERTIFIED EXPERT
  • 15,113 POSTS
As you intend to work on this vehicle, I would suggest buying a hex bit set like those shown. They work far better with a torque wrench and enable you to use regular ratchets with them. You can get functional ones from places like Harbor Freight or Lowes stores for around $30.00 or you could go to Snap-On and get a 210EFTAMY set for around $300.00.
Dec 7, 2024 at 12:45 AM
Avatar
ALPHAA10
  • MEMBER
  • 232 POSTS
Thanks, Steve. If this is what I need to apply proper torque, I need a set, but there is a complication.
1. On inspection, my caliper appears to have a 3/8-inch hex socket at the end of a one-inch-deep recess/cavity, with smooth, non-hexagonal sides. The depth was measured from the cavity's shoulder to its bottom, and suggests the hex socket head set you mention will not reach all the way to contact the hex end, inside the caliper.
2. In my previous post, I asked whether 38 foot-pounds is the proper torque to apply to the caliber slide bolts. Is 38 foot-pounds correct?
3. Do you use a digital or mechanical torque wrench? What do you think of the digital torque wrench as a useful tool?
Dec 7, 2024 at 7:37 PM
Avatar
STEVE W.
  • CERTIFIED EXPERT
  • 15,113 POSTS
They make long-tipped versions of those as well. Yes 38 lbft is correct. I have beam style, click style and digital. Digital is nice but not really needed unless you get into things that call for a torque and then additional angle to reach the full torque. Even then the other types still work fine, you just need to do some math in your head.
Dec 8, 2024 at 6:33 AM
Avatar
ALPHAA10
  • MEMBER
  • 232 POSTS
Awaiting the arrival of the long-tipped hex socket, I discovered my newly purchased set of Raybestos ceramic front disc brake pads lacks anti-rattle clips. Raybestos was no help, claiming their "Professional Grade" brake pads are not shipped with anti-rattle clips. I have searched everywhere, but you may know of a source for the brake clips.
* The original clips are probably damaged beyond repair.
Dec 13, 2024 at 11:53 AM
Avatar
STEVE W.
  • CERTIFIED EXPERT
  • 15,113 POSTS
You are looking for a brake hardware kit. The place you bought the pads from should have them available. If they don't then one of your local parts store like NAPA or O'Reilly should have them.
Dec 13, 2024 at 6:05 PM
Avatar
ALPHAA10
  • MEMBER
  • 232 POSTS
Thanks, Steve.
I have covered that route, already, but I did not try NAPA.
They seem to have everything, whenever I check.
Dec 14, 2024 at 11:27 AM
Avatar
STEVE W.
  • CERTIFIED EXPERT
  • 15,113 POSTS
If you bought Raybestos pads the rattle clips should already be riveted to the pads like the circled areas. If they are not then you likely have the wrong parts. The only other item are the guide pin bushings and those generally are not included unless you buy specific brands. Those are available as GM-19261286, AC Delco-18K279X, or Raybestos-H5609A
Dec 14, 2024 at 2:23 PM
Avatar
ALPHAA10
  • MEMBER
  • 232 POSTS
That is the answer I needed.

Of course, I had checked for the clips with a customer service rep at Raybestos, but he said my pad set does not include anti-rattle clips. (So much for staff training at Raybestos.)

On receipt of my front pads set purchase from RockAuto.com, I had checked the clear plastic-covered pad set, but did not know how an "anti-rattle clip" should look. Your photo exactly matches my pad set and its riveted clips.

Many thanks for that one-- I was all set to order another pad set which came up on NewEgg.com when I searched with "Buick 1998 LeSabre brake hardware". The NewEgg search engine delivered two hits, after ignoring my "1998" and "LeSabre" descriptors. (See photo) The photo shows four clips at the very bottom of the image.
Dec 14, 2024 at 6:06 PM
Avatar
STEVE W.
  • CERTIFIED EXPERT
  • 15,113 POSTS
The picture was the Raybestos set. I figured seeing them might help. I buy a lot of parts from rock auto for my personal and family vehicles. If I need a part faster I get it from one of the local parts places.
Dec 14, 2024 at 10:35 PM
Avatar
ALPHAA10
  • MEMBER
  • 232 POSTS
Just an update to Steve and Ken, on my progress.
Everything is going well-- I removed the original, damaged brake assembly, including rotor, caliper and what remained of the pads. Fortunately, no further damage (such as to the wheel hub) was found. I installed the new rotor, remanufactured caliper and new pads without a problem.
Now, I am working with Liquid Wrench to remove the banjo bolt from the old caliper assembly, which may be an original. Following instructions for a simple pad and rotor replacement, I carefully placed the old caliper body, with its hose still connected to the brake system, off to the side where it will not put pressure on the brake line flexible hose. Yet, now, I find I have no leverage with the loose caliper assembly to remove the banjo bolt.
So, Liquid wrench may help, and I have suspended operations for 48 hours to let the penetrating oil loosen the bolt. Please advise whether the petroleum distillate of the Liquid Wrench product somehow could penetrate into the system brake fluid. All the old brake fluid will be flushed out soon, anyway.
If penetrating oil does not loosen the banjo bolt, I can remove the newly installed brake caliper and its pads, and remount the old caliper body, to give me more leverage.

Dec 24, 2024 at 2:37 PM
Avatar
CARADIODOC
  • CERTIFIED EXPERT
  • 34,306 POSTS
Yes, damage can occur. I've been waiting on the side to learn the solution, but you brought up something that had just prompted me to stick my nose in here. No petroleum product must be allowed to contact any rubber part that will contact brake fluid. Same for cast iron parts because that is porous and can absorb that contamination. Rubber brake parts are not compatible with petroleum products. They will swell and become mushy. Most often we find that in master cylinder reservoirs. There it causes the rubber lip seals to grow past the fluid return ports and blocks them. The heat from braking migrates into the fluid causing it to expand. Since it's trapped, it builds pressure and self-applies the brakes even harder.

The problem is that contamination travels throughout the hydraulic system, so the only proper repair is to remove all the parts with rubber parts that contact brake fluid, including any new ones, flush and dry the steel lines, then install all new rubber parts. That gets to be pretty expensive.

I apologize for not following all the details up to this point, but if you can't get a banjo bolt loose on a rubber flex hose, first try hitting the head with a hammer. Next is to hit the caliper casting right next to the threaded hole to distort it and break the bolt free. That often works for rusted bleeder screws too.

Heat also helps to get bleeder screws freed up, but a propane torch won't get hot enough. Unlike bleeder screws, banjo bolts are a much softer metal, so them being rusted tight isn't very common. I have a suspicion you'll be okay if you wash the penetrating oil off the bolt and hose fitting as soon as you get them apart. Brake fluid is going to run out. Let that occur for a minute or two just in case a little contamination worked its way in. The brake fluid will run out faster if you loosen the cover on the reservoir.

Steve would have covered this, but I wanted you to get this information as soon as possible before you ran into trouble. I'll be waiting to see when you get this solved.
Dec 24, 2024 at 3:44 PM
Avatar
ALPHAA10
  • MEMBER
  • 232 POSTS
This was to be a thorough brake system overhaul on the Buick, so I bought all new parts for front disc and rear drum brake (including rear brake shoe cylinders), but have not installed them into the brake lines. Tomorrow, first thing, I'll remove the new caliper-- not yet connected to the brake lines-- and reinstall (re-bolt) the old caliper. From that firm leverage, perhaps I can remove the banjo bolt, and wash out the contamination. For what it is worth, after using the penetrating oil spray, I did use brake parts cleaner to spray down the brake hose near the caliper fitting, and the fitting itself.
After your message, I went immediately outside to turn the old caliper upside down, so the wicking effect may be limited. That is, the banjo bolt is at the lowest point, now, with the brake hose moving upward from the caliper. The brake hose is still protected from any hanging pressure.
Thanks for your prompt response-- the product, Liquid Wrench, states it is harmless to rubber and plastic, but I am now alarmed the company would be so careless with its instructions for use. .
Hopefully, this will avert damage, particularly since I do not plan to use the car until after I have flushed all four brake lines with new brake fluid, then installed the brake components. Your prescription to "dry" the brake lines seems hard to do, unless you mean flood the system with new brake fluid, and with bleeder valves wide open or even removed, drain everything. .

Please feel free to comment, further. I know everyone is away for the holiday, so your counsel is important.

Many, many thanks!
Dec 24, 2024 at 6:31 PM
Avatar
STEVE W.
  • CERTIFIED EXPERT
  • 15,113 POSTS
As Doc says you don't want petroleum to get to the brake parts, but in this case you should be fine. The outer parts are generally very good at resisting any damage, just keep it away from any internal parts. Like spraying it into a fitting or inside the lines. You also learned the lesson of breaking the bolts loose before you remove the caliper. Most of us learn that lesson the same way! Replace the parts, flush with new fluid, bleed the brakes completely and you should be fine. Get a couple cans of brakekleen and spray off all the areas you used the other spray, and it will clean it all away. There is a guide for bleeding on this site if you need it.
Dec 25, 2024 at 4:39 AM
Avatar
ALPHAA10
  • MEMBER
  • 232 POSTS
Thanks Steve, I had dreaded the prospect of clearing the brake lines, while I still had no idea of how far the penetrating oil had diffused into the banjo fitting. I'll let you know how it goes.
* It brought a smile to read your comment about a preliminary loosening of the banjo bolt-- even 32 FP is a lot to struggle with on a hand-held item, especially while stiil attached to the brake hose..
Dec 25, 2024 at 11:47 AM
Avatar
ALPHAA10
  • MEMBER
  • 232 POSTS
Update:
Finished the right front caliper, with no problem. After re-bolting the old caliper to the knuckle, I had leverage to remove the banjo bolt with ease. With the Liquid Wrench episode driving concern about penetrating oil contamination, I first bled the original caliper from its bleeder value, and then at last removed the banjo bolt and let the thing drain for about one minute.
Tomorrow, I plan to finish bleeding the right front caliper, using a one-man method.
And Friday, UPS will bring me a left front caliper to replace the defective caliper I had ordered.
Dec 25, 2024 at 7:09 PM
Avatar
STEVE W.
  • CERTIFIED EXPERT
  • 15,113 POSTS
I'll tell you something about most penetrating oils, very few actually work. However what you did will be fine. Keep us in the loop please.
Dec 25, 2024 at 7:48 PM
Avatar
CARADIODOC
  • CERTIFIED EXPERT
  • 34,306 POSTS
Yup, I don't mean to cause you to over-react. The flushing the lines I mentioned is only after the entire system has been badly contaminated. Yours hasn't. The steel lines are not made of cast iron, so they're not porous and won't absorb the contamination. It's sufficient to blow in Brake Parts Cleaner from a spray can, then blow that out with compressed air. Carburetor Cleaner is designed to evaporate very quickly. Brake Parts Cleaner hangs around much longer to give you time to scrub and wash parts, so it needs the extra air to disperse it.

Every year I did a demonstration where I had two beakers, each with about an inch of fresh, clean brake fluid. I dropped a brand new wheel cylinder lip seal into each one, then I added one drop of power steering fluid or engine oil into one of them. Set them aside for one week, then pulled those seals out, washed them off, and passed them around. The contaminated one had grown by roughly ten percent, and felt soft and slimy.

I have four stories to share to add context to this problem. The first one was in a class at a Sears Auto Center training center. In the 1970s and 80s, a common tool was a "bleeder ball" that held up to about four gallons of brake fluid. It was pressurized with compressed air, then attached to the brake fluid reservoir to pressure-bleed the system. When it needed to be refilled, the hole was so small that we used a long plastic funnel, and poured the new fluid from five-gallon cans. We heard about one fellow who knew about the contamination concern, so when he used a funnel they used for engine oil, he thoroughly wiped it out first with a rag. It was the residue left behind that contaminated all that new brake fluid, and then got into the brake systems. Sears had to replace all the rubber parts on over a dozen cars. Once we heard that, we had a special, dedicated funnel used just for brake fluid.

Second story, also at Sears, a down-and-out fellow came in with a Ford station wagon he had just bought for $100.00. The right rear brake was locking up, but it was the only one that was applying. Found the seller had filled the reservoir with automatic transmission fluid. Made the brakes work really nice, . . . for a few days, then the problems started. Don't know what the final outcome was on that one. We didn't go any further other than to explain what had happened.

Third one happened to a K-car when I was working at a very nice Chrysler dealership in the '90s. Fellow just got back from a cross-country trip. He claimed that at one gas stop, the attendant checked the fluids and asked if he should top off the brake fluid, (something we never do except during regular brake system services). "That must be where he put in power steering fluid by mistake". I never pressed him, and of course he couldn't remember where that happened or the name of the place, but I think he did it himself and just didn't want to admit it. How did he know it was power steering fluid? I don't remember if we repaired that one or if he went on his way.

The fourth one was on a '59 Edsel I bought from an estate auction. Was a big, heavy, fun car to drive, but after a few weeks, I drove it 55 miles to a car show swap meet. Left home with a full tank of gas. Ran out on the return trip, less than half way back home. Coasted into a gas station but missed the pumps by about ten feet. Couldn't push the car by hand, but luckily my folks were following me. Used their Caravan to push me to the pump. Once I got home and hit the granite driveway, the right front brake locked up and the tire skidded all the way to the garage. Found that reservoir was also filled with automatic transmission fluid. I was able to buy the wheel cylinder lip seals individually, and I found the seals for the single master cylinder. I flushed the steel lines, but I neglected to replace the rubber flex hoses. That should have been part of the repair, but the car was old enough that parts we hard to find. I sold the car to a well-off friend of a friend who parked it behind his business. It sat there unmoved for years, so he probably gave up on it. According to my training, those rubber hoses, which are porous, held some of that contamination which leached back out to recontaminate the new fluid.

There's one more place where contamination often occurred. That was on older cars with tapered front wheel bearings that we had to manually "repack" with grease, by hand. Rebuilding calipers and wheel cylinders was a common practice since it was much more expensive back then to replace those assemblies. Regardless, once the services were completed, the last step was to refill the brake fluid and bleed the system. Typically the rubber bladder seal under the reservoir cap had pulled out over time as the brake fluid traveled out, down to the wheels. That had to be poked back in, and we did that with a fingertip. We just wiped our hands on a rag after repacking the bearings, then with that residue on our fingers, poking the rubber seal back put that contamination on it. Today it's common practice for specialists to wash their hands with soap and water before handling any of those rubber parts to avoid getting fingerprint grease on them.

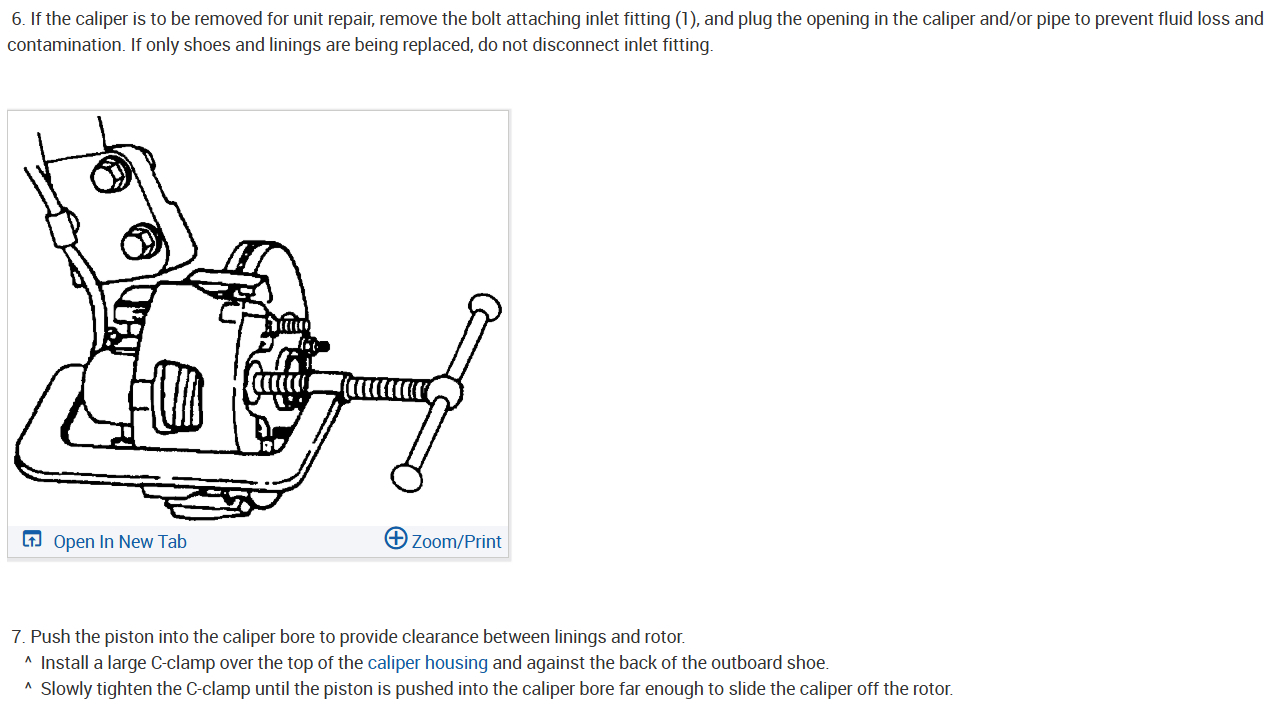
On one hand, we worry about a little residue that's going to contaminate the system, and on the other hand, we find systems completely filled with the petroleum product, and it still takes a few days to show up. Since the grease residue on fingertips rarely resulted in a complaint or objectionable symptoms, I'm pretty sure your penetrating oil is not going to cause a problem. The reason I presented this wondrous story is, in part, for the benefit of others who are researching this topic. Most competent do-it-yourselfers aren't aware of this, and once told of it, many don't believe it. It's easier to be aware of it and work to avoid problems than it is to fix them later.
Dec 26, 2024 at 1:19 PM
Avatar
ALPHAA10
  • MEMBER
  • 232 POSTS
Thanks for that, Caradiodoc-- you had every reason to be concerned, based on your anecdotal experience with even grease-contaminated fingertips.
Ideally, I tend to err on the side of caution, to be thorough in my research before beginning a project, and stop if I need further information.
But not in this case, reasoning, "This is a frozen bolt, and Liquid Wrench is stated by the OEM to be safe for plastics and rubber parts. What could go wrong?"
When my amber caution light went off later, it was only after reflection the OEM said nothing about brake parts, specifically. So, I posted at 2CarPros, hoping I had not made a mistake with the Liquid Wrench.
My general caution is now reinforced by the single instance I did not check my procedure more thoroughly. Precaution before the fact is always desirable, even if caution may seem pointless and even stupid. Easier to avoid a mistake than to recover from one.
And a note of thanks also to Steve W, who gave me more perspective on the matter.
Both of you make 2CarPros a top DIY reference point, and I am sure thousands of others share my gratitude for the effort you guys invest in making the world a better place.
Dec 26, 2024 at 3:04 PM
Avatar
ALPHAA10
  • MEMBER
  • 232 POSTS
Update:
This afternoon, I finished work on the front right caliper, and checked and rechecked all fittings. Even inspected the area for leaks after wiping down everything. I was amazed at how well my one-man home-made bleeder worked. The brake pedal now seems very solid, though I am alert for surprises,
My front left caliper replacement is due tomorrow via UPS, and I look forward to the operation. The work should go more quickly, with few, if any, new questions.
The original front left caliper was ordered many months ago as a left-and-right pair. However, on receipt, I inspected each caliper from only the outside, without checking the bleeder screw on the left front caliper more closely. On the day I finally opened the bleeder screw, I found embedded rust on the valve assembly and its mounting hole thread. Here's hoping for a refund for the defective caliper, despite the time lag..
When the front left caliper is mounted, it is time for slow and patient testing on my quiet urban street, to make sure the pads are embedded properly.
*BTW-- on analysis of the old brake parts, the wear pattern on both rotors was typical of a frozen outboard pad. This time, I used silicone ceramic lubricant, and sparingly, on the sliding points of each brake pad back, paying attention to the wear areas that could affect outboard pad wear..
Dec 26, 2024 at 3:35 PM
Avatar
STRAILER
  • CERTIFIED EXPERT
  • 53,854 POSTS
Good job, it sounds like you have the repair under control, just make sure you get the right caliper, (bleeder on top) let us know if we can help, yep, this was the dream of the site owners, to make the world a little bit better than they found it.
Dec 27, 2024 at 10:35 AM
Avatar
CARADIODOC
  • CERTIFIED EXPERT
  • 34,306 POSTS
I think when they say WD-40 is safe for rubber, they're referring to the same places you'd find rubber that could be covered with leaking engine oil or transmission fluid, namely, the engine hoses, suspension bushings, and the outer covering on brake hoses. I never gave it much thought until now, but we used to recommend brake hose replacement when we saw big cracks in the outer covering with ends of white reinforcing threads hanging out. Those cracks expose the inner hose to leaking engine oil. That's the rubber that has to be compatible with brake fluid, a glycol product. Something more to keep me awake at night.
Dec 27, 2024 at 11:37 AM
Avatar
ALPHAA10
  • MEMBER
  • 232 POSTS
Update.
Jan 2, 2025 at 1:05 AM
Avatar
ALPHAA10
  • MEMBER
  • 232 POSTS
Update:

January 2, 2024

Tuesday, I installed the front left caliper, pads and rotor, but need a refresher on bleeding the caliper assembly. I know the general procedure, and to bleed before the road test, but still got a less-than-perfect pedal on the front left caliper before its road test. Should I have restarted the entire process, beginning with the newly installed front right caliper, and then on getting a firm pedal on the right moved to bleed the front left caliper?

Here is the procedure I followed with the front left caliper:

1. With the bleed screw completely closed, I pump the brake pedal slowly at least five times, and release slowly after each pump.

2. At the bleed screw, I slowly open it, and check for bubbles as they may emerge through the clear plastic tube, running into my half-full bottle.

3. I re-close the bleed screw and repeat the pump procedure until the fluid emerging in step 2 is free of bubbles.

On completion, the pedal had felt firm, but maybe 15 minutes after pump testing in the driveway, the pedal became squishy again. So, again, the question-- should I have re-bled the original starting point, the newly installed front right caliper, and only then, after the pedal was firm, move to the front left caliper?

After more bleeding and pumping, the pedal again felt minimally solid, and I did a very slow road test on my residential street. During that test, the brakes performed well, despite the less-than-perfect pedal. The road test was completed; I finally entered my driveway and stopped easily. Because it was very dark, I halted operations for the night.

Tomorrow, I plan to repeat the bleed test, making sure of the brake master cylinder fluid level before and after each pumping series

So, my guess about the pedal is I had released too much brake fluid from the reservoir without first checking fluid level, and air had entered the system. My problem with checking master cylinder fluid level is the (old) reservoir was coated inside with a dirty grey film, which made fluid level check almost impossible without uncapping, and looking inside the reservoir filler neck. How can I clean the inside of the reservoir? My only practical solution is to use a handful of Q-tips and carefully swab the inside where I can view the actual fluid level.

* Compared to the front right cylinder replacement, the front left was a beast. First, the caliper bolt on the assembly had been without lubrication for years, apparently, and the heat from prior braking use-- ultimately, with metal-to-metal contact-- probably made it even worse. The only thing which worked for me, after inserting a 3/8-inch hex bar tool socket, and striking it with a hammer (with no result), was to use Liquid Wrench, a penetrating oil, applied with its needle-thin applicator beak, directly on the base of the original caliper bolt. After a minute or two, the bolt released under wrench pressure.
Jan 2, 2025 at 4:00 AM
Avatar
ALPHAA10
  • MEMBER
  • 232 POSTS
To the 2 car pros administrator--
Your edit interval is much too short!
Each new post is closed too quickly, often before completion. Some items take more time to organize for clarity, and clarity is needed on a technical website.
Since the ideal interval varies with the content of the post, a good way to handle the problem is to restart the timer after each edit, no matter how small.
Obviously, it would help to lengthen the standard timed interval, as well.
Jan 2, 2025 at 4:10 AM
Avatar
STRAILER
  • CERTIFIED EXPERT
  • 53,854 POSTS
The interval is two hours?
Jan 2, 2025 at 10:26 AM
Avatar
STEVE W.
  • CERTIFIED EXPERT
  • 15,113 POSTS
For initial bleeding I do a gravity bleed. Just leave the bleeder open until you get clean fluid/ Then top off the reservoir. Then I generally either finish with a power bleeder or grab anyone to help. Then it's the old, Pedal down, hold, open bleeder, close bleeder, pedal up. Repeat until you get no air. If I'm working by myself, I use a one-man bleeder valve. Basically, a spring-loaded one-way valve with a hose that attaches to the bleeder, you attach the hose, toss the valve into a container that you also add some fluid to. Now you just step on the pedal, let it return, repeat. Fill reservoir, repeat until you get no air.
Jan 2, 2025 at 10:46 AM
Avatar
ALPHAA10
  • MEMBER
  • 232 POSTS
Steve W,

For a system flush, I expect to use the gravity bleed method, too.
For this job, I decided to use a home-made one-man bleeder hose and bottle. With that method, I eventually got clean fluid from the front left, with no bubbles. I closed the valve, and that process seemed complete, so I was surprised by sponginess, later.
Since all parts are new, there should be no leaks, and air infiltration from the master cylinder is probably the culprit. My mistake was failing to watch the master cylinder fluid level, which may have allowed the system to suck in new air, but I am uncertain until I check the pedal, next.

1. On keeping the master cylinder fluid level visible from the side, without having to look into the cap, how can I clean a "viewing window" on the driver's side of the reservoir? To avoid flooding the system with bottom sediment from the master cylinder, but create a small window, would an ordinary Q-tip effective?

2. On my question about re-bleeding the calipers, in order must I bleed. Thee front right, again, if the front left line has reintroduced air? Doesn't seem I would need to do that, but I need to ask.

BTW, how much new fluid will a complete system brake fluid flush need? My Buick manual specs will give me that answer, but as with changing the oil, some fluid remains, limiting the total. And there is also the new fluid lost in the flush, itself.
Jan 2, 2025 at 2:47 PM
Avatar
ALPHAA10
  • MEMBER
  • 232 POSTS
KenL,

Whatever it is, the edit window seems way too brief, with a 10-minute window, likely. The point being, I guess, that keeping a window open is simply extra server overhead, making this a judgment call.
Jan 2, 2025 at 2:55 PM