One of the valve cover baffles has broken off

1968 CHEVROLET CAMARO
123,000 MILES • 7.4L • V8 • 2WD • MANUAL
Avatar
CITYGUYUSA
  • MEMBER
  • 86 POSTS
I took off my valve covers to clean the rust off the chrome and part of one of the baffles had broken off and was bouncing around under the cover.

My question is, do I need to replace the cover because of the broken baffle or are they not that important?
Aug 27, 2019 at 2:48 AM
Advertisement
Avatar
PATENTED_REPAIR_PRO
  • CERTIFIED EXPERT
  • 1,853 POSTS
It all depends on what the baffle was designed to do.
I would have to say, most likely whatever is was designed to do, can't be that big of a deal, but it is odd that knowing it was broken and bouncing around that it didn't make a noise loud enough that you could hear it.
If the baffle is just to let's say direct some squirting motor oil away from the inside of the valve cover to help cut down on valve cover gasket leaks, then I would say, just check for a massive valve cover gasket leak over the weeks/months to come after putting it back together without repairing it and see if it needs to be replaced, the baffle that is.
I looked these up after my comment, I was close.
https://www.manciniracing.com/valcovbreatb.html
"baffles are designed to mount inside your Moroso valve covers under the breather hole. They'll keep oil from getting into the breather"
http://mewagner.com/?p=1221
"will not guarantee that oil consumption will not be excessive if the PCV valve is not properly baffled. The following experiment shows just how dramatically oil consumption through the PCV system can be reduced with proper baffle design."
https://www.jalopyjournal.com/forum/threads/valve-cover-baffle-or-not.654764/
".if it doesn't have a baffle, then the breather you put on it is going to get oil-soaked in no time"
Aug 27, 2019 at 4:37 AM
Avatar
CITYGUYUSA
  • MEMBER
  • 86 POSTS
So yet again I find myself fishing yet another piece of the "baffle" out from under the valve cover. You can see it in one of the pics I've attached. It came from the valve cover that only has the 2 side pieces of the baffle left. This particular side was the PCV while the other side, also pictured below, that is still intact is the oil filler cap. Note that the other picture is an inside view of the still intact baffle. If you look towards the bottom you can see that something appears to be drilling or cutting into the metal in the center of the baffle.

These valve covers have been in this car for over 20 years now. They were installed prior to me buying the car. It seems odd that something just recently has decided to cut into and literally remove the PVC baffle almost completely and on the other side it's like it's just beginning the process. I would think if something was hitting the cover that would be a real obvious noise but there's a piece of the baffle that was stuck back in behind the last valve and yet the only noise I heard was at initial startup it seemed like the engine has a bit of a clunky sound that seems to go away as it warms up but that makes no sense with what I found that should be more of a piece of tin bouncing between the valves making a more high pitched ching, ching....ching, ching...ching, ching, ching...
From right to left:
1: Is the piece of metal that was ripped from the baffle laying beside the upturned valve cover.
2. This is the driver's side PCV baffle. You can see that the 2 bent finger-like structures that were attached are gone leaving only the sides which are not that visible because of the angle.
3. This is what the passenger side baffle looks like. Both baffles are identical in structure.
4. This is a wider view of the driver's side baffle.
5. Finally, you can see that something is beginning to rip away at the bottom of that baffle too. Right now it almost looks like a legitimate hole but it's not. It's been cut away by a rocker or whatever. But why now? And way up at the top of the valve cover, not at towards the bottom where the fingers hang down.
Oct 16, 2019 at 4:17 PM
Advertisement
Avatar
CITYGUYUSA
  • MEMBER
  • 86 POSTS
I forgot to say that I'm retiring these valve covers as I've been lucky that I don't think any real damage has been done. I'll probably go for something in aluminum that doesn't rust like the cheap chrome they put on these under hood parts. Stainless would be an option as well.
Oct 16, 2019 at 4:20 PM
Avatar
STEVE W.
  • CERTIFIED EXPERT
  • 15,113 POSTS
Replacement would be a good idea. Those baffles are supposed to keep the oil that splashes around under the rocker covers from getting into the PCV system or soaking an air filter. Aluminum work OK if you use the better finned ones as they help remove more heat from the oil that chrome actually holds in. As for what is hitting the baffle, do you know who's rockers and push rods you have? I have been hearing a lot about issues with proform push rods wearing at the tips and as they shorten the rockers tip farther and can hit if the covers are short.
Oct 20, 2019 at 12:08 AM
Avatar
CITYGUYUSA
  • MEMBER
  • 86 POSTS
No, I don't know for sure but they look original to me. The next time I'm out I'll see if I can find some markings. I'm also going to see if there's any play to them although I can't imagine that the only place that would be hit would be just those baffles. I just don't understand how these covers have been in service since I've owned the car and with the little mileage it gets suddenly these rockers or rods are flailing around under the cover? You'd think I would hear it hitting the cover.

I have aluminum ones on the way. This era of having access to items that years ago would have taken many trips to junkyards is interesting. I can get all this stuff but none of it is available in the store's everything must be ordered online. You'd think the store would try to compete a little bit anyway. Well I got 2 other issues to get into so I'd best get typing.
Oct 20, 2019 at 1:47 PM
Avatar
STEVE W.
  • CERTIFIED EXPERT
  • 15,113 POSTS
Yeah it's getting hard to find anything like a real speed shop these days. I still have a couple in the area that deal with the old school stuff. But they also don't do online sales. I've bought a lot of stuff over the years.
Stock shouldn't move unless maybe a rocker stud is pulling free? Toss a straightedge over the tips of the studs and see if any are moving? They get a lot of oil so you might not hear it hitting
Oct 20, 2019 at 3:24 PM
Avatar
CITYGUYUSA
  • MEMBER
  • 86 POSTS
I'm not sure how I would put a single edge against the rods if that's what you are suggesting. but I took a picture and what I see it that some seem to bend one way and others another. I would've expected a little more consistency between them. They don't feel loose to me although some of the tops might twist like a 1/16". Especially looking at the third one.
Oct 28, 2019 at 12:17 PM
Avatar
STEVE W.
  • CERTIFIED EXPERT
  • 15,113 POSTS
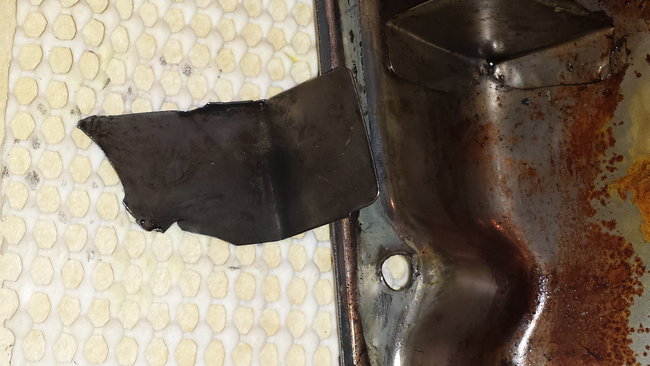
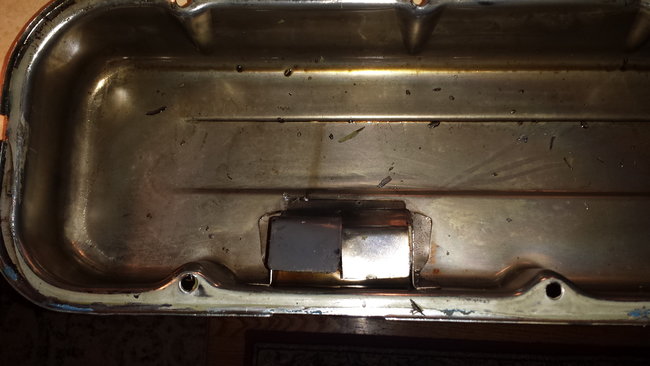
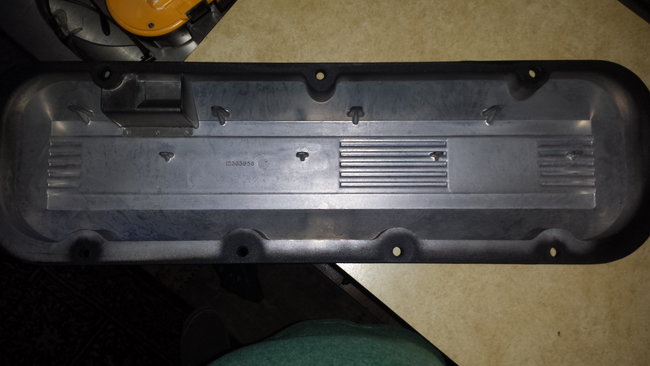
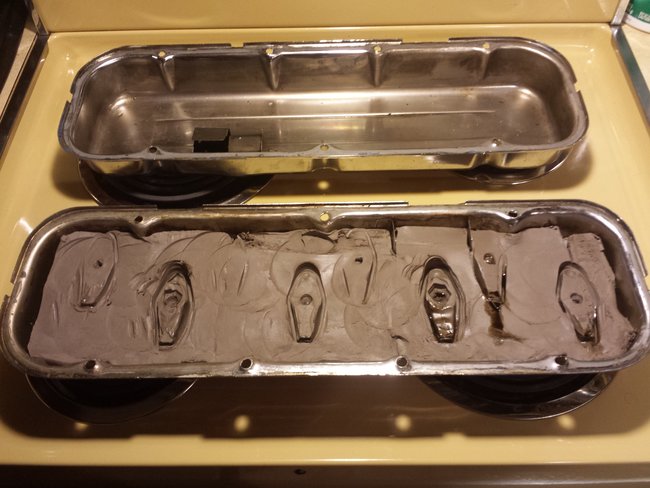
Shouldn't be needed. Those are screw in studs so unless they are loose that isn't the problem. While you have the covers off you might want to run through the valve clearance setting. As you have a "bad" set of valve covers you can make an oil catcher out of one. You basically cut the top of the cover out over each rocker arm so you can reach the rocker pivot nut and adjust them. The cover helps catch the oil that will spray around while the engine is running. As you are getting new valve covers I would wait until you have them in hand. You can also use oil deflector clips, but the oil then tends to overload the oil returns and runs down the heads onto the exhaust.

Adjusting hydraulic lifters with the engine running isn't that hard, just messy.

Start the engine and allow it to warm up.
Turn off the engine
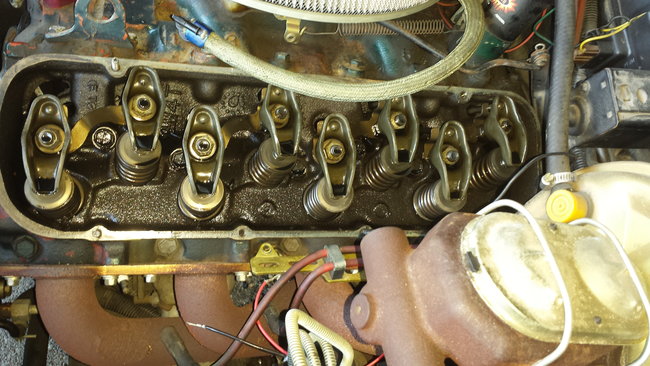
Remove one valve cover and install your deflector clips, custom valve cover to keep the oil splash to a minimum.
Start the engine back up.
Begin to loosen one of the rocker arm adjusting nuts until you hear the valve-train just start to "clatter".
Slowly tighten the rocker nut back down just until the louder "clatter" just stops.
Turn the wrench an additional 1/8 - 1/4 turn to set the lifter preload.
Repeat this procedure on each of the remaining valves.
Turn off the engine.
Remove your oil splash apparatus and install the good valve cover.
Repeat these steps on the other side of the engine.

A mechanics stethoscope is handy to test for loose parts as the engine is running, you touch the stethoscope to the top of the rocker stud to hear if there are loose parts.
Oct 28, 2019 at 2:12 PM
Avatar
CITYGUYUSA
  • MEMBER
  • 86 POSTS
Now when I blow up that picture that shows the valves, rods, lifters, etc. A couple of questions. The first 3 lifters have some minor wear on the front/side edges. That surprised me because they shouldn't be hitting anything. They don't need to be replaced or anything it's just weird to see scuffs and scrapes and rough edges.

Does it matter that some appear to be leaning left or right?

Regarding the valve clearances aren't they moving at an incredible pace while the engine is running? Kind of like 8 butterflies fluttering from front to back and vice-versa? And you're able to get a socket onto them and keep it there while you untighten and retighten? Do you have to worry about the rocker going off-side or anything? Why are most aftermarket rockers flat? Why do people buy anodized aluminum rockers when no one will see them? Is there a reason for the cupped part?

What makes the oil come up through the rods? Why isn't there oil laying in the lower part of that trough like the rockers? Trough is spelled so odd.
Oct 30, 2019 at 8:33 PM
Avatar
STEVE W.
  • CERTIFIED EXPERT
  • 15,113 POSTS
Those are the rocker arms, the damage is likely from the loose metal from the baffle rubbing on them. It was loose in there and the motion of the vehicle would have moved it around a bit.
The leaning is sort of a trait of the way the splayed rocker arms in the big block set.
They actually are not moving that fast. Lets say your engine is warmed up and idling around 600 rpm. The camshaft is turning at half that speed so 300 rpm. The rocker arms are moving at roughly one half of that speed because of the way the valve lifters ride on the camshaft lobes. It's a bit more than that but it depends on exactly what grind the camshaft is. If you look at the center of the rocker arms you will see the nut that retains it and under that is the rocker trunion ball. The nut doesn't move while the engine is running and the ball keeps the rocker arm centered under it. The real trick is listening for the noise as they get loose while you are adjusting them.
Aluminum aftermarket rocker arms do not use the same system, they use a solid pin type trunion that has a bearing on each side and a bearing on the tip that rides on the valve stem. They are flat because the extra material is needed for those three bearings. This reduces the amount of friction in the valve train and allows for a more radical grind on the camshaft while the lowered friction creates less heat, however they usually are not real good for street use on a daily driver because the aluminum has a bad habit of flexing under the bearings and cracking over time. Not a big deal on a race engine that might be expected to last through one event and be torn down and inspected between events, but most people are not going to like tearing the top off an engine every weekend to inspect and adjust the valves.
The anodizing helps when you are inspecting them as well as keeps the material form corroding while on the shelf. Plus it looks great when you have the engine apart..

The cupped area on them is the push rod seat. Without it the push rod wouldn't stay in place. It, the rocker trunion and the opposite end of the rocker arm are three of the places with the most pressure and friction in the entire engine. The only place with more is at the base of the valve lifter where it sets on the camshaft.

The oiling system is a marvel on GM engines of that vintage. Both the small and big block engines can actually operate just fine with under 20 psi of oil pressure at idle with a 10 psi increase per 1000 rpm! They normally run more pressure to counteract the pressure losses from the bearings and protect them better. Oil is also used to cool many of those high friction areas and carry the heat into the oil pan so it can be extracted by the moving air. The oiling system starts in the oil pan, goes up through the oil pump, through the oil filter and then into the oil galleries located between the camshaft and crankshaft. The galleries feed oil to the crankshaft and through it to the rod bearings. They also feed oil to the valve lifter cam area and by using ports in the valve lifters the oil pressure eliminates valve lash by pressurizing the interior of the lifter. That same oil goes through a small hole in the lifters push rod cup and up through the hollow push rod and squirts out of the small hole you see at the edge of the push rod seat on the rocker arm. That lubricates the trunion ball and when it hits the rocker tip it is thrown around and lubes the valve stem tips. From there the oil returns through the return ports in the cylinder head. Ideally the oil you have laying in the rocker arm tips and a couple other places in the casting are all you want to see because you want the oil to lube the engine and return to the pan as fast as possible because you want it to carry away the heat. On many performance engines people will open the oil returns up as far as possible, polish all of the areas and even paint those areas with glyptal or similar to help return the oil to the pan faster.


Oct 30, 2019 at 11:44 PM
Avatar
CITYGUYUSA
  • MEMBER
  • 86 POSTS
Is there a real possibility of a starvation mode that helping get that oil back faster will help? I would think that GM accounted for every drop and if there was a need for polishing they'd have done it. Similar to the cooling system where you don't want the coolant going through the system too fast or it won't have time to leach the heat out and vice-versa in the radiator and if you go to slow you could overheat from leaving the heat in the engine too long. I have to say it's a marvel that these things work at all. Just getting all those passageways bored into the block without accidentally crossing one another is pretty amazing for those days. Every system has a balance except the windshield wiper fluid. Was it that hard to put two wires in the washer bottle to alert the driver that the fluid was running low and the same with the power steering? Every other fluid system has a dummy light, well not in my car but most cars. And as we all know there's nothing worse than driving in snow slop without windshield washer fluid.

It's funny how they pushed back over the cost of seatbelts and now they've gone way past the government requirements with expensive sensors and computers making cars way too dependent on that crap and adding an extra $20K to the price. It was the engineering that made the car not the software and I know software, it's what I used to do for a living. I do like the self-tuning that's a marvel thanks to the O2 sensor. That's actually pretty cool. But all the spying crap they're building in is no good. I can't imagine a world in which my vehicle won't let me hit the gas peddle to get around an 18-wheeler and would instead leave me behind it for the next 2 hours only letting me see the back of that truck. To me, that's almost a claustrophobic feeling not being able to see around what's in front of you.

The other day I was given a rental while my '07 Mustang was in the shop for some bodywork. I didn't even know how to start the thing it has keys but they only need to be nearby. So if your neighbor is out raking you might be able to take their car for a joy ride just don't turn it off. Then it has this rear camera which I didn't understand with all the geometry drawn on overtop of reality what it was attempting to tell me. Of course, I got the big red X when I stopped to close to the person in front of me and it beeped like every couple of seconds but I had no clue why it was beeping nor what I was supposed to do. There's a whole system of buttons on the mirror to be able to set your radio and a bunch of other things that are way worse than driving with your cellphone. I mean you push one button that takes you to a sub-screen and the choices never end but you're not looking at the road. I was trying to find out the miles per gallon so when I had to fill it up I would have an idea how much gas to put in but I never found it. Then I noticed that it displays the speed limit sign on the dash telling me how fast I was supposed to be driving or controlling how fast I was going? It still let me drive without my seat belt a habit I got into with the Camaro and it's lap belts. I just felt so out of my element. I like driving my cars they are enjoyable but that was too much work and a little unnerving.

I got the new covers on Tuesday. These are a bit narrower at the top by about an inch because of their inverted v-shape. It doesn't go to a point but both sides are tapered in at the top and they have random "posts" for lack of a better word that come down in the center of the valve area maybe an inch and along the upper edge which are all but the height of the cover. I did take a cover out to the car and set it on. It seems to fit. However, the instructions say you're supposed to mold clay into the cover and then hand turn the engine through a cycle. They also have the same baffle setup as my old pair. which doesn't excite me. Most of the others I looked at just have a piece of plate aluminum covering the holes which would seem a much easier and cleaner way to accomplish the same thing.

Once I get the clay into the covers I'm supposed to hand turn the engine through a cycle but my crank has 3 bolts, not a center bolt. If I take out the plugs will I be able to turn it by hand? My covers didn't come with the instructions I saw them on some site I was looking at but I can't find them anywhere now. Anyway, they listed a spec of I think 1/8" clearance does that sound right? I guess I could call them.
Nov 2, 2019 at 2:53 PM
Avatar
STEVE W.
  • CERTIFIED EXPERT
  • 15,113 POSTS
Not starvation, it's more to get the heat out by getting the oil back sooner, it also helps keep the oil from pooling anywhere and building sludge. When the polishing is done you do the heads and inside the lifter valley in the block, plus you remove any casting flash in the rest of the block. That helps prevent anything from breaking free and causing issues as well.

The new electronics are there mainly because of the new crop of drivers who don't pay attention to anything but their cell phones. Some of it I like, some I don't want.

The clay is used to make sure you have clearance inside the covers, I doubt you will have an issue with a stock engine, if you had a radical roller cam with very high lift and aftermarket high ratio roller rockers then I'd worry. For the clay, a small chunk on each rocker arm that is close to the cover is all that's needed. So in your picture that would be the areas on the lower (exhaust) rockers where the oil is, On the upper rockers (intakes) you would put it over the push rod end. Play dough works as well and even white bread if you make it into a dough ball. Then you roll the engine over with the covers just setting on top with no gasket and check it for the amount it is mashed.
One thing I like to do is to put a strip of tape on the rocker first, then the clay, that makes it easy to clean up and helps keep it out of anyplace as well, like the oil ports on top of the rockers.

Nov 3, 2019 at 4:08 PM
Avatar
CITYGUYUSA
  • MEMBER
  • 86 POSTS
Anything on how to turn the engine with my 3 bolt crank? Could I pull it by using the belt? The plugs have to come out which is fine I do want to see what their condition is with all the problems that I've been dealing with and I can check the compression. This is worse than rehabbing a house. It just goes and goes one thing leading to another.
Nov 4, 2019 at 3:57 PM
Avatar
CITYGUYUSA
  • MEMBER
  • 86 POSTS
I almost forgot. how thick should I put this clay on?
Nov 4, 2019 at 3:59 PM
Avatar
STEVE W.
  • CERTIFIED EXPERT
  • 15,113 POSTS
Welcome to the wonderful world of engines LOL... You may be able to turn it over with the belt with the plugs out. I don't know of any GM engine that didn't have a center bolt to retain the balancer, you might want to look real close to see if yours is missing or broken off, from the factory they were painted when assembled and can blend in. It is a rather important thing as there is nothing else that retains the dampener. As for the clay, you want at least 1/8 or so clearance so the easy way is to roll it out on a sheet of wax paper so it's 3/16 or so thick. Then put it on, if it doesn't hit you're good to go.
Nov 4, 2019 at 5:19 PM
Avatar
CITYGUYUSA
  • MEMBER
  • 86 POSTS
I have a serpentine system on the front so the one bolt balancer is no longer.
Nov 5, 2019 at 9:47 PM
Avatar
STEVE W.
  • CERTIFIED EXPERT
  • 15,113 POSTS
Think you could take a couple pictures of that? Please? I've never seen a GM crankshaft that didn't have a center hole for a bolt.
Nov 5, 2019 at 10:31 PM
Avatar
CITYGUYUSA
  • MEMBER
  • 86 POSTS
https://marchperformance.com/chevy/chevy-big-block/pulley-and-bracket-kits/long-water-pump/chevy-big-block-long-water-pump-ultra.html This is the newest one it's got a hole in the center to get at that crank but mine doesn't. I don't know that I can get back far enough to get a picture. If I can I will but this is what it looks like with that difference. I don't have the entier setup but most of it.
Nov 6, 2019 at 9:04 PM
Avatar
STEVE W.
  • CERTIFIED EXPERT
  • 15,113 POSTS
That is a neat kit. Nice of them to hide the crank bolt for you. I would pull the plugs and see if you can turn it over with the belt, a big block is sort of stiff but you may be lucky. If not you could make a strap wrench out of a chunk of belt wrapped around the pulley and a cheap impact socket with slots ground in the sides so the belt can slip through. Sort of like the picture but using the piece of belt for better grip and protection of the pulley.
Nov 6, 2019 at 9:51 PM
Avatar
CITYGUYUSA
  • MEMBER
  • 86 POSTS
I was thinking maybe a piece of wood with holes at the 3 bolts that could have a bolt in the center or even a stand up handle on one of the sides to turn it.
Nov 7, 2019 at 5:29 PM
Avatar
STEVE W.
  • CERTIFIED EXPERT
  • 15,113 POSTS
Whatever lets you turn it over. You could even use the starter if you just set the covers on loose, just use some spray tack on the gaskets to hold them to the cover and set one in place. Then hold it there with a bungee or someones hand, bump it over so it turns 4 times and if you don't feel the cover move and the clay doesn't show impacts, clean it up and install them. Do one side then the other.
Nov 7, 2019 at 6:27 PM
Avatar
CITYGUYUSA
  • MEMBER
  • 86 POSTS
I finally had some time to do very basic start. I didn't have enough clay to actually fill even a single side of the valve cover which I wasn't thinking I would need to fill it but the top set of valves are so close to the bottom of the valve cover I barely got an indentation. But I could see where the bolts are. What I noticed was how close the one valve is to the oil baffle. If it's not or wasn't hitting the baffle that would be a miracle. Let me know your thoughts.

Secondly, as we talked about the new covers are a lot lower than these. As you can see by the lower set of valve imprints they are deep. I didn't use a seal because I just wanted to know where to drill through the old valve covers but a seal is what like 1/8" thick? I did check the seating of the new covers they do fit and seem to seat but I haven't rotated the engine yet. You told me that the valves don't move all that much and being stock you wouldn't expect any problems.

I was really curious about your thoughts on the valve and the baffle. It's the 2nd valve from the right. You can see where the baffle used to be by the 2-90 degree straight pieces of metal coming down from the top.
Jul 15, 2020 at 6:38 PM
Avatar
STEVE W.
  • CERTIFIED EXPERT
  • 15,113 POSTS
Easier test. Take a small bit of clay, put it around the baffle so it is about 1/4 inch thick all around it and set it in place. If it doesn't touch you are good to go.
Jul 15, 2020 at 9:01 PM
Avatar
CITYGUYUSA
  • MEMBER
  • 86 POSTS
You're talking about the new covers? I was talking about the old ones because I couldn't figure out how that baffle came apart. It was literally torn off but how long was it like that? And while that valve might explain 1 side of a split baffle it doesn't explain the other side which when I had the cover off the first time was still intact. Even looking at the location of the other 3 valves across the top they are literally against the side of the valve cover.

But yeah, I'll definitely test around both baffles on both sides because they are in totally different places than the old covers.
Jul 16, 2020 at 7:00 PM
Avatar
STEVE W.
  • CERTIFIED EXPERT
  • 15,113 POSTS
Most of them are only spot welded in place so if one side was hitting it would tend to keep flexing until the welds failed and it fell off.
Jul 16, 2020 at 7:48 PM
Avatar
CITYGUYUSA
  • MEMBER
  • 86 POSTS
Yesterday, I got my weekly update from camaros,net and it just happened to have a post about valve lash. I thought I'd compare notes but the words were getting heated so I thought let me see what other posts are out here and it seems that it's a hotly debated topic about how to accomplish the task after you find out if you have solid or hydraulic lifters. One person discussed what you told me but most were doing it on a cold engine in firing sequence and then turning the engine 90 degrees some OCIC, I think it was, acronym. I'll post the thread here just so you can look at it and offer your 2 cents https://www.camaros.net/threads/valve-lash.477993/#post-1783238825 And like I said that's just one of many that have difficulty agreeing.
Aug 1, 2020 at 11:06 PM
Avatar
STEVE W.
  • CERTIFIED EXPERT
  • 15,113 POSTS
It makes a big difference if you have solids or hydraulic. With solids you rotate the engine until all travel on a rocker has stopped and the lifter is on the base circle of the cam, then use a feeler gauge to adjust the lash to either the stock number or whatever the cam maker asks for. With hydraulic lifters it depends on what lifter and cam combination you have. With all stock parts the best method is to adjust them with the engine warm in the manner I posted earlier. For the initial cold adjustment you can use the exhaust opening and intake closing method (EO/IC) which is just rotating the engine and adjusting each rocker when you see them stop moving as the engine reaches TDC. Unless you are using something like a Rhoads lifter set up. Those can be a bear to adjust because you need to see the lifters to set proper preload as they are designed to bleed down when the engine is running. The issue of the lifter pumping up and causing valve float is true, however that usually happens with the engine running at very high rpm, like drag racing.
Aug 2, 2020 at 6:41 AM
Avatar
CITYGUYUSA
  • MEMBER
  • 86 POSTS
So, stick with what you told me including "Turn the wrench an additional 1/8 - 1/4 turn to set the lifter preload."? I felt like they couldn't even agree on the amount you had to turn to preload it.
Aug 2, 2020 at 3:47 PM
Avatar
STEVE W.
  • CERTIFIED EXPERT
  • 15,113 POSTS
Reading through it shows that most have a set method that works but they don't specify as to what parts they are using. If you were building an engine with all non-stock parts like a high lift cam, racing lifters, roller rockers and such you use a bit different method. For stock rockers and cam the entire idea of hydraulic lifters it to self adjust for wear using the oil pressure in the engine. To do that you need the preload to be enough to compensate for any heat changes as well as the wear. On most engines 1/4 turn will work, but anything up to 1 full turn will work on stock parts as they have a lot of extra travel in them.
Aug 2, 2020 at 4:22 PM
Avatar
CITYGUYUSA
  • MEMBER
  • 86 POSTS
I've had to replace the front suspension springs and I need to do the hood and the trunk. Now I'm thinking about the valve springs. I don't know how old anything in the engine is or if it was rebuilt a couple thousand miles ago. Is there a way to know if these springs are sprung and have seen better days?
Aug 4, 2020 at 1:12 AM
Avatar
STEVE W.
  • CERTIFIED EXPERT
  • 15,113 POSTS
The only good way is to remove them and use a valve spring tester to see what spring rate they have. If you are doing that then it's usually easier to just buy all new and do the valve stem seals at the same time.
Aug 4, 2020 at 6:35 AM
Avatar
CITYGUYUSA
  • MEMBER
  • 86 POSTS
I was just about ready to bump my engine to check the valve covers to ensure clearance. I already noted I was a screw short and that the rubber grommet that they gave me for the PCV wasn't big enough for my PCV. I tried to use the old grommet but it's not soft like the new one and isn't giving a 1/16th to go in the hole. I guess I could grind it down a bit.

It was then that I realized I had 2 holes on one side and one on the other. What the heck. Never in a million years did I even look at these for extra holes. I either didn't see it or I never handled them together to realize that it was 2 different holes. Anyways it's an actual hole but I have no idea what it's for or what to do about it. Oddly it has a rubber grommet on it where the other one was in the bag with the screws. I would have just moved the PCV to the other side but it doesn't fit there either. Can I plug the odd hole somehow?

The first 2 pics are just the grommets beside each other. They're not that really much different size wise just one's hard or aged rubber and the other is willing to squeeze into the hole. The 3rd pic was what I was planning to use for the PCV hole. The 4th pic of the hole in the other cover is for what?

PS. Since I was down on the ground thinking maybe one of the valve cover screws jumped I decided I might as well check for a center bolt on the drive pulley and sure enough it wasn't covered over like I had thought. Just can't see it because of the radiator being so close. That's a good thing. No valve cover screw however.

What's your definition of a bolt? A screw? I always thought a bolt had to do with the absence of a slot(s). But from the dictionary a bolt is a connector that holds things together with the help of a nut. Another childhood theory up in smoke. So the crankshaft is a screw?
Sep 8, 2020 at 4:33 PM
Avatar
STEVE W.
  • CERTIFIED EXPERT
  • 15,113 POSTS
You can sometimes get hard rubber to soften using hot water and soaking it, but it's better to replace it. The reason for the extra holes is due to the different ways the older engines were vented. One hole would be for the oil filler, one is for the PCV and the last either goes to a hose that comes out the base of the air cleaner or a push in filter both were used over the years. The PCV allows the crankcase gases to go back into the intake manifold, isually through a vacuum fitting under the carb or on one of the runners, while the other line or filter lets in the fresh air to scavenge those gasses out. Without the air inlet the vacuum on the PCV can cause serious seal damage and oil use from the constant vacuum. On modern engines they have tightened that system up and now if you tried using an open filter on the PCV system it would set a vacuum leak code and cause a high idle. Not a problem on the older engines. I usually think of a screw as a smaller fastener, under about 1/4 inch and using a driver while a bolt is larger and uses a wrench. Either one can go into a tapped hole or use a nut. When you really start looking though there are multiple definitions for each depending on the field of study you are looking in. Mechanics call them one thing, machinists use different words and engineers even others. Then there are differences in other countries as well.
Sep 8, 2020 at 6:04 PM
Avatar
CITYGUYUSA
  • MEMBER
  • 86 POSTS
So what am I looking for to put in that hole? My air cleaner isn't a snorkel type which had a puck on the snorkel with a hose connected and it's not the type with a filter on the side of the base of the air cleaner. I have an open sides air cleaner with a base and a lid.
Sep 8, 2020 at 9:26 PM
Avatar
STEVE W.
  • CERTIFIED EXPERT
  • 15,113 POSTS
There used to be kits that let you install a line into the air cleaner but in your case you could just go with a simple push in breather in one hole. Then a PCV valve with a hose over to the port under the carb. Then a push in oil filler. K&N, Earls and others make kits where you just need to know the size of the hole in the grommet.
Sep 8, 2020 at 9:54 PM
Avatar
CITYGUYUSA
  • MEMBER
  • 86 POSTS
I have the PCV and the filler cap.

Is this push in something I can get from Autozone or is it a specialty that I would have to find from Eklers or 396, etc?
Sep 9, 2020 at 3:03 PM
Avatar
STEVE W.
  • CERTIFIED EXPERT
  • 15,113 POSTS
They should have some on the shelf near the chrome parts for engine dress up. Unless you want something matching what you have or something nicer. They can also order them from what they show online.
Sep 9, 2020 at 3:26 PM