when i turned on the defroster i was showered in sunflower seeds

2008 TOYOTA RAV4
30,000 MILES • 4 CYL • 4WD • AUTOMATIC
Avatar
POWNAL55
  • MEMBER
  • 6 POSTS
i left a bag of sunflower seeds in the car. i took it out and noticed a hole in the bag, mouse in the car. i trapped the mouse but he left a problem. when i turned on the defroster i was showered in sunflower seeds, about a cup full. since then i get seeds each time i use the defroster or the upper vents on the dash. the car has duel zone heat and ac. the defroster and dash vents on the driver side blow cold air, no warm air. on the passenger side it blows warm air but blower is weak. can i remove the dashboard vent covers and insert a small vacuum hose in to suck out the seeds? how do they come off? does it sound like wiring damage? I did turn the blower on high until all the seeds came out. But running it from day to day produces occasional seeds and I can here them rattling around behind the dash. The fact that the passenger side blower is weak suggest a blockage somewhere. thanks
Jan 11, 2010 at 7:50 AM
Advertisement
Avatar
RASMATAZ
  • CERTIFIED EXPERT
  • 75,992 POSTS
Welcome to 2carpros and TY for the donation Try this be advised its not gonna be easy Notes INSTRUMENT PANEL: UPPER INSTRUMENT PANEL: REMOVAL REMOVAL 
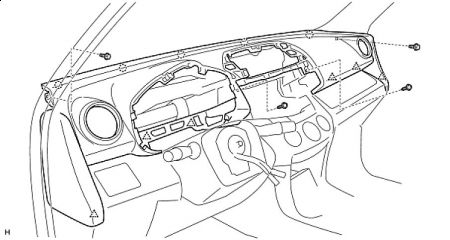
TABLE OF BOLT, SCREW AND NUT HINT: All bolts, screws and nuts relevant to installing and removing the instrument panel are shown along with their alphabet codes in the table below.


https://www.2carpros.com/forum/automotive_pictures/12900_ac1_3.jpg

DISCONNECT CABLE FROM NEGATIVE BATTERY TERMINAL CAUTION: Wait at least 90 seconds after disconnecting the cable from the negative (-) battery terminal to prevent airbag and seat belt pretensioner activation.


https://www.2carpros.com/forum/automotive_pictures/12900_ac2_2.jpg

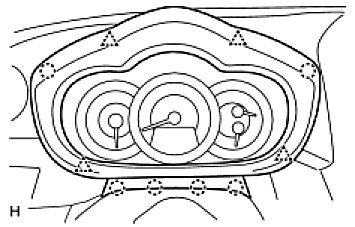
REMOVE INSTRUMENT CLUSTER FINISH PANEL SUB-ASSEMBLY (a) Using a screwdriver, detach the 4 clips, 6 claws and remove the instrument cluster finish panel. HINT: Tape the screwdriver tip before use.


https://www.2carpros.com/forum/automotive_pictures/12900_ac3_1.jpg

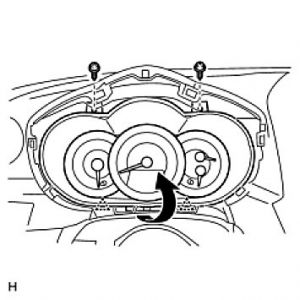
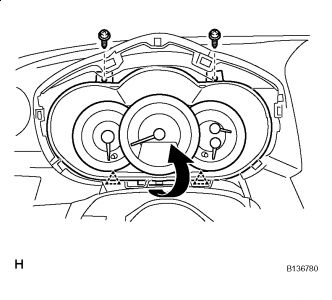
REMOVE COMBINATION METER ASSEMBLY (a) Remove the 2 screws. (b) Pull the combination meter as indicated by the arrow in the illustration to detach the 2 clips. (c) Disconnect the connector and remove the combination meter.


https://www.2carpros.com/forum/automotive_pictures/12900_ac4_1.jpg

REMOVE NO. 2 INSTRUMENT CLUSTER FINISH PANEL CENTER (a) Using a screwdriver, detach the 3 clips, 3claws and remove the cluster finish panel, then disconnect the connector. HINT: Tape the screwdriver tip before use.


https://www.2carpros.com/forum/automotive_pictures/12900_ac5_1.jpg

REMOVE NO. 1 INSTRUMENT CLUSTER FINISH PANEL CENTER (a) Using a screwdriver, detach the 3 clips, 3claws and remove the cluster finish panel, then disconnect the connector. HINT: Tape the screwdriver tip before use.


https://www.2carpros.com/forum/automotive_pictures/12900_ac6_1.jpg

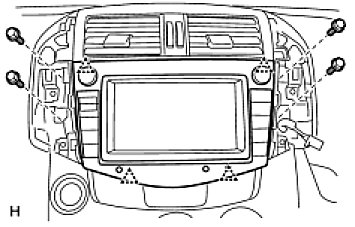
REMOVE RADIO RECEIVER (a) Remove the 4 bolts. (b) Detach the 4 clips, remove the radio receiver and then disconnect the connectors.


https://www.2carpros.com/forum/automotive_pictures/12900_ac7_1.jpg

REMOVE INSTRUMENT PANEL REGISTER ASSEMBLY CENTER (a) Using a screwdriver, detach the 5 clips and remove the instrument panel register. HINT: Tape the screwdriver tip before use. REMOVE GLOVE COMPARTMENT DOOR ASSEMBLY See: Lower Instrument Panel\Removal 
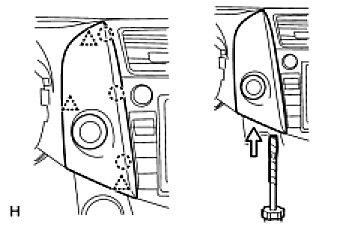
REMOVE FRONT PILLAR GARNISH LH See: Headliner\Service and Repair\Removal REMOVE FRONT PILLAR GARNISH RH See: Headliner\Service and Repair\Removal 
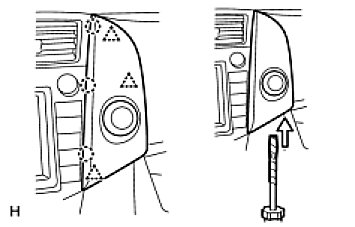
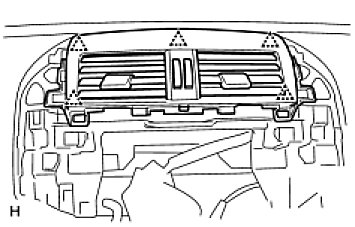
REMOVE UPPER INSTRUMENT PANEL


https://www.2carpros.com/forum/automotive_pictures/12900_ac8_1.jpg

(a) Remove the 2 bolts from the passenger airbag. (b) Disconnect the passenger airbag connector. 
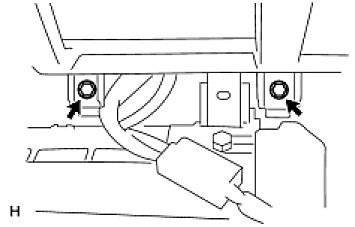
(c) Remove the 2 bolts and 2 screws. (d) Disconnect the connectors and clamps. (e) Detach the 6 clips and 5 claws and remove the instrument panel.


https://www.2carpros.com/forum/automotive_pictures/12900_ac9_1.jpg

Jan 12, 2010 at 2:53 PM
Avatar
BLUELIGHTNIN6
  • CERTIFIED EXPERT
  • 16,542 POSTS
Okay, well then it will definitely need disassembled. Follow these steps to gain access to the vents.. Disconnect negative battery cable Remove instrument cluster finish panel sub-assembly by using a screwdriver to detach the 4 clips & 6 claws then remove the instrument cluster finish panel. (Tape the screwdriver tip before doing this to prevent damage) Now remove the combination meter assembly by removing the 2 screws. Pull the comb. meter as indicated by the arrow in the picture below to detach the 2 clips Disconnect and remove the combination meter..


https://www.2carpros.com/forum/automotive_pictures/261618_Graphic_266.jpg

Remove number 2 instrument cluster finish panel center by using the screwdriver again to detach 3 clips & 3 claws then remove the finish panel and disconnect the connector. Remove number 1 instrument cluster finish panel center same way as number 2.. Remove radio receiver by removing 4 bolts and detaching 4 clips. Now radio should come out, disconnect connectors. Now remove instrument panel register assembly center by using screwdriver to detach the 5 cilps. Next remove the glove compartment door and both front pillar garnishes. (Pillar garnishes have 10 claws that need detached) Last remove upper instrument panel by removing 2 bolts from passenger airbag. Disconnect airbag connector. Remove 2 bolts and 2 screws. Disconnect the connectors and clamps. Detach 6 clilps and 5 claws and remove instrument panel. You should finally have access to the ducts now.
Jan 12, 2010 at 2:56 PM
Advertisement