1994 Toyota Camry Changed Head Gasket, now Will not Start

1994 TOYOTA CAMRY
140,000 MILES • 4 CYL • FWD • AUTOMATIC
Avatar
DIY-DUD
  • MEMBER
  • 12 POSTS
Hi guys, 4 cylinder Toyota Camry 1994

I replaced the head gasket and put it all back together correctly but it will not start.

As a side note, a fuse was blown, the blue 100 A one that says it was for the wiring harness. (this may be attributed to the fact that I forgot to disconnect the batter until halfway to the head gasket)

I am suspecting that the problem may be with the distributor or related components.

I have a manual that discusses an ohmmeter, but I don't have one of those. It discussed checking for spark but I am not exactly sure how to do that (the spark plug wires are contained within deep rubber tubes). I also need clear instruction on how to check for spark etc… There are two different wires connected to the distributor other than the sparkplug wires. I am not sure what each of them are exactly. My question is similar to another question posted on this site, but I did not see what the solution was on that post:

http://www.2carpros.com/forum/1994-toyota-camry--wont-start-vt113967.html


Thanks for the help

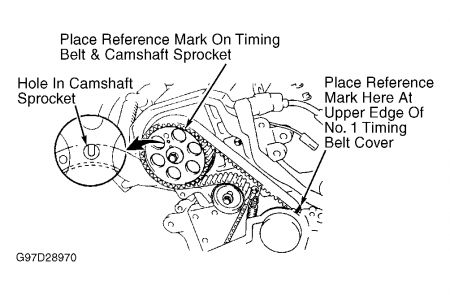
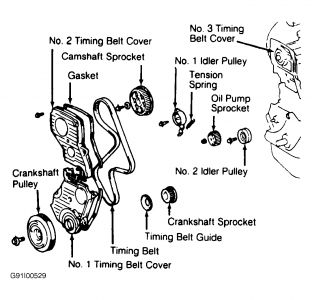
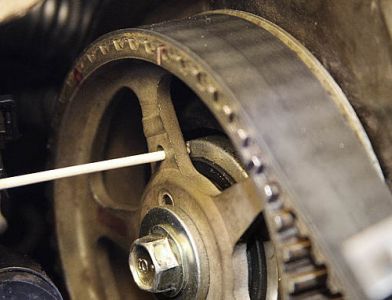
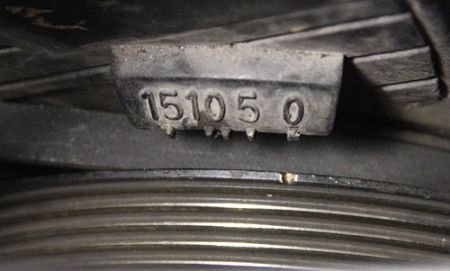
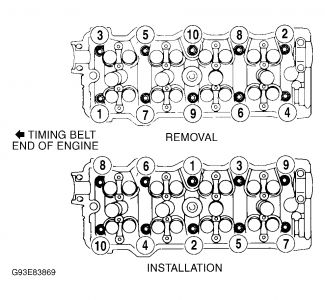
[img:caad092b3b]http://www.2carpros.com/forum/automotive_pictures/298324_ignitionDiagram_1.jpg[/img:caad092b3b][img:caad092b3b]http://www.2carpros.com/forum/automotive_pictures/298324_Enginshot_1.jpg[/img:caad092b3b][img:caad092b3b]http://www.2carpros.com/forum/automotive_pictures/298324_DistribDiagram_1.jpg[/img:caad092b3b][img:caad092b3b]http://www.2carpros.com/forum/automotive_pictures/298324_toy944cylDistributor_1.jpg[/img:caad092b3b]
Jan 7, 2009 at 11:30 PM
Advertisement
Avatar
DAVE H
  • CERTIFIED EXPERT
  • 13,384 POSTS
Hello ... and thanks for the donation .. much appreciated

Firstly we need to see if you are getting a spark !! ..

remove a spark plug

plug it back into it's wire

hold plug and lead at rubber insulater with insulated pair of pliers (do NOT hold with hands you will get a shock)

hold bottom of plug about 1mm away from a good ground point on engine (any clean bolt head etc. needs to be a clean ground use a bit of sandpaper if needed)

have someone crank engine over for you ... you should see spark jumping across spark plug gap ??

let me know ?
Jan 8, 2009 at 8:48 AM
Avatar
DIY-DUD
  • MEMBER
  • 12 POSTS
Hi Dave, thanks for the reply,

I got spark on the one that I tested, #1 plug wire.

With all the plugs back in, and the engine is turned over, it does not start but it sound a little like sporadic sputtering.

What should I do next.
Jan 8, 2009 at 10:37 PM
Advertisement
Avatar
DAVE H
  • CERTIFIED EXPERT
  • 13,384 POSTS
ok so we are getting spark .. just check you are getting fuel ..can you smell fuel on plugs after cranking .. I think you are .. when you say it is spluttering, I think you have the timing slightly out ..you will need to check this before we go any further ? make sure your both timing marks are all set correctly ...these HAVE to be spot on ? let me know


https://www.2carpros.com/forum/automotive_pictures/266999_time2_4.jpg


https://www.2carpros.com/forum/automotive_pictures/266999_time3_1.jpg


https://www.2carpros.com/forum/automotive_pictures/266999_time_9.jpg

Jan 9, 2009 at 6:15 AM
Avatar
DIY-DUD
  • MEMBER
  • 12 POSTS
The reference marks that I have are lining up. Here is the Upper Cam and the lower Zero mark on the Crankshaft Pulley lining up:


https://www.2carpros.com/forum/automotive_pictures/298324_campullypointer_1.jpg


https://www.2carpros.com/forum/automotive_pictures/298324_zeromarker_1.jpg

Do I have to remove the whole bottom assemble to see if the crankshaft Sprocket is lined up? I thought that the zero mark "0" on the lower timing belt cover indicated that the crankshaft was at Bottom Dead Center. I have tried moving the alignment of the upper camshaft a few teeth before and a few teeth after to see if it would start but it would not. When I did the spark test and there was an open spark plug hole, it looked like gas vapor was sprayed out of it - if it was then it was getting gas. I am not sure if this information is relevant to the starting problem, but I also noticed on the spark plug that I tested that it was being covered with black - I had sanded them before reinstalling them after the head gasket job, but during this time of trying to start the engine black stuff coated the plug.
Jan 9, 2009 at 2:04 PM
Avatar
DAVE H
  • CERTIFIED EXPERT
  • 13,384 POSTS
You are getting fuel and spark .. you are quite correct your marks are lined up ... but once they are lined up .. before you totally tighten #1 idler pulley to spec .. crank needs to be set @ 45 degree BTDC mark on #1 timing belt cover .. explained below .. so the timing is slightly out on crank ... changeing it @ cam will be pot luck at getting it right .. but i applaud you for your setting skills ..let me know if you need any of the other diagrams !!


https://www.2carpros.com/forum/automotive_pictures/266999_45_1.jpg

Installation Install No. 2 idler pulley (if removed). Install and tighten bolt to specification. See TORQUE SPECIFICATIONS . Ensure idler pulley is clean and rotates smoothly. Install No. 1 idler pulley and tension spring (if removed). Pry No. 1 idler pulley away from timing belt area as far as possible. Temporarily tighten No. 1 idler pulley bolt. Ensure idler pulley is clean and rotates smoothly. Using crankshaft pulley bolt, rotate crankshaft so timing mark on crankshaft sprocket aligns with timing mark on oil pump housing. See Fig. 4 . This will position keyway in crankshaft sprocket at 12 o'clock position. CAUTION:If reusing timing belt, ensure reference marks on timing belt align with reference marks placed on crankshaft and camshaft sprockets. Ensure timing belt is installed in original direction of rotation. Ensure all sprockets and idler pulleys are clean. Install timing belt on crankshaft sprocket, oil pump sprocket, No. 1 idler pulley, and then No. 2 idler pulley in sequence. Install timing belt guide with cupped side away from crankshaft sprocket and flat side toward timing belt. Install No. 1 timing belt cover and new gasket. Align crankshaft pulley key groove with key in crankshaft. Install crankshaft pulley. Install and tighten crankshaft pulley bolt to specification. Rotate crankshaft clockwise so cylinder No. 1 is at TDC on compression stroke. Ensure timing mark on crankshaft pulley aligns with "0" mark on No. 1 timing belt cover. If reusing timing belt, ensure reference mark on timing belt aligns with upper edge of No. 1 timing belt cover. Rotate camshaft, and align hole in camshaft sprocket with alignment mark on camshaft bearing cap. See Fig. 2 . Install timing belt on camshaft sprocket. If reusing timing belt, ensure reference mark on timing belt aligns with the reference mark on camshaft sprocket. Ensure tension exists on timing belt between the crankshaft and camshaft sprockets. CAUTION:DO NOT rotate crankshaft counterclockwise, as viewed from timing belt end of engine. Loosen No. 1 idler pulley bolt 1/2 turn. Rotate crankshaft pulley 2 full revolutions clockwise from TDC to TDC. Ensure timing mark on crankshaft pulley aligns with "0" mark on No. 1 timing belt cover, and hole in camshaft sprocket aligns with alignment mark on camshaft bearing cap. See Fig. 2 . If timing marks are not aligned, remove timing belt and reinstall. Rotate crankshaft clockwise 1 and 7/8 revolutions and align crankshaft pulley "0" mark with 45-degree Before Top Dead Center (BTDC) mark on No. 1 timing belt cover. See Fig. 5 . Tighten No. 1 idler pulley bolt to specification. See TORQUE SPECIFICATIONS . Install No. 2 timing belt cover and gaskets. Install and tighten spark plugs to specification. To install remaining components, reverse removal procedure. Install all bolts/nuts on right (timing belt side) engine mount before tightening to specification. On Camry, when installing control rod and bracket on strut tower and right (timing belt side engine mount, tighten bolts to specification in sequence. See Fig. 6 . On MR2, tighten engine mount bolts in correct locations. See Fig. 7 . Adjust drive belts to proper tension.
Jan 9, 2009 at 2:53 PM
Avatar
DIY-DUD
  • MEMBER
  • 12 POSTS
I followed the procedure and it sounded like it wanted to start for the first second but then it cranked as if there was no spark (sound wise). I also found this in my manual:


https://www.2carpros.com/forum/automotive_pictures/298324_SilverGreen_1.jpg

My spring was silver, but I basically did that procedure before and no start. So, what do we do next?
Jan 9, 2009 at 5:15 PM
Avatar
DAVE H
  • CERTIFIED EXPERT
  • 13,384 POSTS
can you manually line up the cam timing marks and let me know where the crank timing mark is now ?? is it @45 degree ..@ "0" or is it way out ... does the belt feel tight .. ?? also do you have access to a compression tester ?? and you mentioned the plug you pulled was black covered .. was this an oil wet black or like a coal dusty blackness ?? let me know NOTE:For 1992-96 Camry, the timing belt tension spring procedure has been revised. See REVISED TIMING BELT TENSION SPRING PROCEDURE (1992-96 CAMRY) . Revised Timing Belt Tension Spring Procedure (1992-96 Camry) From Toyota technical service bulletin EG001-99; January 29, 1999: For 1992-96 Camry, the timing belt tension spring procedure was revised. When replacing the timing belt on 1992-96 Camry with 2.2L, tension spring MUST be replaced. The revised tension spring 0 (Part No. 905-7-17003) is a 13-coil design which replaces the original 10-coil design. spring Free Length Except 1999-00 Camry......1.811" (46.00 mm)


https://www.2carpros.com/forum/automotive_pictures/266999_spring_1.jpg

Jan 10, 2009 at 8:06 AM
Avatar
DIY-DUD
  • MEMBER
  • 12 POSTS
The crank timing mark lines up at "0"

I do not have a compression tester but when I turn the crank I can feel the difference in pressure getting harder and then easier.

The black was coal dusty black, and I pulled and tested the other wires and they are getting spark. The other plug that I pulled out was black as well and smelled of gasoline.

The spring was a ten coil - do I need to get a 13 coil one?

What should we do next.
Jan 10, 2009 at 1:12 PM
Avatar
DAVE H
  • CERTIFIED EXPERT
  • 13,384 POSTS
yes we need to replace the spring for the 13 coil type .. the newer type is shorter so I don't think we are getting the correct adjustment when setting @45 degree BTDC 5S-FE - REVISED TIMING BELT TENSION SPRING TECHNICAL SERVICE BULLETIN Reference Number(s): EG001-99, Date of Issue: January 29, 1999 Related Ref Number(s): EG001-99 ARTICLE BEGINNING REVISED TIMING BELT TENSION SPRING Model(s): 1992-1996 Toyota Camry 5S-FE Section: Engine Bulletin No.: EG001-99 Date: January 29, 1999 INTRODUCTION The service replacement Timing Belt for the 5S-FE Engine has been revised. To insure that this belt fits properly, the Timing Belt and Timing Belt Tensioner Spring must be replaced as a set. AFFECTED VEHICLES 1992-1996 Camry with 5S-FE Engines PARTS INFORMATION Refer to Fig. 1 . PARTS INFORMATION Previous Part NumberCurrent Part NumberPart Name 90507-1803090507-17003Tension Spring 13568-0904013568-09041Timing Belt REPAIR PROCEDURE Replace Tension Spring with revised part when replacing Timing Belt.


https://www.2carpros.com/forum/automotive_pictures/266999_springs_1.jpg

Jan 10, 2009 at 1:34 PM
Avatar
DIY-DUD
  • MEMBER
  • 12 POSTS
I installed the new 13 coil spring, took it back to 45 degrees BTDC (to the left of zero) and tried to start it. It sounded like it wanted to start the first second but after that it just turned.
Jan 10, 2009 at 3:59 PM
Avatar
DAVE H
  • CERTIFIED EXPERT
  • 13,384 POSTS
OK this vehicle is getting fuel ..it's getting spark ... we have set the timing up numerous times correctly ...it should be firing up ... we need to check compression ... can you beg/borrow/steal/rent or buy a compression tester .. most good autoparts stores rent tools out ?? the only other thing we could check is fuel .. is it getting totally flooded ?remove the plugs after cranking to see if they are drenched with gas ..or is something cutting fuel after initial injection ...i'll look into this tonight ...
Jan 10, 2009 at 9:52 PM
Avatar
DIY-DUD
  • MEMBER
  • 12 POSTS
I borrowed a compression tester and tested all four cylinders. They were all about 90 psi. I also checked each spark plug after trying to start and they were soaked with gas. In doing some research I came across this component called a Cold Start Injector Time Switch that might be causing the problem, what do you think? I am not sure where this is located on my car, but I think that I have located it correctly. Please see the following images to see if this is correct.


https://www.2carpros.com/forum/automotive_pictures/298324_CSITWLocation_1.jpg


https://www.2carpros.com/forum/automotive_pictures/298324_ColdStartInjectorTimeSwitch_1.jpg

Is this the Cold Start Injector Time Switch or is this the water/coolant temp sensor or are they one in the same? During disassembly, to get to the head gasket, the instructions that I was following, on step 15, said: "Disconnect the water temperature sender gauge connector, water temperature sensor connector, cold start injector time switch connector, upper radiator hose, water hoses, and the emission control vacuum hoses. Unbolt and remove the water outlet and gaskets." At the time, I was unable to identify the cold start injector time switch. If you think this could be the problem how do I test to see if this is the problem. From what I was reading this is supposed to be a very expensive item. I can not afford to replace something may not be the problem. Is there a way to cross the wires to trick the car's computer into thinking that the car is cold etc... What should we try next?
Jan 14, 2009 at 4:41 PM
Avatar
DAVE H
  • CERTIFIED EXPERT
  • 13,384 POSTS
your compression is almost half what it should be .. even with a well used engine your almost 50 psi out on the minimum required ... why was you changeing the headgasket ? did the car car have a major cut out ?? the sensor in your pic is of the ECT engine coolant temp sensor see diagram below ... let me know ENGINE COMPRESSION Check engine compression with engine at normal operating temperature at specified cranking speed, all spark plugs removed and throttle wide open. COMPRESSION SPECIFICATIONS Application................................Specification Compression Ratio.........................9.5:1 Compression Pressure..........178 psi (12.5 kg/cm2 ) Minimum Compression Pressure.....142 psi (10.0 kg/cm2 ) Maximum Variation Between Cylinders....14 psi (1.0 kg/cm2 )


https://www.2carpros.com/forum/automotive_pictures/266999_camry_1.jpg

Jan 14, 2009 at 8:08 PM
Avatar
DIY-DUD
  • MEMBER
  • 12 POSTS
As far as the compression tests that I did, the car was cold because it can not start and I did not know that all the other spark plugs were supposed to be removed. Each cylinder was tested while the other spark plugs were in the other cylinders. I do not know how these conditions would effect the tests as the requirements called for in your post are for normal operating temp with no other plugs installed. As to the reason for the original head gasket job: For a long time there was excessive pressure in the cooling system, to the point that it blew a few radiators. Eventually, over a short period of time, there began to be coolant in the oil and burnt oily built up in the coolant that was coating the walls of the cooling system with brown clumpy/slimy build up. The gasket looked pretty worn. The car is a wagon and the previous owner said that he drove it across many states. It also had a hitch for a trailer, so it may have been pulling a load. Here is the old gasket:


https://www.2carpros.com/forum/automotive_pictures/298324_HeadGasket_1.jpg


https://www.2carpros.com/forum/automotive_pictures/298324_HeadGasketCloseUp_1.jpg

Well, whats next.
Jan 14, 2009 at 10:53 PM
Avatar
DAVE H
  • CERTIFIED EXPERT
  • 13,384 POSTS
you will need to compression test with plugs removed and oil level correct ... the cold will not affect it to much as long as you crank each cylinder around 5 times ... the old head gasket did have a leak i can see ..but i have seen worse .. from what i can see, the leak you pointed out was no where near enough to blow a couple of radiators .. i'll be honest with you .. i'm thinking this head is cracked or warped ? let me know the results of comp test ..
Jan 15, 2009 at 7:26 PM
Avatar
DIY-DUD
  • MEMBER
  • 12 POSTS
I did the tests again - all plugs removed and oil level is correct.

They all performed about same at 107 psi.

By the way, I did have the head milled and cleaned before I put it back on. I also used new head bolts as well.

I was able to get it to start and run before I did the head gasket job so I would expect that it would at least do as good if not better now, but that is logical reasoning talking and not practical experience as this was my first head gasket job.

(as a side note when I first went to do the compression tests I got the air tub stuck in the spark plug hole as the free turning end could not get enough grip to be unscrewed. I finally got it out by putting a ten inch piece of PVC pip over the air tub and pushed down with the pip on the free turning end while pulling up on the tub, creating a counter pressure allowing me to unscrew it. It was a simple solution, but for a while there I didn't know what I was going to do, so I prayed, thank God for the solution.)

Well, what do you think we should do from here?
Jan 16, 2009 at 12:41 AM
Avatar
DAVE H
  • CERTIFIED EXPERT
  • 13,384 POSTS
when you had the head milled & cleaned..did they pressure test at the same time .. i would expect them too, but i have never had one done here in the USA, in england they do it as standard ? also you seem have done a fantastic job this being your first headgasket, so please do not take offence when i ask this ... you did torque the head down correctly ..? ..the reason i'm askin is we seem to have compression loss of the same amount on all 4 cylinders .. if the head was cracked or warped, i would expect at least one/two of them to be showing close to normal psi .. and the others showing low .. this engine has a leak somewhere on all 4 .. do you see where i'm coming from ?? you said you could at least get it running before .. was it a real sruggle to start it, then it ran real rough ?? let me know !! Cylinder Head Bolt Step 1..............................Ft.Lbs 36 (49)Nm Step 2..............................Additional 90 Degrees


https://www.2carpros.com/forum/automotive_pictures/266999_head_4.jpg

Jan 16, 2009 at 5:11 AM
Avatar
DIY-DUD
  • MEMBER
  • 12 POSTS
I do appreciate the sensitivity in which you phrased your question, and by the way, welcome to the USA.

I wasn't sure if the shop that milled the head checked the pressure, so I called and asked but they said that if I did no pay for it they did not do it. He advised me to put some oil in the cylinders just in case the piston rings were "fuel washed." I did this and pressure tested one of the cylinders and it shot up to 160 psi. I put the plugs back in and tried to start it, but no start. I then pressure tested all the cylinders and there were at about 112 psi but #3 was at about 102 psi.

When I did the head gasket job, I did get a torque wrench and tightened them to specification in the order given and I did do that last 90 deg. turn on each bolt.

As far as starting the car before, It wasn't a struggle to start but it did start rough if it was cold, but after it warmed up it ran much smoother. One of its behaviors though was that at a stop light it would begin to shake a little, so I would put it in park and give it a little gas which would reduce the shake and then when the light turned green I would put it in gear and go.

I did notice that during the winter, the car would have trouble shifting up to the last gear no mater how fast I would go. Only when it got warmed up, would it shift correctly, but this would be an automatic transmission issue right?
Jan 16, 2009 at 2:47 PM
Avatar
DAVE H
  • CERTIFIED EXPERT
  • 13,384 POSTS
Thanks for the welcome ... It could be the head is cracked/warped, as i said previously it should be checked when milled/cleaned ? but it could also be, and I'm not happy saying this too you because of all the good work you put in !! but I'm now thinking after you first installed the gasket and set the timing .. it was out .. and when you cranked it over it has bent the valves .. the only way we can check this is to remove the head again ?? it would have to be valves in every cylinder ..because the compression loss is across the 4 cylinders ...if there are no valves bent then we have to be looking at the head being bad .. and we need to have it pressure tested off the vehicle .. again this would have to be a major crack or warp to be across all 4 cylinders .. i know this is a major step to take .. but i don't see what else we can check without taking the head off ?? let me know ?

Ohh and the late shifting is trans issue and we can get to that later ?
Jan 16, 2009 at 8:50 PM
Avatar
DIY-DUD
  • MEMBER
  • 12 POSTS
It is my understanding that this engine is non-interference, meaning that the pistons would never hit the valves even if the timing were out.

What happens if you turn the crank counter clockwise for about 20 degrees - I did do that and then read you should not do that.

I will look into the pressure test. Please let me know of any other ideas you may have.
Jan 16, 2009 at 11:13 PM
Avatar
DAVE H
  • CERTIFIED EXPERT
  • 13,384 POSTS
Sorry .. you are quite correct it is a non-interferance engine .. should have checked before posting .. so we are back to loss of compression due to the head .. we need to take it off and pressure test it !! there is a specail tool for doing this ... but i have not come across one in the U.S. ... let me know

Cylinder Leakage Detection
When a cylinder produces a low reading, use of the Engine Cylinder Leak Detection/Air Pressurization Kit will be helpful in pinpointing the exact cause.
The leakage detector is inserted in the spark plug hole, the piston is brought up to dead center on the compression stroke, and compressed air is admitted.
Once the combustion chamber is pressurized, a special gauge included in the kit will read the percentage of leakage. Leakage exceeding 20 percent is excessive.
While the air pressure is retained in the cylinder, listen for the hiss of escaping air. A leak at the intake valve will be heard in the throttle body. A leak at the exhaust valve can be heard at the tail pipe. Leakage past the piston rings will be audible at the positive crankcase ventilation (PCV) connection. If air is passing through a blown head gasket to an adjacent cylinder, the noise will be evident at the spark plug hole of the cylinder into which the air is leaking. Cracks in the cylinder block or gasket leakage into the cooling system may be detected by a stream of bubbles in the radiator.
Jan 18, 2009 at 8:33 AM
Avatar
DIY-DUD
  • MEMBER
  • 12 POSTS
Hi Dave,

I have not been able to get to the compression test yet, I do not posses a compressor, I did manage to find a leak down compression tester that would fit onto the end of an air compressor.

I have been talking to different people about the problem and one person said that the spark plugs should spark strong blue, and that they should spark even if they are held up away from a ground, but still being connected to the wire. My spark plugs did spark when I did the test that you had me do, but they did not spark strong blue, but yellow. I also tried to see if they would spark away from a ground and they would not. What do you think about this? Is it a weak spark? If this is so does it mean that the Control Module-Ignition might be faulty. If so, how would you even check to see if it is. I asked at a local parts store and they said that they could not test it. It is an expensive part and not one that I can just buy to see if it works.

This would not fix the compression but I was wondering if it might be a possible issue.

Thanks for your wise counsel,
Jan 23, 2009 at 7:31 PM
Avatar
DAVE H
  • CERTIFIED EXPERT
  • 13,384 POSTS
Hey DIY

I thought you had given up on me .. lol .. glad to see you are still trying to figure this out ! I know it must be frustrating for you !

It is true you should get a blue spark .. but even though your spark is yellow which is a weak spark .. the fact is you are getting a spark, and the car should firing up/attempting to fire up or be at least coughing and spluttering for you ? we can look into the weak spark after we get it running !! you will not get any spark at all if you hold the spark plug away from a ground point .. it is like any electrical connection .. you need a hot and a ground for it to function .. remove any one of them and you loose the connection .. when you screw the plug back in to the engine that is your ground .. if you then unplug the wire off it you lose your hot feed .. so it will not fire ..just like a headlight bulb if you remove the ground wire off it, it will not work ... I'm having a problem with my computer tonight and cannot look at my manual .. to get wiring diagram for the ignition module .. will let you know tommorrow ... but as i said you are getting a (weak)spark .. you are getting fuel .. the only thing we have missing is full compression !!
Jan 23, 2009 at 9:23 PM
Avatar
PENNYEGREEN
  • MEMBER
  • 1 POST
i am curious as to what the problem turned out to be even though its been a along time. some of these cars had very sensative alarms that disabled driving the car if it is triggered. the only way to deactivate them is in the ownersmanual IF you have it. they had no key fob to easily turn them off. if you have to manual and u think the alarm wont allow the car to start a dealer is the only place that can fix it. i didnt realize my 94 camry had an alarm when i bought. i found the info needed to deactivate this alarm when reading the owners manual. good thing cause when changing a fuse it activated and the car would not start. another occasion, my battery went dead and did it again. with the manuals very specific info and directions, i realized my alarm had activated in the silent mode. i was able to disable the alarm and start my car. i have seen this style alarm a few times in mid 90's model imports. they each have specific code to enter to deactivate the alarm. without the onwers book...you will need a tow to ur nearest dealer. on my camry the alarm runs thru the stereo. it has a toggle switch seemingly, randomly placed between the bottom of the steering columns right side and the cup holder/ashtray, console area. there is a small red light next to it. when the alarm is triggered, the light blinks to notify you. if set to silent, that little light may be the only indicator to tell you the alarm is why the car wont start. the info in the manual is there to prevent situations like this, but also to assist the owner in these exact situations.
Oct 15, 2012 at 6:20 AM