1989 Toyota Camry

1989 TOYOTA CAMRY
165,000 MILES • 6 CYL • FWD • AUTOMATIC
Avatar
ROY ANSELL
  • MEMBER
  • 5 POSTS
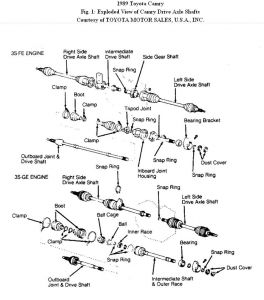
my driver side transsaxle is broke ....i went to replace it but cannot seam to get the top strut bolt to line up and go in ...could you tell me the proper proceedure to remove and install the transaxle...i think ive should not have had to remove the bolt...
on the strut.. itook it apart again and put the bolt in ..but than i cannot get the cv joint in the hub...
and cannot get a spring compressor to work either...
i must be using a bad procedure..how is it normally done
Sep 13, 2010 at 10:29 AM
Advertisement
Avatar
KHLOW2008
  • CERTIFIED EXPERT
  • 41,814 POSTS
Hi roy ansell,

Which bolt are you referring to? A picture would make it easier to understand what problem you are encountering.
Sep 15, 2010 at 12:48 PM
Avatar
ROY ANSELL
  • MEMBER
  • 5 POSTS
the bolt is on thr top hub to strut bracket...but thats ok ...it should solve itself with the proper procedure instructions.....it looks like you missed the question....
Sep 16, 2010 at 8:16 AM
Advertisement
Avatar
KHLOW2008
  • CERTIFIED EXPERT
  • 41,814 POSTS
STRUT ASSEMBLY

Removal
1. Disconnect brake tube from flexible brake hose. Drain
brake fluid into a container. Remove 2 clips and 2 "E" rings. Remove brake caliper. Do not disconnect flexible brake hose from caliper assembly.

2. Scribe mark strut lower bracket and camber adjusting cam for installation reference. Remove nuts and bolts and separate strut from steering knuckle.

3. Remove dust cover from top of strut. Remove nuts holding top of strut to body. Remove strut from vehicle.
Sep 16, 2010 at 11:57 AM
Avatar
ROY ANSELL
  • MEMBER
  • 5 POSTS
please give me the proper sequence and procedure to remove driverside cv axle,,and reinstall
Sep 17, 2010 at 9:18 AM
Avatar
KHLOW2008
  • CERTIFIED EXPERT
  • 41,814 POSTS
Removal 1. Remove hub cap, cotter pin and lock nut. Loosen and remove lock nut from wheel bearing. Remove engine undercover. Remove front fender apron seal. 2. Use paint to apply mating marks to axle shaft flange and side gear shaft flange; DO NOT use punch marks. Apply brakes and remove 6 retaining nuts on each inboard axle shaft flange. 3. Disconnect steering knuckle from lower ball joints. Drain transaxle fluid. Remove axle shafts from transaxle. On All-Trac and V6 models, DO NOT compress inboard CV joint boot or CV joint will become disassembled. The drive shaft retaining bolts and washers may be used to keep CV joint together. 4. On all models, use plastic hammer to drive axle shaft out of bearing hub. Loosen intermediate axle shaft lock bolt. Remove snap ring from differential bearing bracket and pull out intermediate axle shaft. NOTE: Use NEW intermediate axle shaft bearing lock bolt during installation.


https://www.2carpros.com/forum/automotive_pictures/192750_Driveshaft89CamryFig01_1.jpg

5. If it is necessary to remove side gear shaft, push side gear shaft into differential. See Fig. 1 . Measure and note distance between transaxle case and side gear shaft. 6. Using a slide hammer, pull intermediate axle shaft out of transaxle. Inspect side gear and side gear shaft seal for damage, replace if necessary.
Sep 17, 2010 at 9:39 AM