How to set the timing?

1998 NISSAN SENTRA
232,058 MILES • 1.6L • 4 CYL • 2WD • AUTOMATIC
Avatar
AZDANNO04
  • MEMBER
  • 343 POSTS
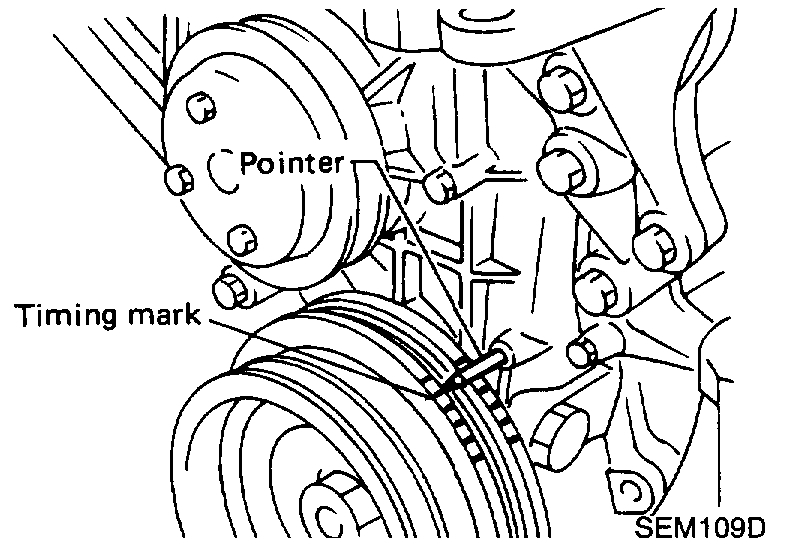
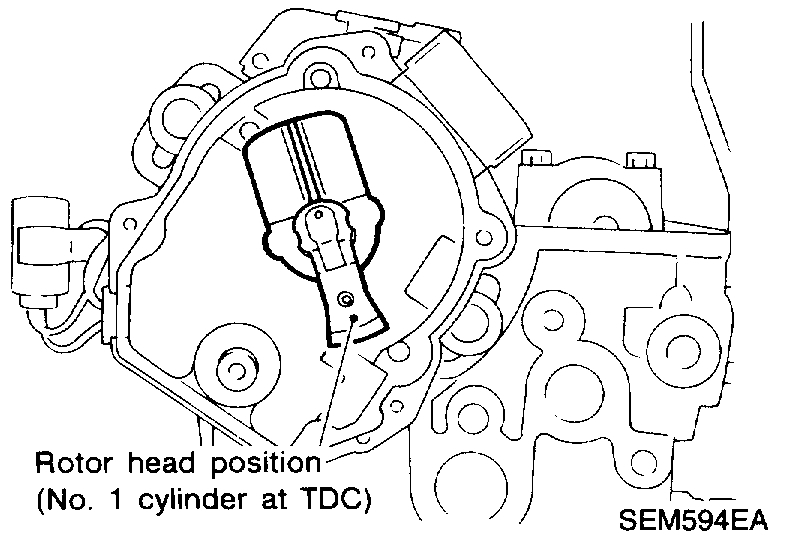
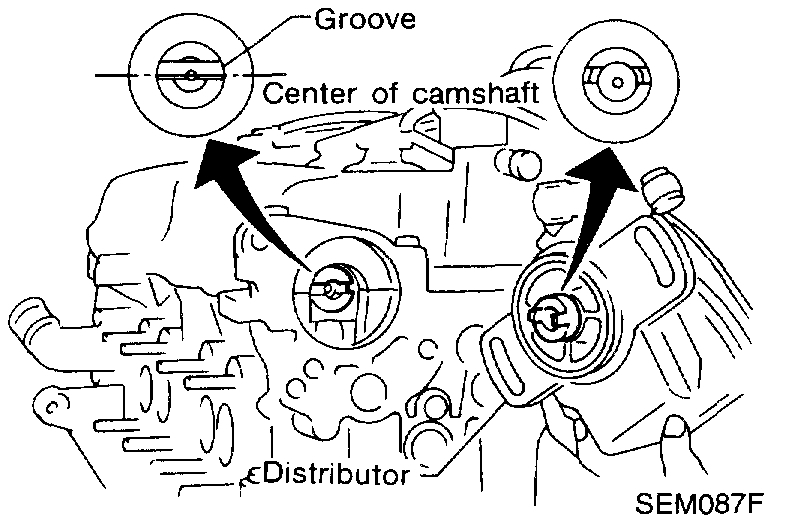
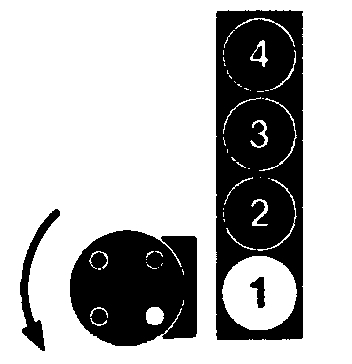
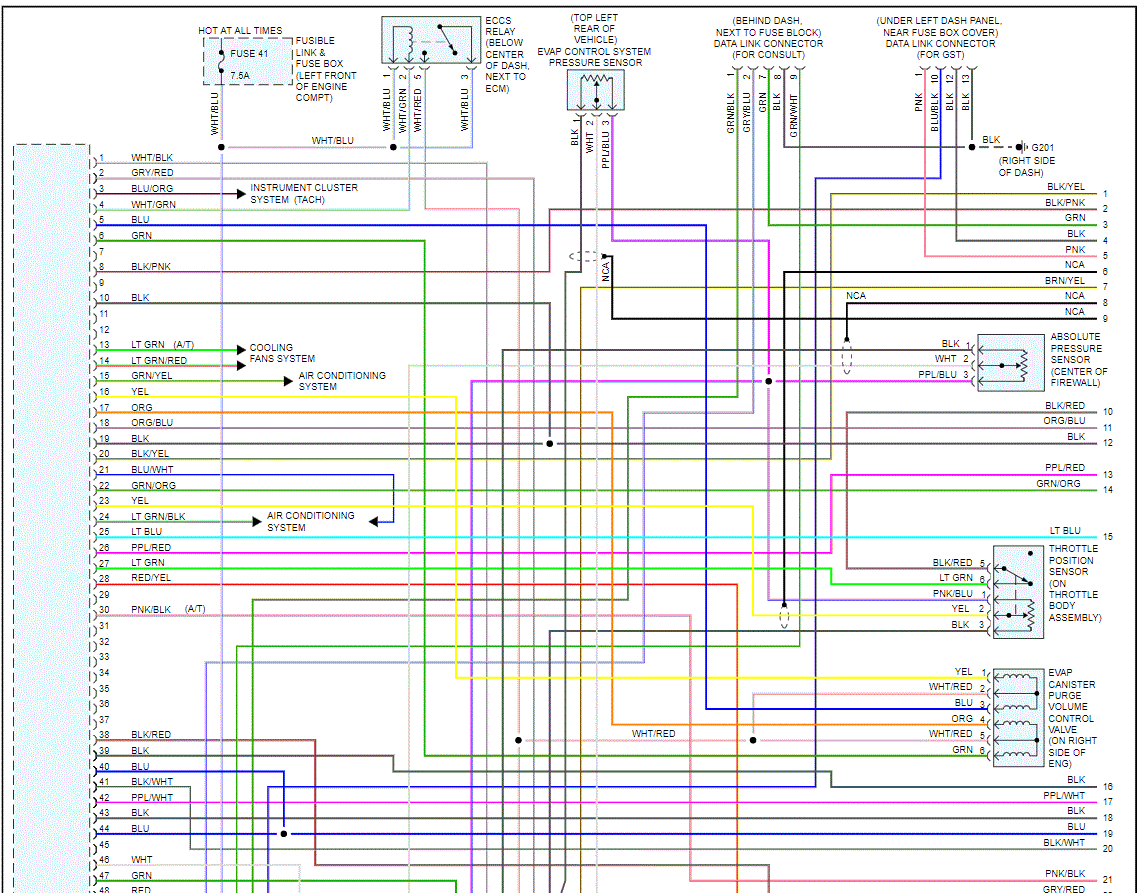
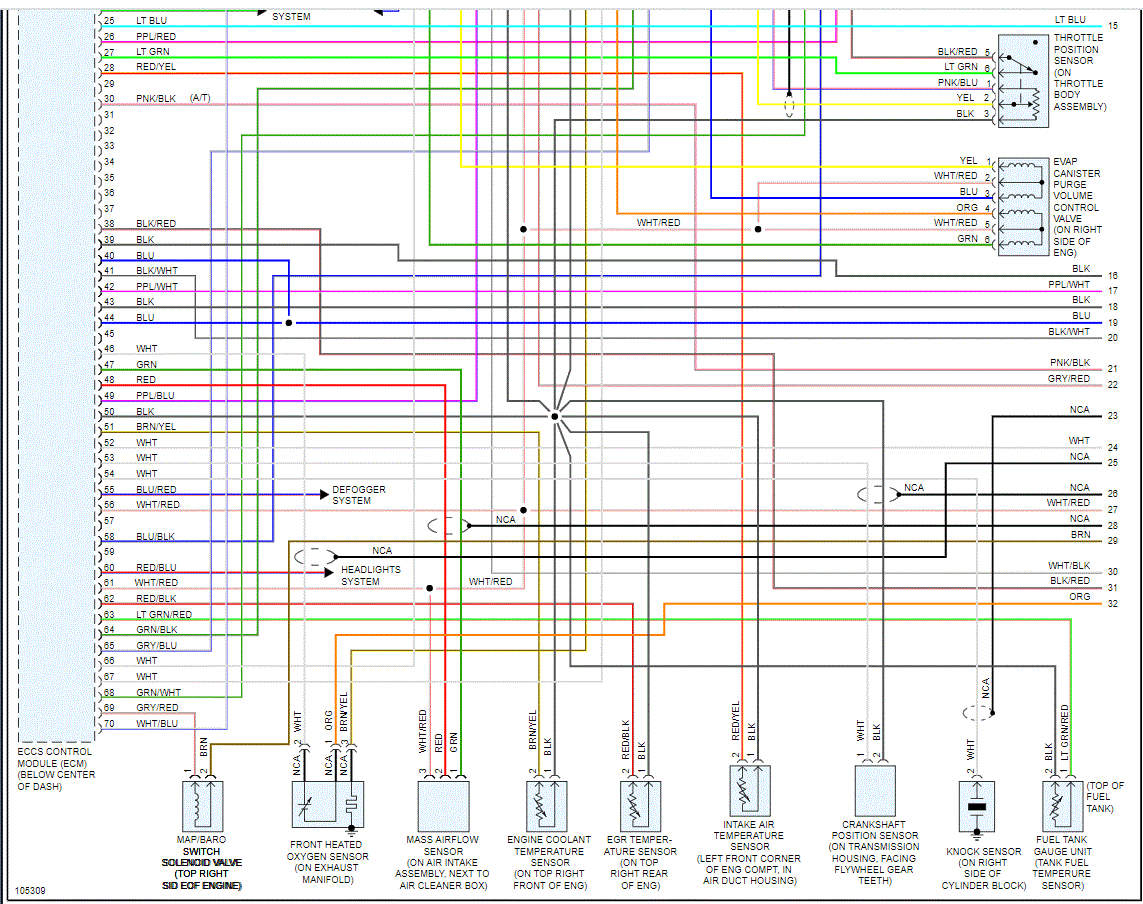
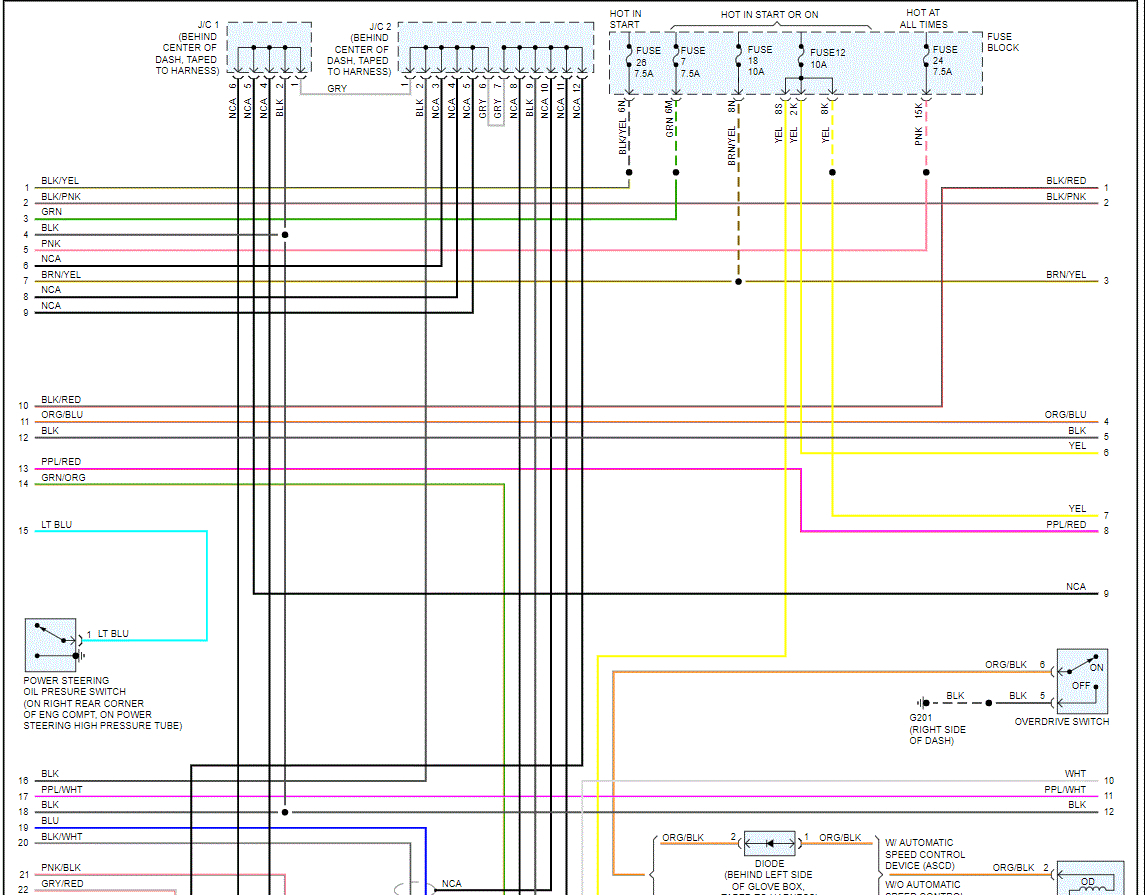
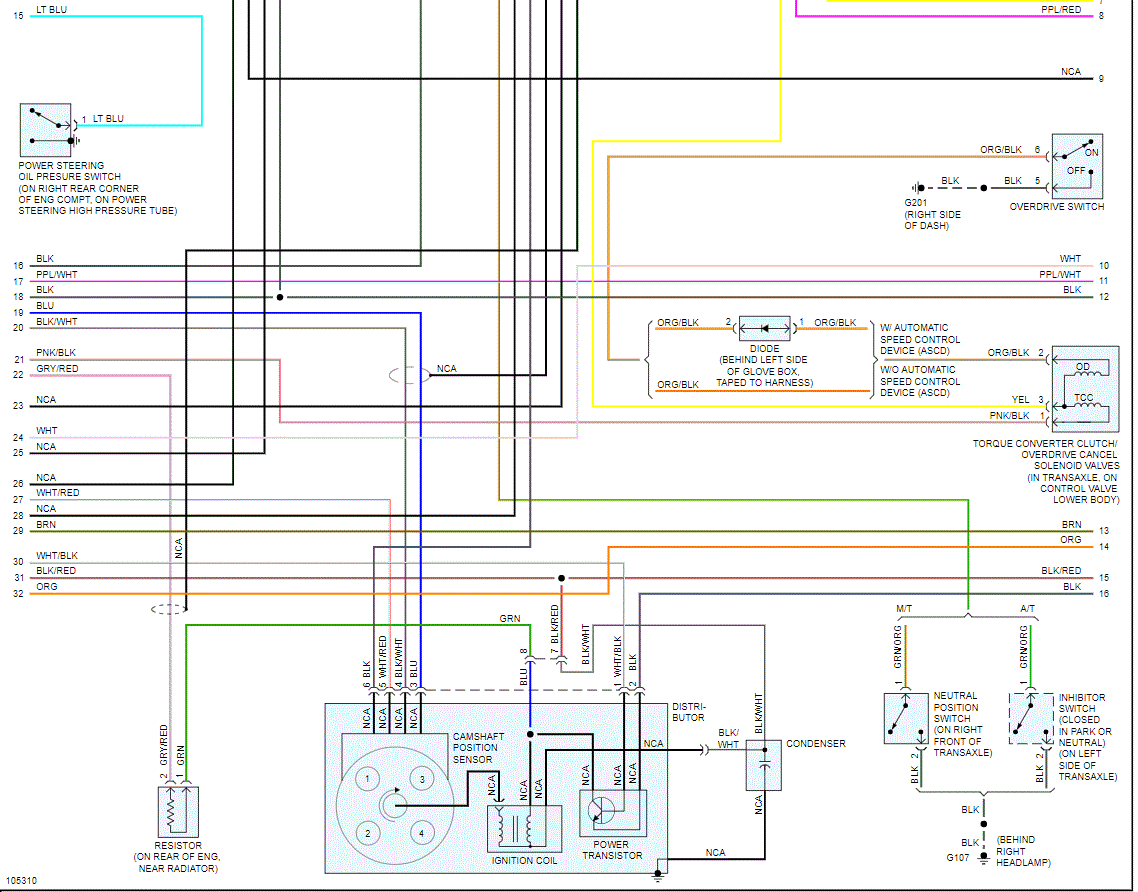
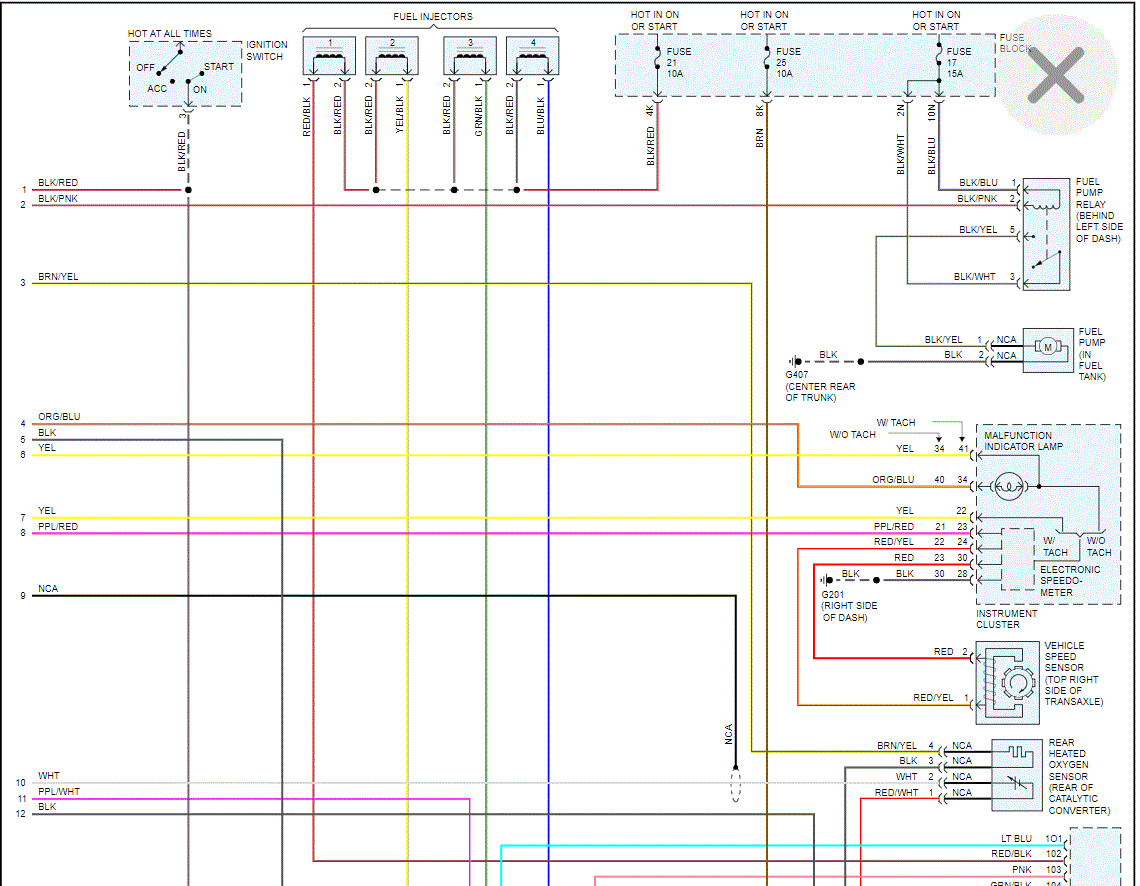
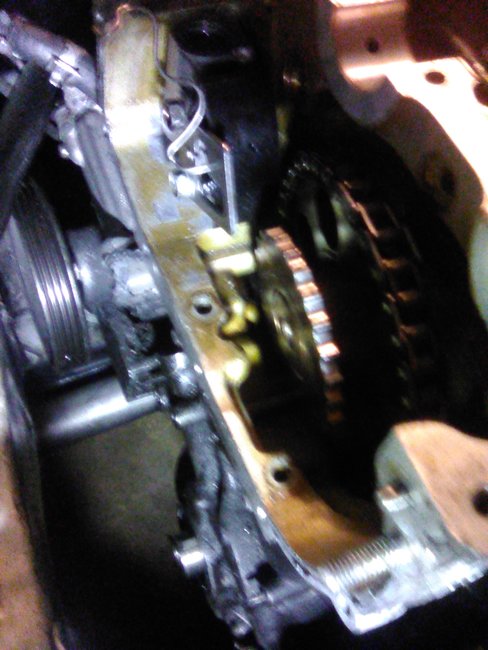
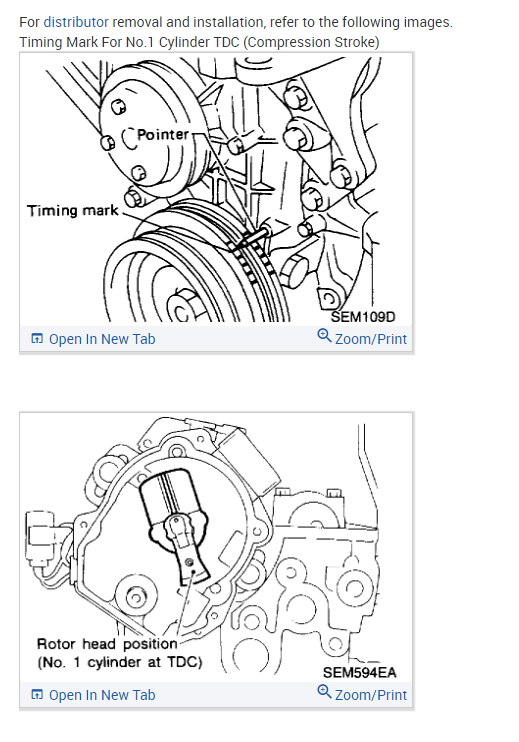
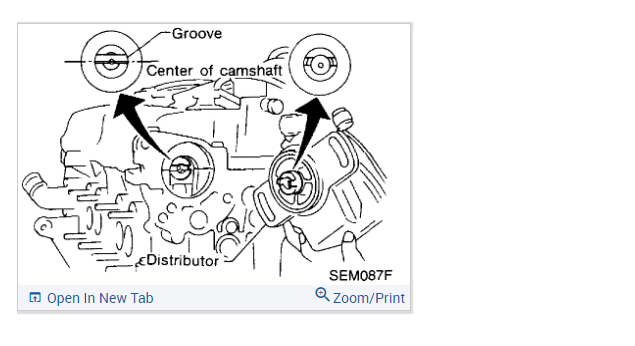
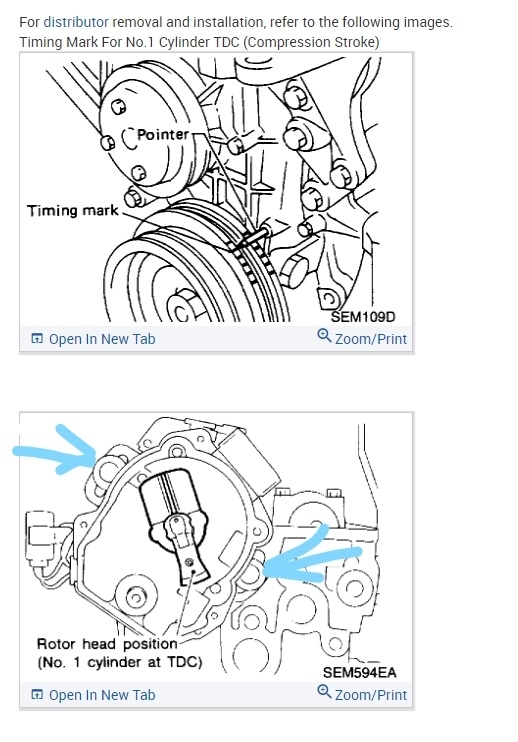
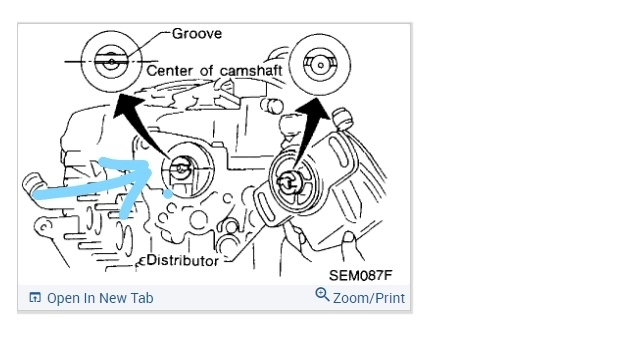
I got a new distributor. I am picking up from the mail. Hopefully it contains the solenoid can shaft adjuster. Never set timing before and don't have a timing light. Nor the funds to rent one. Need to know the procedure for setting the timing. Hopefully this will solve my vehicle not turning over issue. It cranks but wouldn't turn over. I just know the injectors are not pulsating. They have power just nor pulsating. Replaced crankshaft sensor. I noticed there was no seal around sensor for crankshaft.
Mar 13, 2021 at 9:29 AM
Advertisement
Avatar
JACOBANDNICKOLAS
  • CERTIFIED EXPERT
  • 110,175 POSTS
Hi,

To fine tune the timing, you do need a timing light. First, if you watch the video below, it shows one being installed in a larger engine. However, the procedure remains the same.

https://youtu.be/El1H0_6IYxQ

Here are the directions specific to your vehicle. The attached pics below correlate with the directions.

__________________________________________

1998 Nissan-Datsun Sentra L4-1597cc 1.6L DOHC MFI (GA16DE)
Procedures
Vehicle Powertrain Management Ignition System Distributor Service and Repair Procedures
PROCEDURES
For distributor removal and installation, refer to the following images.
Timing Mark For No.1 Cylinder TDC (Compression Stroke)

pic 1


pic 2


pic 3


pic 4


Hold down bolt torque: 16 - 19 ft. lbs.

_________________________________

I hope this helps. Let me know if you have other questions.

Take care and God Bless,

Joe
Mar 13, 2021 at 10:03 PM
Avatar
AZDANNO04
  • MEMBER
  • 343 POSTS
Car almost turned over but didn't. I took the distributor cap off and found rotor facing top left. Turned crankshaft till rotor faced bottom right.
Mar 22, 2021 at 4:18 PM
Advertisement
Avatar
AZDANNO04
  • MEMBER
  • 343 POSTS
But checked the fuel injectors first injector by taking the harness off and using a test light and got power to it, but checked for pulse no pulsating on injector.
Mar 22, 2021 at 4:46 PM
Avatar
JACOBANDNICKOLAS
  • CERTIFIED EXPERT
  • 110,175 POSTS
Hi,

You have power to the injector all the time? The ECM supplies a ground to the injector circuit. That is what allows the circuit to be energized. If you have power all the time, you either have a constant ground (short) or the ECM is bad. Do me a favor. Disconnect the battery and then the ECM. Check if there is continuity to ground on either of the injector wires.

_________________

I attached the wiring schematics for the entire powertrain management system. Use this as a guide. Also, here is a link you may find helpful:

https://www.2carpros.com/articles/how-to-check-wiring

____________________________________

Let me know what you find.

Joe

Mar 22, 2021 at 6:25 PM
Avatar
AZDANNO04
  • MEMBER
  • 343 POSTS
My buddy used my test light and said it has power but didn't blink with for the pulsating on the wiring harness for the injector.
Mar 22, 2021 at 7:14 PM
Avatar
AZDANNO04
  • MEMBER
  • 343 POSTS
I also bought a used ECM and checked and matched the part number for the ECM I have on the car. I swap those and purchased a new relay for the ECM. Still wouldn't start. It almost turned over when I had to turn the crankshaft clockwise till the rotor was pointing at the first spark plug wire bottom right. When we tried it again it didn't change.
Mar 22, 2021 at 7:17 PM
Avatar
JACOBANDNICKOLAS
  • CERTIFIED EXPERT
  • 110,175 POSTS
Hi,

When you set the rotor to the number one position, was the crankshaft on top dead center (TDC)? Is it possible for you to record it cranking so I can hear it?

Let me know.

Joe
Mar 22, 2021 at 8:16 PM
Avatar
AZDANNO04
  • MEMBER
  • 343 POSTS
I can do that for you.
Mar 23, 2021 at 10:29 AM
Avatar
AZDANNO04
  • MEMBER
  • 343 POSTS
My neighbor had a fuel pressure tester and while he was checking everything else had me turn the crankshaft to be TDC. When he turned it he noticed some noise underneath the valve cover and had me remove it. Sure enough the chain had too much play and the center sprocket hardly had any teeth left. I have a timing kit when I replaced the upper tensioner but didn't change anything else. But I believe that was the one sprocket that didn't come with the kit which is the variable timing sprocket. Which I just ordered.
Mar 23, 2021 at 3:53 PM
Avatar
AZDANNO04
  • MEMBER
  • 343 POSTS
My fuel pressure is good so it isn't the fuel.
Mar 23, 2021 at 3:57 PM
Avatar
JACOBANDNICKOLAS
  • CERTIFIED EXPERT
  • 110,175 POSTS
Hi,

My biggest concern at this point is if the timing jumped. This is an interference engine which means internal damage can occur if the timing is wrong.

I'm going to provide the directions for the removal and replacement of the timing chain. See the pics below for directions and pics to help guide you.

Let me know if this helps or if you have other questions.

Take care,
Joe
Mar 23, 2021 at 6:24 PM
Avatar
AZDANNO04
  • MEMBER
  • 343 POSTS
When I took the camshaft cover off. That's where I saw the upper tensioner that I had replaced 8 months ago. I guess the vibration backed the two 10mm bolts out and it was pushing the chain against the idler sprocket wearing down the teeth. I looked at the upper tensioner still good but I did have to re thread one the bolts and was wondering should I use the blue for vibrations lock-tite? I also have the timing kit the chains etc., in a bucket of new engine oil till I finish taking off the harmonic balancer. Hopefully I don't need to take the water pump off or housing to replace the lower tensioner. It looks like I can...
Mar 29, 2021 at 12:07 AM
Avatar
JACOBANDNICKOLAS
  • CERTIFIED EXPERT
  • 110,175 POSTS
Hi,

It will not hurt to use Loctite. I would. Did the engine jump time? If so, were you cranking it like that?

Joe
Mar 29, 2021 at 6:49 PM
Avatar
AZDANNO04
  • MEMBER
  • 343 POSTS
More likely so since I was unaware of the situation till I took the camshaft or the upper timing cover off. That's when I saw the upper tensioner laying there. Luckily it didn't get jammed or broke into pieces clogging the components. Since the timing is off and I want to replace the lower tensioner and idler sprocket. How would I go about correcting and being able use paint or white out markings on the sprockets and chains? So far I am at where the valve cover is off and loosen the 10mm bolts that hold down the crankshafts and removed the 19mm bolts that bolt into the sprockets. I don't have the replacement bolts or washers that are heat treated in order to replace the head gasket but hopefully I can get those from AutoZone that way I don't have to wait for through the mail. Definitely need to replace the idler sprocket since that upper tensioner either pushed the chain against the idler which is why the teeth are all grinded down. For everything else so far looks good. I haven't taken off the oil pan in order for me to remove the timing cover to also replace the two oil seals and timing cover gasket.
Apr 1, 2021 at 9:42 AM
Avatar
JACOBANDNICKOLAS
  • CERTIFIED EXPERT
  • 110,175 POSTS
Hi,

If the timing has jumped, we may have an issue. Cranking the engine without out it running can damage things. At this point, the best thing to do is get it back together and timed correctly. We may need to check for compression once it's together. I should be able to tell if there is a problem by hearing it crank. So, if you have concerns, record it when it is cranking with the starter and upload it for me to hear.

As far as the chain, it should already be marked. Check for a different color link.

Joe
Apr 1, 2021 at 6:26 PM
Avatar
AZDANNO04
  • MEMBER
  • 343 POSTS
Ah yes, I see the chain is marked and the sprockets are marked as well and it had to have jumped the timing since those markings are not lined up with each other. I know I installed a new distributor and the neighbor helped me with the crankshaft manually with the timing even though we couldn't get it to start because of the upper tensioner being off and the chain around the camshaft was too loose due to the upper tensioner. And the idler sprocket having hardly any teeth left. How can I replace the idler sprocket. I'm assuming I need to replace that I. Order to get the car to turn over along with the upper tensioner put back in. Quick question can I put Loctite the blue color for the vibration on those two 10mm bolts that hold the upper tensioner in?
Apr 1, 2021 at 7:23 PM
Avatar
JACOBANDNICKOLAS
  • CERTIFIED EXPERT
  • 110,175 POSTS
Hi,

Absolutely. If you have concerns that something may come loose, Loctite is a great idea. I can't remember the colors exactly. Just make sure it is okay with oil and heat.

Joe
Apr 1, 2021 at 11:12 PM
Avatar
AZDANNO04
  • MEMBER
  • 343 POSTS
I had loosened all the camshaft cap bolts. Since I needed to make sure it is on TDC before going any further. As I was putting the bolts back on and tightening up according to the tightening procedure. I had snapped off the Intake #4 bolt and the Exhaust #4 which are both the first two bolts to start tightening up. I was able to get the broken part out of the block. But now I have to order those two bolts before I can proceed anything. I know the torque specs stated 52 lbs and it hadn't even gotten close and it snapped. When I do get those replaced. I will turn the crankshaft manually clockwise till both lobes towards the front of the engine the lobes are almost facing each other and the rotor is facing on 1st spark plug or the down right plug on the distributor cap. Then I can proceed to remove the components when I am on TDC the book states between 6 or 8 degrees. Or do I place it on the second notch on the harmonic balancer when its on 0 degrees.
Apr 2, 2021 at 12:09 AM
Avatar
JACOBANDNICKOLAS
  • CERTIFIED EXPERT
  • 110,175 POSTS
Just follow the manual. Once you have the chain links aligned with the timing marks, it will be correct.
Apr 2, 2021 at 7:04 PM
Avatar
AZDANNO04
  • MEMBER
  • 343 POSTS
Unfortunately, the Haynes book doesn't go into detail for a lot of the steps and procedures. My favorite, when you have to remove or come across something that requires more attention and care. It will just state take to a dealership or someone professional to handle the situation. If I had the funds, I would. Hence I am working on my car. Don't like that on the Haynes books. I prefer and like how 2CarPros provides knowledgeable mechanics like yourselves and how you and many other mechanics on here even provide images, video and input.
Apr 2, 2021 at 11:23 PM
Avatar
JACOBANDNICKOLAS
  • CERTIFIED EXPERT
  • 110,175 POSTS
Hi,

Is there a specific concern you have? Let me know. Also, let me know how things are going so far.

Joe
Apr 3, 2021 at 8:43 PM
Avatar
AZDANNO04
  • MEMBER
  • 343 POSTS
How to replace the idler sprocket? And this would be my first time resetting the timing. Does the notches on the pulley which starts negative five then zero? Do I place it on zero or the book says on 6 and 8 degrees or is that what it needs to be once I get it to turn over and adjust the timing?
Apr 3, 2021 at 10:00 PM
Avatar
JACOBANDNICKOLAS
  • CERTIFIED EXPERT
  • 110,175 POSTS
Hi,

I'm not sure I follow the idea of the idler being 6 or 8 degrees. When you install the chain, pulleys need to be aligned with specific marks.

Often times, people set the timing with a timing light once the engine is running. I think that is what the 6 or 8 degrees is referring to.

Where did you get the info for that?

Joe
Apr 4, 2021 at 8:42 PM
Avatar
AZDANNO04
  • MEMBER
  • 343 POSTS
I believe from the Haynes book or Nissan website car owner community. The last question about this ordeal is the torque specs for the upper tensioner and transmission mount torque specs.
Apr 8, 2021 at 1:39 AM
Avatar
JACOBANDNICKOLAS
  • CERTIFIED EXPERT
  • 110,175 POSTS
Hi,

As far as the upper tensioner, it should be 55.6 to 73.8 inch-pounds. See pic 1

The transmission mount torques are in pic 2.

Let me know if this helps or if you have other questions.

Take care,
Joe
Apr 8, 2021 at 6:50 PM
Avatar
AZDANNO04
  • MEMBER
  • 343 POSTS
For the inch per pound 73 / 12 right to get the torque for lbs or .0833 per inch times 73 equals 6 pounds?
Apr 18, 2021 at 5:40 AM
Avatar
AZDANNO04
  • MEMBER
  • 343 POSTS
The worn down sprocket.now trying to get the timing cover off. Then the fuel rail and intake manifold to remove the.heads to see what damage it has done. Hopefully just one piston if that's why I found a piece of a valve in the oil pan.
Apr 18, 2021 at 5:44 AM
Avatar
NICKOLAOSF
  • CERTIFIED EXPERT
  • 69 POSTS
Hi azdanno04,

We can help you with this information if you want to replace the distributor and you don't have timing light and did not move the original distributor, you will have two hold down points one on the top side and one on the side of the distributor there should be 12mm or 13mm nuts that hold it down. before you do any removing mark the distributer side with a point and the cylinder head side. for reference, then you can remove electrical connectors and then the nuts, also you might want to remove the distributor cap unscrew it to be able to see rotor.
Below are diagrams to help you see what you are in for.
(remember the distributor shaft is off set do not force)
Let us know what happens and please upload pictures or videos of the problem.
I am glad to help you, if there is anything else we can help you with please contact us again. Thank you for choosing 2CarPros.
Cheers, Nick
Apr 18, 2021 at 1:41 PM