Rough idle on cold starts

2000 MERCURY MARQUIS
134,000 MILES • 4.6L • V8 • 2WD • AUTOMATIC
Avatar
MGOBLUE78
  • MEMBER
  • 19 POSTS
Once engine warms up seems to run fine. I’ve replaced IAC, spark plugs (coppers), fuel filter, and O2 sensors. I will sometimes get lean codes from both banks. I’ve looked for vacuum leaks and even cleaned the mass air flow sensor. Any ideas?
Mar 11, 2019 at 4:19 PM
Advertisement
Avatar
ASEMASTER6371
  • CERTIFIED EXPERT
  • 52,796 POSTS
Good evening,

What are all the codes?

A common issue for this is the intake manifold leaking down into the valley.

Let's start with the codes.

Roy
Mar 11, 2019 at 4:23 PM
Avatar
MGOBLUE78
  • MEMBER
  • 19 POSTS
Hi Roy, I’ve gotten a p0174 and p0171 codes.
Mar 11, 2019 at 4:57 PM
Advertisement
Avatar
ASEMASTER6371
  • CERTIFIED EXPERT
  • 52,796 POSTS
Got it.

These codes indicate a lean condition and is usually a vacuum leak at the intake manifold.

Will you be doing this job yourself? It is a big job.


Roy
Mar 11, 2019 at 5:06 PM
Avatar
MGOBLUE78
  • MEMBER
  • 19 POSTS
Yes, I will be doing the work.
Mar 11, 2019 at 5:10 PM
Avatar
ASEMASTER6371
  • CERTIFIED EXPERT
  • 52,796 POSTS
Procedure

Change Vehicle Bookmarks Library Request Conversion Calculator Technician's Reference - Collision

intake manifold
108
Community 25 Create Quote
2000 Mercury Grand Marquis V8-4.6L VIN W
Procedures
Vehicle Engine, Cooling and Exhaust Engine Intake Manifold Service and Repair Procedures
PROCEDURES
Removal
1. Disconnect the battery ground cable.
2. Drain the engine cooling system.
3. Remove the air cleaner outlet tube.
4. Disconnect the fuel line.
5. Remove the wiper arm and pivot shaft.
6. Remove the drive belt.
7. Raise the vehicle on a hoist.


imageOpen In New TabZoom/Print


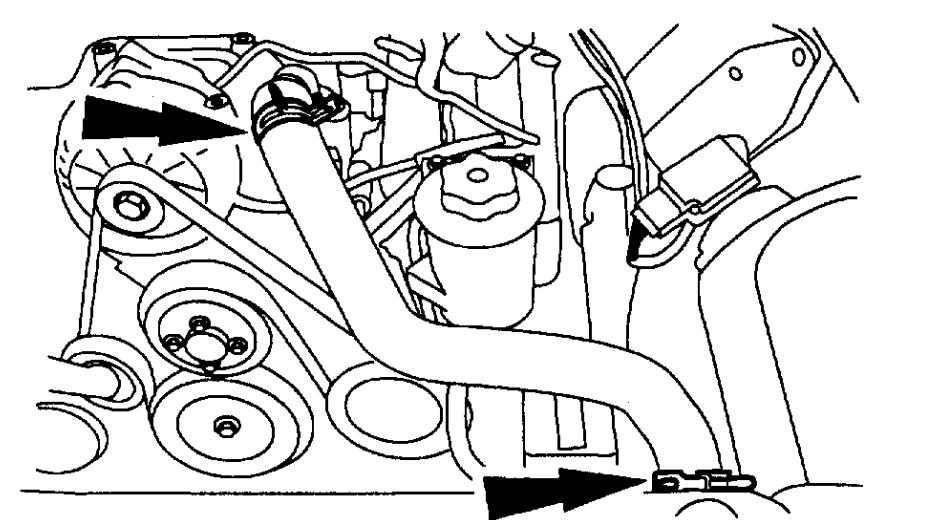
8. Disconnect the electrical connector at the Crankshaft Position (CKP) sensor.
- Disconnect the pin-type retainer from the A/C compressor bracket.


imageOpen In New TabZoom/Print


9. Disconnect the electrical connector from the A/C compressor.


imageOpen In New TabZoom/Print


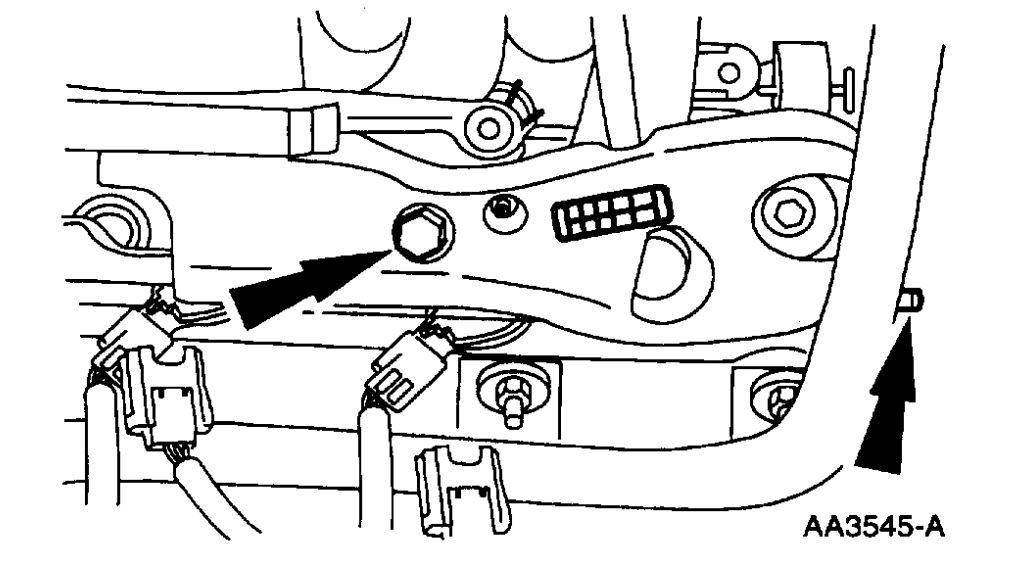
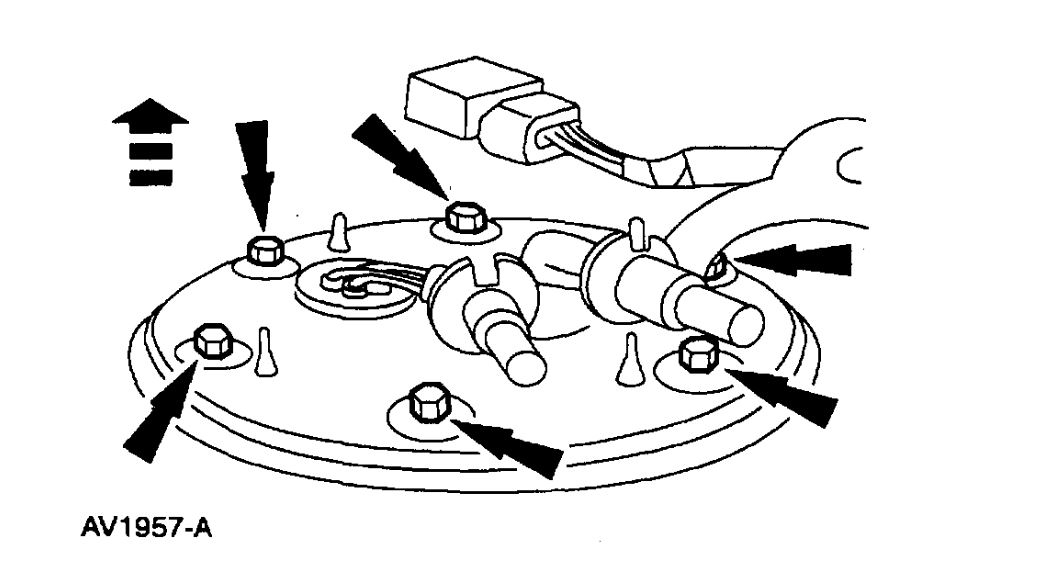
10. Remove the oil bypass filter.


imageOpen In New TabZoom/Print


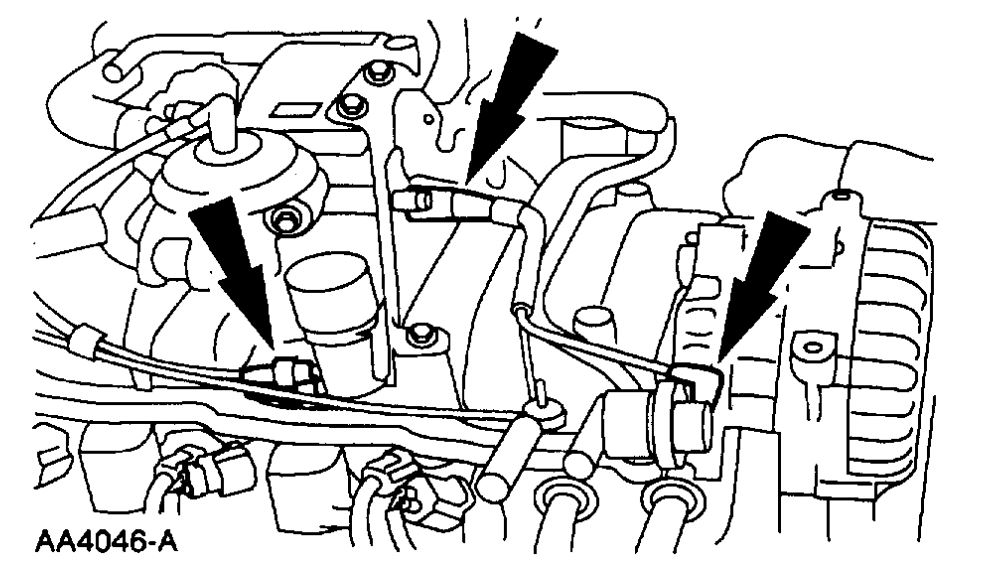
11. Disconnect the oil pressure sensor electrical connector and the Power Steering Pressure (PSP) switch electrical connector.


imageOpen In New TabZoom/Print


12. Disconnect the Exhaust Gas Recirculation (EGR) tube from the exhaust manifold.
13. Lower the vehicle.


imageOpen In New TabZoom/Print


14. Disconnect the two differential pressure feedback EGR hoses.

image
15. Disconnect the RH heated oxygen sensor electrical connector.


imageOpen In New TabZoom/Print


16. Disconnect the fuel charging wiring electrical connectors from the eight ignition coils.


imageOpen In New TabZoom/Print


17. Disconnect the fuel charging wiring electrical connectors from the eight fuel injectors.


imageOpen In New TabZoom/Print


18. Disconnect the accelerator cable and the speed control actuator cable.


imageOpen In New TabZoom/Print


19. Remove the cables from the EGR tube heat shield and position out of the way.


imageOpen In New TabZoom/Print


20. Remove the bolts and the EGR tube heat shield.


imageOpen In New TabZoom/Print


21. Disconnect the Evaporative Emissions (EVAP) return tube, the main chassis vacuum supply line, and the EGR valve vacuum supply.


imageOpen In New TabZoom/Print


22. Disconnect the Positive Crankcase Ventilation (PCV) tube assembly at two locations and remove.


imageOpen In New TabZoom/Print


23. Disconnect the electrical connector from the EGR vacuum regulator solenoid.


imageOpen In New TabZoom/Print


24. Disconnect the vacuum line from the EVAP canister purge valve.


imageOpen In New TabZoom/Print


25. Disconnect the generator cable and electrical connector.


imageOpen In New TabZoom/Print


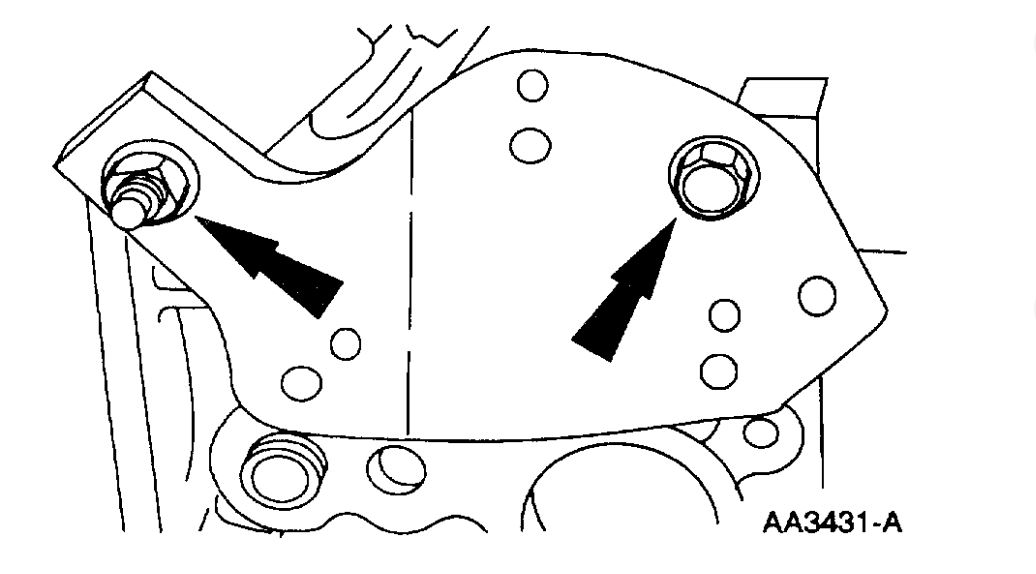
26. Remove the bolts and the generator mounting bracket.


imageOpen In New TabZoom/Print


27. Remove the upper radiator hose.


imageOpen In New TabZoom/Print


28. Disconnect the electrical connector from the Idle Air Control (IAC) valve and the Throttle Position (TP) sensor.


imageOpen In New TabZoom/Print


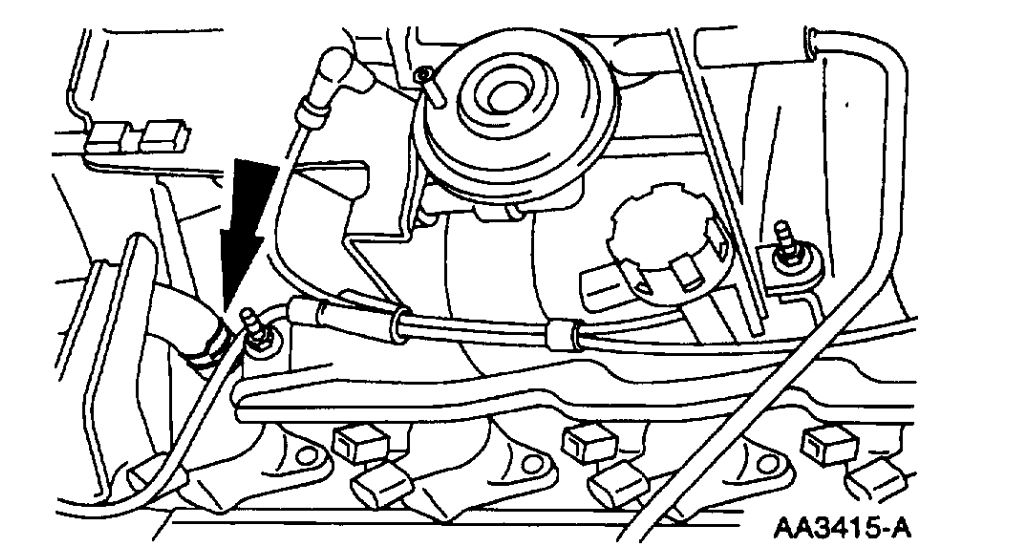
29. Disconnect the heater water hose.


imageOpen In New TabZoom/Print


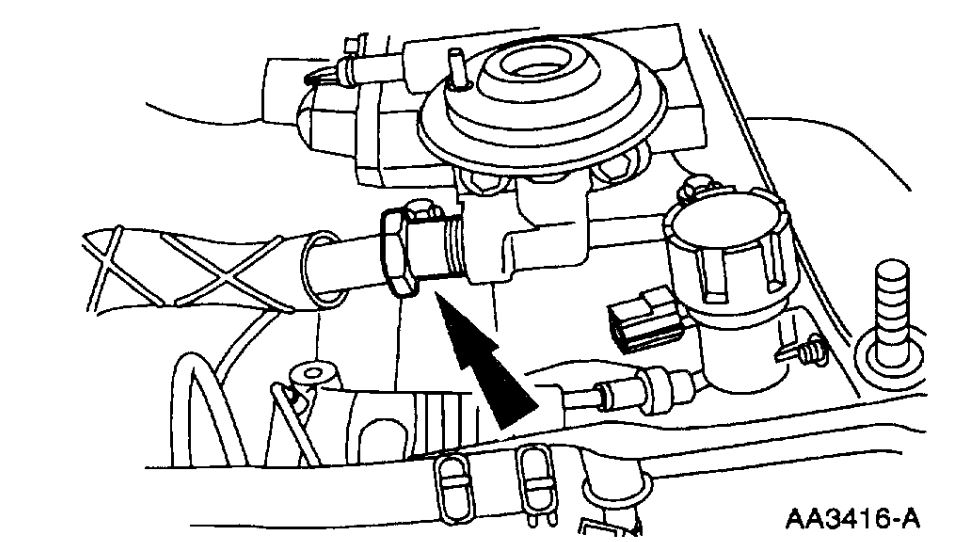
30. Disconnect the EGR tube from the EGR valve.


imageOpen In New TabZoom/Print


31. Note: The LH heated oxygen sensor and the transmission electrical connectors are attached to the wiring bracket and must be separated from the bracket.

Remove the wiring bracket.
- Disconnect the wiring connectors.
- Separate the transmission harness from the stud.
- Remove the nut and the bolt and remove the bracket.


imageOpen In New TabZoom/Print


32. Remove the bolts and the throttle body.


imageOpen In New TabZoom/Print


33. Separate the fuel charging wiring pin-type retainer from the crash bracket.


imageOpen In New TabZoom/Print


34. Remove the bolt and the stud and remove the crash bracket.


imageOpen In New TabZoom/Print


35. Disconnect the vacuum lines and remove the vacuum harness.


imageOpen In New TabZoom/Print


36. Remove the studs and the fuel injection supply manifold and fuel injectors as an assembly.


imageOpen In New TabZoom/Print


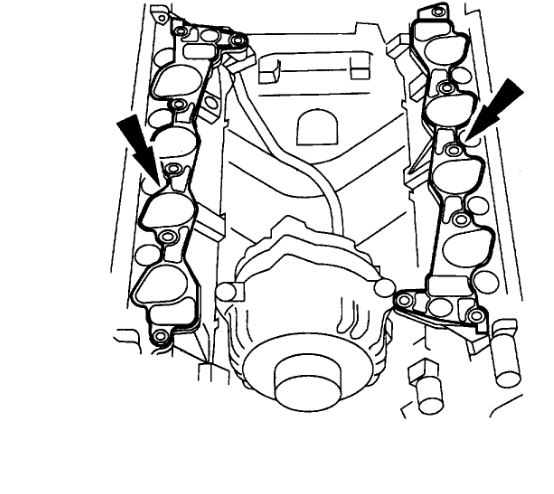
37. Remove the bolts and the ignition coils.


imageOpen In New TabZoom/Print


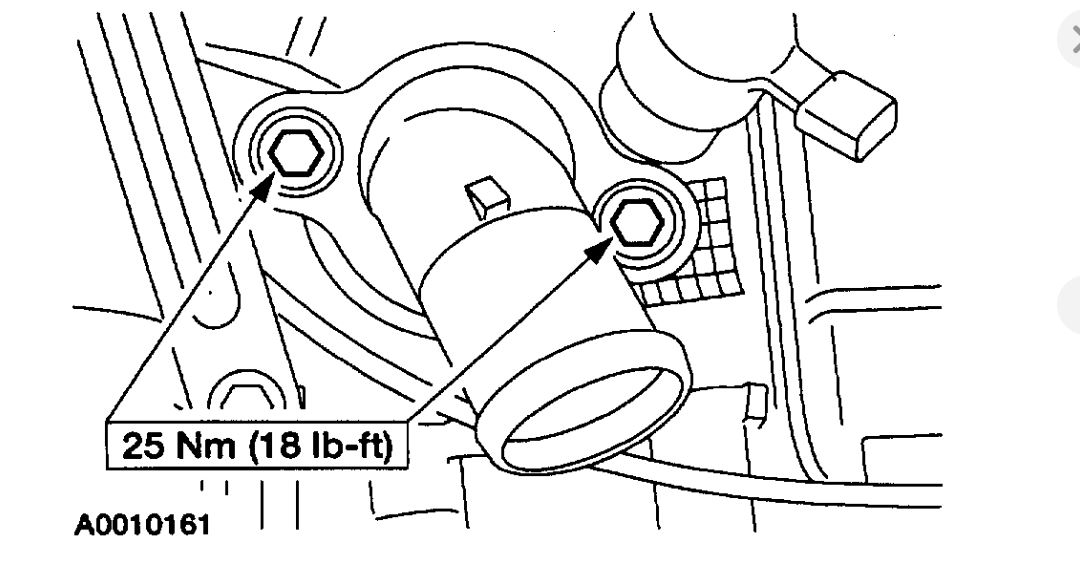
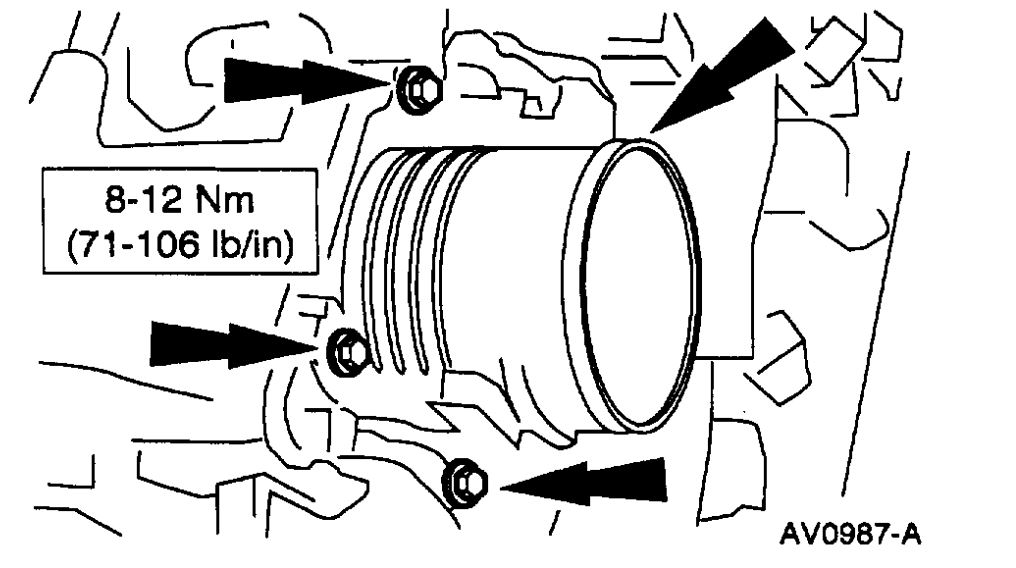
38. Remove the bolts and the water outlet adapter.


imageOpen In New TabZoom/Print


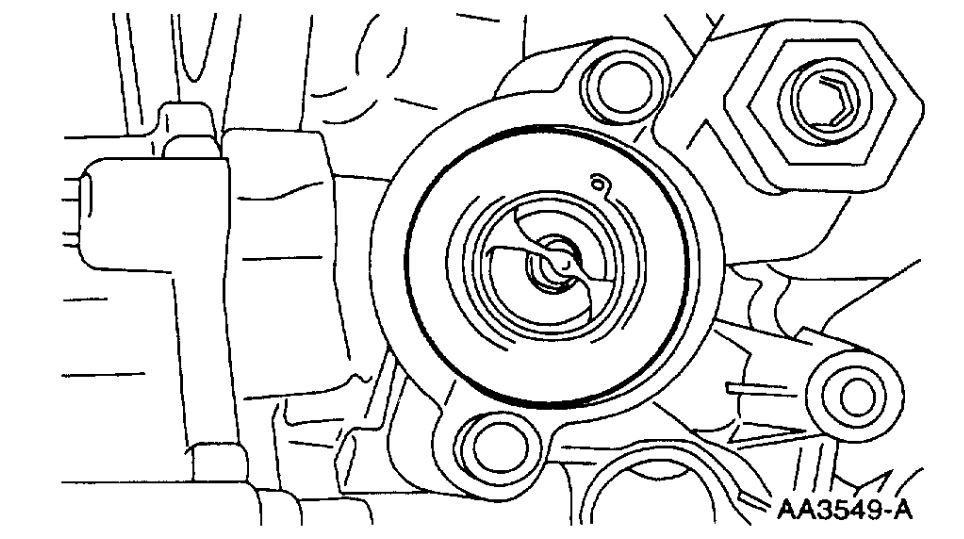
39. Remove the water thermostat.


imageOpen In New TabZoom/Print


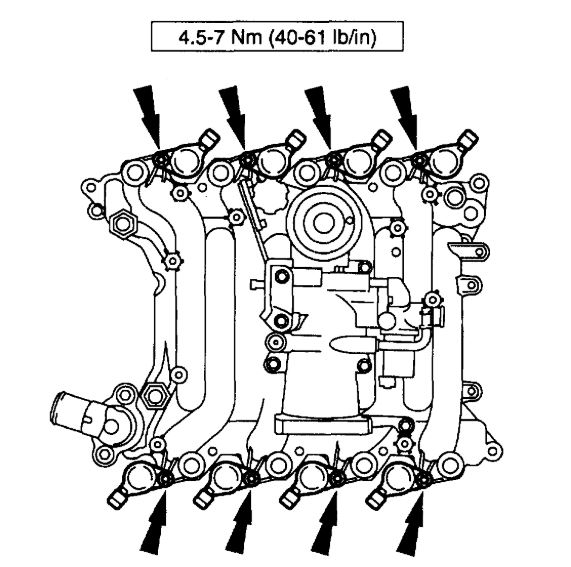
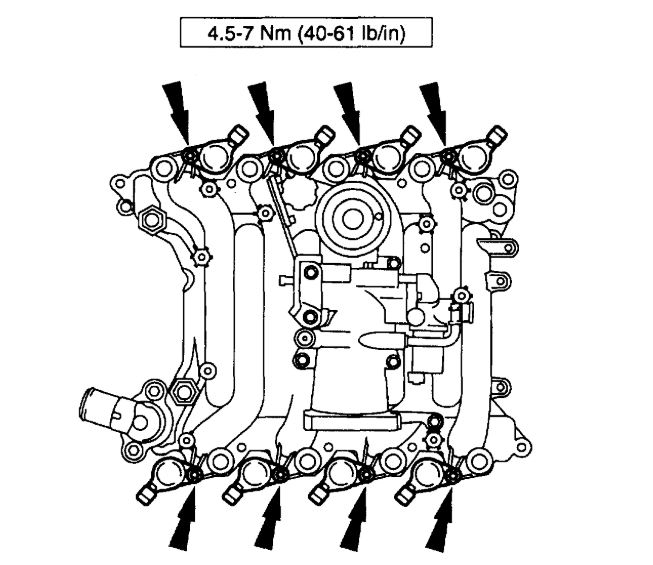
40. Remove the bolts and the intake manifold.

Mar 11, 2019 at 5:22 PM
Avatar
MGOBLUE78
  • MEMBER
  • 19 POSTS
Thank you for the help! Not sure how soon this project will happen but I’ll be in touch with any help needed. Thanks again for your time and help!
Mar 11, 2019 at 5:35 PM
Avatar
ASEMASTER6371
  • CERTIFIED EXPERT
  • 52,796 POSTS
You're welcome.

Always glad to help.

Roy
Mar 11, 2019 at 5:42 PM
Avatar
MGOBLUE78
  • MEMBER
  • 19 POSTS
Hey Roy, just a little update. I had to take my car to a mechanic to diagnose the problem. He did a smoke test and couldn’t find a vacuum leak or anything else wrong other than cleaning my maf sensor. That did seem to help but only for a day or so. He noticed I had Autolite spark plugs to which I was told there pretty much junk. I replaced them with motorcrafts and also replaced the maf sensor. Since then I haven’t had a check engine light. I still have a rough idle on cold starts. My short term fuel trim is high 20-30%(at idle) until engine warms up then drop’s to around 0% like it should be. Any ideas or do you still feel it’s my intake?
Apr 27, 2019 at 9:49 AM
Avatar
ASEMASTER6371
  • CERTIFIED EXPERT
  • 52,796 POSTS
I need the long term trim readings, not the short.

Did they do a compression test?

It sounds like a carbon issue on the intake valves.

Roy

Apr 27, 2019 at 9:55 AM
Avatar
MGOBLUE78
  • MEMBER
  • 19 POSTS
I don’t think he did. Long term fuel trim is 15-25% at idle. Drops down as you give it gas.
Apr 27, 2019 at 10:07 AM
Avatar
ASEMASTER6371
  • CERTIFIED EXPERT
  • 52,796 POSTS
Running lean.

Did you check the fuel pressure?

Roy
Apr 27, 2019 at 10:16 AM
Avatar
MGOBLUE78
  • MEMBER
  • 19 POSTS
Not yet, but will now.
Apr 27, 2019 at 10:23 AM
Avatar
ASEMASTER6371
  • CERTIFIED EXPERT
  • 52,796 POSTS
Sounds good.

Keep me updated.

Roy
Apr 27, 2019 at 10:56 AM
Avatar
MGOBLUE78
  • MEMBER
  • 19 POSTS
Hey Roy, sorry for such a long delay. I finally checked my fuel pressure. First, I did car off, turned ignition to run, reading - 6psi. Then I started the car and let it idle for a few minutes, reading - 32psi. Turned car off, let it sit for fifteen minutes, reading - 30psi. I’ve also noticed since the outside temperatures are warmer now, on cold starts my long term fuel trim starts at 15% or less then will drop as low as 5% when car gets up to normal temperature.
Jun 22, 2019 at 9:12 AM
Avatar
ASEMASTER6371
  • CERTIFIED EXPERT
  • 52,796 POSTS
Got it.

You need a fuel pump. The pressure is way low.


Roy

REMOVAL
1. Remove the fuel tank. For additional information, refer to Fuel Tank. See: Fuel Tank > Procedures
2. Disconnect the pressure transducer connector on the top rear comer of the fuel tank.
3. Clean the area around the fuel pump mounting flange.


imageOpen In New TabZoom/Print


4. Remove the bolts and remove the fuel pump.

CAUTION: The fuel pump must be handled carefully to avoid damage to the float arm and the filter.

5. Remove and discard the fuel pump mounting gasket.
Jun 22, 2019 at 11:12 AM
Avatar
MGOBLUE78
  • MEMBER
  • 19 POSTS
That’s what I was afraid of. Thank you for all your help!
Jun 22, 2019 at 4:12 PM
Avatar
ASEMASTER6371
  • CERTIFIED EXPERT
  • 52,796 POSTS
You are welcome.

Always glad to help.

Roy
Jun 22, 2019 at 4:14 PM