Good morning,
I attached a procedure and pictures for you,
It s on the drivers side under the dash on left side drive units.
Roy
1. Disconnect and isolate the negative battery cable.
2. On RHD models, remove the glove box bin See: Glove Compartment > Removal and Replacement > Instrument Panel Glove Box - Removal.
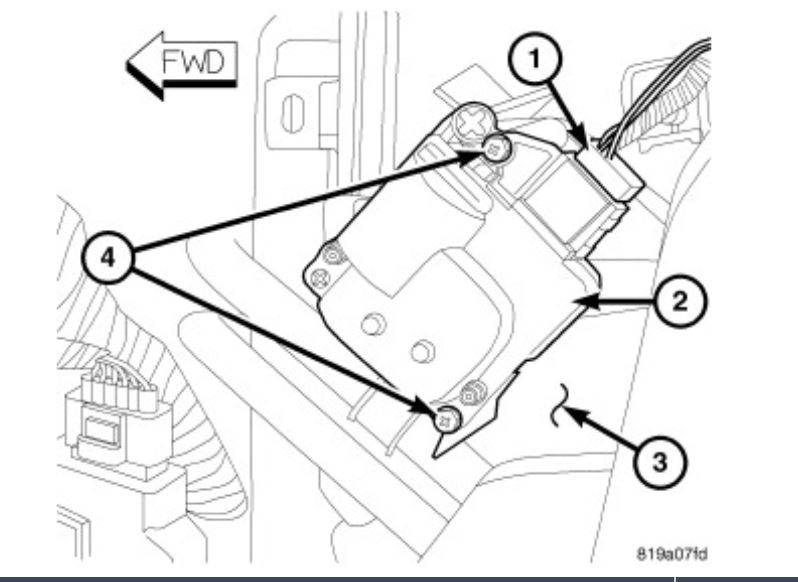
3. Disconnect the wire harness connector (1) from the blend door actuator (2) located on the left side of the HVAC air distribution housing (3).
4. Remove the two screws (4) that secure the blend door actuator to the air distribution housing and remove the actuator.
NOTE:
LHD model shown. RHD model similar.
1. Position the blend door actuator (2) onto the left side of the HVAC air distribution housing (3). If necessary, rotate the actuator slightly to align the splines on the actuator output shaft with those in the blend air door linkage.
2. Install the two screws (4) that secure the blend door actuator to the air distribution housing. Tighten the screws to 2 Nm (17 in. lbs.).
3. Connect the wire harness connector (1) to the blend door actuator.
4. On RHD models, install the glove box bin See: Glove Compartment > Removal and Replacement > Instrument Panel Glove Box - Installation.
5. Reconnect the negative battery cable.
6. Initiate the Actuator Calibration function using a scan tool See: Heating and Air Conditioning > Initial Inspection and Diagnostic Overview > Heating-A/C System Diagnostics.
Jun 18, 2020 at 7:09 AM