No spark?

2007 CHEVROLET SILVERADO
180,000 MILES • 6.0L • V8 • 2WD • AUTOMATIC
Avatar
NWM2019
  • MEMBER
  • 2 POSTS
I just put a new motor in my truck. Due to a blown motor. I've put a long block in. Got everything put back and tried to start but will not fire. Have fuel but no fire.
Feb 10, 2020 at 6:53 PM
Advertisement
Avatar
JACOBANDNICKOLAS
  • CERTIFIED EXPERT
  • 110,175 POSTS
Hi,

Have you tried pulling diagnostic codes? Have you checked the crankshaft position sensor connector? Did you use the old crank sensor?

Do you have a live data scanner? If so, plug it in and see if there is an RPM signal when cranking.

Next, I am seeing more and more a ground issue related to ignition spark loss. All of the coils have a common ground that is located on the driver's side of the engine about 3/4 of the way down toward the front of the engine. It should be a black wire that bolts to the side of the engine block. Make sure that is connected and not broken or damaged.

Let me know what you find.

Joe
Feb 10, 2020 at 7:44 PM
Avatar
NWM2019
  • MEMBER
  • 2 POSTS
I do not have a live scanner and yes I have used the old crank and cam sensors.
Feb 10, 2020 at 8:55 PM
Advertisement
Avatar
JACOBANDNICKOLAS
  • CERTIFIED EXPERT
  • 110,175 POSTS
Hi,

Without a scanner, we need to start checking things one at a time. I know there are two fuses related to the coils / injectors, fuses 14 and 25 in the under hood power box. Check both. See pics below.

Also, did you check the ground on the engine block I mentioned?

Let me know.
Joe
Feb 11, 2020 at 6:51 PM
Avatar
GPANKA
  • MEMBER
  • 5 POSTS
I have the truck listed above 1500. I have lost all spark on every cylinder. i had the truck idling in the driveway and it shut off all of sudden. went out to restart and i don't get a fire or any pop at all. Put a spark tester on multiple cylinders and identified that i indeed have no spark anywhere. i started by testing to make sure i have good voltage and ground at the plugins for each coil which i do. then i replaced the crankshaft position sensor (which it wasn't throwing a code for it but replaced it anyway) and it still has no spark. the only thing i could think of left that could be bad would be my PCM. I decided to order a new PCM with my VIN programmed into it. received it in a few days. installed it and went through the re-learn procedure, still no spark, replaced the camshaft sensor, still no spark. checked the wiring going to the crankshaft and camshaft positioning sensor for a good ground and good voltage and everything looks good there. decided to replace the ignition switch underneath the steering column just for giggles and still no spark. i am absolutely stumped here. any help would be appreciated.

PS: the truck isn't throwing any codes and hasn't been through this whole ordeal at all other than my normal 02 codes.
Oct 5, 2020 at 10:07 AM (Merged)
Avatar
ASEMASTER6371
  • CERTIFIED EXPERT
  • 52,796 POSTS
Good afternoon,

Did you verify voltage to the pink wires at the coils?

I attached the diagram for you and the location of the fuse to check for power.

Roy
Oct 5, 2020 at 10:07 AM (Merged)
Avatar
GPANKA
  • MEMBER
  • 5 POSTS
yes, i have good voltage and good continuity to ground at the coils.
Oct 5, 2020 at 10:07 AM (Merged)
Avatar
ASEMASTER6371
  • CERTIFIED EXPERT
  • 52,796 POSTS
What is the voltage? The ground is controlled by the ECM. How did you check that?

Roy
Oct 5, 2020 at 10:07 AM (Merged)
Avatar
GPANKA
  • MEMBER
  • 5 POSTS
i had 12 volts on the pink, main hot lead for ignition. i checked continuity to ground by checking resistance at the ground on the coil plug with one test lead and other test lead on the ground to battery.
Oct 5, 2020 at 10:07 AM (Merged)
Avatar
GPANKA
  • MEMBER
  • 5 POSTS
i do not know what i am supposed to have on the two signal wires when in run or cranking.
Oct 5, 2020 at 10:07 AM (Merged)
Avatar
ASEMASTER6371
  • CERTIFIED EXPERT
  • 52,796 POSTS
You cannot measure the other wires as they a pulse width modulated. You need to make sure the connections are good at the ECM. You may have a failed ECM.

Roy
Oct 5, 2020 at 10:07 AM (Merged)
Avatar
HOMERHOME442
  • MEMBER
  • 2 POSTS
The truck cranks but I am not getting spark. i put new cap, rotor and coil and just put control module and still getting nothing.
Oct 5, 2020 at 10:07 AM (Merged)
Avatar
JACOBANDNICKOLAS
  • CERTIFIED EXPERT
  • 110,175 POSTS
Welcome to 2CarPros.

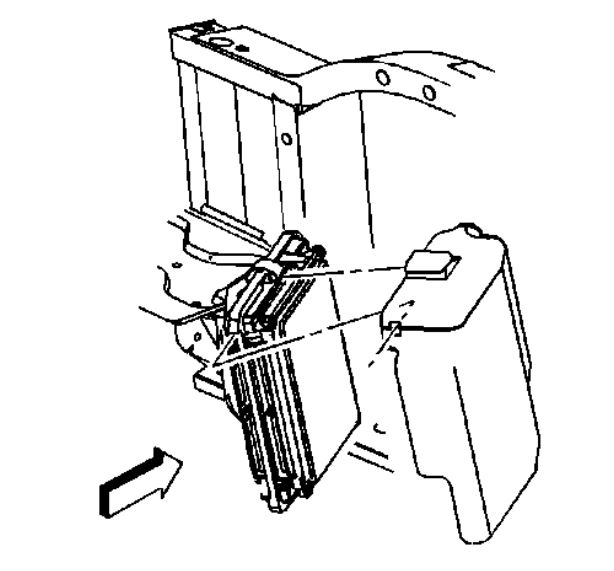
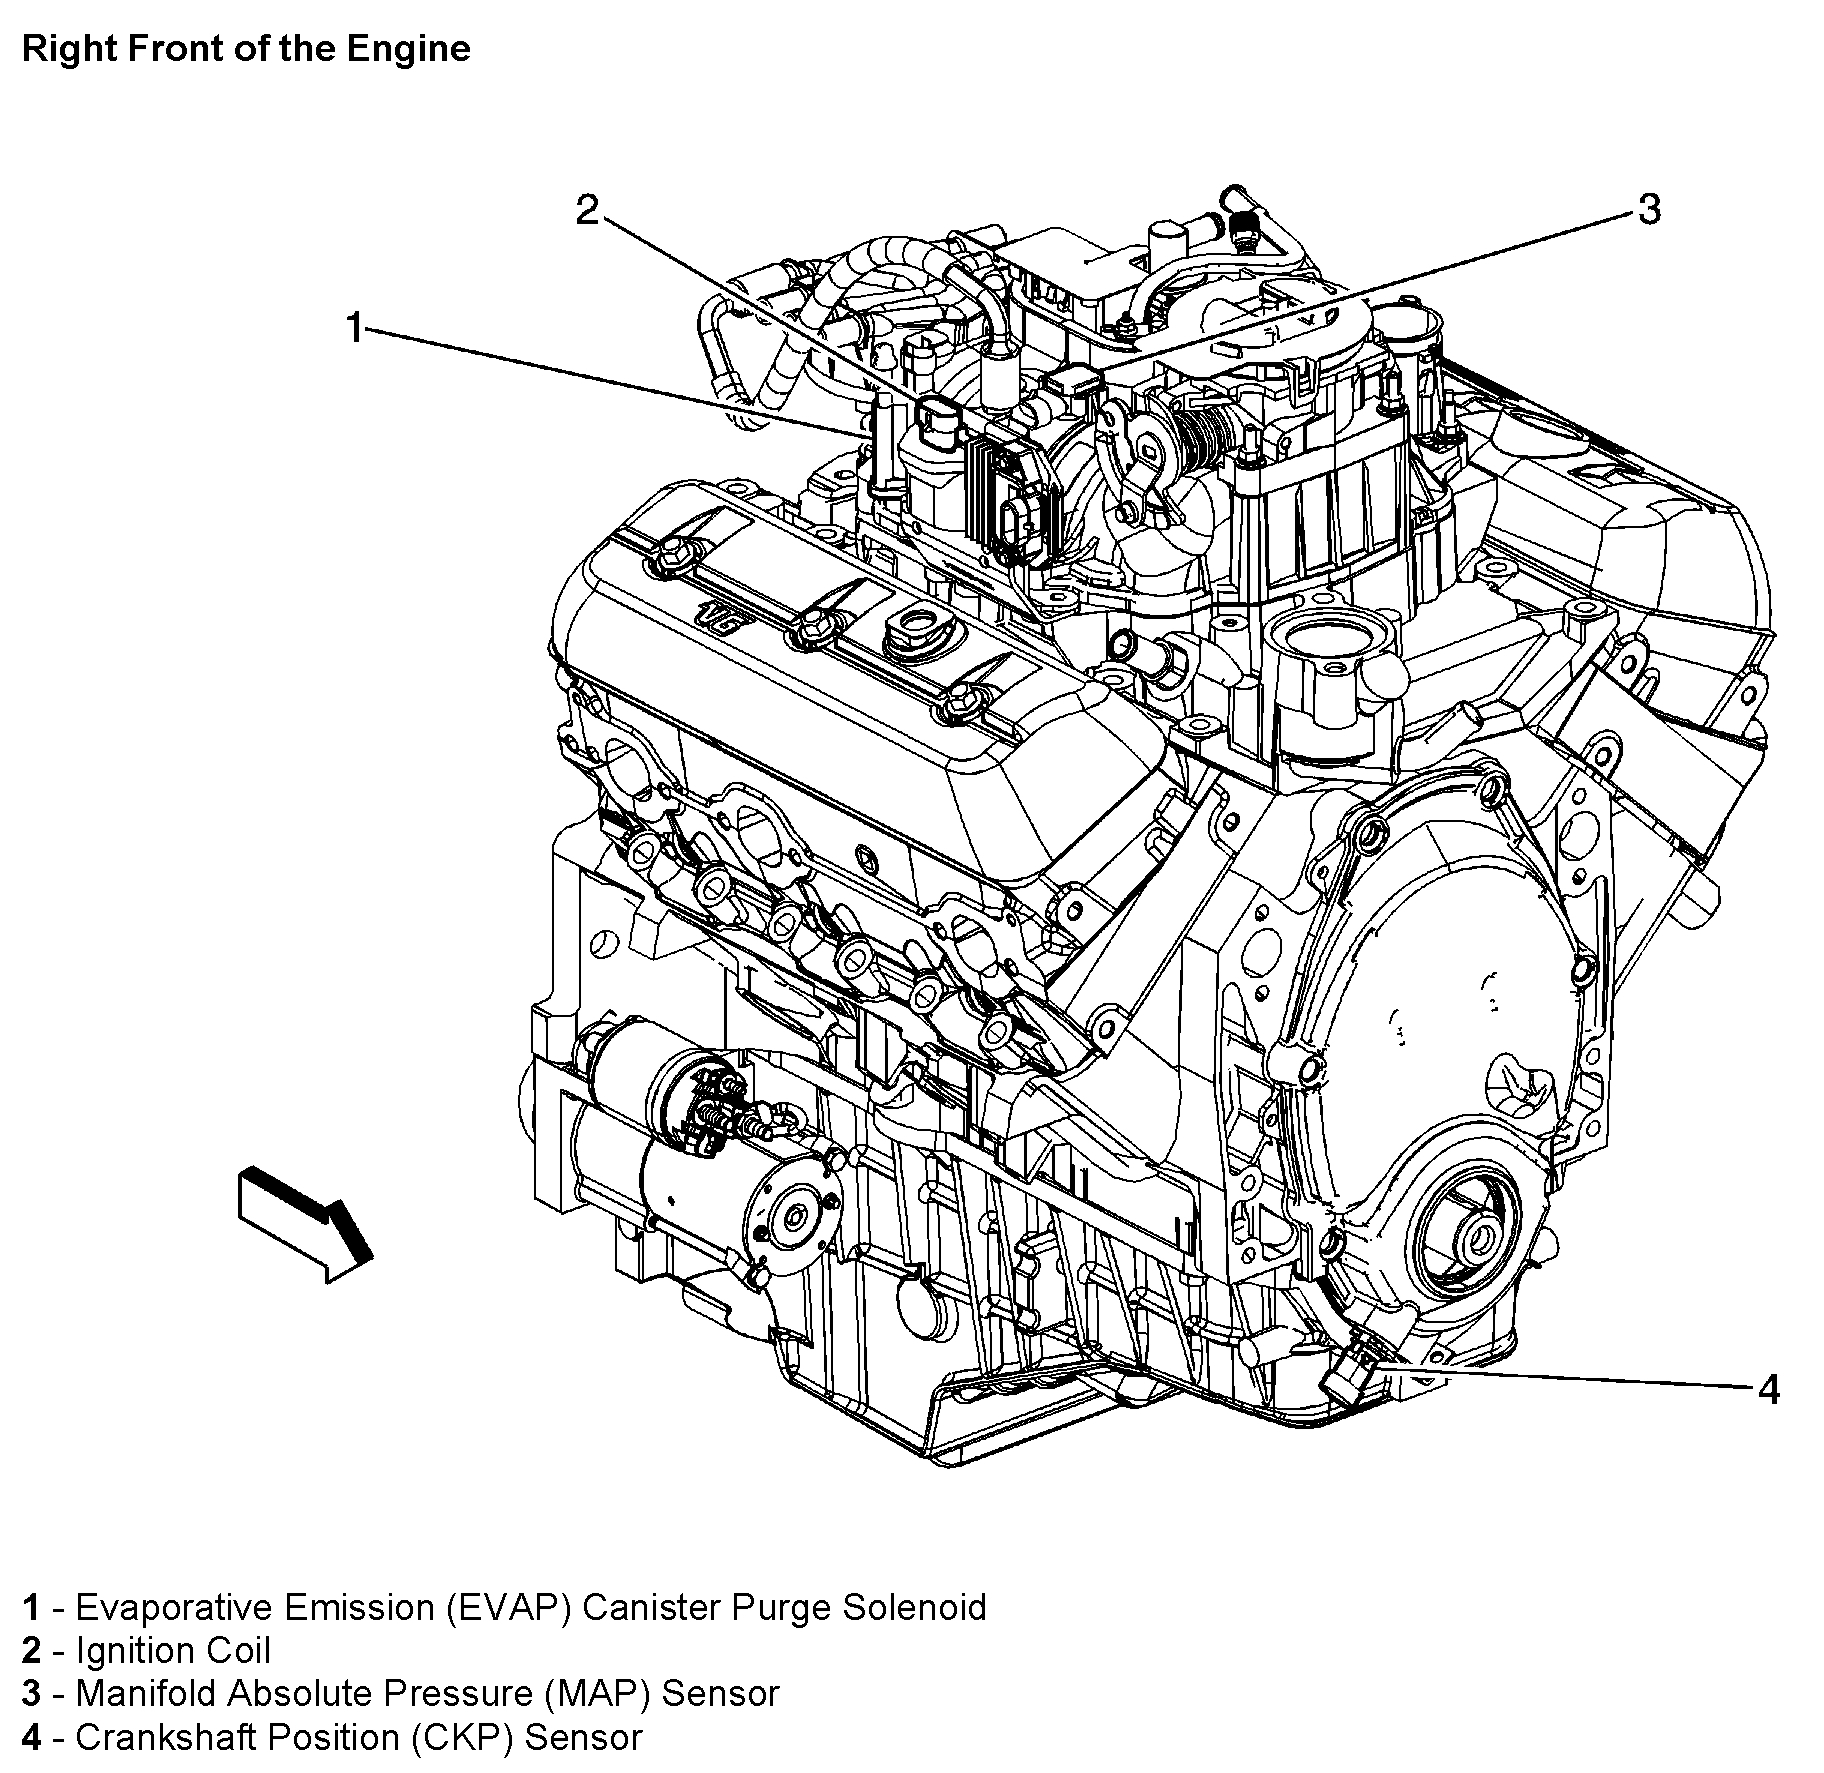
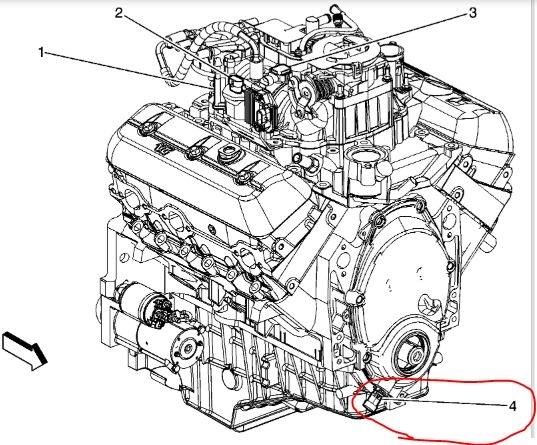
First, have you replaced the crankshaft position sensor? I attached two pictures showing location. I circled the part in picture 2. If you haven't, we need to check that. When I do it, I use a live data scanner and check for an PRM signal while cranking. Take a look through these links. They discuss how it works and its purpose, symptoms, and in general how one is replaced.

https://www.2carpros.com/articles/how-a-crank-shaft-angle-sensor-works

https://www.2carpros.com/articles/symptoms-of-a-bad-crankshaft-sensor

https://www.2carpros.com/articles/crankshaft-angle-sensor-replacement

If you find it is bad, here are the directions specific to your vehicle for replacement. Also, the attached pictures correlate with the directions. Additionally, I added the relearn procedure after the directions.

________________________________________________

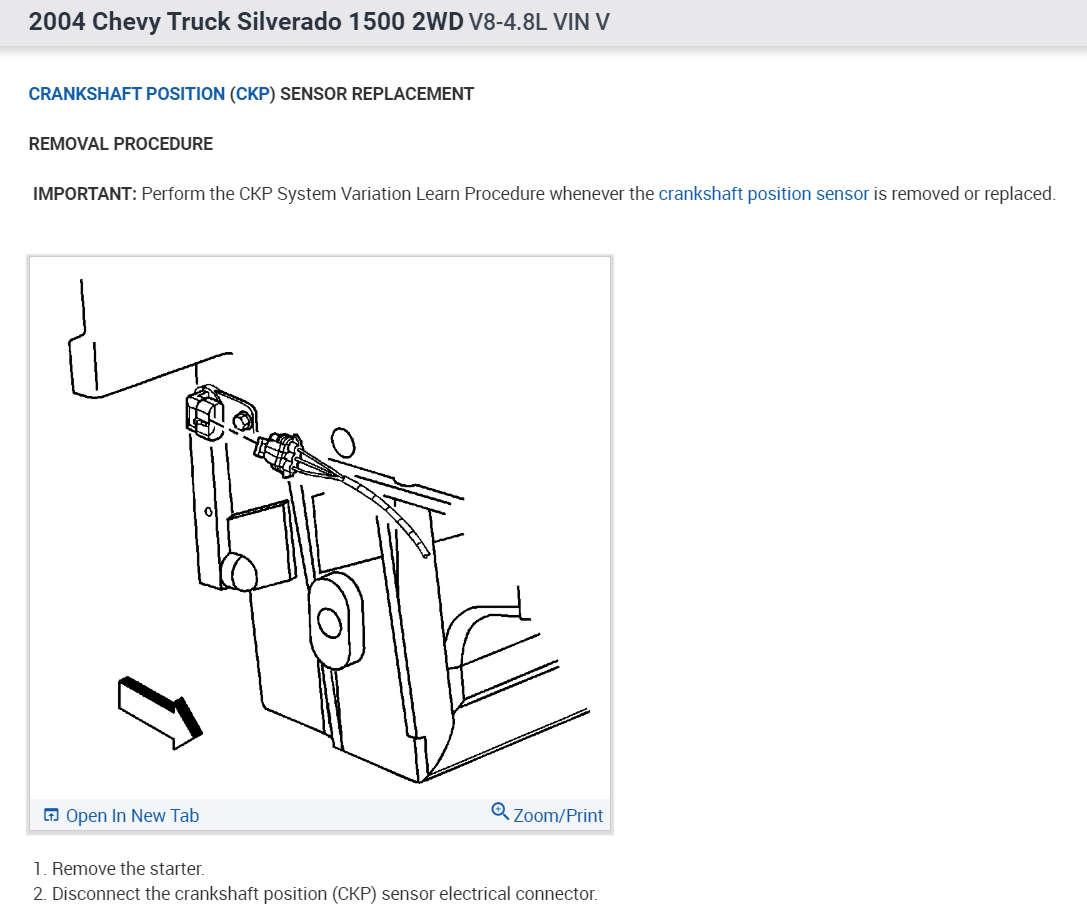
CRANKSHAFT POSITION (CKP) SENSOR REPLACEMENT

REMOVAL PROCEDURE

IMPORTANT: The crankshaft position (CKP) system variation learn procedure will need to be performed whenever the CKP sensor is removed or replaced.
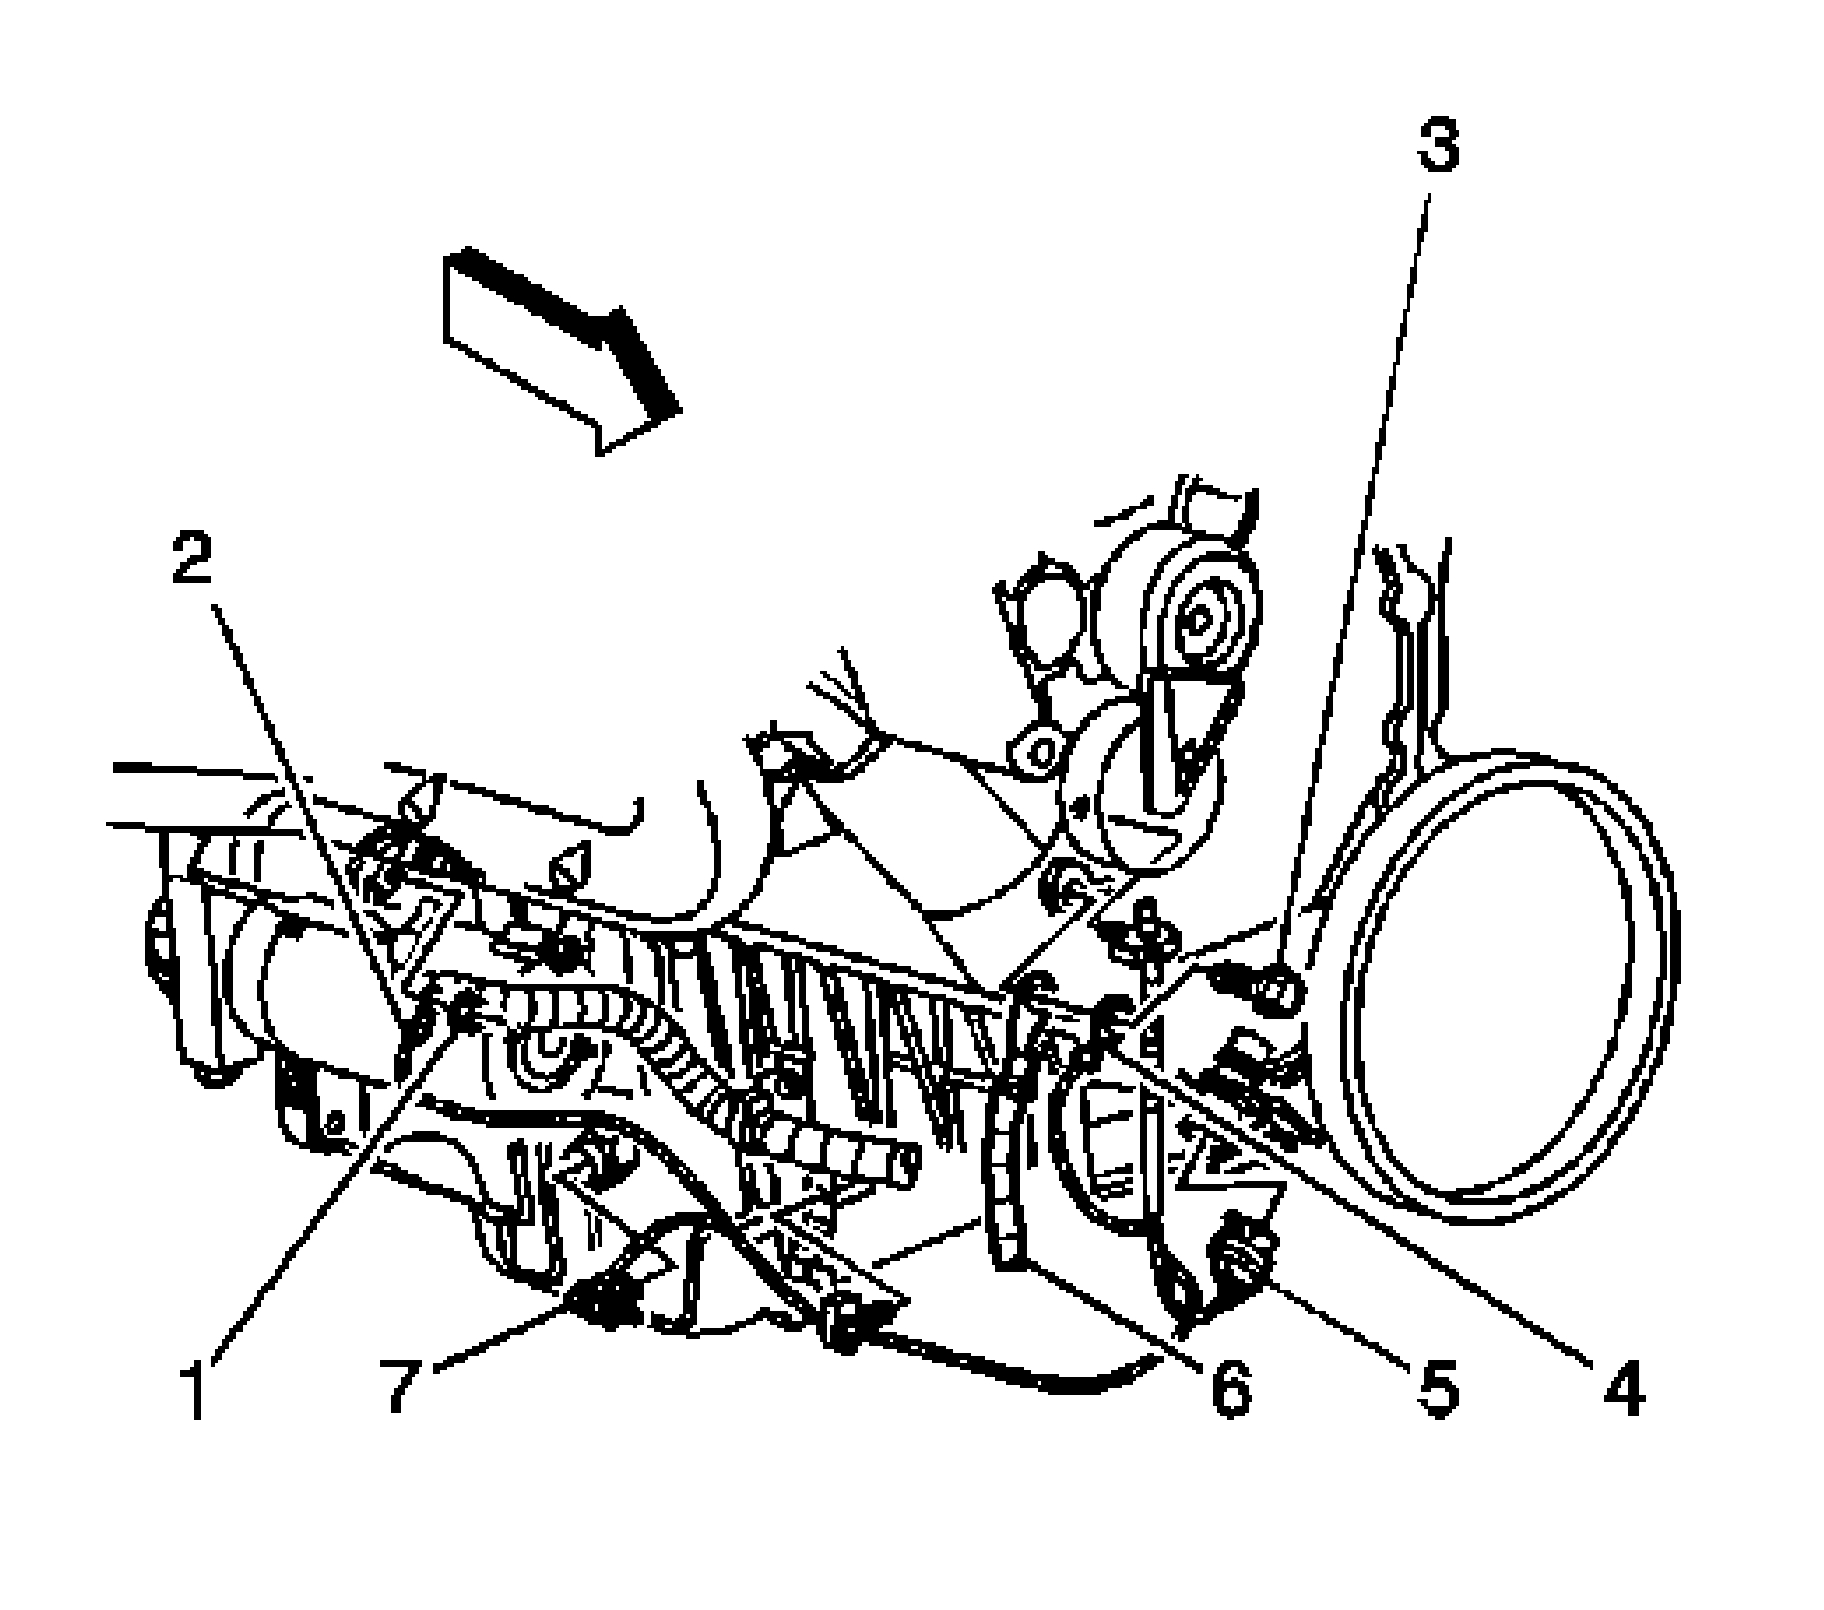
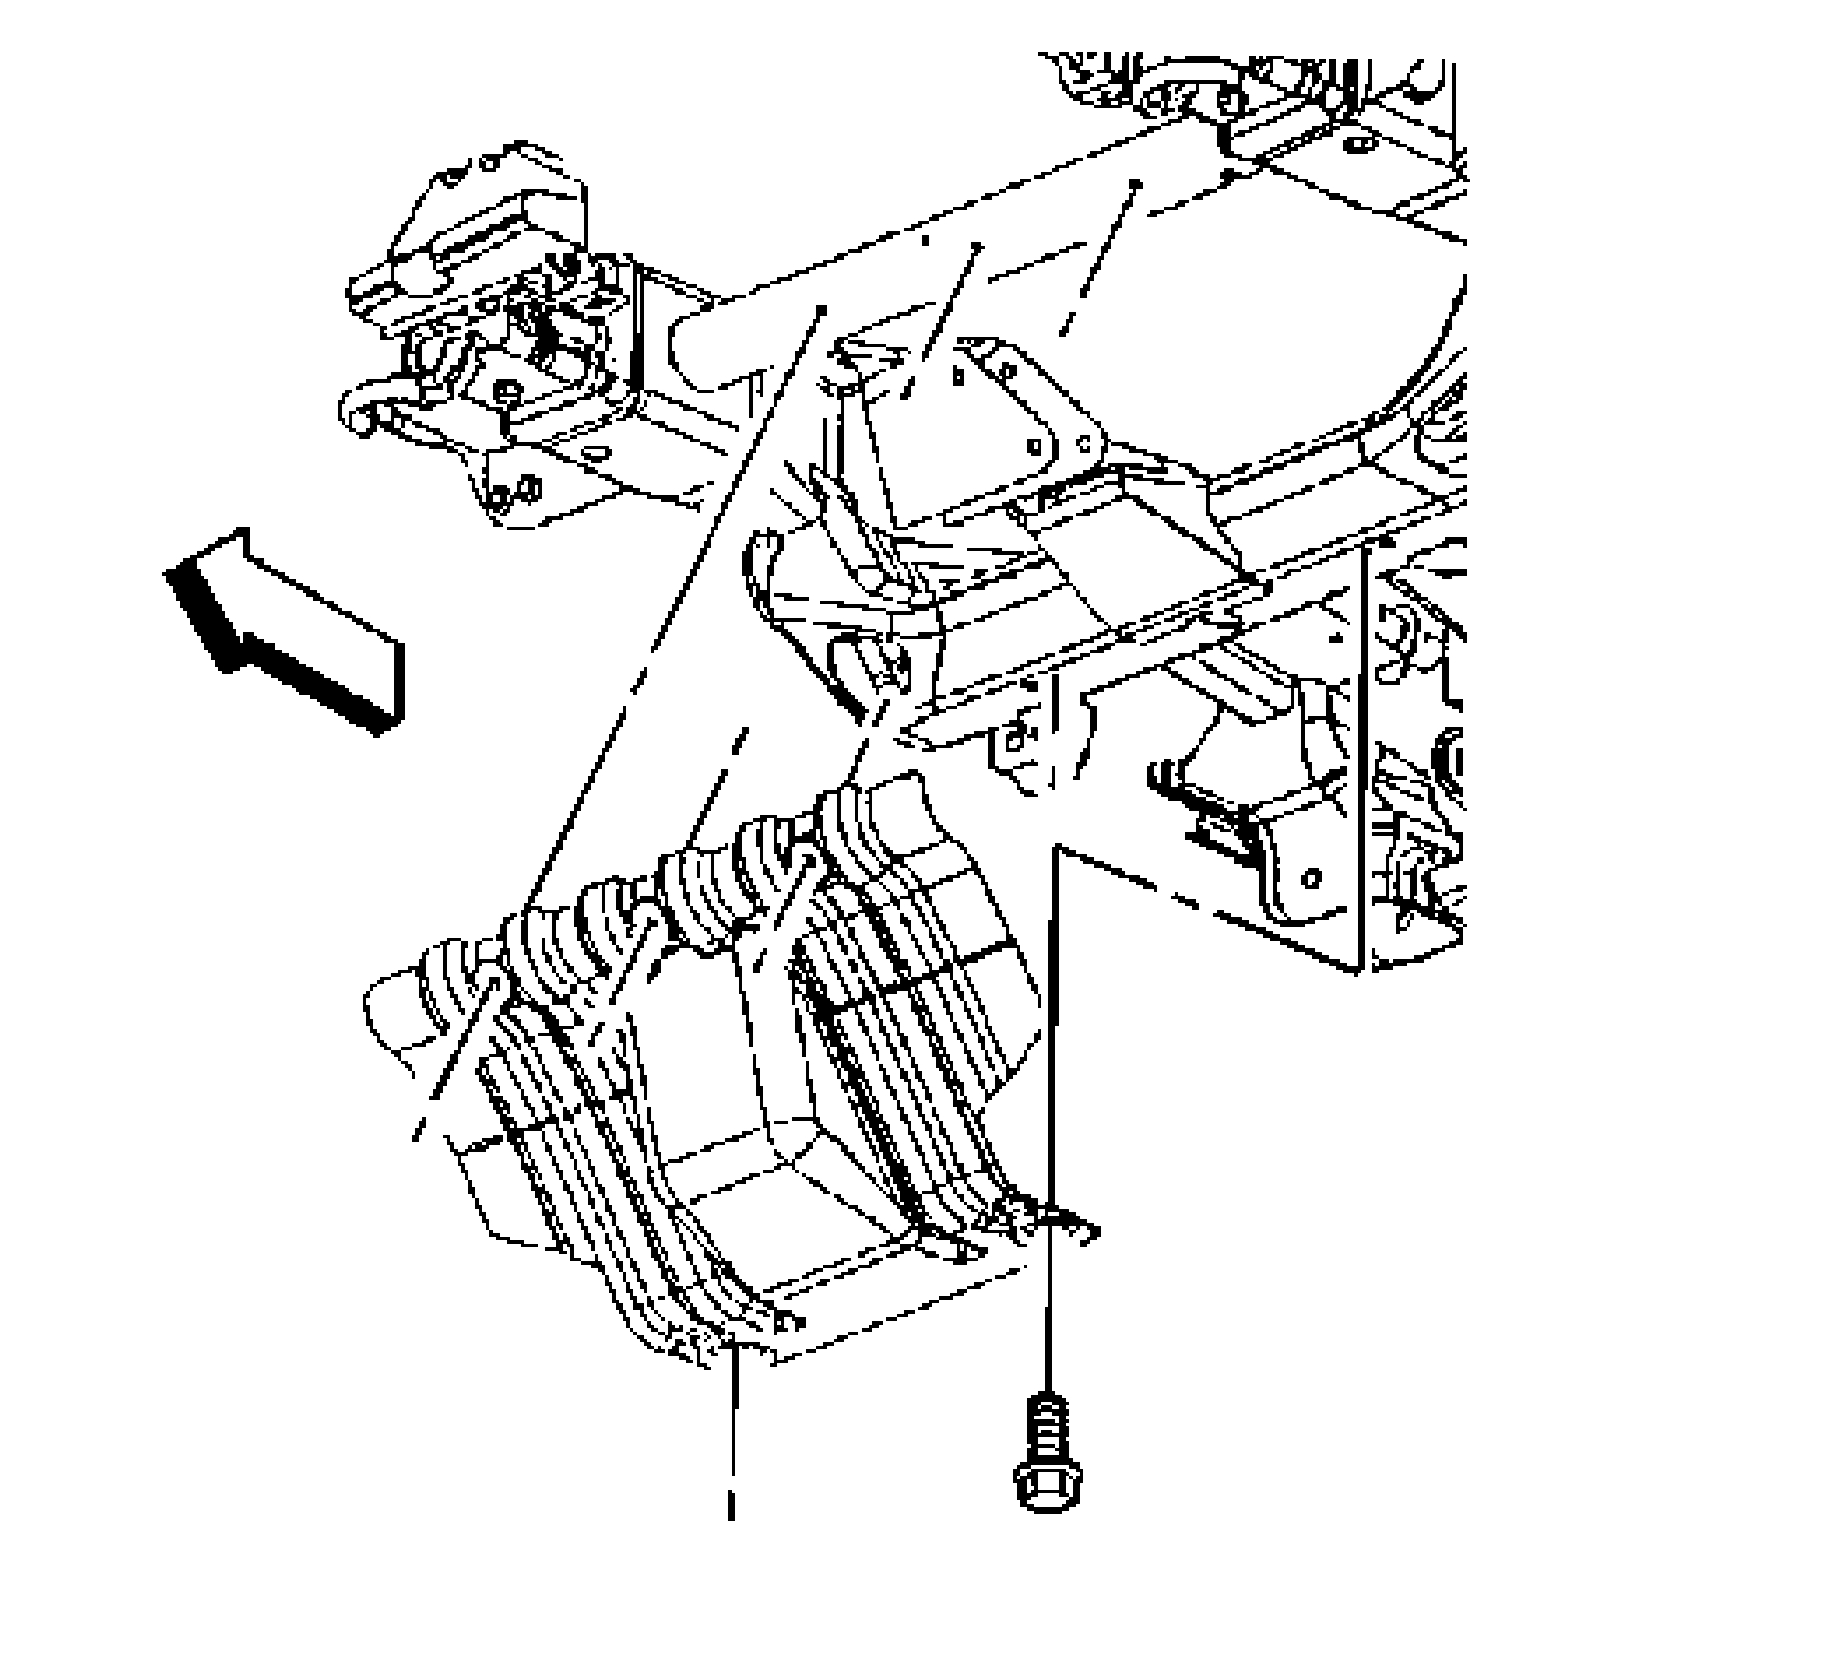

pic 3

1. Raise and suitably support the vehicle. Refer to Vehicle Lifting.
2. If equipped, remove the engine shield bolts.
3. Remove the engine shield.


pic 4

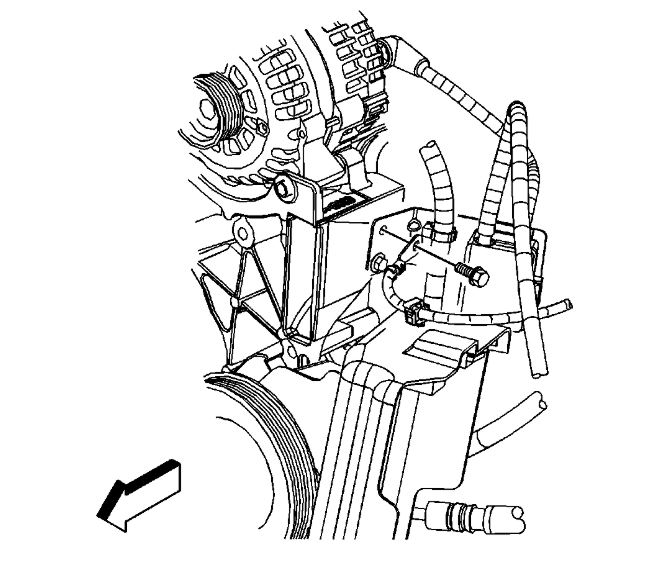
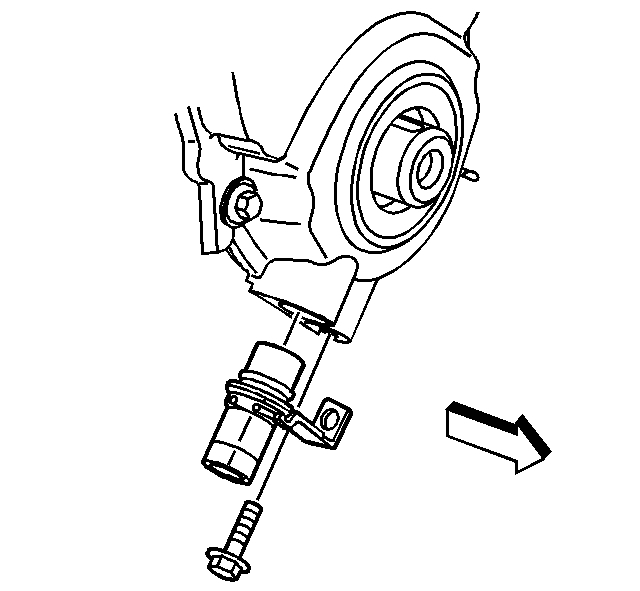
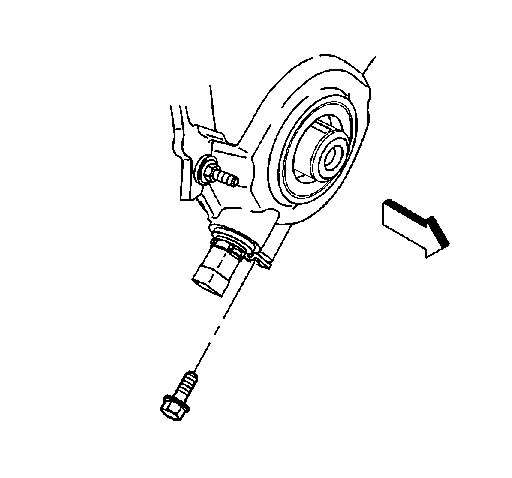
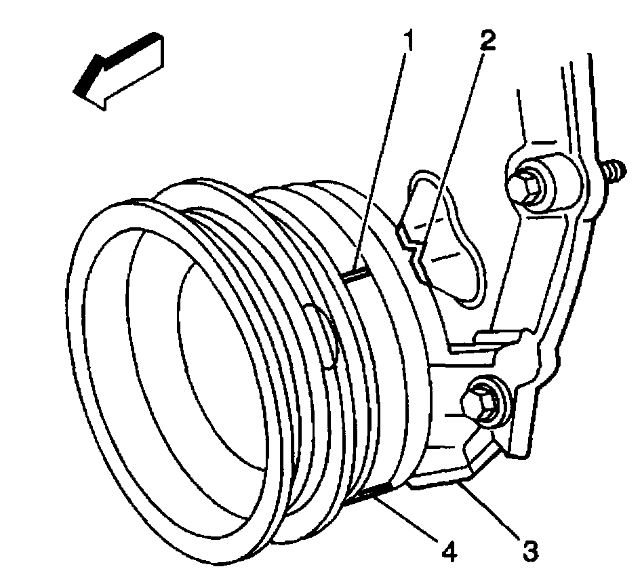
4. Disconnect the CKP sensor electrical connector (5).


pic 5

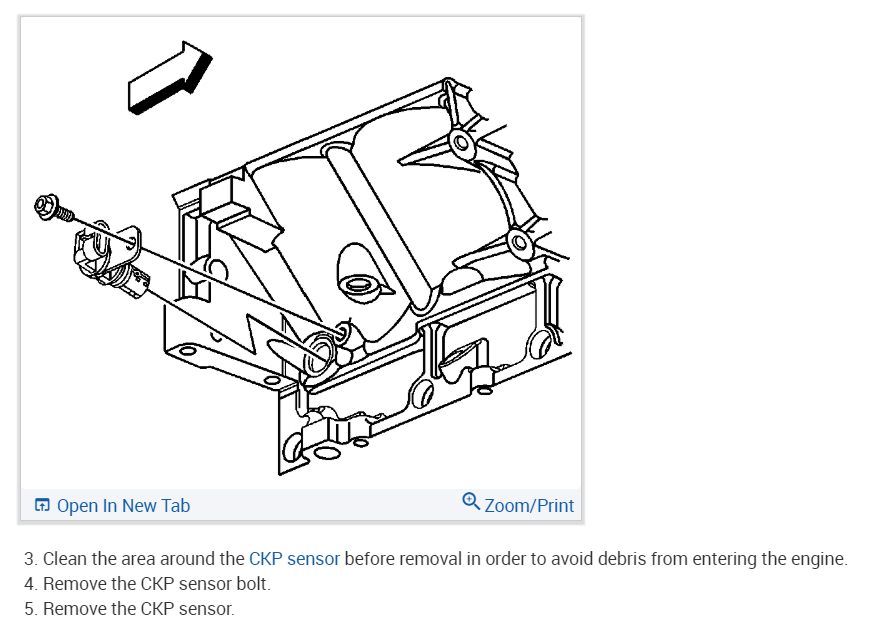
5. Remove the CKP sensor bolt.


pic 6

6. Remove the CKP sensor.

INSTALLATION PROCEDURE

IMPORTANT: When installing the CKP sensor, make sure the sensor is fully seated before tightening the bolt. A poorly seated CKP sensor may perform erratically and may set false diagnostic trouble codes (DTCs).


pic 7

1. If installing the old CKP sensor, install a NEW O-ring seal.

IMPORTANT: Do not reuse the original O-ring seal.

2. Lubricate the O-ring seal with clean engine oil.
3. Install the CKP sensor.


pic 8

4. Install the CKP sensor bolt.

NOTE: Refer to Fastener Notice in Service Precautions.

Tighten the bolt to 9 N.m (80 lb in).


pic 9

5. Connect the CKP sensor electrical connector (5).


pic 10

6. Install the engine shield.
7. Install the engine shield bolts.

Tighten the bolts to 20 N.m (15 lb ft).

8. Perform the CKP system variation learn procedure. See: Vehicle > Programming and Relearning

_______________________________________

Variation Relearn

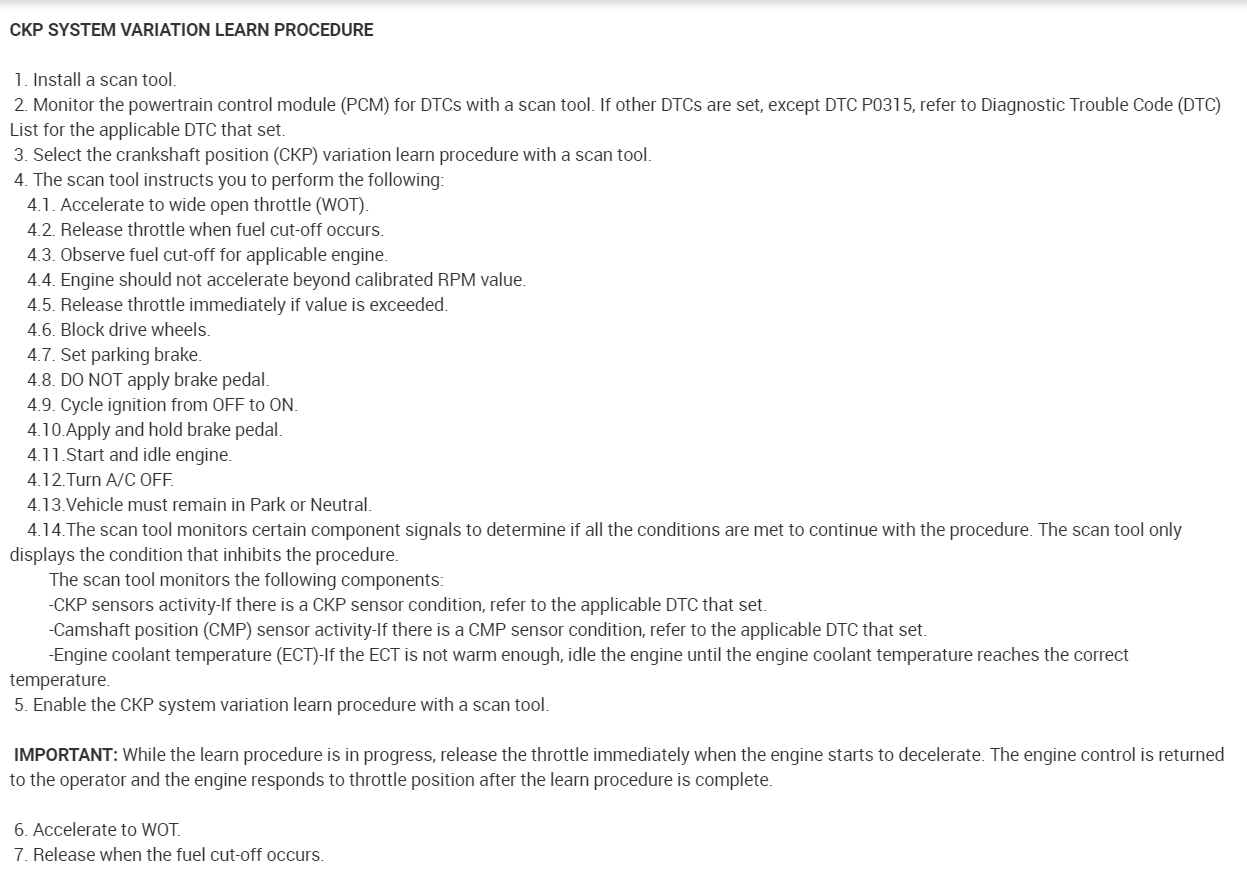
CKP SYSTEM VARIATION LEARN PROCEDURE

1. Install a scan tool.
2. Monitor the powertrain control module (PCM) for DTCs with a scan tool. If other DTCs are set, except DTC P0315, refer to Diagnostic Trouble Code (DTC) List - Vehicle in Vehicle DTC Information for the applicable DTC.
3. Select the crankshaft position variation learn procedure with a scan tool.
4. The scan tool instructs you to perform the following:
1. Accelerate to wide open throttle (WOT).
2. Release throttle when fuel cut-off occurs.
3. Observe fuel cut-off for applicable engine.
4. Engine should not accelerate beyond calibrated RPM value.
5. Release throttle immediately if value is exceeded.
6. Block drive wheels.
7. Set parking brake.
8. DO NOT apply brake pedal.
9. Cycle ignition from OFF to ON.
10. Apply and hold brake pedal.
11. Start and idle engine.
12. Turn the A/C OFF.
13. Vehicle must remain in Park or Neutral.
14. The scan tool monitors certain component signals to determine if all the conditions are met to continue with the procedure. The scan tool only displays the condition that inhibits the procedure. The scan tool monitors the following components:
- Crankshaft position (CKP) sensors activity-If there is a CKP sensor condition, refer to the applicable DTC.
- Camshaft position (CMP) signal activity-If there is a CMP signal condition, refer to the applicable DTC.
- Engine coolant temperature (ECT)-If the engine coolant temperature is not warm enough, idle the engine until the engine coolant temperature reaches the correct temperature.
5. Enable the CKP system variation learn procedure with the scan tool.
6. Accelerate to WOT.

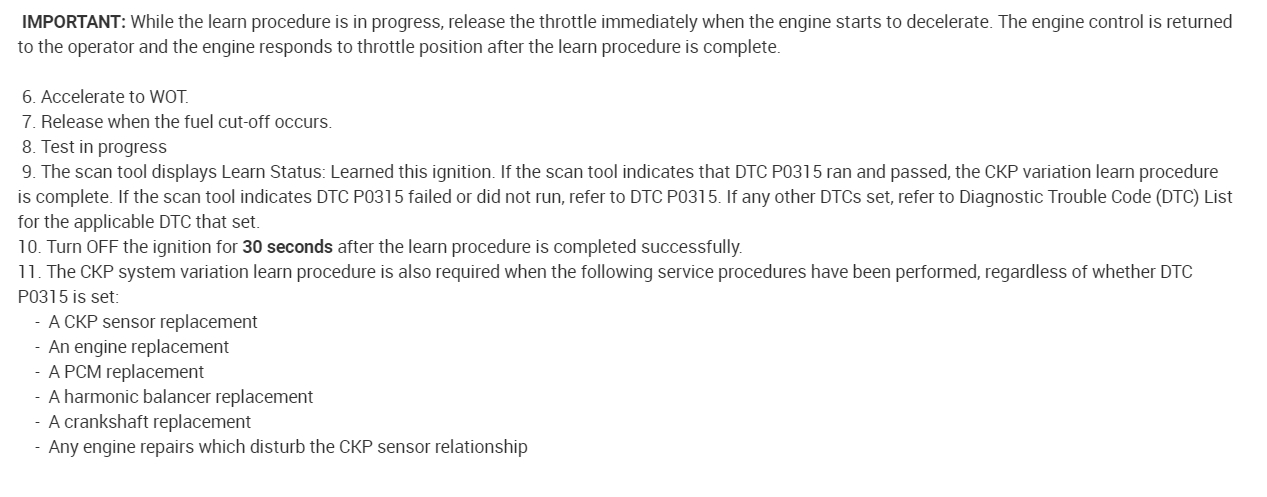
IMPORTANT: While the learn procedure is in progress, release the throttle immediately when the engine starts to decelerate. The engine control is returned to the operator and the engine responds to throttle position after the learn procedure is complete.

7. Release throttle when fuel cut-off occurs.
8. The scan tool display reads Test In Progress.
9. The scan tool displays Learn Status: Learned this ignition. If the scan tool indicates that DTC P0315 ran and passed, the CKP variation learn procedure is complete. If the scan tool indicates DTC P0315 failed or did not run, refer to DTC P0315. If any other DTCs set, refer to Diagnostic Trouble Code (DTC) List - Vehicle in Vehicle DTC Information for the applicable DTC.
10. Turn OFF the ignition for 30 seconds after the learn procedure is completed successfully.
11. The CKP system variation learn procedure is also required when the following service procedures have been performed, regardless of whether or not DTC P0315 is set:
- An engine replacement
- A PCM replacement
- A harmonic balancer replacement
- A crankshaft replacement
- A CKP sensor replacement
- Any engine repairs which disturb the crankshaft to CKP sensor relationship.

________________________________________

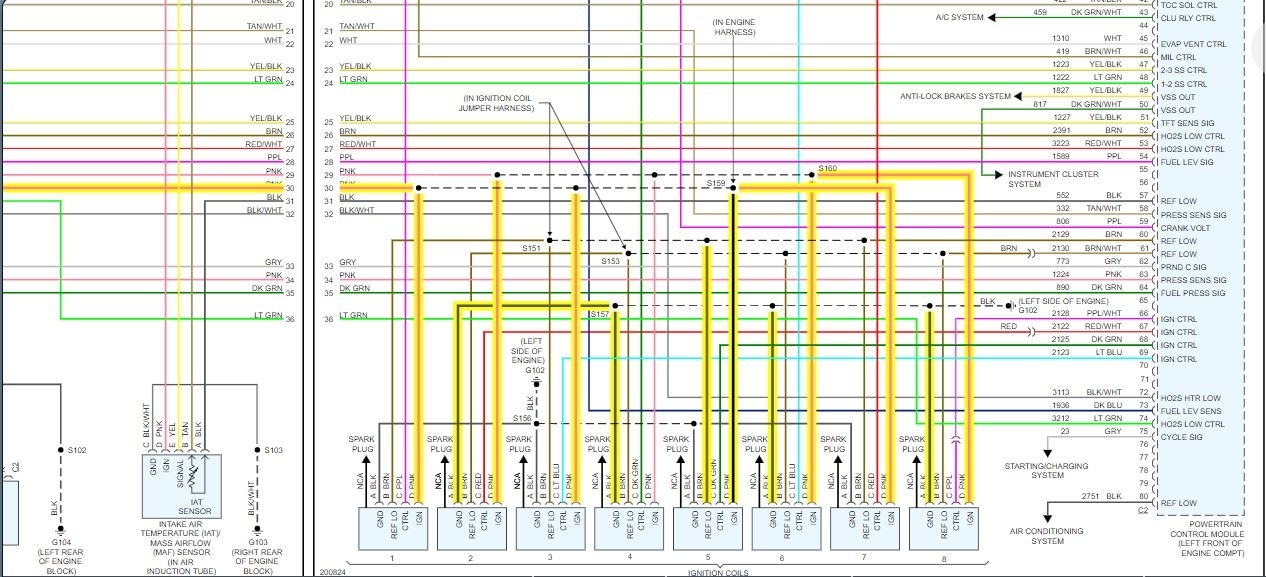
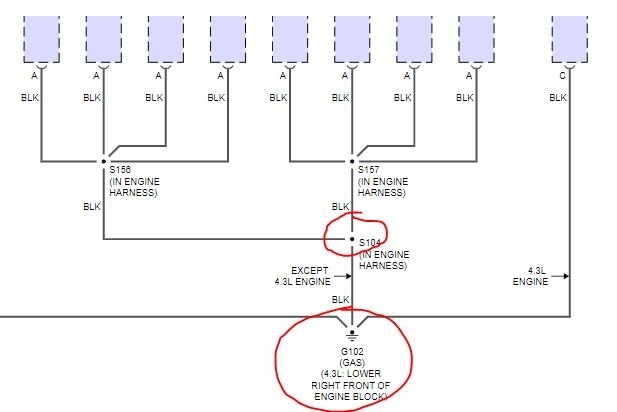
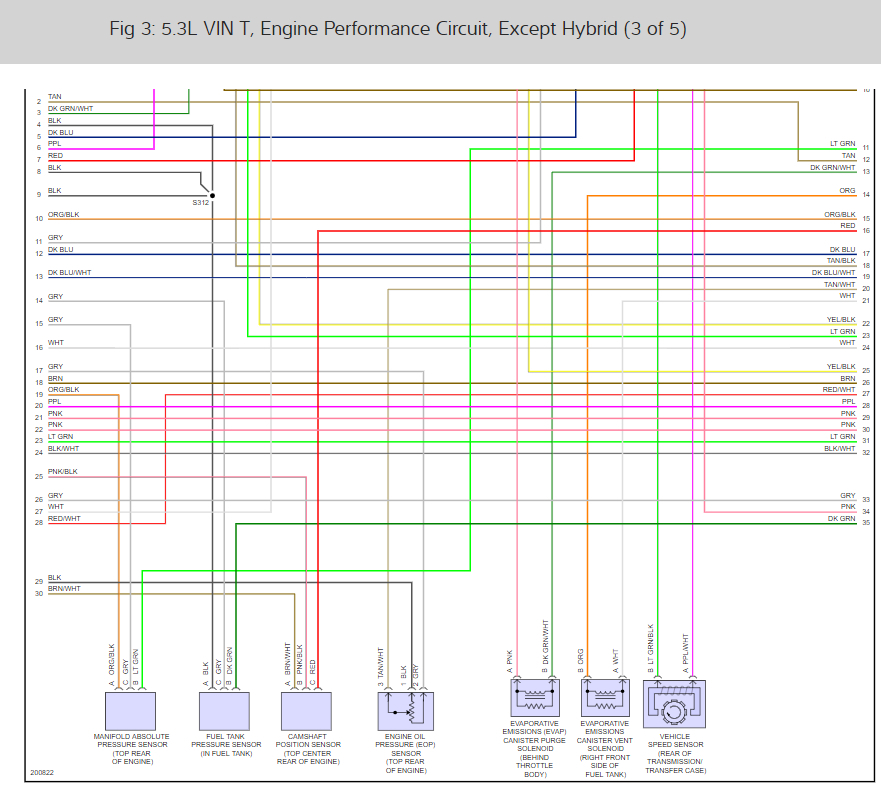
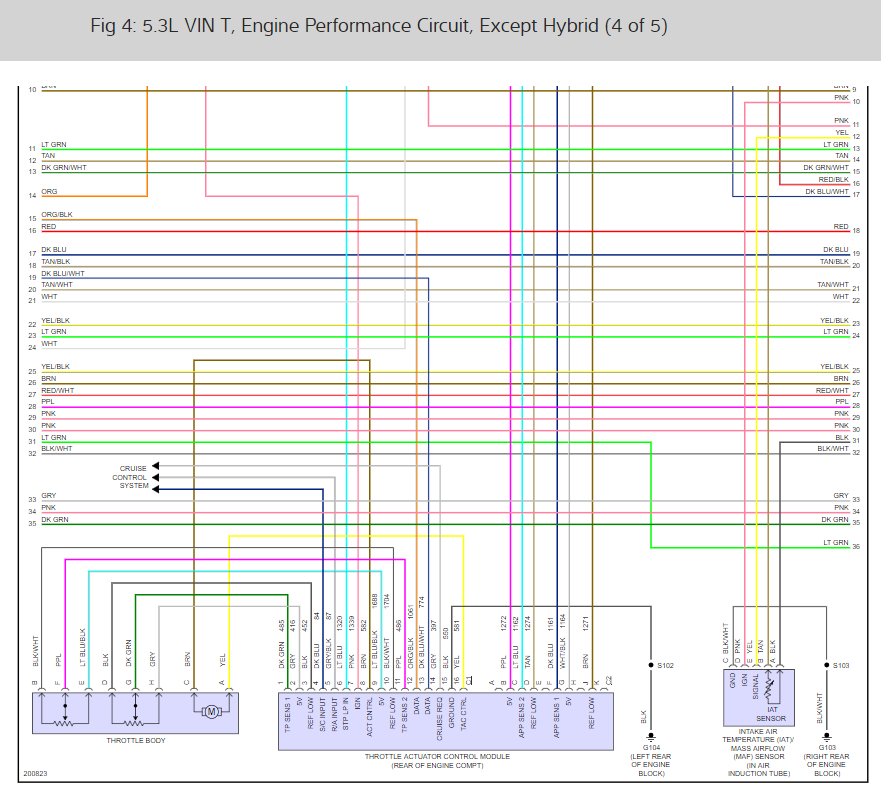
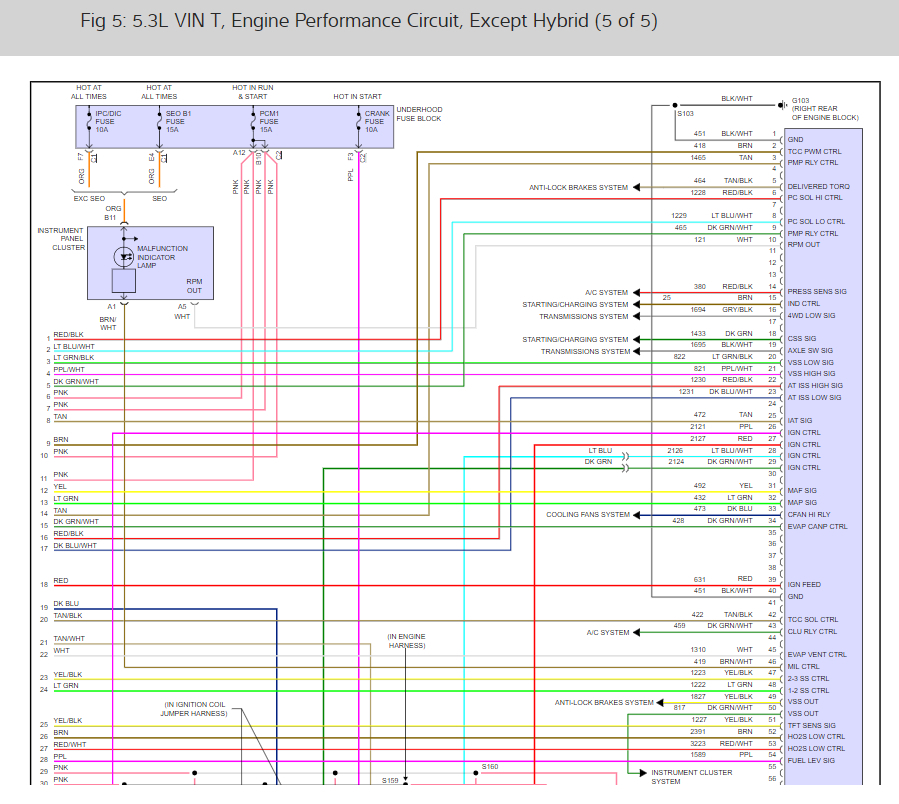
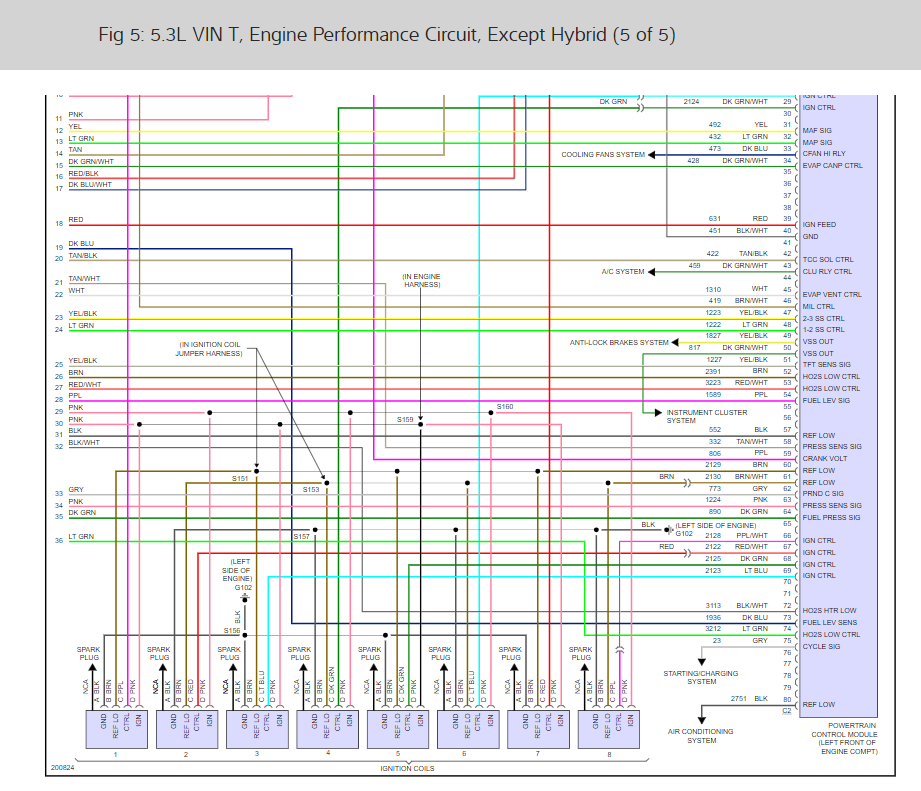
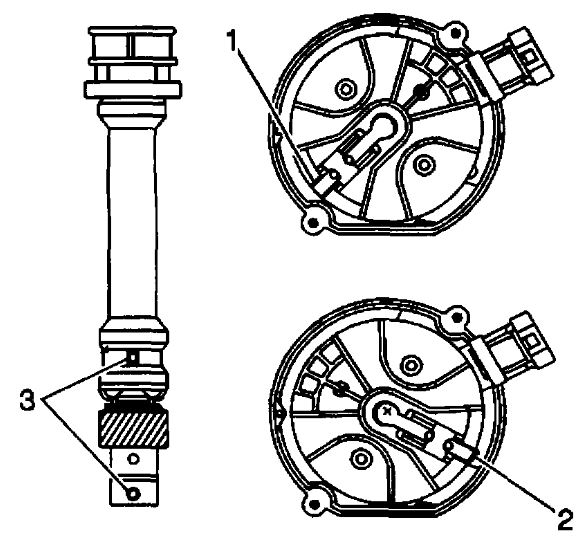
Now, before you replace the sensor, there is one more thing I want you to check. It is the ground for the coils and module. They all have 1 common ground. This ground is pron to fail after miles and years, so I strongly recommend checking it. Even though it may look attached at the engine block, make sure the connector is not ready to break, it is tight, and there isn't a corrosion issue. I learned this the hard way. Same conditions as your truck and couldn't find the problem. Touched the ground and it fell off. LOL

I attached a picture of the coils and ground. I circled the ground location. Make sure you also check the splice in the harness if the ground is good. Also, note that it can show continuity but fail when a load is placed on it. That's why I didn't suspect it.

Let me know if any of this helps or if you have other questions.

Take care,
Joe
Oct 5, 2020 at 10:07 AM (Merged)
Avatar
GPANKA
  • MEMBER
  • 5 POSTS
i already explained in the very beginning that i have replaced the PCM and yes the connections are good.
Oct 5, 2020 at 10:07 AM (Merged)
Avatar
ASEMASTER6371
  • CERTIFIED EXPERT
  • 52,796 POSTS
It still could be the PCM. Buying one preprogrammed does not always work.

Do you have a scan tool to read live data?

Roy
Oct 5, 2020 at 10:07 AM (Merged)
Avatar
MLONG0790
  • MEMBER
  • 1 POST
Engine will crank fuel will pump but no spark changed crankshaft position sensor changed battery check ignition coil putting thorough 10 volts alternator puts out 12 volts relays and doses are all ok can't find problem it started and ran one day and hasn't started swapped around plug wires and ignition coils need help really need to get back to work help me
Oct 5, 2020 at 10:08 AM (Merged)
Avatar
STRAILER
  • CERTIFIED EXPERT
  • 53,854 POSTS
Hello,

Two things come to mind, first is the security light flashing when you try to start it? This means the security system in engaged and it wont allow the engine ignition system to operate. This guide will help set it if its blinking.

https://www.2carpros.com/articles/how-to-reset-a-security-system

If not you may have an PCM1 fuse that is blow due to a shorted coil or injector. Please check the fuse for power and get back to me.

https://www.2carpros.com/articles/how-to-check-a-car-fuse

Here are the fuse locations and the engine wiring diagrams so you can see how the system works. If the fuse is blown unplug each coil and injector then plug them in one at time until the fuse blows.

This guide can helps as well

https://www.2carpros.com/articles/car-cranks-but-wont-start


Check out the diagrams (Below). Please run this test and get back to us.

Cheers, Ken


Oct 5, 2020 at 10:08 AM (Merged)
Avatar
MLONG0790
  • MEMBER
  • 1 POST
Yep you were right it was the BCM I took it to the dealer and it cost me $550.00 for everything. Thanks for your help I love this site.
Oct 5, 2020 at 10:08 AM (Merged)
Avatar
NAKITA67062
  • MEMBER
  • 0 POST
I had this problem as well the dealer had to initialize the crankshaft sensor cost me $130.00
Oct 5, 2020 at 10:08 AM (Merged)
Avatar
RONDULSKE92
  • MEMBER
  • 1 POST
I have. 2004 Chevy Silverado 1500 5.3 v8 flex fuel I have good compression good fuel and new battery but no spark at all I need help can’t figure it out
Oct 5, 2020 at 10:08 AM (Merged)
Avatar
STRAILER
  • CERTIFIED EXPERT
  • 53,854 POSTS
9 times out of 10 its the crankshaft angle sensor here is a guide to yelp you replace it. You may need to do the relearn which I have included below.

https://www.2carpros.com/articles/crankshaft-angle-sensor-replacement

Check out the diagrams (Below). Please let us know what happens.

Oct 5, 2020 at 10:08 AM (Merged)
Avatar
NICK123456#
  • MEMBER
  • 4 POSTS
My truck is cranking but not starting. Originally it was misfiring and jerking under load then it started dying when put in gear and sitting at a stop sign and it just died going up a hill and would not turn back on.

I replaced the alternator, belt, crankshaft sensor, spark plugs and spark plug wiring, and the distributor. I also tried jump starting it.

I checked the fuel pump pressure with a gauge and ran at 60 psi (fuel pump was replaced within the year). To also make sure it wasn't the fuel pump I used starting fluid and still would not start.

I tested the spark plug on cylinder 1 and boot with a tester. Received no spark. I then replaced the distributor, and now have spark but still no go on the start.

I next replaced the spark plugs and wiring. Still no start.

My next theory is the cam shaft sensor is bad. Could this cause a no start? Or could I have installed the distributor wrong but if it is wrong, why am I still receiving spark?

Codes that were on p0404 , p0405 , p1345 , p0300 , p0341

Oct 5, 2020 at 10:08 AM (Merged)
Avatar
MOTOR MASTER
  • CERTIFIED EXPERT
  • 279 POSTS
Hello my name is Dave.

First thing we need to diagnose is the P1345 code which is saying that the cam and crank sensors are not synchronized with each other. In simpler terms the timing is off (I don't know why that can't just call it that ). This can cause a cam sensor code (P0341) and random misfire code (P0300 ). The cam sensor is located in the distributor so if you replaced the distributor with a complete unit you have already replaced the sensor. I am going to attach the diagrams from the manual showing how to install the distributor. Unfortunately to properly time the cam sensor (distributor) you will need a scan tool that has live data however if you follow the distributor installation instructions the engine should start provided that is the only cause of your no start. I am also noting where the illustrations are located in the manual.
Illustration 1
1. Rotate the crankshaft balancer clockwise until the alignment marks on the crankshaft balancer are aligned with the tabs on the engine front cover and the number 1 piston is at top dead center of the compression stroke.
Illustration 2
2. Align white paint mark on the bottom stem of the distributor, and the pre-drilled indent hole in the bottom of the gear (3).
NOTE: The ignition system distributor driven gear and rotor may be installed in multiple positions. In order to avoid mistakes, mark the distributor on the following compartments in order to ensure the same mounting position upon reassembly:
^ The distributor driven gear
^ The distributor shaft
^ The rotor holes
Installing the driven gear 180 degrees out of alignment, or locating the rotor in the wrong holes, will cause a no-start condition. Premature engine wear or damage may result.
3. With the gear in this position, the rotor segment should be positioned as shoran for a V6 engine.
Illustration 3
4. Using a long screw driver, align the oil pump drive shaft to the drive tab of the distributor.
5. Guide the distributor into the engine. Ensure that the spark plug towers are perpendicular to the center-line of the engine.
Illustration 4
6. Once the distributor is fully seated, the rotor segment should be aligned with the pointer cast into the distributor base.
^ This pointer may have a 6 cast into it, indicating that the distributor is to be used on a 6 cylinder engine or a 8 cast into it, indicating that the distributor is to be used on a 8 cylinder engine.
^ If the rotor segment does not come within a few degrees of the pointer, the gear mesh between the distributor and the camshaft may be off a tooth or more.
^ If this is the case, repeat the procedure again in order to achieve proper alignment.
I believe if you follow these instructions the engine will start and as far as the other codes for the EGR valve lets worry about those after we get the engine running. Please keep us up to date on your progress and thank you for using 2CarPros!
Oct 5, 2020 at 10:08 AM (Merged)
Avatar
PBUTCHER04
  • MEMBER
  • 4 POSTS
Engine Mechanical problem
2002 Chevy Silverado 6 cyl Two Wheel Drive Automatic

I was driving the other day when my truck started sputtering and then died. It will crank but not start. I have installed a new coil and control module. I can hear the fuel pump running when i turn the key. Ive checked all fuses and everything is ok. I see it sparking from the coil but the spark is orange. I would expect it to be blue, but i dont know. What could be the problem ??
Oct 5, 2020 at 10:08 AM (Merged)
Avatar
MASTERTECHTIM
  • CERTIFIED EXPERT
  • 4,750 POSTS
sprAY starter fluid into intake and see if it starts, if it does then the fuel pump is too weak
Oct 5, 2020 at 10:09 AM (Merged)
Avatar
PBUTCHER04
  • MEMBER
  • 4 POSTS
sprayed starter fluid. still doesnt start. does give more of an effort. but nothing
Oct 5, 2020 at 10:09 AM (Merged)
Avatar
MASTERTECHTIM
  • CERTIFIED EXPERT
  • 4,750 POSTS
well i would first want to check distributor cap and rotor to make sure the spark is going to the right cylinders. if ok then remove spark plugs and checked for flooding and go from there
Oct 5, 2020 at 10:09 AM (Merged)
Avatar
PBUTCHER04
  • MEMBER
  • 4 POSTS
did all that. everything seems fine
Oct 5, 2020 at 10:09 AM (Merged)
Avatar
MASTERTECHTIM
  • CERTIFIED EXPERT
  • 4,750 POSTS
if the spark plugs are not fouled then i would assume its from not getting fuel. you did spray starter fluid directly into intake throttle body and you say it did not start? 99 percent of the time when i have spark on this engine and no start its from a lack of fuel pressure and starter fluiod in the throttle body is the easiest way to determine this because it will give enough to get it to run. i would double check the starter fluid trick again. have some one crank engine over then spray starter fluid directly into throttle body and tell me what happe\ns
Oct 5, 2020 at 10:09 AM (Merged)
Avatar
PBUTCHER04
  • MEMBER
  • 4 POSTS
i sprayed starting fluid. it acts like its going to start but never does. I have tried and tried.
Oct 5, 2020 at 10:09 AM (Merged)
Avatar
TOM RUNDHAUG
  • MEMBER
  • 1 POST
I had a problem with my starter. The wire from the solenoid to the starter was corroded off . I put a new end on the starter wire and put the starter back in the truck. I went to start the truck and it turned over fine, just wouldn't start. I went and pulled a plug and checked spark, nothing. I started checking all fuses and they all checked out fine. someone told me to try a different key (anti theft) still nothing. I even took the starter back out to see if I messed the wires to the crank position sensor and I couldn't find any damage or loose wires. I put the starter back and now I'm In need of some help.
Oct 5, 2020 at 10:09 AM (Merged)
Avatar
MASTERTECHTIM
  • CERTIFIED EXPERT
  • 4,750 POSTS
you will need to do a compression test on all cylinders and get back to me with the readings
Oct 5, 2020 at 10:09 AM (Merged)
Avatar
JDL
  • CERTIFIED EXPERT
  • 16,098 POSTS
Hello,

I have seen many crankshaft angle sensors go out in these trucks it sounds like that's what happened to your truck here is a video showing the job being done.

https://youtu.be/sKo7xRWVNqY

Please run down this guide and report back.

Oct 5, 2020 at 10:09 AM (Merged)
Avatar
BROWNN
  • MEMBER
  • 1 POST
Thanks for this post I watched the video and replaced the sensor truck fired right up :) I love this site.
Oct 5, 2020 at 10:09 AM (Merged)
Avatar
BOB TYREE
  • MEMBER
  • 2 POSTS
I had no spark and I took off a plug wire and put a new plug in it and turned ignition there was no spark. I tried again and noticed spark at 1st then nothing. I turned the key again but just enough to turn motor over and plenty if spark and it started the motor. I put plug wire back on and every time I just turn the ignition enough to turn over motor it starts if I turn ignition all the way no start.
Oct 5, 2020 at 10:09 AM (Merged)
Avatar
STRAILER
  • CERTIFIED EXPERT
  • 53,854 POSTS
Hello,

It sounds like the ignition switch has gone bad here is how can replace it. Check out the diagrams (Below). Please let us know what happens.

Oct 5, 2020 at 10:09 AM (Merged)
Avatar
BOB TYREE
  • MEMBER
  • 2 POSTS
Ken thanks for the advice on the ignition switch. I had changed it out and I still have the same issue.
Oct 5, 2020 at 10:09 AM (Merged)
Avatar
STRAILER
  • CERTIFIED EXPERT
  • 53,854 POSTS
Can you please shoot a quick video with your phone so we can see what's going on? that would be great. You can upload it here with your response. It could be the PCM lets run the codes to see if anything comes up.

https://www.2carpros.com/articles/checking-a-service-engine-soon-or-check-engine-light-on-or-flashing

Please run down this guide and report back.

Oct 5, 2020 at 10:09 AM (Merged)
Avatar
BIG_AL71
  • MEMBER
  • 1 POST
im a litltle baffled by this one. i installed new distibutor w/ new cap an rotor truck won't start. so i check spark at plug and i'm not getting any spark. so i check spark at coil to dist: an i'm getting good spark. so i installed new crank sensor but still no spark at wires. now on harmonic balancer pulley there are 2 marks for timing but no numbers that indicate degrees since timing is not adjustable. so my question is which mark do i use for top dead center and if dist is advanced a tooth would that cause no spark at plugs which don't make sense
Oct 5, 2020 at 10:09 AM (Merged)
Avatar
MHPAUTOS
  • CERTIFIED EXPERT
  • 31,937 POSTS
Hi there,

If you have a good spark at the coil but not at the plugs, you best check that you have the correct cap and rotor and that the carbon bush in the cap that passes the voltage to the rotor is there,

mark (mhpautos)
Oct 5, 2020 at 10:09 AM (Merged)
Avatar
GEORGE1146
  • MEMBER
  • 1 POST
My engine will turn over but will not start. Mechanic replaced spark plugs and now has replaced the fuel injector assy and still won't start. There is 62 psi from gas tank to engine. Any idea why there is either no spark or no fuel to fire engine???? Needless to say I have no confidence in the mechanic!!!
Oct 5, 2020 at 10:09 AM (Merged)