timing belt replacement

2004 MITSUBISHI ECLIPSE
96,000 MILES • 6 CYL • FWD • MANUAL
Avatar
DAVWEST
  • MEMBER
  • 2 POSTS
Replaced timing belt now car timing is off. made sure was TDC when installed belt. What am I missing ?
Aug 25, 2009 at 8:14 PM
Advertisement
Avatar
BLUELIGHTNIN6
  • CERTIFIED EXPERT
  • 16,542 POSTS
make sure timing marks are lined up This guide will help https://www.2carpros.com/diagrams/mitsubishi/eclipse/2004


https://www.2carpros.com/forum/automotive_pictures/261618_Graphic_133.jpg

May 20, 2020 at 10:40 AM
Avatar
DAVWEST
  • MEMBER
  • 2 POSTS
Thanks for the input. I am sure alignment be true
May 20, 2020 at 10:40 AM
Advertisement
Avatar
PROAUTOBODY
  • MEMBER
  • 1 POST
Changing the timing belt as a precaution but now created an issue. Before removing the old belt rotated engine to line up all marks at the identified locations. Proceeded to replace the belt verifying the same Camshaft and Crankshaft marks were aligned. Engine starts but appears as if the timing is to far advance (when initially cranking) and the idle will hunt. If you raise the engine speed it feels like the ignition is breaking down. We replaced the sparkplugs and rechecked the timing belt alignment 5 times and still this issue cannot get cleared.
Does the Engine Control Module lock into a limp mode until it is reset? During the initial repair the engine was cranked over with the Mass airflow sensor and the Cranksensor disconnected.
Jul 1, 2020 at 1:39 PM (Merged)
Avatar
MERLIN2021
  • CERTIFIED EXPERT
  • 17,250 POSTS
Installation (Eclipse & Galant) 1. Place auto-tensioner in soft-jawed vise to SLOWLY compress the push rod. If there is a plug at the base of the auto-tensioner body, place flat washer around plug so it will not contact vise jaw. 2. Slowly compress auto-tensioner push rod until holes in push rod and auto-tensioner housing are aligned. Insert a locking pin into the alignment holes. Install auto-tensioner on engine. 3. Ensure all timing marks are still aligned. See Fig. 2. Install timing belt on crankshaft sprocket, idler pulley, left bank camshaft sprocket, water pump pulley, right bank camshaft sprocket, and tensioner pulley. Take all slack out of timing belt. 4. Loosen the tensioner pulley center bolt. Using Tensioner Pulley Socket Wrench (MD998767), rotate tensioner pulley against timing belt. Temporarily tighten tensioner pulley center bolt. Using Crankshaft Pulley Spacer (MD998769), turn crankshaft 1/4 turn counterclockwise. Turn crankshaft 1/4 turn clockwise. Ensure all timing belt marks are still aligned. 5. For 1999-00 models, loosen tensioner pulley center bolt. Position tensioner pin holes at BOTTOM of tensioner. Install Tensioner Pulley Socket Wrench (MD998767) on tensioner pulley. See Fig. 6. Use a torque wrench to apply 39 INCH lbs. (4.4 N.m) of torque (counterclockwise direction) to tensioner pulley. Tighten tensioner center bolt to specification while holding tensioner stationary. See TORQUE SPECIFICATIONS. 6. For 2001 and later models, loosen tensioner pulley center bolt. Position tensioner pin holes at TOP of tensioner. Install Tensioner Pulley Socket Wrench (MD998767) on tensioner pulley. See Fig. 7. Use a torque wrench to apply 39 INCH lbs. (4.4 N.m) of torque (clockwise direction) to tensioner pulley. Tighten tensioner center bolt to specification while holding tensioner stationary. See TORQUE SPECIFICATIONS. 7. On all models, remove locking pin from auto-tensioner. Turn crankshaft 2 revolutions clockwise and align all timing marks. DO NOT rotate counterclockwise. 8. Wait for at least 5 minutes, then check auto-tensioner push rod protrusion. To check push rod protrusion, measure clearance between body of auto-tensioner and bottom of tensioner pulley bracket arm. Clearance should be 0.15-0.20" (3.8-5.0 mm). If protrusion is not correct, repeat timing belt tensioning procedure. 9. Install engine support bracket on engine block. Tighten top bolt first, then working in a counterclockwise direction, tighten the remaining bolts. See Fig. 8. Install timing belt covers. Install crankshaft pulley. Apply engine oil to crankshaft pulley bolt, then tighten bolt to specification. See TORQUE SPECIFICATIONS. 10. To install remaining components, reverse removal procedure. Adjust drive belts to proper tension. CAUTION: Never compress the auto-tensioner too fast, or the push rod will be damaged. WARNING: Right bank camshaft can turn easily due to applied spring force, so keep fingers out of the way.


https://www.2carpros.com/forum/automotive_pictures/62217_eclipa_1.jpg

Jul 1, 2020 at 1:39 PM (Merged)
Avatar
JERRYLMO
  • MEMBER
  • 27 POSTS
I'm considering buying a 2003 Mitsubishi Eclipse. It has 79K miles, 4 cyl engine, automatic trans and from all appearances has been left totally stock. The only obvious things wrong with it are, the A/C doesn't work and there's a few tears on the plastic facia. Other than that it doesn't look like it's had too hard a life. With 79K miles, my guess is the timing belt is about due to be changed. Is that something that's possible by a fairly experienced mechanic or is it a "dealer only" job? Is there anything '03 Eclipses are noted for that might make me want to stay away from this vehicle? Thanks for your time.
Jul 1, 2020 at 1:40 PM (Merged)
Avatar
OBXAUTOMEDIC
  • CERTIFIED EXPERT
  • 3,711 POSTS
Here is an exploded view of timing. You as an experienced mechanic can do the job.


https://www.2carpros.com/forum/automotive_pictures/188069_03eclipsetiming_1.jpg

Here are the Timing Marks....


https://www.2carpros.com/forum/automotive_pictures/188069_03eclipsetimingmarks_1.jpg

Jul 1, 2020 at 1:40 PM (Merged)
Avatar
JERRYLMO
  • MEMBER
  • 27 POSTS
That's good to hear. I'm going to look into it right away. The recommendation is to change the belt at 75,000 miles and it's got 79,000 miles on it now. Do you have a picture of a 4 cylinder? These diagrams appear to be of a V6. Thanks again for your help.
Jul 1, 2020 at 1:40 PM (Merged)
Avatar
OBXAUTOMEDIC
  • CERTIFIED EXPERT
  • 3,711 POSTS
OOOPPPPPSSSS Here's for the 4 cylinder, Sorry bout that...


https://www.2carpros.com/forum/automotive_pictures/188069_034cyleclipstiming_1.jpg


https://www.2carpros.com/forum/automotive_pictures/188069_034cyleclipstimingmarks_1.jpg

Jul 1, 2020 at 1:40 PM (Merged)
Avatar
SCOTTCAM12
  • MEMBER
  • 6 POSTS
the timing marks are all dead on and I checked for the car firing and fuel to the fuel rail
Jul 1, 2020 at 1:40 PM (Merged)
Avatar
BILLYMAC
  • CERTIFIED EXPERT
  • 2,204 POSTS
I would have to assume that the engine won't start..
next thing to check is compression in each cylinder.
Jul 1, 2020 at 1:40 PM (Merged)
Avatar
SCOTTCAM12
  • MEMBER
  • 6 POSTS
It has compression in all cylinders
Jul 1, 2020 at 1:40 PM (Merged)
Avatar
BILLYMAC
  • CERTIFIED EXPERT
  • 2,204 POSTS
spark fuel pressure ok? all fuses ground wires on engine?
Jul 1, 2020 at 1:40 PM (Merged)
Avatar
SCOTTCAM12
  • MEMBER
  • 6 POSTS
fuel pressure ok so is spark.
i didn't disconnect anything except the crank positioning sensor and i reconected it.
Jul 1, 2020 at 1:40 PM (Merged)
Avatar
BILLYMAC
  • CERTIFIED EXPERT
  • 2,204 POSTS
well we can certainly rule out a easy fix.lol
the next thing we have to know is do you have injector pulse?
but first check all the fuses . remove neg batt cable and reconnect. the ecm has shut the eng down for some reason.also check the plug at the crank sensor look inside sensor and plug to verify that a pin did not get bent.
Jul 1, 2020 at 1:40 PM (Merged)
Avatar
LUCKY13
  • MEMBER
  • 1 POST
when i change the timing belt on a 01 eclipse gt should i get the water pump replaced at the same time even though it may not need to be replaced cause i got quotes from reapair shops with the replacing of the water pump and without replacing the water pump
Jul 1, 2020 at 1:40 PM (Merged)
Avatar
LEONU4
  • MEMBER
  • 15 POSTS
water pump replacement? YES! you should do very well to replace your water pump the same time as timing belt. It's right there in the same area. Makes sense. & is strongly recommended.! thanx for the post!
Jul 1, 2020 at 1:40 PM (Merged)
Avatar
SCOTTCAM12
  • MEMBER
  • 6 POSTS
No fuses are blown and the positive battery cable has been off the car for awhile since I've tried to start it.
checked the crank sensor and it looks good it only has one plug on the sensor up at the top of the engine and it also looks good
Jul 1, 2020 at 1:40 PM (Merged)
Avatar
SCOTTCAM12
  • MEMBER
  • 6 POSTS
Okay I have the car started now but it is running rough.
could it be that I have a low battery and the alternator isn't hooked up and all the other things that are disconnected?
Jul 1, 2020 at 1:40 PM (Merged)
Avatar
BILLYMAC
  • CERTIFIED EXPERT
  • 2,204 POSTS
yes everything has to be hooked up especially the alt
Jul 1, 2020 at 1:40 PM (Merged)
Avatar
SCOTTCAM12
  • MEMBER
  • 6 POSTS
everything is hooked up now but it is hard to crank and runs rough when we pulled the codes it pulled a cam positioning sensor circuit failure and a random multiple misfire detected code any ideas on what's wrong?
Jul 1, 2020 at 1:40 PM (Merged)
Avatar
FORDROCKS2382
  • MEMBER
  • 1 POST
how do i remove the timing belt to replace the chrankshaft sensor
Jul 1, 2020 at 1:40 PM (Merged)
Avatar
BLUELIGHTNIN6
  • CERTIFIED EXPERT
  • 16,542 POSTS
Hello and thanks for donating Follow the steps below to remove the timing belt and access the crankshaft sensor.


https://www.2carpros.com/forum/automotive_pictures/261618_Noname_2467.jpg


https://www.2carpros.com/forum/automotive_pictures/261618_Noname2_807.jpg

Jul 1, 2020 at 1:40 PM (Merged)
Avatar
BILLYMAC
  • CERTIFIED EXPERT
  • 2,204 POSTS
Hi well sounds like either a bad cam sensor faulty cam sensor plug.
or timeing off 1 tooth somewhere.
Jul 1, 2020 at 1:40 PM (Merged)
Avatar
RASMATAZ
  • CERTIFIED EXPERT
  • 75,992 POSTS
CPS


https://www.2carpros.com/forum/automotive_pictures/12900_cps_49.jpg

REMOVAL AND INSTALLATION REMOVAL SERVICE POINT <> TIMING BELT REMOVAL CAUTION: The crankshaft should always be turned in the forward direction only.


https://www.2carpros.com/forum/automotive_pictures/12900_t1_18.jpg

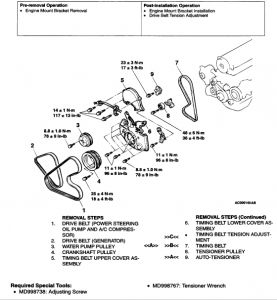
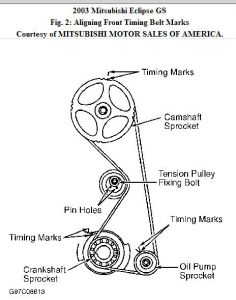
Turn the crankshaft in the forward direction (to the right) to align the camshaft sprocket timing marks.


https://www.2carpros.com/forum/automotive_pictures/12900_t2_3.gif

Loosen the tension pulley fixing bolt. CAUTION: If the timing belt is to be re-used, use chalk to mark (on its flat side) an arrow indicating the clockwise direction. Move the tension pulley to the water pump side, and then remove the timing belt. INSTALLATION SERVICE POINTS >>A<< AUTO-TENSIONER INSTALLATION


https://www.2carpros.com/forum/automotive_pictures/12900_t3_2.gif

Apply 98 - 196 N (22 - 44 pound) force to the pushrod of the auto-tensioner by pressing it against a metal object (such as the engine block) and measure the movement of the pushrod. Standard value: Within 1 mm (0.04 inch) A: Length when it is free (not pressed) B: Length when it is pressed A - B: Movement If it is outside the standard value, replace the auto-tensioner. CAUTION: Never compress the pushrod too fast, or it may be damaged.


https://www.2carpros.com/forum/automotive_pictures/12900_t4_1.gif

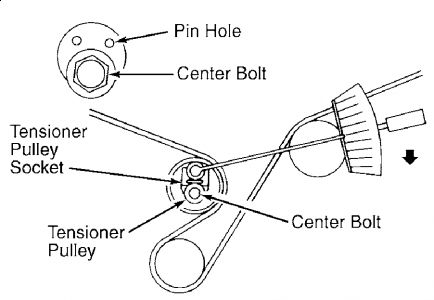
Use a press or vise to gently compress the auto-tensioner pushrod until pin hole A of the pushrod and pin hole B of the tensioner cylinder are aligned.


https://www.2carpros.com/forum/automotive_pictures/12900_t5_1.gif

When the holes are aligned, insert the set pin. NOTE: When replacing the auto-tensioner with a new part, the pin will be in the auto-tensioner. Install the auto-tensioner to the engine. >>B<< TIMING BELT INSTALLATION


https://www.2carpros.com/forum/automotive_pictures/12900_t6_1.gif

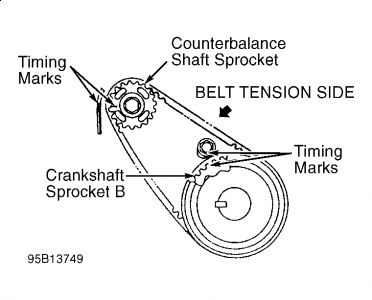
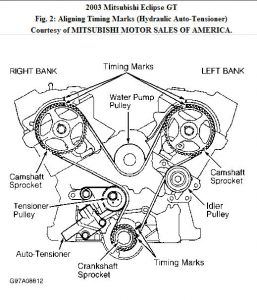
Align the timing marks on the camshaft sprocket, crankshaft sprocket and oil pump sprocket.


https://www.2carpros.com/forum/automotive_pictures/12900_t7_1.gif

After aligning the timing mark on the oil pump sprocket, remove the cylinder block plug and insert a Phillips(r) head 8 mm (0.3 inch) screwdriver. Check to be sure that the screwdriver goes in 60 mm (2.4 inches) or more. If the screwdriver will only go in 20 - 25 mm (0.8 - 1.0 inch) before striking the counterbalance shaft, turn the sprocket once, realign the timing marks and check that the screwdriver goes in 60 mm (2.4 inches) or more. The screwdriver should not be taken out until the timing belt is installed. CAUTION: the timing belt is re-used, install so that the arrow marked on it at time of removal is pointing in the clockwise direction. Install the belt to the crankshaft sprocket, oil pump sprocket and camshaft sprocket in that order, so that there is no slackness in the belt tension.


https://www.2carpros.com/forum/automotive_pictures/12900_t8_1.gif

Set the tension pulley so that the pin holes are at the bottom, press the tension pulley lightly against the timing belt, and then provisionally tighten the fixing bolt. Adjust the timing belt tension. >>C<< TIMING BELT TENSION ADJUSTMENT CAUTION: Do not use a spanner or the similar tool to turn special tool MD998738.. Otherwise, the auto-tensioner set pin may be broken. Turn special tool MD998738 by hand only.


https://www.2carpros.com/forum/automotive_pictures/12900_t9_1.gif

Remove the rubber plug from the rear of the timing belt cover assembly. Then screw in special tool MD998738 by hand until the tensioner arm is touching the auto-tensioner pushrod. After turning the crankshaft 1/4 of a revolution in the counterclockwise direction, turn it in the clockwise direction until the timing marks are aligned. CAUTION: When tightening the fixing bolt, make sure that the tension pulley does not turn with the bolt.


https://www.2carpros.com/forum/automotive_pictures/12900_t10_1.gif

Loosen the tension pulley fixing bolt, and then use special tool MD998767 and a torque wrench to tighten the fixing bolt to the specified torque while applying tension to the timing belt. Timing belt tension torque: 3.5 Nm (31 inch lbs.) Tightening torque: 48 ±6 Nm (36 ±4 ft. lbs.) Remove the set pin that has been inserted into the auto tensioner, and then remove special tool MD998767.


https://www.2carpros.com/forum/automotive_pictures/12900_t11_1.gif

Turn the crankshaft two revolutions clockwise so that the timing marks are aligned. After leaving it for 15 minutes, measure the amount of protrusion of the auto-tensioner. Standard value (A): 3.8 - 4.5 mm (0.15 - 0.18 inch) If the amount of protrusion is outside the standard value, repeat steps 1 through (5). Check again to be sure that the timing marks of each sprocket are aligned. https://www.2carpros.com/kpages/auto_repair_manuals_alldata.htm
Jul 1, 2020 at 1:40 PM (Merged)
Avatar
CWELLZ
  • MEMBER
  • 1 POST
I just changed the timing belt on car this weekend, when starting up, it now has a loud vibration and shakes. The engine light is on, I stopped and got codes, the codes were P0340 and P0421. Can you
help me?

Thanks,

Cheryl
Jul 1, 2020 at 1:40 PM (Merged)
Avatar
MONTY STEPHENS
  • MEMBER
  • 79 POSTS
Well you know these cars have BALANCE shafts. It could be that or I've been told that if you get even one notch off on the timing belt, that it will cause all kinds of vibration in the motor.

Either way -- I think you have to go back in. Sorry about that.

P.S The MITS is considered one of the toughest to do car in the world.
Jul 1, 2020 at 1:40 PM (Merged)
Avatar
ROMANJ
  • MEMBER
  • 2 POSTS
my timing belt slipped when my water pump died. now when i start it there is a chattering noise from the top of the engine. I'm guessing valve stem damage. What else could it be and how difficult are they to replace? could it be something else? Any help is better then no help. Thanks
Jul 1, 2020 at 1:50 PM (Merged)
Avatar
ASEMASTER6371
  • CERTIFIED EXPERT
  • 52,796 POSTS
sounds like you are right. the heads will have to come off and the valves replaced. it is a major job. plan on spending in the area of 1500 or better depending on the damage


Roy
Jul 1, 2020 at 1:50 PM (Merged)
Avatar
ROMANJ
  • MEMBER
  • 2 POSTS
Could the engine be badly out of time and the valves just slapping against the pistons or on the wrong cycle and fighting itself?
Jul 1, 2020 at 1:50 PM (Merged)
Avatar
ASEMASTER6371
  • CERTIFIED EXPERT
  • 52,796 POSTS
if the valves hit the pistons, the damage is done. yes, it sounds like it is out of time. why dont you at least get the opinion of a shop to confirm.

Roy
Jul 1, 2020 at 1:50 PM (Merged)