Glove box tension device

2004 LEXUS ES 330
Avatar
  • MEMBER
  • 4 POSTS
6 cyl Front Wheel Drive Automatic 33,000 miles
----------------------------------------------------------------
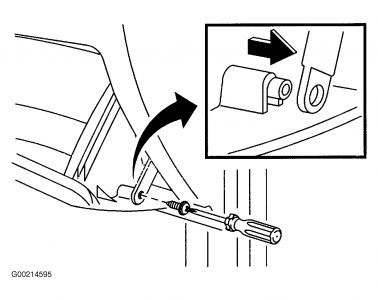
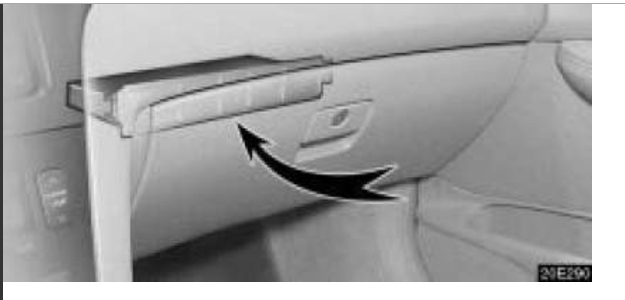
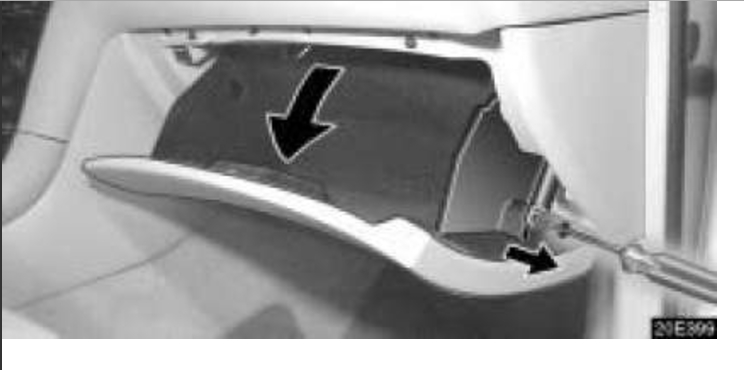
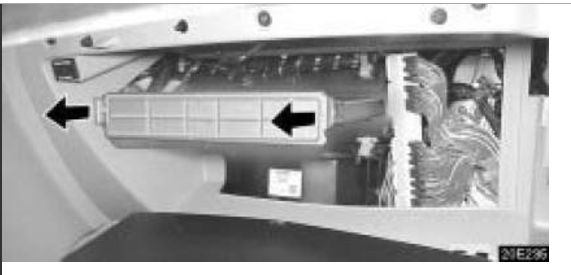
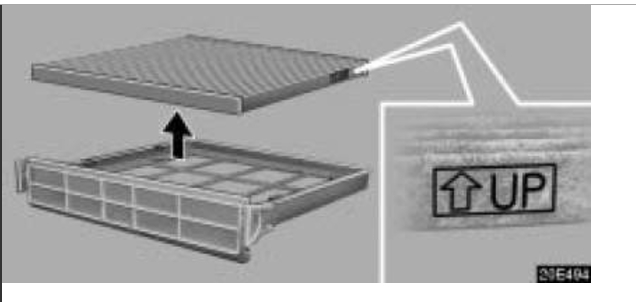
I recently installed a new cabin air filter. When I disassembled the components to allow me to get into the filter, the glove box door tension device fell into the space to the right, rear of the door. Upuo reassembly of the glove box door, I find I don't konow how to reassemble the tension device. Does the Philips head screw go thru hole C? If not which hole, A or B? In addition does the tension device get mounted with the rib up or down?

THanks for your help.
Jul 28, 2008 at 12:36 PM
Advertisement
Avatar
KHLOW2008
  • CERTIFIED EXPERT
  • 41,814 POSTS
Hi cimcor, Hope the diagram is what your are looking for.


https://www.2carpros.com/forum/automotive_pictures/192750_LexusE330GloveBox01_1.jpg

Here is a video that can help as well. https://youtu.be/1S9FWyxH5V4 Its close to the same car that shows the glove box shock which is the same on your car. Please let us know if you need anything else to get the problem fixed. Cheers
Jul 30, 2008 at 10:20 AM
Avatar
DJCLOUD
  • MEMBER
  • 7 POSTS
Thanks you so much the this is great! I got the job done while saving some cash.

:)
Feb 14, 2012 at 7:18 PM
Advertisement
Avatar
FIXITMR
  • CERTIFIED EXPERT
  • 9,990 POSTS
is this like yours? http://www.youtube.com/watch?v=hoszqKqTdG8
Feb 14, 2012 at 7:28 PM
Avatar
DJCLOUD
  • MEMBER
  • 7 POSTS
I will have to wait until I get home from work to check it....they block youtube here at work. I will get back to you tomorrow. Thank you for hanging with me on this issue. I will be back to you tomorrow
Feb 14, 2012 at 7:42 PM
Avatar
FIXITMR
  • CERTIFIED EXPERT
  • 9,990 POSTS
what i found so far is the end that came off just clips on whatever that means, since i dont know what the other end looks like.
Feb 14, 2012 at 7:56 PM
Avatar
DJCLOUD
  • MEMBER
  • 7 POSTS
I watched the video last night. It may be a problem with my tensioner. I am not sure that the rod that attaches to the glove box is actually telescopic. I just got in my replacement filter, so I will be taking it apart again tonight. I will let you know what I find.
Stay tuned!!!
Feb 15, 2012 at 12:24 PM
Avatar
FIXITMR
  • CERTIFIED EXPERT
  • 9,990 POSTS
yes it says in vid arm disappears into hole when you disconnect. i was assuming you were holding it your hand loose from glove box.
Feb 16, 2012 at 1:42 AM
Avatar
TRILECCA
  • MEMBER
  • 1 POST
Did you ever figure this one out. I've had the same problem with mine and can't figure out what the top of the tension arm clips to. The video doesn't show that part of it. I know it says it should disappear back into the hole, but mine fell off altogether as well. Are there any video's or instructions somewhere online to fix that? Thanks!! :)
Apr 4, 2012 at 10:45 PM
Avatar
KENHREED
  • MEMBER
  • 1 POST
The top of the tensioner slides onto a small plastic "nub". You have the two black plugs that keep the glove box from falling down when it is reassembled. Look at the hole for the plug on the right. Inside that area will be a small plastic nub (same color as the plastic around it) Your tensioner slides onto that "nub"
Apr 18, 2012 at 2:20 AM
Avatar
NORRISRN
  • MEMBER
  • 2 POSTS
I have an '04 ES330 on which the service tech apparently pulled the tensioner from its mounting post each time the cabin air filter was replaced resulting in a situation where it simply won't stay in place on the post resulting in the same situation described above. It appears the little legs on the mounting nub have have been squeezed together and won't stay far enough apart to keep the tensioner from sliding off. Any suggestions for resolving this issue?
Aug 22, 2012 at 7:24 PM
Avatar
BOBBENEDICT
  • MEMBER
  • 1 POST
Maybe to make the attachment a bit more clear... on the cylinder there two black loops molded into the plastic. Disconnect the cylinder arm from the glove box if it is still attached and with the loops pointed down, simply slide the loop furthest away from the end with the screw onto the black nub on its left. After it's affixed to the nub, pull the screw-end arm down and replace the screw, attaching the arm to the glove box. All that remains is to replace the right and left plastic attachments inside the glove box.
Oct 17, 2012 at 7:22 PM
Avatar
FIXITMR
  • CERTIFIED EXPERT
  • 9,990 POSTS
a picture or drawing of the "legs" situation would help with recommending a fix.
Oct 18, 2012 at 4:40 AM