Hello
Thanks for the assistance James.....
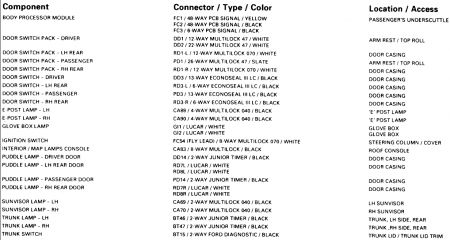
I have attached the only info I can locate on the panel removal and though the information said front door the figures state rear doors. Hope this helps.
Disconnect vehicle battery ground lead.
Remove the door trim pad veneer panel.
Remove the upper trim pad.
Remove the door armrest.
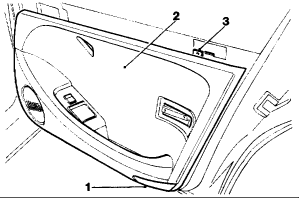
From inside the door pocket, release the puddle lamp (1 Fig.1) securing quarter turn fastener.
Undo and remove fixing (3 Fig.1), (front door only)
Carefully release lower trim pad fir tree fasteners.
To avoid damage and distortion of the door metal, lift the lower trim pad complete with clip and clip retainer.
Carefully pull the trim pad away from the door panel.
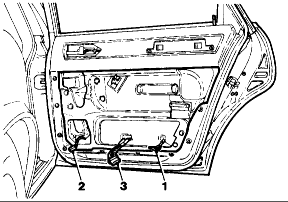
Disconnect the multi-plugs (1 Fig.2) and remove the lamp.
Carefully displace the trim pad (2 Fig.1) from the door retaining clips.
Disconnect the multi-plugs (2 Fig.2) and (3 Fig.2).
Remove the door pocket.
Displace and remove the retaining clips and remove the trim..
Refit in the reverse order of the removal procedure. Check the trim pad retainers for damage before refitting.
Before refitting the lower trim pad, remove the clip retainer from the pad and and reposition retainer to the door.
NOTE: Figs.1 & 2 show rear door components only.
Undo door handle escutcheon screw and remove escutcheon
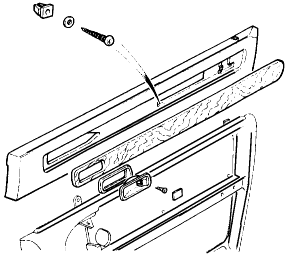
Remove the door trim pad veneer panel.
Undo and remove the upper trim pad securing screws.
Remove the chrome strip.
Undo and remove the top channel securing nuts.
Displace and remove the top channel assembly.
Place the trim pad aside (Fig. 1).
Refit in the reverse order of the removal procedure.
Nov 13, 2008 at 7:17 PM