Install new head and now I have valve noise

1994 FORD ESCORT
95,000 MILES • 1.9L • 4 CYL • 2WD • AUTOMATIC
Avatar
RANDY ARWOOD
  • MEMBER
  • 28 POSTS
I bought a re-manufactured head from Allied Motor Parts. It came complete with cam,valves, and everything. Installed it and now I have a constant ticking noise coming from it, since startup, seems to be less noisy as car warms up but still not right. I don't think there is a way to adjust valves on this 1.9 liter Ford. Any help ,would be appreciated.
Thanks
May 6, 2019 at 12:09 PM
Advertisement
Avatar
STEVE W.
  • CERTIFIED EXPERT
  • 15,113 POSTS
Welcome back to 2CarPros. You are correct in that the 1.9 uses hydraulic tappets that are not adjustable. There is a way to check that it has enough clearance for them to operate but no way to adjust them tighter. The common wear points are in the rocker arm seat where the pivot is as well as the valve stem tips. The only way I know of to tighten them is to replace parts. I'm not sure that a lash cap would work on that engine without having adjustable rocker arms.
May 6, 2019 at 12:45 PM
Avatar
RANDY ARWOOD
  • MEMBER
  • 28 POSTS
I saw a service bulletin that said I should try to bleed the air out of the lifter.can I do that without pulling the head? can I replace tappets without pulling the head? And just for my clarification, tappets = lifters right?
May 6, 2019 at 1:21 PM
Advertisement
Avatar
STEVE W.
  • CERTIFIED EXPERT
  • 15,113 POSTS
Tappets, lifter, cam follower, all the same in this case. Normally you would bleed them only on initial install. However, I suppose that head may have been on the shelf a while so it couldn't hurt. You can remove them with the head installed. You remove the valve cover, then the rockers. Be sure you keep things in order. Next there are the lifter guide rails and the lifters. First thing to look at when you pull the valve cover is where do you or don't you have oil. Normally a lifter that is air locked won't push as much oil to the rockers.
May 6, 2019 at 2:29 PM
Avatar
RANDY ARWOOD
  • MEMBER
  • 28 POSTS
How do I bleed the lifter? I took one out the old head and it does not depress in any way.
May 6, 2019 at 6:38 PM
Avatar
STEVE W.
  • CERTIFIED EXPERT
  • 15,113 POSTS
Normally you just set them into a container filled with oil and let them set with the top plunger up so the oil can fill it and push air out the top. You can also use an oil can into the oiling port to do the same thing. When they are full of oil they take a lot of pressure to slowly bleed down. There is a special tool that you can use on the rocker arm to compress the lifter in order to check that they have the proper clearance. Minimum is .000 Normal is 2.2mm and out of spec is 4.5mm The tool isn't hard to build if you need one. Search T81P-6500-A and there are images of the tool with sizes.
May 6, 2019 at 9:12 PM
Avatar
RANDY ARWOOD
  • MEMBER
  • 28 POSTS
The book I have gives instruction for checking valve clearance, it describes checking clearances while each piston is at TDC, and to accomplish that I need to rotate the crank in 180 degree Intervals. It does not tell me about this tool, does that mean I do not have a hydraulic lifter?
May 7, 2019 at 4:14 AM
Avatar
STEVE W.
  • CERTIFIED EXPERT
  • 15,113 POSTS
You have hydraulic lifters. If you didn't you would have a way to adjust the valve lash. The clearances are just to be sure that the lifters oil inlet is open to the oil passages in the head.
May 7, 2019 at 5:07 AM
Avatar
RANDY ARWOOD
  • MEMBER
  • 28 POSTS
I will try to take a picture of one of these tappets for you. I don't remember seeing an oil inlet hole on the one I took out of the old head. Having some surgery today so may be a bit before I get back to this. Thanks again.
May 7, 2019 at 7:38 AM
Avatar
STEVE W.
  • CERTIFIED EXPERT
  • 15,113 POSTS
No rush, we'll be here.
May 7, 2019 at 10:06 AM
Avatar
RANDY ARWOOD
  • MEMBER
  • 28 POSTS
So this is one I took out of old head. How do I tell if they r working correctly?
May 10, 2019 at 4:58 PM
Avatar
RANDY ARWOOD
  • MEMBER
  • 28 POSTS
So I just ordered a tappet compressor tool, should be here in a week. So I can check the clearance between the valve and the rocker arm correctly. The Chilton I have sucks b.t.w. , doesn't show any of that shizzz!
May 10, 2019 at 5:15 PM
Avatar
RANDY ARWOOD
  • MEMBER
  • 28 POSTS
Oh and I can't seem to find a feeler gauge that goes up to 4.5mm , did you mean .045mm instead?
May 10, 2019 at 5:31 PM
Avatar
STEVE W.
  • CERTIFIED EXPERT
  • 15,113 POSTS
The clearance issue is to be sure that the oil hole is lined up with the passage in the head. You compress the lifter in the head which pushes the oil out of the lifter. It will take a couple seconds. Then you check the clearance. The clearance between the valve and rocker will tell you if the hole is lined up okay. 4.5mm of clearance means the hole is below the oil passage when it is on the base circle of the cam. 2.2mm should put it about in the middle. If the holes position is wrong it will not get oil and you will have valve clatter because the lifter will not be under the oil pressure when it starts to move the rocker.
May 10, 2019 at 8:42 PM
Avatar
RANDY ARWOOD
  • MEMBER
  • 28 POSTS
To be clear, do I need to make sure every cylinder is at TDC when I check the valves for that corresponding cylinder?
May 10, 2019 at 9:43 PM
Avatar
STEVE W.
  • CERTIFIED EXPERT
  • 15,113 POSTS
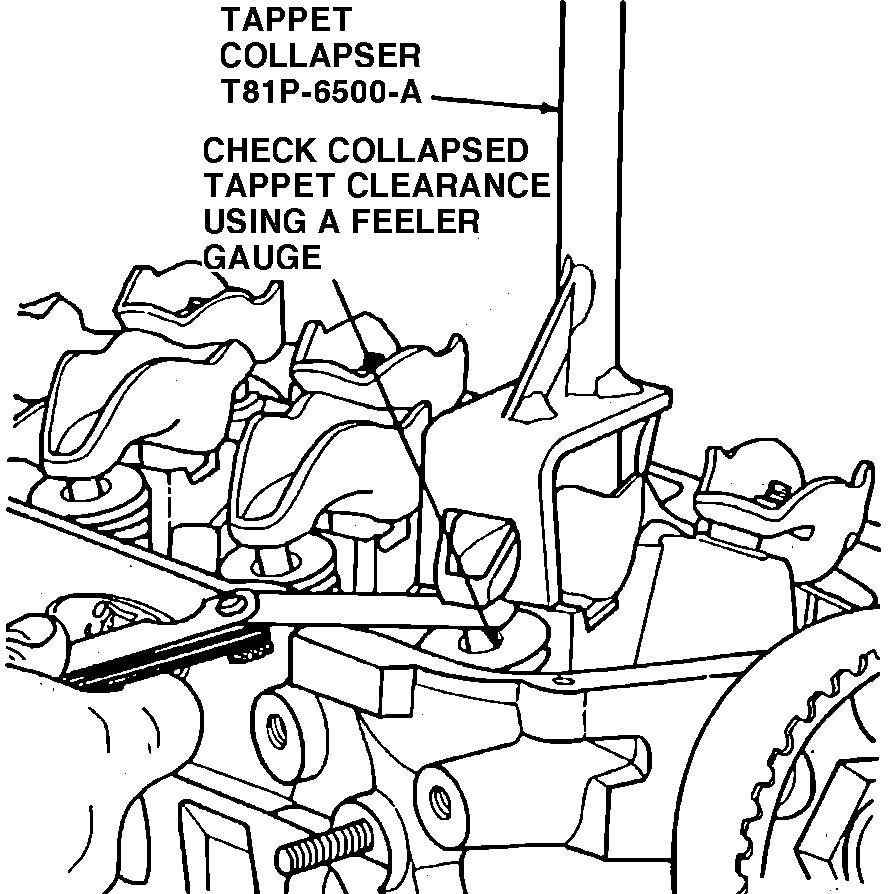
2. Position Tappet Collapser T81P-6500-A on the rocker arm. Slowly apply pressure to bleed down the valve tappet until it is completely bottomed. Hold the valve tappet in this position and check the available clearance between the rocker arm and the valve stem tip with a feeler gauge.

The collapsed valve tappet gap, when the cylinder head is on base circle, should be as follows:

Minimum: 0mm (0.000inch)
Nominal: 2.2mm (0.087inch)
Maximum: 4.5mm (0.177inch)

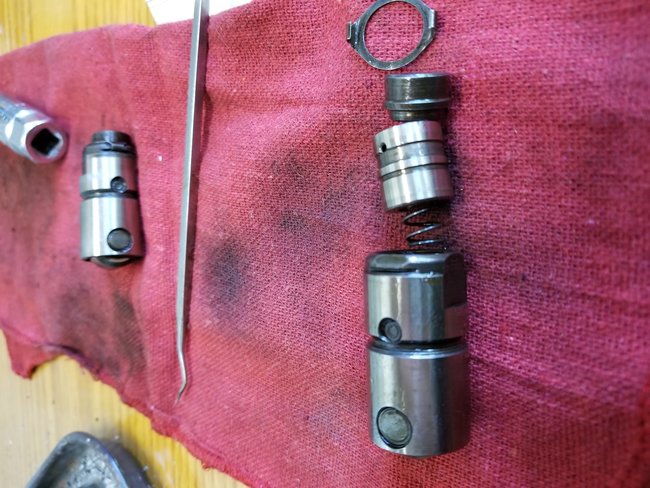
If the clearance is greater than specification, check the following for wear:

- Rocker arm seat.
- Valve tappet.
- Camshaft lobe.
- Valve tip.

3. With the No. 1 piston at the TDC end of the compression stroke (Position No. 1), check the following valves:

- No. 1 Intake Valve, No. 1 Exhaust valve.
- No. 2 Intake Valve.

4. Rotate the crankshaft to position No. 2 (cyl 3 at TDC)and check the following valves:

- No. 3 Intake Valve, No. 3 Exhaust valve.

5. Rotate the crankshaft another 180 degrees from position No. 2 back to TDC (cyl 4 at TDC) and check the following valves:

- No. 4 Intake Valve, No. 4 Exhaust Valve.
- No. 2 Exhaust Valve.
May 10, 2019 at 9:57 PM
Avatar
RANDY ARWOOD
  • MEMBER
  • 28 POSTS
I found all within tolerance, but cylinder 2. intake was very easy to leave down compared to the rest of them. it was as if there was no oil in it to compress out with the tool. Could this be my issue?
May 24, 2019 at 4:03 PM
Avatar
STEVE W.
  • CERTIFIED EXPERT
  • 15,113 POSTS
Yes. Without oil in it the lifter will collapse under the pressure of the valve spring. I'd remove it and open it up to see if some dirt/debris is blocking it. Worst case you could buy a new lifter to install if you find nothing.
May 24, 2019 at 4:35 PM
Avatar
RANDY ARWOOD
  • MEMBER
  • 28 POSTS
Can I use old one from old head to test?
May 24, 2019 at 5:35 PM
Avatar
STEVE W.
  • CERTIFIED EXPERT
  • 15,113 POSTS
In theory yes, but I wouldn't because there is a chance the roller has an odd wear pattern and could hurt the cam in the new head.
May 24, 2019 at 6:52 PM
Avatar
RANDY ARWOOD
  • MEMBER
  • 28 POSTS
Okay, I buy a new one. Be back with results soon. Thanks.
May 24, 2019 at 9:36 PM
Avatar
RANDY ARWOOD
  • MEMBER
  • 28 POSTS
I called the company who rebuilt the head and they sending me four new tappets, couldn't get them to send eight. In the mean time I removed all the tappets, cleaned and reinstalled and still have same tick tick noise. I'm a try and upload video, tell me your thoughts.
May 28, 2019 at 1:51 PM
Avatar
STEVE W.
  • CERTIFIED EXPERT
  • 15,113 POSTS
Yeah that is some serious valve train noise.
May 28, 2019 at 8:18 PM
Avatar
RANDY ARWOOD
  • MEMBER
  • 28 POSTS
I couldn't wait, I pulled all 8 tappets from the old head, disassembled,cleaned and used all to replace the ones that came in the new head. Started car and noise went away in about two minutes, after they pumped up with oil. So it is definitely a bad tappet or a few. How do I tell which one is failed or I guess I just write all 8 off and get all new ones?
May 28, 2019 at 8:31 PM
Avatar
STEVE W.
  • CERTIFIED EXPERT
  • 15,113 POSTS
About the easiest way is to use an automotive stethoscope to listen to each rocker arm with the engine running. Start with a cold engine and put a few towels around it to catch the oil. Start it and go down each rocker you will hear and feel the ones causing the problem.
May 28, 2019 at 9:58 PM
Avatar
RANDY ARWOOD
  • MEMBER
  • 28 POSTS
Well I was trying to stethoscope through the valve cover but it didn't work to well, can't run it with cover off due to three foot oil stream shooting strait up. I'm on the next problem ,my temperature gauge stays cold. Going to check sending unit tomorrow. the gauge works better after I flushed the heater core , it came up bout a 1/4 inch on the gauge when cars hot. Needle still not in the middle though. And the fan never comes on accept when car is first started. So I'll be in the shop tomorrow trying to figure that out. I also have a brake light in dash staying lit. so, one problem solved and a few more to go.
May 28, 2019 at 10:50 PM
Avatar
STEVE W.
  • CERTIFIED EXPERT
  • 15,113 POSTS
Oh this is one of "those" cars. LOL Fix one thing and two others pop up. BTDT. To run it with the cover off you make a tent out of cheap flashing and set it so the oil deflects back into the head. But I think you might be able to tell using the tool you have, if you bring a cylinder up to TDC the rockers should be tight on a good lifter. The ones clattering will be loose.
Jun 1, 2019 at 12:15 AM
Avatar
RANDY ARWOOD
  • MEMBER
  • 28 POSTS
I have no more valve-train noise at this point. What I do have is a bad PCM not controlling the cooling fan as it should, I've checked both relays high and low fan and checked the fan, only thing left is the PCM. I am not getting signal to the relay to switch from the PCM. So I have a PCM on order. The low speed fan comes on when ac is turned on but will not actuate otherwise. Really confusing to explain but I believe I have narrowed it down. Thanks for all the help
Jun 1, 2019 at 5:53 PM
Avatar
STEVE W.
  • CERTIFIED EXPERT
  • 15,113 POSTS
Not confusing to me. The PCM controlled fans can be a real pain. I've added thermal switches on more than one car because the controller failed. They worked for a lot of years.
Jun 2, 2019 at 12:57 AM
Avatar
RANDY ARWOOD
  • MEMBER
  • 28 POSTS
Ya, I was looking at that option here but didn't find one, I thought would work great. They all had mixed reviews, some people said works great they just don't last. others said they didn't last at all. I had trouble finding one with an A/C bypass also, I'd need 2 relay one, one to run low speed for engine heat and one to run high fan when A/C is on.
Jun 2, 2019 at 7:09 AM
Avatar
STEVE W.
  • CERTIFIED EXPERT
  • 15,113 POSTS
So the PCM isn't grounding at pin 31 to turn on the high speed relay? That system is sort of common. The fan is a 2 speed unit. Apply 12 volts to the Yellow lead and it runs on low, remove that and apply 12 volts to the Light green/ yellow stripe and it should spin up on high. The PCM should show a ground at pin 35 and pin 31 when the coolant temp hits 230 F
That turns on both relays, the low speed switches to an open circuit while the high speed relay switches power to the other terminal of the fan for high speed.
Jun 2, 2019 at 6:17 PM
Avatar
RANDY ARWOOD
  • MEMBER
  • 28 POSTS
Yes, I have jumped both high and low and both work. Pin 31 for high speed never becomes grounded. Even when AC is switched on. Pin 35 stays grounded all the time keeping the relay open and not allowing power to get to the yellow wire for low speed. When the AC is kicked on pin 35 drops ground and thus operating low speed fan. If I do nothing the car temperature gauge reaches way past middle range and surpasses the "A" in "normal" where as if I jump low speed fan the temperature stays right in the middle between r and m.
Jun 3, 2019 at 10:12 AM
Avatar
STEVE W.
  • CERTIFIED EXPERT
  • 15,113 POSTS
Did you check that the coolant temperature sensor is switching? That is what tells the PCM to change state.
Jun 3, 2019 at 6:59 PM
Avatar
RANDY ARWOOD
  • MEMBER
  • 28 POSTS
So I replaced the temperature sending unit, the temperature sensor. The temperature sensor had a resistance of over 2k ohms while car was hot. As my Chilton sucks and tells me to go to the dealer to diagnose a bad temp sensor I assume it is good, partly because it's new and partly because the car idles down when the temperature gauge starts to indicate the car is warm, meaning the PCM is getting a signal from that sensor.
Jun 3, 2019 at 8:16 PM
Avatar
RANDY ARWOOD
  • MEMBER
  • 28 POSTS
The sending unit and the temperature sensor are both new.
*Correction of the above.
Jun 3, 2019 at 8:17 PM
Avatar
STEVE W.
  • CERTIFIED EXPERT
  • 15,113 POSTS
In that case it could very well be the PCM. Do you have access to a scan tool that can activate the fans through the PCM? I'm guessing no. That would be the ideal method to verify the problem.
Jun 6, 2019 at 2:50 PM
Avatar
RANDY ARWOOD
  • MEMBER
  • 28 POSTS
Nope, I have an obd2 scanner but this is obd1.
Jun 6, 2019 at 2:51 PM
Avatar
STEVE W.
  • CERTIFIED EXPERT
  • 15,113 POSTS
Time to hunt up a brick (Snap-On MT-2500) With the proper cartridges and keys they can cover all of OBD I through OBD II / 2007-9 with the later cables and CAN adapter. Those are impressive tools for being "obsolete"!
Jun 6, 2019 at 4:06 PM
Avatar
RANDY ARWOOD
  • MEMBER
  • 28 POSTS
Ya maybe, I do own and operate two of these cars now. My youngest car at this point is a 2008.
Jun 6, 2019 at 4:13 PM