Inline spark testing

2004 CHEVROLET TAHOE
225,000 MILES • 5.3L • V8 • 2WD • AUTOMATIC
Avatar
GLENNST
  • MEMBER
  • 42 POSTS
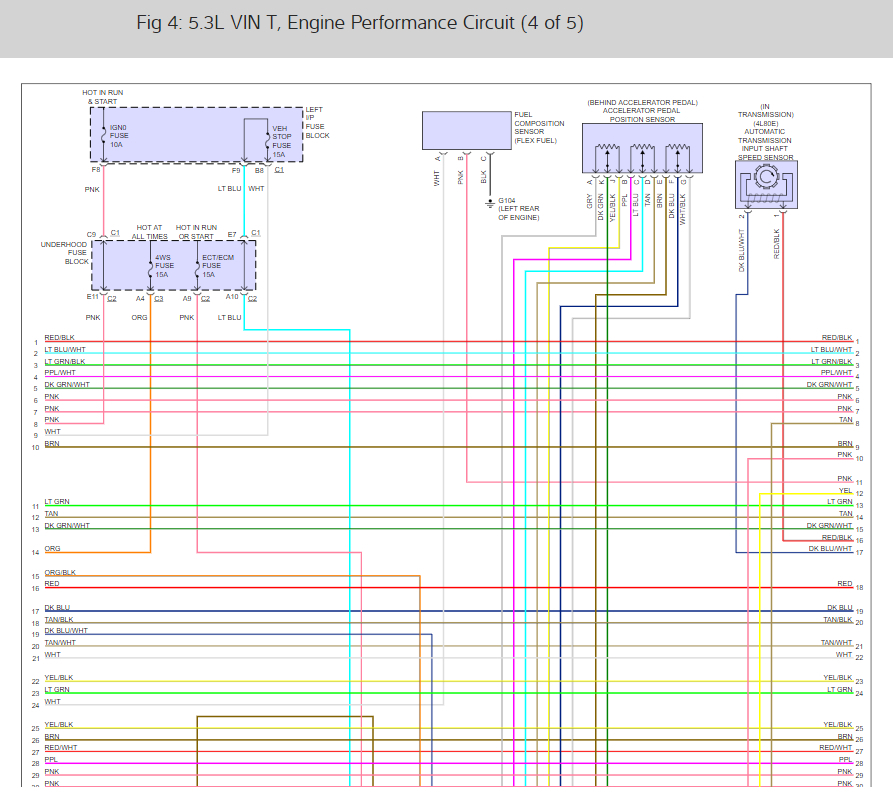
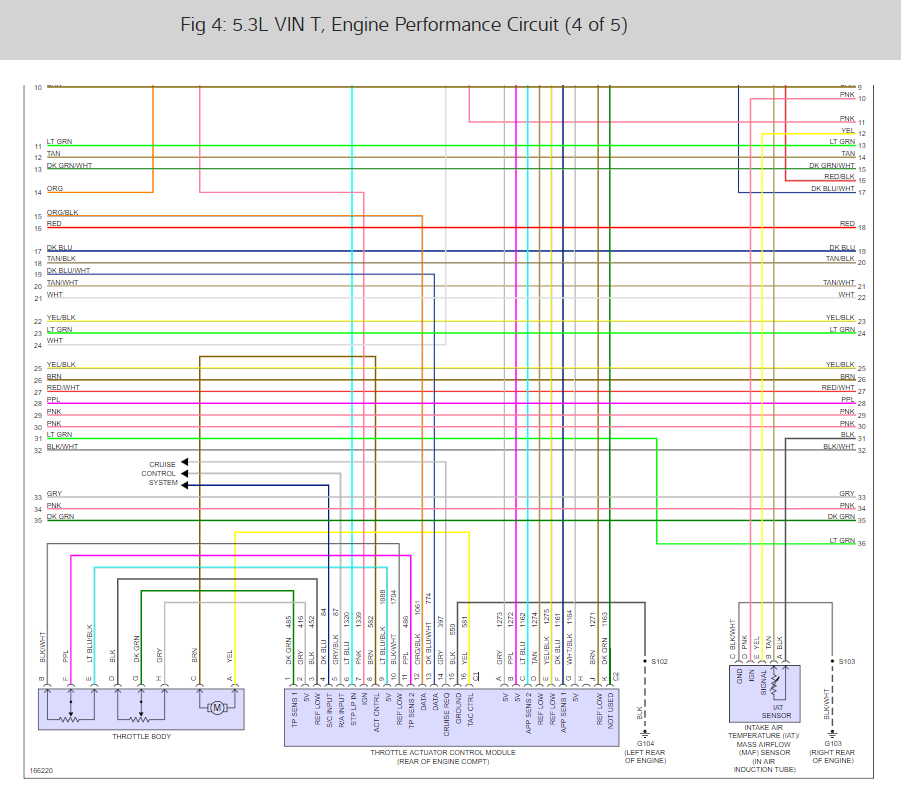
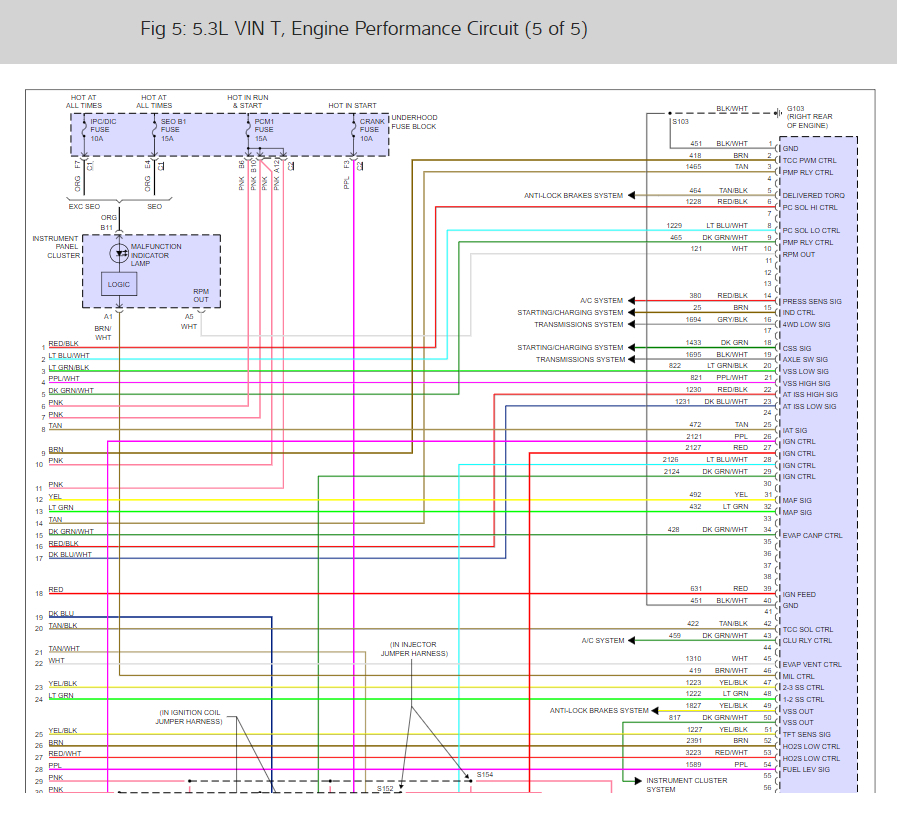
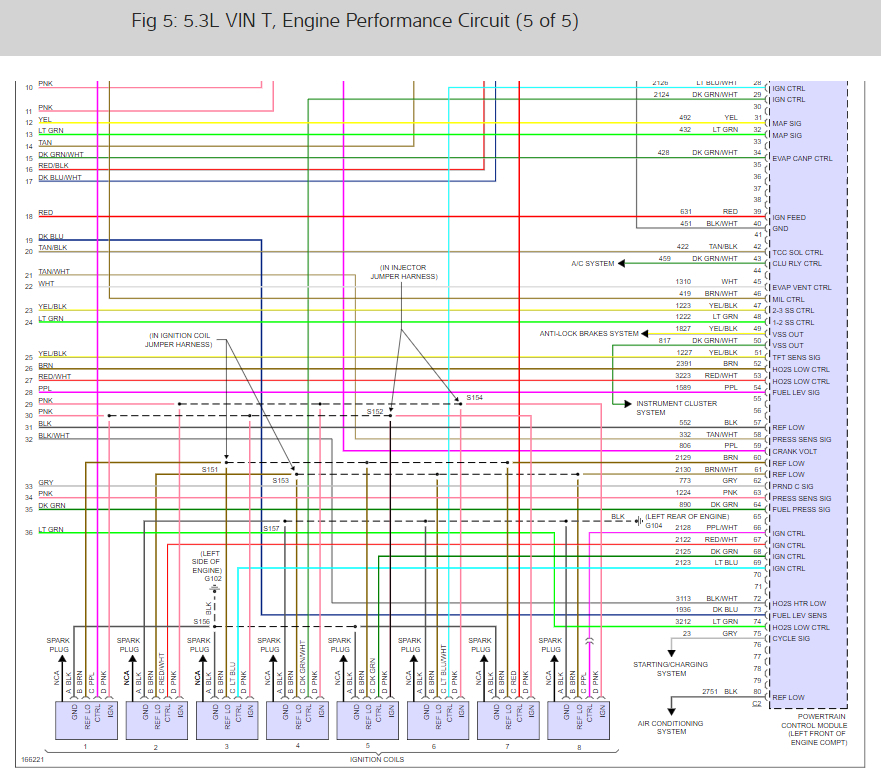
How to read a spark test? Should the spark be consistent related to frequency. My understanding is the ECU sends an igniter signal to coil telling it to fire. I would think this means the spark should be very consistent based on timing sequence.
I notice the spark mostly consistent but blanks (no light) are mixed in sporadically when monitoring the tester. Should this occur?
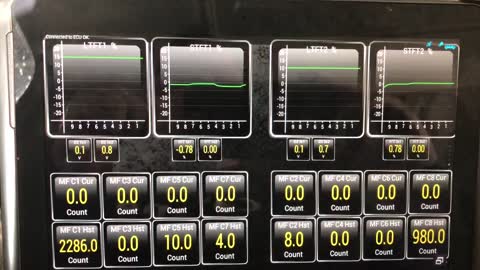
Noting that the cylinder in question is known to have misfires. Plugs, plug wires, and coil has been replaced so does it point to possible bad wiring or connection?
Nov 22, 2018 at 8:51 AM
Advertisement
Avatar
JACOBANDNICKOLAS
  • CERTIFIED EXPERT
  • 110,175 POSTS
Hi and thanks for using 2CarPros.

The spark should be consistent and not interrupted. If you have spark consistent and then it stops and comes back, that is not normal.

Take a look through this description of the system:

ELECTRONIC IGNITION (EI) SYSTEM DESCRIPTION

The electronic ignition (EI) system is responsible for producing and controlling a high energy secondary spark. This spark is used to ignite the compressed air/fuel mixture at precisely the correct time. This provides optimal performance, fuel economy, and control of exhaust emissions. This ignition system consists of a separate ignition coil connected to each spark plug by a short secondary wire. The driver modules within each coil assembly are commanded ON/OFF by the power-train control module (PCM). The PCM primarily uses engine speed and position information from the crankshaft and camshaft position (CMP) sensors to control the sequence, dwell, and timing of the spark. The EI system consists of the following components:


Now, based on your description, I need to know how you are checking spark. I ask this because all eight coils have a common ground that is known to corrode, break, fail. It is located on the side of the engine (driver's side) toward the front of the engine close to the bottom of the block. There will be black wires going to it.

That is the first thing I would like for you to check. Make sure the connector is in good condition, the ground is tight, and there are no corrosion issues. Do not depend on a continuity test. It can, and often does, provide a false positive.

Start with this and let me know what you find.

Joe

Nov 22, 2018 at 7:09 PM
Avatar
GLENNST
  • MEMBER
  • 42 POSTS
Joe,

I am checking apart using a lisle inline spark tester. Plugs in between plug and coil wire. It has red light light that flashes. I will try to attach video of cylinder one. May need to blow it up or zoom in to see light.

Ground wire? Is this the main wire from battery negative terminal? It goes to front drivers side bottom of engine. There is a smaller cable coming off of it near battery that goes under the radiator.

Nov 23, 2018 at 10:07 AM
Advertisement
Avatar
GLENNST
  • MEMBER
  • 42 POSTS
I traced main ground wire to bottom of engine block. On same connector is. Smaller wire that travels into a larger cable harness. That harness goes to top of manifold and combines with main cable harness that runs over the bank 1 coil packs. The bank 1 coil pack cable and bank 1 injector cables combine into this same main harness.

The ground connections at block are snug and in good shape.
Nov 23, 2018 at 2:25 PM
Avatar
JACOBANDNICKOLAS
  • CERTIFIED EXPERT
  • 110,175 POSTS
Hi and welcome back.

That is the one. I cannot tell you how many times that ground has caused problems for people. If you are certain it is good, then we need to move on. Is the vehicle setting a cylinder one misfire code? (P0301) I see the test light working. However, and it is hard to tell sitting at home, but when the light stops flashing, I hear no misfire or variation in engine performance. If there is, let me know. As far as the light, it should be constant and you asked, so I see your concern.

Let me know answers to my questions.

Take care,
Joe.
PS: I will be signing off here shortly but will be back on again tonight. I will check for your reply.
Nov 23, 2018 at 4:01 PM
Avatar
GLENNST
  • MEMBER
  • 42 POSTS
Thanks Joe. On the ground I am going to be certain and loosen the bolt tomorrow because the small cable going into wiring harness is behind the large cable on the bolt and I cannot see it. The bolt is tight, the cables seem attached well when I try to move them, but they are covered with cable panduit.

I am only getting P0300 code and none of the 301-308 codes. My cheap Ancel AD310 plug in is limited. However, today I purchased Torque Pro application and it does more. It shows me the cylinder current and history misfire data. I am not a mechanic and not sure what is normal but I am now aware 1 and 8 seem to be the culprits.

I am attaching my dashboard I built. It is a video of me accelerating hard, then slowing down. Left side is all bank 1, right side bank 2. Graphs are LTFT and STFT, small icons are O2 and Trim sensors, and bottom are cylinders left to right as 1,3,5,7 then 2,4,6,8 showing the current misfires on top row and history on bottom row.

Plugs are new, plug cables are new, coils original but have been swapped around with no change. Intake gaskets replaced with Fel-Pro metal frame type and torqued to spec (89 in pounds). Injectors are new ($120.00 set off Amazon), CAM sensor new, MAP new, Purge Solenoid new, Throttle body new, Fuel Regulator new, fuel filter new (Fuel pressure 42 psi per spec for 2004 Tahoe 5. Z Flex), all hoses and lines on intake new except the fuel purge tube is original. Original MAF but I did clean it.

I built a smoker can that connects to bicycle pump and smoke test passed with flying colors. No smoke from intake anywhere, but after pumping for a couple minutes I do see smoke from oil dip stick tube.

Compression testing on cylinders 2-8 is 179-186 psi (4% variance), cylinder one dry test is 160 psi, wet test 160 psi, but it can reach 180 psi if I double the start cycles from 5 to 10 count. It reached 151 psi after only to cycles and have read that 80% of pressure should occur in first two cycles.

Leak down on number one was 85/80 (5% leakage) with leak detected mostly at throttle body and some from oil inlet. I forgot to listen to exhaust. I want to think pressure measurements are okay for combustion to occur? Tomorrow or Sunday I will leak down test #8.

I am not rich but car is paid off so I have thrown parts and new tools at it just to learn how to do it. If I can fix it myself I basically get experience and tools for free I can use in future.

I have also pulled the valve covers off and connected coils so I could watch valves. All sixteen valves are moving /rockers/springs clicking so I understand this means lifters are working and thus camshaft loves are okay? I replaced valve cover gaskets also.

Nov 23, 2018 at 5:42 PM
Avatar
JACOBANDNICKOLAS
  • CERTIFIED EXPERT
  • 110,175 POSTS
Wow, you have done a lot. I do see one problem. The fuel pressure is low and that can cause a misfire. Here are the manufacturer's specs.

Fuel Pressure (Key ON, Engine OFF) .................... 385-425 kPa (55-62 psi)
Fuel Pressure (vin Z) .................... 335-375 kPa (48-54 psi)

With a Z vin code, you are still 6 psi below minimum.

Have you done anything with the regulator? Check to make sure you aren't drawing fuel into the regulator vacuum hose. Although it's new, it could be bad.

Let me know.

Joe
Nov 23, 2018 at 6:41 PM
Avatar
GLENNST
  • MEMBER
  • 42 POSTS
Hi Joe,

I have changed the regulator.

I forgot to share that the pressure was 50 psi key on/engine off. The 42 psi I mentioned above is with engine running.

On YouTube or somewhere there was mention that when running the psi should drop about 8 psi which matched my numbers.

Nov 24, 2018 at 5:31 AM
Avatar
GLENNST
  • MEMBER
  • 42 POSTS
Joe

If there were a MAF sensor issue where ECU was measuring incorrect air flow and causing a lean/rich fuel supply would that not spread misfires more evenly across all cylinders? Not just focused on #1 and 8?
Nov 24, 2018 at 5:36 AM
Avatar
GLENNST
  • MEMBER
  • 42 POSTS
Joe I may be reaching but I found that the firing order is 1-8-7-2-6-5-4-3. Is it coincidental that my problem misfires are on cylinders 1-8, the first 2 in the order? Is there anything else common to these cylinders such as ECU wiring, common return wire, etc?

I am trying to think beyond the obvious items since I have addressed the common issues like fuel, air, plugs, coils, vacuum. I have check the ground today and it’s good.

My gut tells me it is something less obvious but lack of mechanical experience has me handicapped.
Nov 24, 2018 at 11:12 AM
Avatar
JACOBANDNICKOLAS
  • CERTIFIED EXPERT
  • 110,175 POSTS
HI:
The variation in spark would not come from the MAF. If anything, I would think the crankshaft position sensor or reluctor wheel. That could have something to do with why it is 1 and 8. Have you removed the sensor?
Nov 24, 2018 at 5:07 PM
Avatar
GLENNST
  • MEMBER
  • 42 POSTS
Yes. When I was replacing the intake gaskets I decided to replace the cam position sensor because of its location is very difficult to reach. If there is a relearn procedure or something I should have performed I was not aware.
Nov 25, 2018 at 6:36 AM
Avatar
GLENNST
  • MEMBER
  • 42 POSTS
Joe

If the compression values of a cylinder are 160+ and leak down loss is only 5% can we fully eliminate cylinder pressure as a cause for misfire?

Nov 25, 2018 at 6:41 AM
Avatar
GLENNST
  • MEMBER
  • 42 POSTS
Joe

Also should I remove valve covers one more time and reconfirm valves are working? I did that prior and all were rocking/moving. I thought I wiggled them all to see if any were loose but I cannot remember if I “pulled up” on the arm (valve side) to see if it raised or dropped on rod side.

If all valves are rocking does that fully eliminate a lifter and valve open/close concern?

I have read that to set the valve lash on a hydraulic system is to turn set screw until tap is heard then back off 3/4 a turn.

NOTE: I have never heard tapping or lifter noise on my vehicle, so could a valve not be opening enough for proper intake?
Nov 25, 2018 at 7:33 AM
Avatar
GLENNST
  • MEMBER
  • 42 POSTS
Joe,

I swapped the 7&8 coil and plug wire and drove this morning. No change and misfires remained on 8. I had already swapped 1&3 prior and misfires remained on 1. Thus I am 100% convinced it’s not coils or plug wires. I am 99% sure it is not plugs unless I got some bad ones from AutoZone. It could still be a coil harness but unless 1&8 are together and both have similar continuity issue odds are the wiring is okay.

New information:

Maybe this information helps but I noticed 2 main things when driving today. As I monitored my Torque Pro dashboard the misfires only occurs below 20 mph. I set cruise at 70 mph for five miles with no misfire counts. So either the sensors cannot detect them at high rpm or they stopped occurring at higher rpm? I can only feel them and see them at less than 20 mph.

Second is that FTs seemed to work normally in that LT would stabilize at a certain speed and not move, and ST would bounce +|- 5%. However, LT1 and LT2 seemed to act differently. At low speeds 0-20 LT1 would be low (ex 8.0) while LT2 would be high (ex 18), but when I accelerated and set cruise on 70 mph they came towards each other. LT1 rose up to around 12, and LT2 dropped to around 12 and stabilized. As I lowered speed the went separate ways again. I would think they both would do the same thing, not opposite?
Nov 25, 2018 at 9:00 AM
Avatar
GLENNST
  • MEMBER
  • 42 POSTS
Joe

I just swapped the injectors around. They were new but not OEM.

I swapped injectors as follows:

Before swapping cylinders 2-7 running good with no misfires. 1 & 8 misfiring.

1&3 swapped
2&4 swapped
5&7 swapped
6&8 swapped

After swapping injectors no change. Cylinders 1&8 still the problem. The others also look good. So I am convinced the problem is not fuel pressure or injector related. Also per prior email it’s not coil, plug, or plug cable related. I had swapped quad coil mount bracket from bank 1 to bank 2 which moveed position 1 to 8. I guess it’s possible both 1-8 have bad wiring from coil to primary mount connector but odds of that are very low?

MAP is new, CAM sensor new, gaskets new, hoses new, vacuum is steady needle @ 19 inhg, MAF cleaned but original.

My next item I will check leak down on cylinder 8. It measured 182 psi on a prior compression test, so I never did a leak down.


Nov 25, 2018 at 11:12 AM
Avatar
GLENNST
  • MEMBER
  • 42 POSTS
Joe

I found an article about restricted exhaust (cats) below. This seems what is happening to my FTs. Thoughts?

“Restricted exhaust. (Although no two converters fail exactly the same, if fuel trim goes high under acceleration on only 1 bank, suspect a restriction on the other. The MAF reads complete air intake, and then ECM initially distributes fuel evenly to both sides. If much less air is going through one side, there will be more than enough fuel for that restricted side and not enough fuel for the unrestricted side.)”
Nov 25, 2018 at 12:14 PM
Avatar
JACOBANDNICKOLAS
  • CERTIFIED EXPERT
  • 110,175 POSTS
I read through your post. Anything is possible, but that type of problem is not going to have an affect on the spark rate variations. I am going to ask the site owner for his ideas. He is an excellent tech and may know something we are missing.

Stay in touch.

Joe
Nov 25, 2018 at 4:56 PM
Avatar
STRAILER
  • CERTIFIED EXPERT
  • 53,854 POSTS
Hello,

I couple things come to mind. These engines had a problem with the camshafts going flat. Can we remove the valve covers and do an Inspection on the lobes, use a flashlight? If they seem okay I would do a pin to pin the make sure there is no high resistance to any injector/ignition coil. Here are the engine wiring diagrams and guide to help:

https://www.2carpros.com/articles/how-to-check-wiring

If all okay swap the PCM out for a used/rebuilt unit to see what happens.

Check out the diagrams (below). Please let us know what you find.

Cheers, Ken
Nov 26, 2018 at 9:55 AM
Avatar
GLENNST
  • MEMBER
  • 42 POSTS
Ken, I am new to this. What am I looking for when I take off the valve covers? Do I remove rocker or anything? Where do I look with flashlight?

I have checked the injector outputs with a NOID tester. But have not measure pin to pin on connector. On the coil connector I did measure pin to pin and all of the signal or igniter violates on bank 1 are the same. I think they all were around 3 volts. I will find my information and share.
Nov 26, 2018 at 7:26 PM
Avatar
GLENNST
  • MEMBER
  • 42 POSTS
Ken,

I saw a article on cylinders pressure and spent all day today doing testing. Below is information and I hope you can see the table below. What a job. I am sore from climbing under truck to turn crankshaft.

NOTES for TABLE:
1) Leak down input was 80 psi.
2) Wet and Dry were 5 starter cycles.
3) Snap was gas pedal 2500 rpm hit, but not consistent.


Cyl Dry Wet Idle Snap Leakdwn % Loss
1 160 160 85 110 75 6%
2 179 Skip. 85. 130 78 3%
3 185 Skip. 85 115 77 4%
4 179 Skip. 82 130 78 3%
5 179 Skip. 80 110 79 2%
6 186 Skip. 80 110 78 3%
7 186 Skip. 85 100 79 2%
8 182 Skip. 85 120 80 0%

I will look at CAM per request, but need to know more about how I do it and what I am looking for.
Nov 26, 2018 at 7:34 PM
Avatar
GLENNST
  • MEMBER
  • 42 POSTS
Ken I searched on camshaft lobe inspection and some videos came up about removing valve cover and simply watching the lifter rods/ticker arms working. I did this originally thinking I had a bad lifter. All of my rocking arms are moving up/down and are very tight to the touch.

Let me know how to inspect with flashlight.

Nov 27, 2018 at 1:51 AM
Avatar
GLENNST
  • MEMBER
  • 42 POSTS
Ken or Joe

I have read the thread again and I caught something Joe asked me. He asked me about crankshaft position sensor. I did replace the cam position sensor, but not the crankshaft sensor. Also I do not know what a reluctor wheel is so have not looked at it either.
Nov 27, 2018 at 2:01 AM
Avatar
STRAILER
  • CERTIFIED EXPERT
  • 53,854 POSTS
I would do the crankshaft sensor. Here is a guide to help walk you through the steps:

https://www.2carpros.com/articles/crankshaft-angle-sensor-replacement

Disconnect the battery before you begin.

Nov 27, 2018 at 11:03 AM
Avatar
GLENNST
  • MEMBER
  • 42 POSTS
Thanks Ken

Also, can you clarify what and how I check the cam from the valve area?
Nov 27, 2018 at 11:05 AM
Avatar
GLENNST
  • MEMBER
  • 42 POSTS
Okay, I purchased a crank sensor today.
Also I found this video that is really cool that explained it well. I am excited that this could be it!

Could you watch from 19:55 to 20:59 when he referenced “air gap”? Just curious how to adjust the air gap?

https://youtu.be/ws59zXvr1SM


Nov 27, 2018 at 3:36 PM
Avatar
STRAILER
  • CERTIFIED EXPERT
  • 53,854 POSTS
The air gap they are referring to is the distance between the sensor and the reluctor wheel. There is no adjustment for this car though, simple bolt in.
Nov 28, 2018 at 9:49 AM
Avatar
GLENNST
  • MEMBER
  • 42 POSTS
Okay, thanks.

Will I be able to do a crank relearn myself following written instructions?

I do not have the tool to initiate a relearn process via the PCM.
Nov 28, 2018 at 11:33 AM
Avatar
STRAILER
  • CERTIFIED EXPERT
  • 53,854 POSTS
I have seen them work with an install and some will need to be programed. Disconnect the battery before you change it. Worst case is you will need to have the initialization done at a shop cost about $130.00. Please let us know what you find. We are interested to see what it is.
Nov 29, 2018 at 9:51 AM
Avatar
GLENNST
  • MEMBER
  • 42 POSTS
Today I replaced the sensor. I do not have a lift so I was on my back a lot. That was fun but I have a whole new respect for mechanics. I looked at the connector and it appeared okay, but I could not test it since batter ground was disconnected. The grounds on tip of starter were also checked as well as I re taped all wiring really good. I used a AZ Duralast sensor because the store did not have a ACDelco in stock.

I did crank it and let it idle. After a few minutes the check engine light started flashing but when I read the codes it was a P0300 code only. I am hoping the sensor has not relearned since I did not drive it.

I just took a shower and am about to go drive the vehicle. Below is a procedure I found online but do not know if it is true. I have also heard to do the same steps you do with a Tech II scanner except you just will not see the ECM confirm it completed?

Procedure without scan tool:

1. Turn off all of the accessories.
With the Air temperature sensor and
Coolant temperature within 5 degrees
(Centigrade) of each other, start the
engine and let it idle in Park or
Neutral for two minutes.
2. Accelerate the vehicle to 55 mph at
part throttle. Cruise at 55 mph for 8-
10 minutes until the engine reaches
operating temperature.
3. Cruise at 55 mph for another 5-6
minutes.
4. Decelerate to 45 mph without
using the brakes, and maintain 45
mph for 1 minute.
5. Perform 4 deceleration cycles,
without using the brakes, of 25
seconds each where no specific
speed is necessary. Returning to 45
mph for 15 seconds in between
deceleration cycles.
6. Accelerate to 55 mph and cruise
for 2 minutes.
7. Stop the vehicle and idle for 2
minutes with the brake applied and
the transmission in Drive (automatic
trans.) or Neutral (manual trans.)
with the clutch depressed. Refer to
diagram A on page 8.

Nov 29, 2018 at 12:22 PM
Avatar
GLENNST
  • MEMBER
  • 42 POSTS
Well I first performed the drive procedure but at idle it still misfires. I then found a rural mechanic and offered him $40.00 to do the relearn. He has a SnapOn scanner and did it fast. While we sat in vehicle we talked and he was really cool about helping. His ear could pick up a noise I could not detect. He said it sounded like a lifter is worn out. Even though I told him the rockers are moving he indicated with all I have done to it the only explanation left is valves not opening enough causing bad mixtures. He said he could hear the lifter noise and after he taught me what to hone in on I could hear it also.

Lesson learned for anyone reading this is do not assume lifters are good just because the rocker arms are moving up down.

Ken, short of taking off the heads to replace lifters I would be glad to keep trying anything you recommend? This mechanic mentioned something about a test that measures how much the valves are opening but I forgot the name of tool? Let me know and I may try to do that test.
Nov 29, 2018 at 2:38 PM
Avatar
GLENNST
  • MEMBER
  • 42 POSTS
I have decided I am going to pull the heads, clean the valves and top of pistons, lap the valves with either the wooden lapping tool, or with drill and 1/8 vacuum tube, and install new lifters.

It will be my first time ever but looks like fun. I have watched several zero (0) lash setting videos and will do it per attached link below.

https://youtu.be/5EGlb_VpTAw

Ken is is best to reuse all valves, rods, rockers, springs, on my vehicle or get new ones? I would rather reuse them if they are good.
Nov 29, 2018 at 7:54 PM
Avatar
STRAILER
  • CERTIFIED EXPERT
  • 53,854 POSTS
It is best to inspect test all springs and valves to replace as needed, please post pictures or video of the job. Here are diagrams to help you get the job done it shows the torque specs as well. Check out the diagrams (below). Please let us know what you find. We are interested to see what it is.

Cheers, Ken
Nov 30, 2018 at 9:38 AM
Avatar
GLENNST
  • MEMBER
  • 42 POSTS
Thanks for information Ken.

I will definitely inspect everything very well. Can you tell me how to test springs? I will search YouTube but if you have information please share.

I promise to share what I find and will take pictures and or video.
Nov 30, 2018 at 1:07 PM
Avatar
GLENNST
  • MEMBER
  • 42 POSTS
Okay, a valve spring tester appears to be expensive for myself since I will not use it often. I was told by a friend to send my heads to a machine shop and they will return it will cleaned valves and assembled. He told me it is about $100.00 a head. Not sure if I will do that but if they can test the springs for me then maybe.
Nov 30, 2018 at 1:22 PM
Avatar
STRAILER
  • CERTIFIED EXPERT
  • 53,854 POSTS
A new set of stock valve springs are not that much, I would get a new set if you are doing the work yourself.
Dec 1, 2018 at 11:13 AM
Avatar
GLENNST
  • MEMBER
  • 42 POSTS
I likely will get new springs and push rods. Would you agree that rockers are likely okay to reuse?
Dec 2, 2018 at 6:04 AM
Avatar
GLENNST
  • MEMBER
  • 42 POSTS
Ken can you give me your approval for below parts from Rock Auto. Am I getting the right stuff for my 2004 Tahoe 5.3L Z Flex Fuel.

ECK1567 - CAM and Lifter Kit
ERV3598 - Valve Spring Set
MPR614 - Push Rods

I plan to reuse rockers and valves if in good shape.

It likely does not matter but I do not understand why the vendor (ENGINETECH) makes the CAM, Lifters, Springs, Rockers, and valves, but do not make push rods? Strange!
Dec 2, 2018 at 6:14 AM
Avatar
STRAILER
  • CERTIFIED EXPERT
  • 53,854 POSTS
Push rods do not usually wear out, but you can get a set from Rock as well.

MELLING MPR614

The rest looks good. Please take pictures of the job being done, that would be great. :)
Dec 3, 2018 at 9:04 AM
Avatar
GLENNST
  • MEMBER
  • 42 POSTS
Thanks Ken. I will do video and pictures. However, I may wait until after Christmas when I get my bonus check.

I am going with new head bolts but not sure if I need first or second design bolt kit.
I will dig deeper.
Dec 3, 2018 at 2:19 PM
Avatar
STRAILER
  • CERTIFIED EXPERT
  • 53,854 POSTS
Okay, let me know what happens.
Dec 3, 2018 at 6:44 PM