Evap leak

1998 HONDA ACCORD
103,690 MILES • 4 CYL • 2WD • AUTOMATIC
Avatar
VETSTUDENT
  • MEMBER
  • 1 POST
My car is giving P1456 EVAP emission leak detected (fuel tank leak) error. I cleared the engine light once but it again came up today.
Also, I have noticed a dip in car mileage.
Please let me know how can I get it rectified (starting from cheapest) and how much it is going to cost me?
Thanks
Aug 28, 2009 at 11:07 AM
Advertisement
Avatar
IMPALASS
  • CERTIFIED EXPERT
  • 3,112 POSTS
Hello.

The code it appears that it has to flag twice before it trips.

This is a two-trip code; once cleared, it cannot be reproduced in one trip. Also, certain specific driving and ambient conditions must occur before the ECM/PCM will complete the system checks. Additional test drives may still not meet the specific conditions needed to reproduce the code.

There are several tests to check the code, but the first suggestion is the fuel fill cap was not properly installed.

My suggestion is first make sure your fuel cap is on really good at least three clicks.

This guide can help us

https://www.2carpros.com/articles/evap-system-code-repair

Next please go to Auto Zone (AZ) or O'Reilly's and for free they can pull the codes to the car. Most important: Once they check your codes, please make sure you write it down and then have them clear the codes.

Then lets see if it trips again. That will eliminate the fuel cap.
Sep 1, 2009 at 5:17 PM
Avatar
IMPALASS
  • CERTIFIED EXPERT
  • 3,112 POSTS
Hello. Also, it looks like you may have some recalls on your vehicle. The dealer may fix these for free. Please contact the dealer service department, give them the VIN number of your car and have them check on these to see if they apply to you.


https://www.2carpros.com/forum/automotive_pictures/248015_Recalls_37.jpg

Sep 1, 2009 at 5:30 PM
Advertisement
Avatar
GORDON2
  • MEMBER
  • 76 POSTS
My 1998 Accord LX four cylinder automatic is giving a P1456 EVAP Emission leak detected (fuel tank leak) error. I have cleared the engine light more than once but it comes back after a few days or a week. I have noticed a dip in car mileage.

I found that behind my gas cap, a gasket appears at the top of the filler tube. It appears to have a split. Could that be causing the problem?

Would replacing a part such as 17662-S04-003 possibly resolve the P1456 issue?
Jun 23, 2018 at 9:29 AM
Avatar
GORDON2
  • MEMBER
  • 76 POSTS
To test the theory that the leak is where I suspect it is located, I applied some caulk to try to patch the leak. I will drive it this way for a few weeks to see if the engine light and P1456 come back.
Jun 23, 2018 at 11:33 AM
Avatar
STRAILER
  • CERTIFIED EXPERT
  • 53,854 POSTS
Sorry, that might not change anything because that really does not seal anything the tube travels below that. I have seen the charcoal canister leak on these cars. Here is a diagram so you can remove it and test is for leaks also check the hoses from it to the tank and the purge solenoid. Check the seal on the gas cap as well.

Check out the diagrams (below). Let us know what happens and please upload pictures or videos of the problem.

Cheers, Ken
Jun 23, 2018 at 12:11 PM
Avatar
GORDON2
  • MEMBER
  • 76 POSTS
Ken,

Thanks for the help. At least I will not bother with trying to replace the 17662-S04-003.

I have previously taken the car to a dealer and they cleared the code and tightened the gas cap. Before the tank was empty the code came back on. I suppose replacing the gas cap with a new one is fairly inexpensive, so perhaps I should try that next.

I had some difficulty locating the charcoal canister, but did find that it is underneath the car body, below the rear seat on the driver’s side. I believe the canister part number is 17011-S84-A00. I have attached photos corresponding to the diagrams provided.

How would I test the canister for leaks? Do I need some particular type of tool?

How would I test the hoses from the canister to the tank and from the canister to the purge solenoid?

Thanks again,
Gordon
Jun 23, 2018 at 4:12 PM
Avatar
STRAILER
  • CERTIFIED EXPERT
  • 53,854 POSTS
You will need to rig something to plug hose ports and something to blow a little pressure into it while holding it under water much like a balloon. Also, check all hoses for the system here is a diagram so you can see which ones to look at. Check out the diagrams (below). Please let us know what happens.

Jun 24, 2018 at 12:00 PM
Avatar
GORDON2
  • MEMBER
  • 76 POSTS
I also found that one of my pictures shows evidence of a leak near the "EVAP bypass solenoid valve". See the first attached image, dark area left of center.

But another picture (second image) taken at a later time seems to not show any evidence of a leak. I am wondering if maybe I had fuel present in the first picture that evaporated by the time I took the second one or it could have been wet dirt from driving in the rain, but why just in that area? This may not help, but does seem odd.
Jun 24, 2018 at 1:42 PM
Avatar
GORDON2
  • MEMBER
  • 76 POSTS
Other comments:

I used my code reader to execute an “EVAP Sys. Leak test”. The code reader indicates “Command Sent” and I heard what sounded like a relay near the canister. This did not cause any malfunction indicator light (Check Engine Light) nor did it set any codes. However, the gas tank is near full so this may not be a legitimate test.

I found some areas that may show evidence of leaks and cleaned them up so that I could check for future evidence of leaking.

The first image is a dirty IAT sensor. The second image is the same sensor cleaned up so that I can check for future leaks.

The third image may indicate leaks from the gas cap. The fourth image is the same area cleaned up so that I can check for future leaks.
Jun 24, 2018 at 1:58 PM
Avatar
STRAILER
  • CERTIFIED EXPERT
  • 53,854 POSTS
The elak will be gas vapor so its hard to see. I do not see anything in the pictures that warrant a leak you are going to need to test the castistner and lines with the control valves to find the leak. Have you tried a new gas cap?
Jun 25, 2018 at 10:51 AM
Avatar
GORDON2
  • MEMBER
  • 76 POSTS
I did order a new Honda gas cap online. I will give that a try.

If (after installing the new cap) I get a check engine light, I will provide an update. If I do not get a check engine light after a couple of tanks of gas, I will report presumed success, but that will probably take a few weeks to know.
Jun 25, 2018 at 6:13 PM
Avatar
STRAILER
  • CERTIFIED EXPERT
  • 53,854 POSTS
Okay good, let me know, we are interested. Ken
Jun 26, 2018 at 11:19 AM
Avatar
GORDON2
  • MEMBER
  • 76 POSTS
Since the last time I had the check engine light (and the P1456), I have made two changes. (1) I applied the caulk described in my 6/23/18 post and (2) I replaced the gas cap on 6/30/18. Ken responded to the 6/23/18 post and indicated that the caulk would not help. I have not yet checked the canister for leaks.

I installed a new gas cap on 6/30/2018. The original gas cap had been in use since I bought the car in October 1997. The sticker near the driver’s side door indicates the car was built 09/97.

When the new fuel cap was installed, the car had around a three quarter full gas tank. It has been driven a few times (several trips) so that it is now just over half full. The check engine light has not yet come back on. I think if it gets through the next tank of gas after the current one, the problem is likely fixed by the new gas cap.
Jul 1, 2018 at 2:17 PM
Avatar
STRAILER
  • CERTIFIED EXPERT
  • 53,854 POSTS
That would be great! Let it roll out. Please let us know if the light stays out. Ken
Jul 2, 2018 at 11:50 AM
Avatar
GORDON2
  • MEMBER
  • 76 POSTS
No light so far, but I do have a pending code, P1456.
Jul 2, 2018 at 5:33 PM
Avatar
STRAILER
  • CERTIFIED EXPERT
  • 53,854 POSTS
It might go away, keep an eye on it.
Jul 3, 2018 at 12:24 PM
Avatar
GORDON2
  • MEMBER
  • 76 POSTS
I think the pending P1456 code cleared automatically, which is what I understand the car should do if the test passed the next time it was run. I believe two consecutive measured failures are required to cause a malfunction indicator (check engine) light to be turned on.

I am still on the same tank of gas I was using on 7/2/2018 when I had the pending code, P1456. I have not touched the gas cap since it was replaced on 7/1/2018. The pending code seen on 7/2/2018 may have been set before I had replaced the gas cap (there is no way of knowing at this point). I did not try to clear that pending code (at least not intentionally).

While investigating a problem with my temperature gauge on 7/4/2018, I noticed that my standalone ODB II code reader gave me a green LED. The manual indicates that I would get a yellow LED if I had pending codes.

Today (7/5/2018) I used a Wi-Fi ODB II reader with the ODB Fusion app and on the "diagnostics" screen under the heading "pending" I now have a green check and "No trouble codes are detected." For completeness, under the heading "confirmed" I also have "no trouble codes are detected." This is the test equipment I used when I found the pending code reported on 7/2/2018 (earlier post).

I think this problem is solved, but will continue to monitor through the next tank of gas. The new gas cap seems to have been the solution.
Jul 5, 2018 at 9:27 AM
Avatar
STRAILER
  • CERTIFIED EXPERT
  • 53,854 POSTS
Good to hear, please use 2CarPros anytime we are here to help.

Cheers, Ken
Jul 5, 2018 at 11:21 AM
Avatar
GORDON2
  • MEMBER
  • 76 POSTS
Thank you Ken and 2CarPros.com.
Jul 5, 2018 at 12:41 PM
Avatar
GORDON2
  • MEMBER
  • 76 POSTS
Unfortunately, the P1456 code and malfunction indicator (check engine) light are back. I suppose I have an actual vacuum leak somewhere, possibly the canister.
Jul 18, 2018 at 6:39 PM
Avatar
STRAILER
  • CERTIFIED EXPERT
  • 53,854 POSTS
Yes, that is what I was thinking. Check all lines then replace the canister I would find a used one. You can rig an air pressure test and hold it under water to see if there are any leaks. Let us know what happens. Ken
Jul 19, 2018 at 10:40 AM
Avatar
GORDON2
  • MEMBER
  • 76 POSTS
It will take me some time (a few weeks) to work this. I move a few years ago and since then lack some tools, jack stands, etc. I do plan to test for leaks and will follow up when I can. I am thinking of buying a tool/kit MITMV8500 and conduct some of the leak tests documented in my Haynes manual. It would be great if I had an easier time identifying some of the parts they mention. Perhaps I need to read the manual a few times to make sure I know which part (step 9) is "the vacuum line from the EVAP control canister, which I think is item #2 in picture 19.9 in the image. Is the "EVAP control canister vent shut Valve" mentioned in step 11 an electrical signal/power connector or vacuum house item?
Jul 21, 2018 at 12:15 PM
Avatar
STRAILER
  • CERTIFIED EXPERT
  • 53,854 POSTS
It is a simple system of hoses valves and air tight containers. You should be able to eliminate components by using simple tests.

Here is the entire system so you can start at the front and work your way back.

Check out the diagrams (below). Please let us know what happens.

Cheers, Ken
Jul 21, 2018 at 1:45 PM
Avatar
GORDON2
  • MEMBER
  • 76 POSTS
I tried to label items on the diagram. Did I get them correct?
Jul 22, 2018 at 4:57 PM
Avatar
STRAILER
  • CERTIFIED EXPERT
  • 53,854 POSTS
Yes, looks right to me. Let me know what you find. Happy hunting. ;)
Jul 23, 2018 at 10:02 AM
Avatar
GORDON2
  • MEMBER
  • 76 POSTS
I use this car to go to work so I am hesitant to take off parts that I have never taken off before. Because of that, I would like to be able to do as much testing as I can with the parts still installed on the car. I would also like to test as much as i can without the engine running.

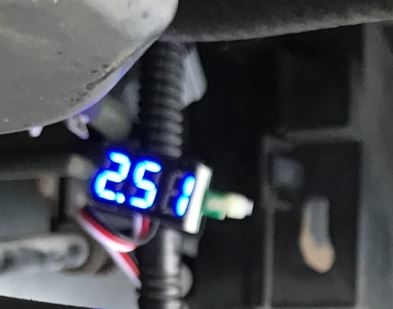
It is even better if I can test with the ignition key in the off position. I cannot do all of the testing that way, as testing the fuel tank pressure sensor appears to depend on having the ignition key on, and using a volt meter, but the engine does not need to be running.

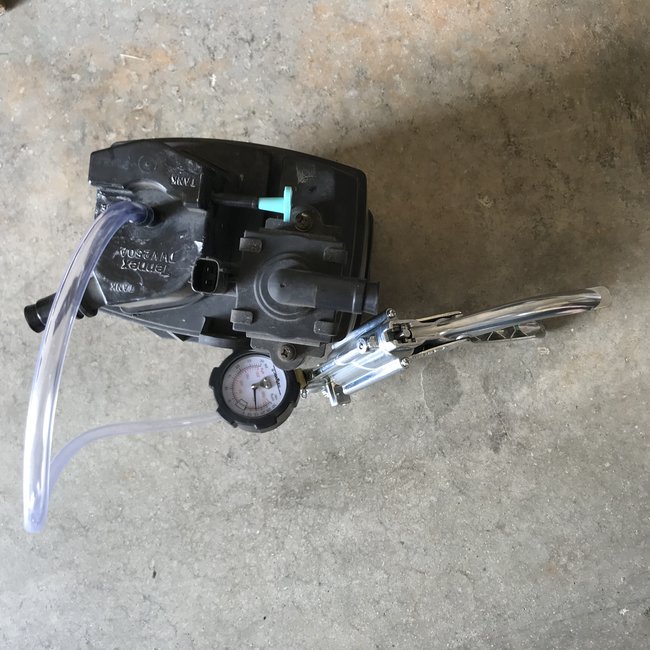
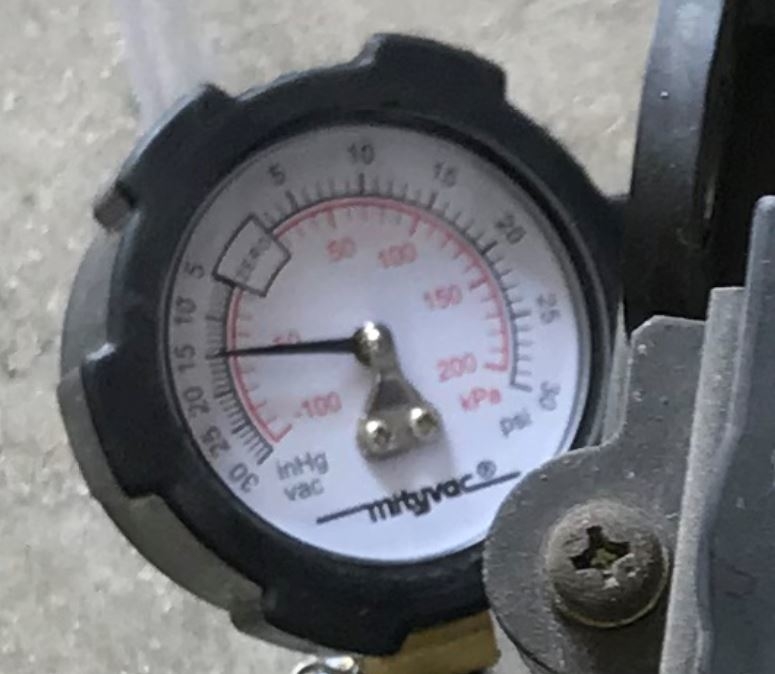
I think I could do much of the testing with the ignition off. I need some tools, one being a hand vacuum pump (Mityvac, which I have not yet bought). I also need something to activate some of the solenoids. I do not know of a tool for that, so I might make something using a 9 volt battery, but wish I could find a real tool for this purpose.

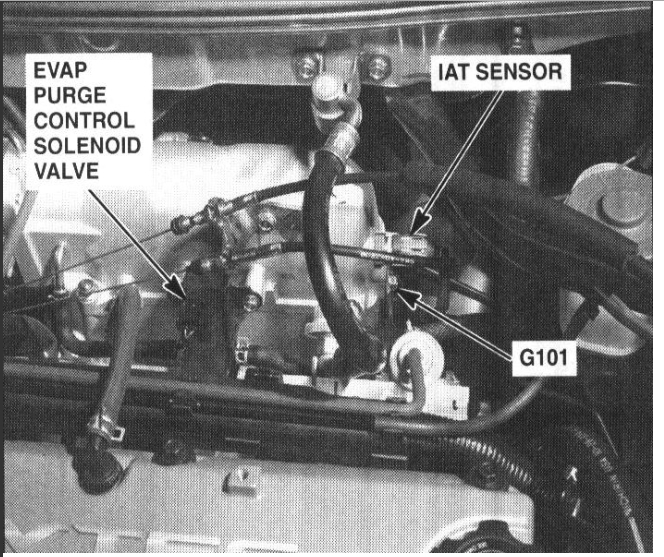
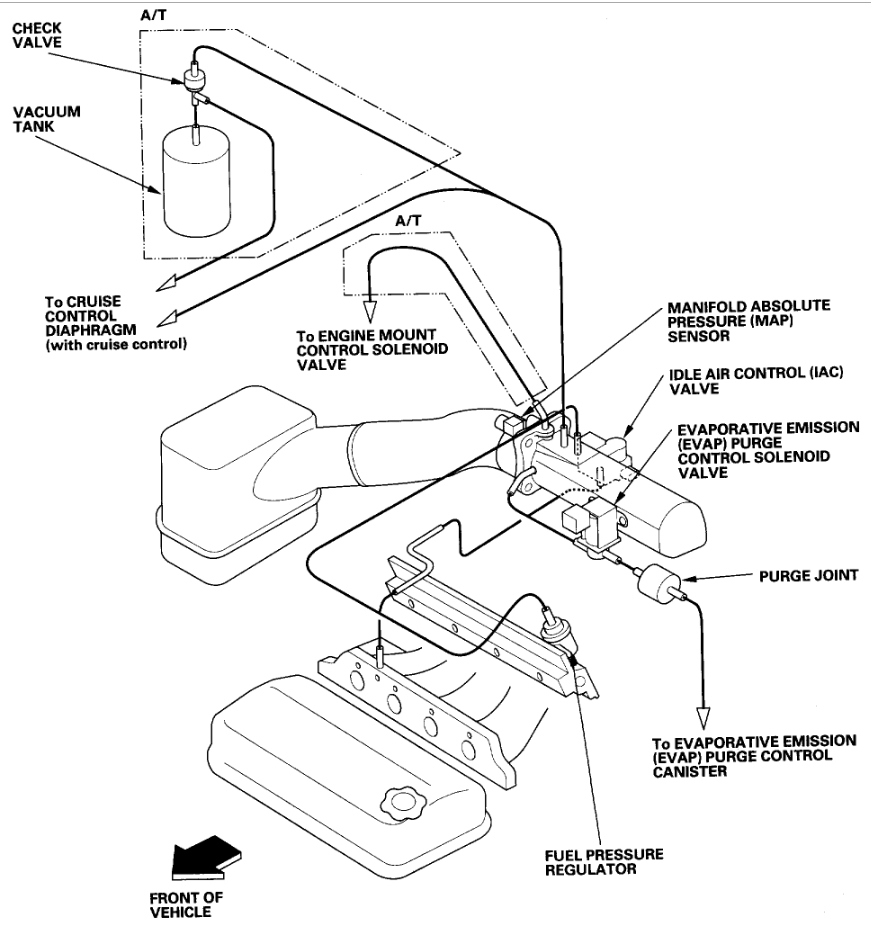
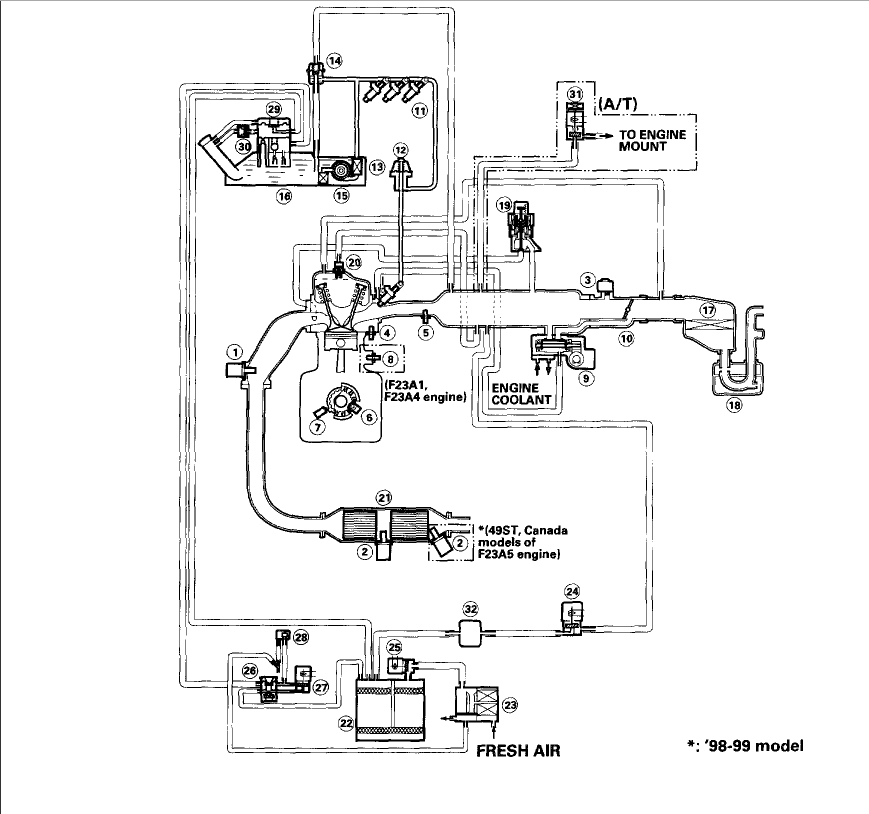
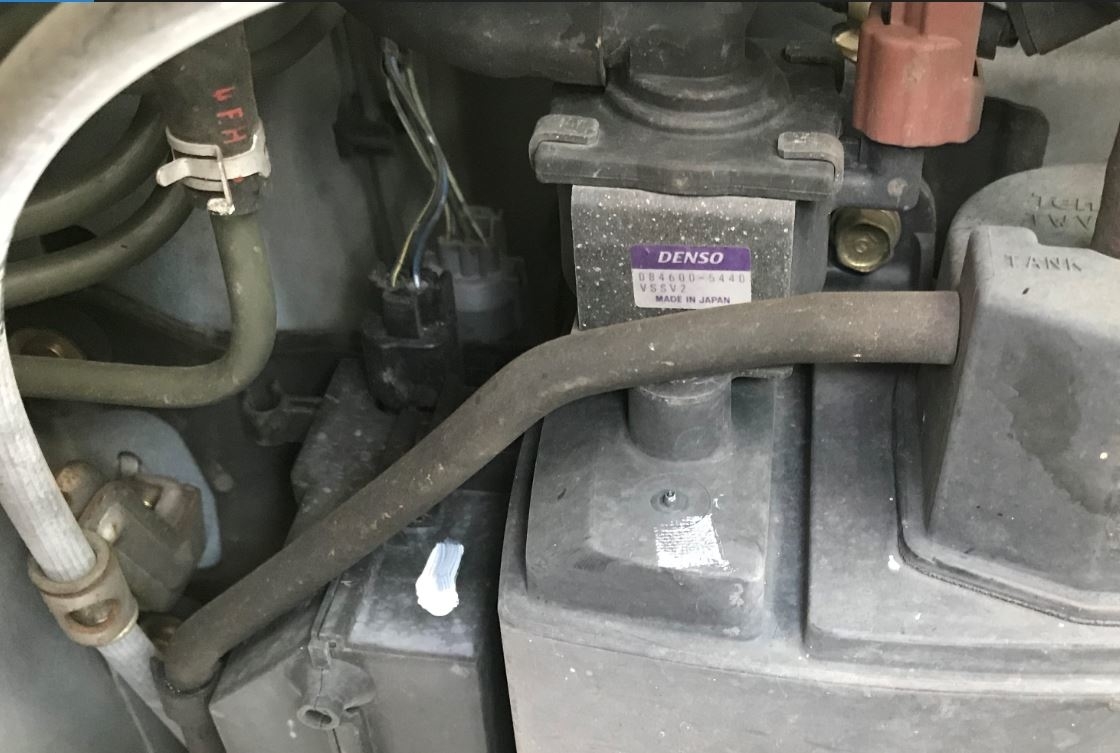
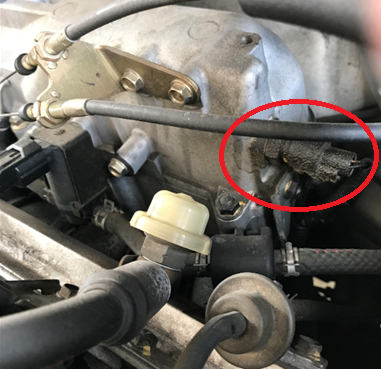
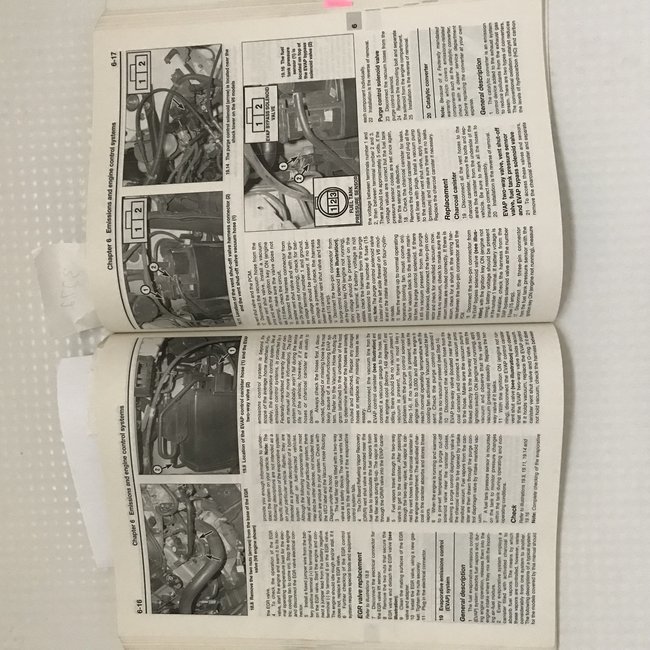
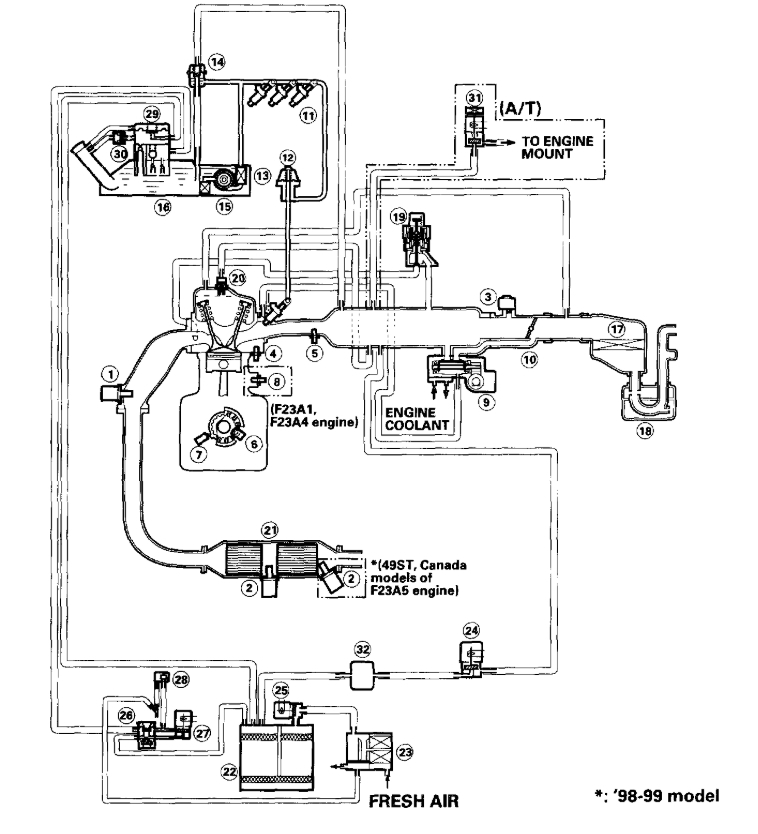
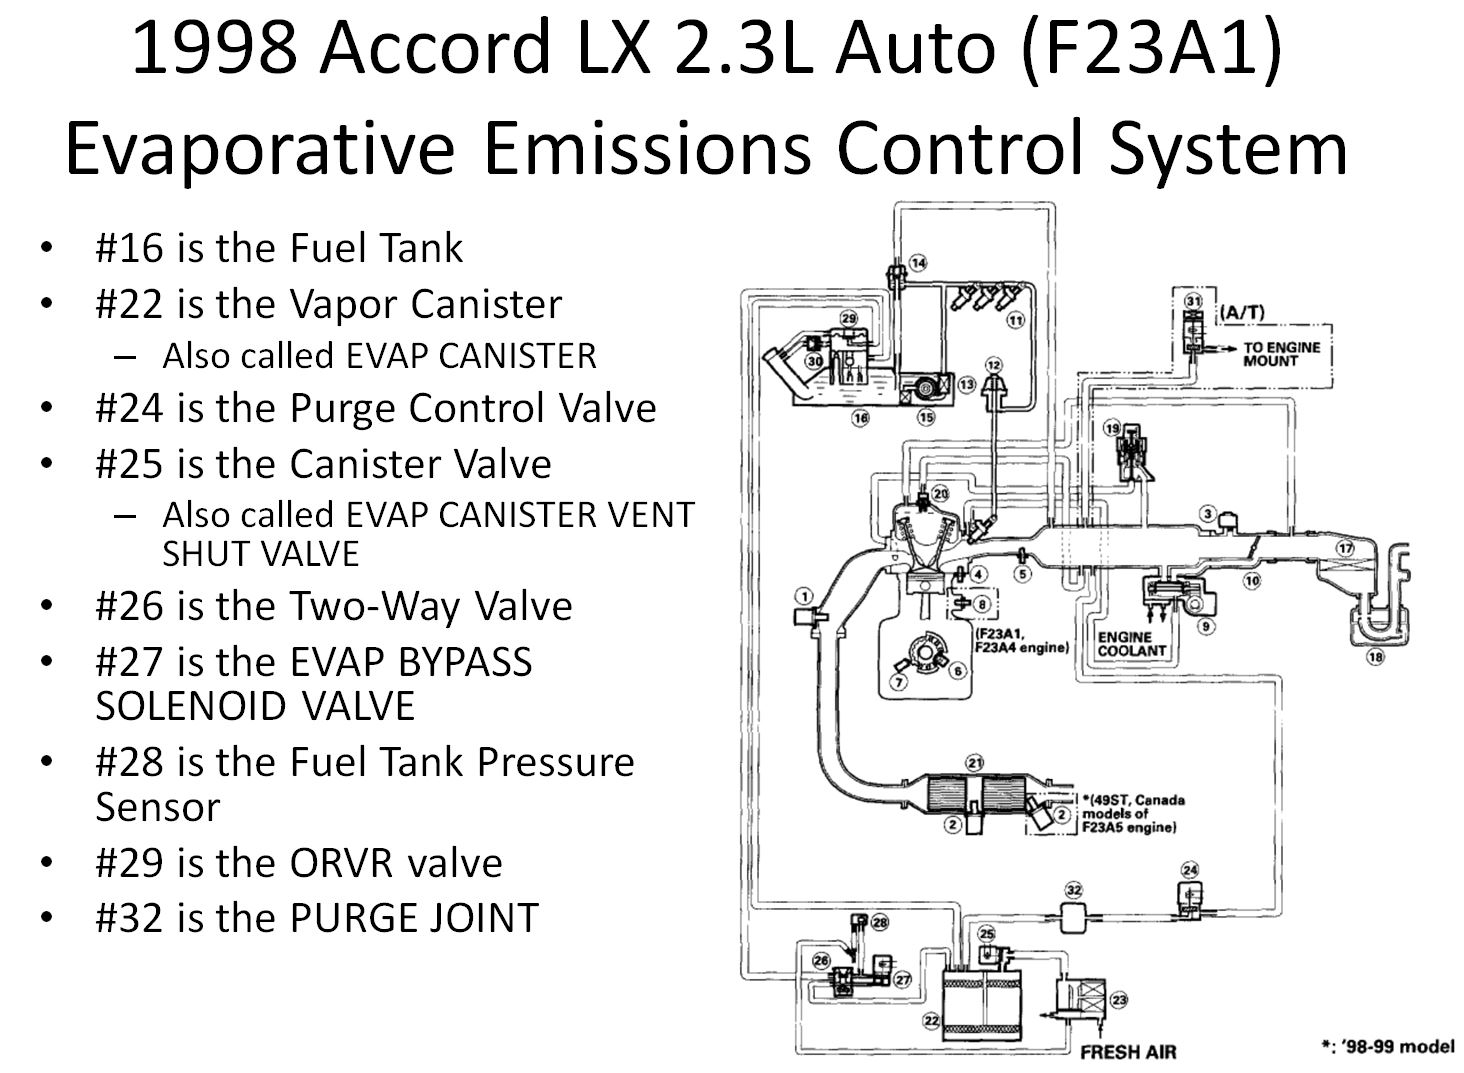
For example, if I want to test the purge control valve (#24), I think I can do that with the ignition off. I can disconnect the vacuum hose from the manifold that leads to the purge control valve. I can connect the hand vacuum pump to the hose and create a vacuum. I would expect the purge control valve to be closed since the ignition is off, and I would expect the vacuum to hold unless the purge control valve leaks. I am not sure how much of a vacuum I will need, but assume I can figure that out. I think that if the vacuum holds for two minutes or so, the purge control valve does not leak. I would also want to be sure that the purge control valve opens when it is supposed to open. If I disconnect the two pin connector from the purge control valve solenoid, I should be able to test it by applying power from a 9 volt battery to the solenoid. I do need to figure out which side is positive (+) and which is negative (-) on the solenoid. If I find the vacuum holding at some level just before I apply power, I would expect the vacuum to immediately drop when the 9 volt battery power is correctly applied to the solenoid. I can do that test without even looking under the car. If the purge control valve is good, I would reconnect the vacuum hose between the purge control valve and the intake manifold. I would also reconnect the two pin connector to the purge control valve solenoid to make sure I put things back the way they started.

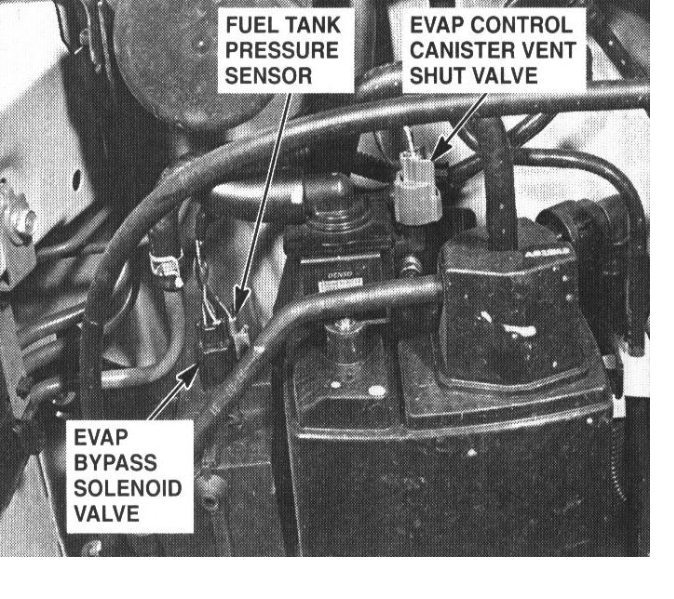
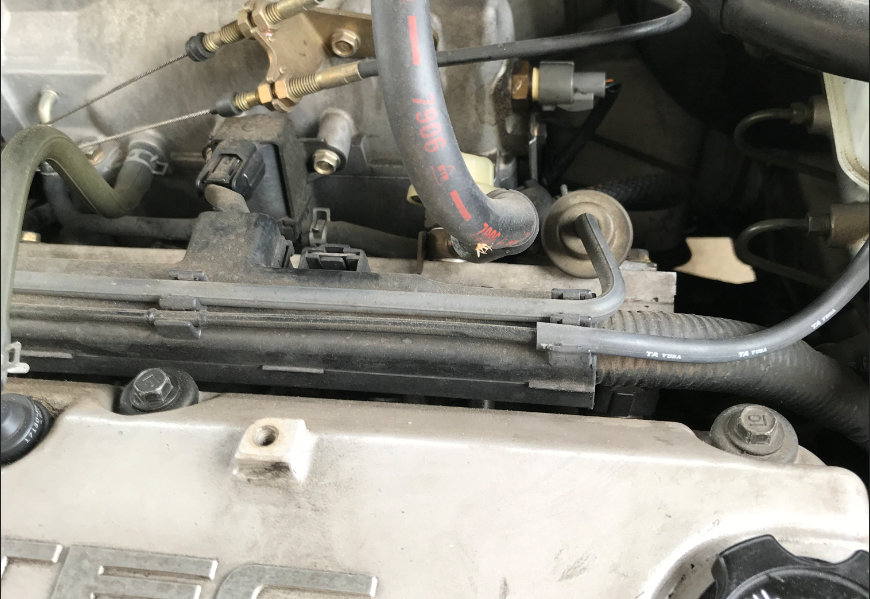
I understand that manifold vacuum pressure (perhaps negative pressure) gets to the EVAP canister via the purge control valve. If the purge control valve appears to be doing its job, I could then move testing to the other side of the purge control valve by disconnecting the vacuum hose from the purge control valve that leads to the EVAP canister. I would connect the hand vacuum pump to the open end of that vacuum hose, where I disconnected it from the purge control valve. This places the vacuum suction past the purge control valve, but for the rest of the system suction would appear to be coming from the intake manifold. If I try to create a vacuum, it should fail because, as I understand it, the EVAP canister vent shut valve is normally open. Doing that test shows that either the EVAP canister vent valve does its job when no power is applied to its solenoid, or some other leak is occurring.

The EVAP canister vent valve closes when power is applied to the EVAP canister vent shut valve solenoid. If I disconnect the two pin connector from the EVAP bypass solenoid valve, I could apply power from a 9 volt battery to that solenoid. I think I should be able to create and hold a vacuum in this condition, because the rest of the system appears to be a closed system. However, my supposedly closed system seems to have a leak, which means it is not truly closed. I could then try clamping shut the all of the hoses that connect to the EVAP canister except the line that leads back towards the purge control valve (or hand vacuum pump when configured for this test). With the 9 volt battery attached to the EVAP canister vent shut valve solenoid, I should be able to create a vacuum with the hand pump. If I cannot create a vacuum, I have a leak in my canister (#22), a leak in my evap canister vent shut valve (#25), or a leak in the vacuum hose or purge joint (#32) on the route back to the purge control valve (#24). I can test the vacuum hose part by placing a clamp on that hose near where it attaches to the canister and trying to create a vacuum using the hand pump.

If the vacuum hose is good, that indicates that either the (#22) canister or (#25) vent shut valve leaks. In that case, I probably need to remove the canister to try to isolate which has failed. At that point, I might want to replace both unless I can figure out how to test the vent shut valve by itself. Or as you suggested quite some time ago, I could plug holes in the canister and check it for leaks, but I would have to remove the vent shut valve first. After replacing either or both, I would clear the code, put things back, and test drive until I get through at least a tank and a half of gas to see if the p1456 comes back.

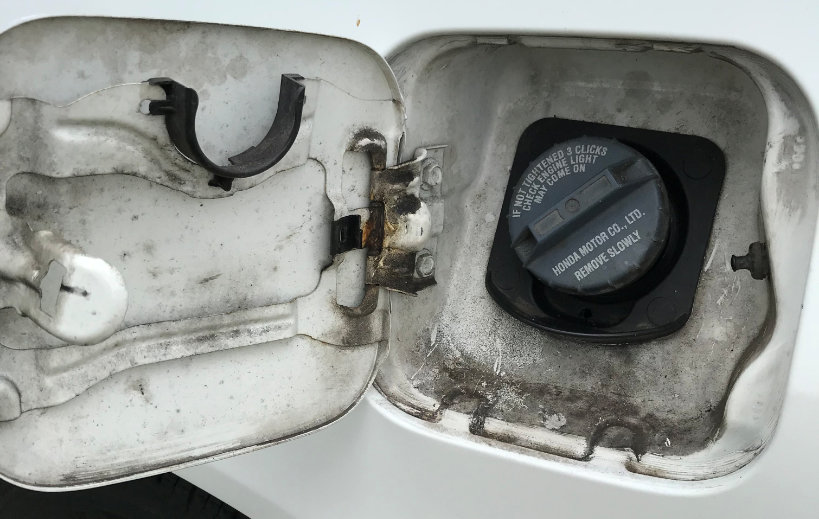
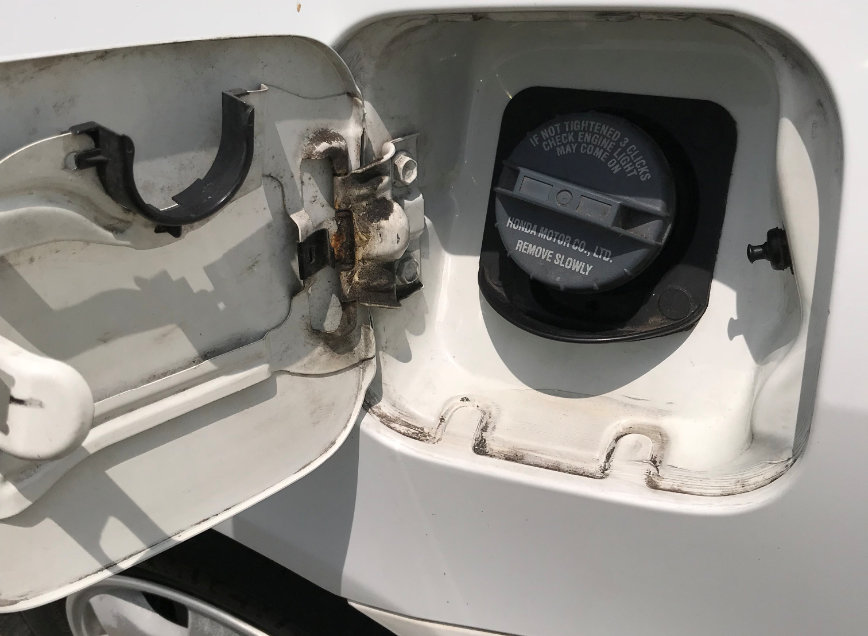
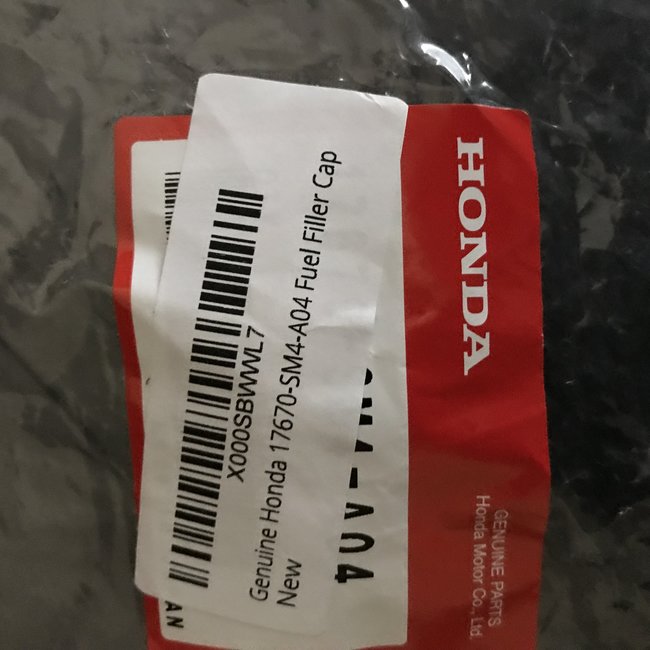
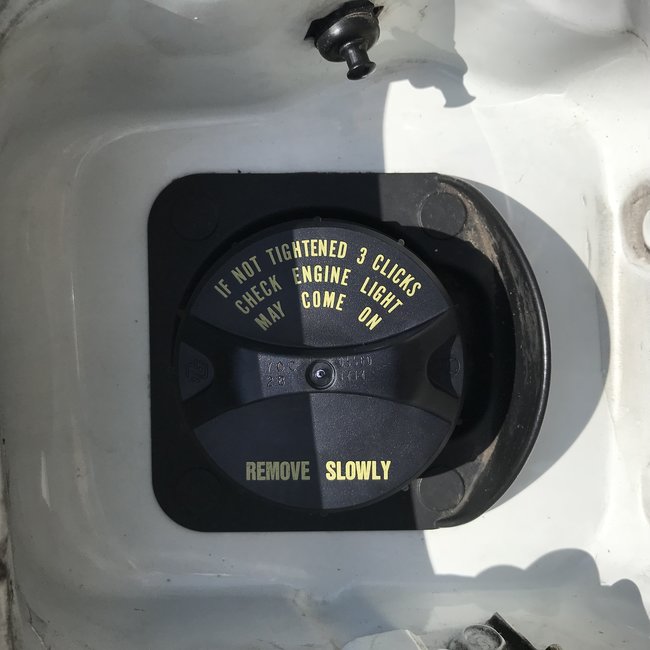
If instead the above tests indicate working equipment, I need to figure out how to test the (#26) two-way valve, the (#27) eval bypass solenoid valve, and the (#29) ORVR valve. I suppose my new gas cap could also be at fault, which would be a real shame after all of this! I do not quite understand how the two-way valve (#26) is supposed to operate. I think vacuum applied to one of its connections causes it to either connect to the canister or bypass it. Is that correct? What does the eval bypass solenoid valve (#27) do?

2018-07-23 19:40:52
Jul 23, 2018 at 7:40 PM
Avatar
STRAILER
  • CERTIFIED EXPERT
  • 53,854 POSTS
You can use 12 volts from the battery and a couple of wire leads to test the solenoids. It seems like we are making this harder than it needs to be. The system is leaking somewhere. Have you removed the canister and plugged it with pressure and held it under water to see if it leaks? Do a visal on the hoses and manually check the control valves using 12 volts, gas cap good?
Jul 24, 2018 at 10:58 AM
Avatar
GORDON2
  • MEMBER
  • 76 POSTS
I am acquiring some parts and tools to work on this. I went to a junk yard and bought a canister, purge valve and a two-way valve. That gave me a chance to figure out how the parts are attached to the car without risk of damaging my own car. I also ordered a vacuum pump and some jack stands online. I do not have everything I need (including time to do the work) so I have been driving the car with the check engine/malfunction indicator light (MIL) lit.

Today the MIL went out while driving. My OBD II code reader shows that I still have a stored code (P1456) and a pending code (P1456). It also indicates that the MIL is off. Does this suggest an intermittent problem or perhaps a small/marginal leak? Why would the light go out?

I noticed that the light went out on my way to work in the morning (cold engine warming up) at roughly the same distance driven on the same route when the light most recently came on. It also happens with the tank around three quarters full. It seems that drive satisfies the conditions for the purge and test activity to occur.
Aug 1, 2018 at 6:13 PM
Avatar
STRAILER
  • CERTIFIED EXPERT
  • 53,854 POSTS
The code is pending so it seems like the problem is still there, a small leak. Go ahead and do some testing all around the system to see what is leaking it is like finding a air leak in a tire take things apart and apply a small amount of pressure to see what it leaking. Use soapy water works really well.
Aug 2, 2018 at 8:56 AM
Avatar
GORDON2
  • MEMBER
  • 76 POSTS
I still have the stored code, but the pending code cleared itself. I am thinking that the stored code will not clear by itself, but will stay set until a scan tool is used to clear it. That would allow someone to determine that it has happened in the past, and clear it to see if it comes back again.
Aug 4, 2018 at 11:52 AM
Avatar
STRAILER
  • CERTIFIED EXPERT
  • 53,854 POSTS
Good call, lets try clearing the codes and see what happens.

https://youtu.be/ahK_eucFi-k

Please let us know what happens.
Aug 4, 2018 at 12:33 PM
Avatar
GORDON2
  • MEMBER
  • 76 POSTS
I drove the car twenty miles today (two trips, ten miles each). I have a pending P1456. It seems the problem is intermittent. I will see where things are next weekend.
Aug 5, 2018 at 11:38 AM
Avatar
STRAILER
  • CERTIFIED EXPERT
  • 53,854 POSTS
Okay.
Aug 5, 2018 at 4:08 PM
Avatar
GORDON2
  • MEMBER
  • 76 POSTS
I removed the canister, then plugged all the canister openings except the one labeled 'purge', where engine vacuum is applied when the engine is running. I attached a hand powered vacuum pump to the purge opening and created a vacuum. The canister held 15-inHg vacuum for several (at least ten) minutes. I removed the rubber plug from the canister vent valve and vacuum was immediately lost (dropped to 0-inHg). This indicates that the ‘normally open’ valve was open as expected. I put the plug back in and restored the 15-inHg vacuum. This time I applied 12 volts to close the canister vent shut valve. Then I removed the rubber plug from the canister vent valve and the vacuum dropped to around 8-inHg and held there. I removed the 12 volts and the vacuum again dropped to 0-inHg. I repeated the test with the 12 volts applied and got the same result. How much vacuum should the canister vent valve be able to hold?
Aug 25, 2018 at 11:45 AM
Avatar
GORDON2
  • MEMBER
  • 76 POSTS
I disconnected the vacuum line from the canister that goes to the two way valve. I connected a hand powered vacuum pump to that line. I disconnected the tube from the canister that leads back to the ORVR valve and put a rubber plug in that tube. I applied 12V to the two-way valve (evap bypass solenoid). I connected a voltage meter to the fuel tank pressure sensor and noted that with the gas cap removed I have 2.51V. After tightening the gas cap three clicks, I created sufficient vacuum to get the volt meter to read 2.10V. I let that persist for a few minutes. I then loosened the gas cap, and the volt meter went back to 2.51V (pretty timely response, sensitive to how quickly the cap is loosened). I believe this confirms that the gas cap does its job.
Aug 25, 2018 at 12:29 PM
Avatar
GORDON2
  • MEMBER
  • 76 POSTS
I tried but was unable to disconnect the vacuum line from the intake manifold that goes to the canister purge control valve. Instead, I disconnected the vacuum line from the canister that goes to the canister purge control valve. I applied vacuum to that line. Note: that this applies vacuum on the 'wrong side' of the purge control valve. The vacuum held for several minutes. I momentarily applied 12 volts to the canister purge control valve solenoid and the vacuum was lost. I believe this demonstrates that (1) the canister purge control valve holds manifold vacuum when it should, and (2) it allows manifold vacuum pressure to pass through when it should. Note that the canister purge control valve solenoid operates with a duty cycle, so power should not be applied continuously. I rigged up a 12 volts motorcycle blinker relay so that the power would not be continuous. Only a second or so is enough to demonstrate that the solenoid opens when power is applied.
Aug 25, 2018 at 12:50 PM
Avatar
STRAILER
  • CERTIFIED EXPERT
  • 53,854 POSTS
Yes, it sounds like everything is working. I am starting to lean toward a bad PCM which can cause the issue as well. I would try a used unit and plug it in to see what happens. Here is the location.

Check out the diagrams (below). Please let us know what you find. We are interested to see what it is.

Cheers, Ken
Aug 25, 2018 at 1:22 PM
Avatar
GORDON2
  • MEMBER
  • 76 POSTS
Thank you for the quick reply.

Is the 8-inHg held by the canister vent valve adequate? I was thinking that was a likely candidate for needing replacement.

I was also thinking I still needed to determine whether either the two-way valve or the ORVR valve was problematic. Would you rule those out already?

I would like to run the vacuum/valves/etc., to ground before trying to figure out the PCM business. But if that is where the problem is, I suppose I will end up there.
Aug 25, 2018 at 1:48 PM
Avatar
GORDON2
  • MEMBER
  • 76 POSTS
It could in fact be the PCM/ECU that is causing the problem, but fixing that may cross the line of how much effort and money is worth putting into this car. I say that because I gather that I need to get a dealer to program a new PCM/ECU.

For the tests I performed earlier (8/25/18 posts), in cases where I applied 12V, I used an external power supply rather than the car battery. I also never put the key in the ignition, and therefore could not have put the key in the "on" position during those tests. The PCM/ECU was not involved. I also used an external power supply for the 5V input applied to the Fuel Tank Pressure (FTP) sensor, where I measured 2.51V sensor output when the fuel cap was removed. The problem could be in one of the harnesses on the vehicle. It could even be the case that re-seating the harness connectors after the testing fixed a poor contact condition.

Other observations: (1) The Malfunction Indicator Light (MIL) is not lit and has not been lit for a while. (2) After putting the canister back on and driving the car, I believe I could smell fuel vapor, which makes me wonder if I caused some harm. I will simply monitor these conditions going forward.
Aug 26, 2018 at 7:37 AM
Avatar
STRAILER
  • CERTIFIED EXPERT
  • 53,854 POSTS
It does sounds like the canister is leaking slightly, also if you get a used PCM you will not need to program it. Check all electrical and hoses then go for the PCM. Gas cap is good correct?
Aug 26, 2018 at 10:24 AM