OK Ready? You asked for it! Here's all info on testing the blower problem:
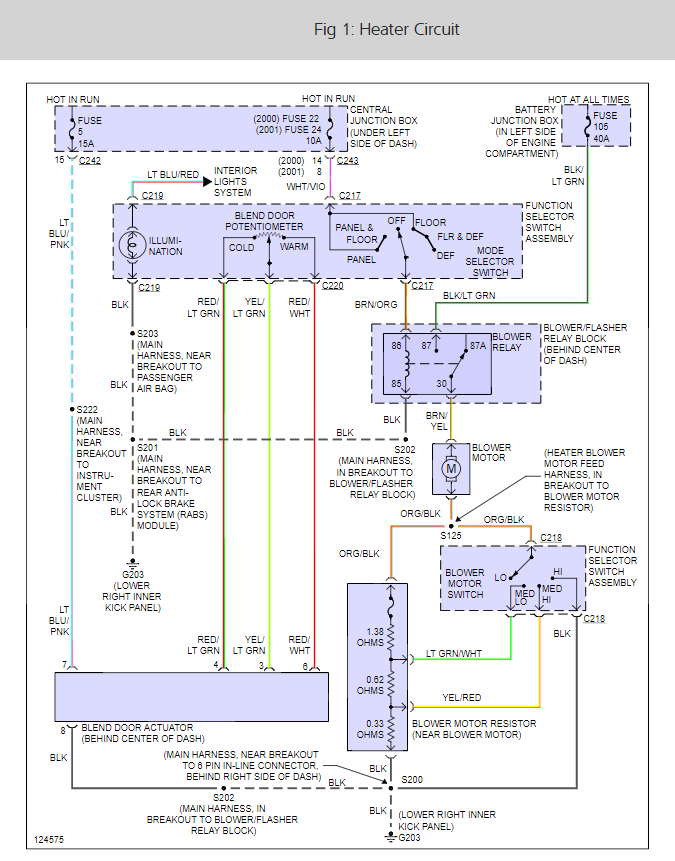
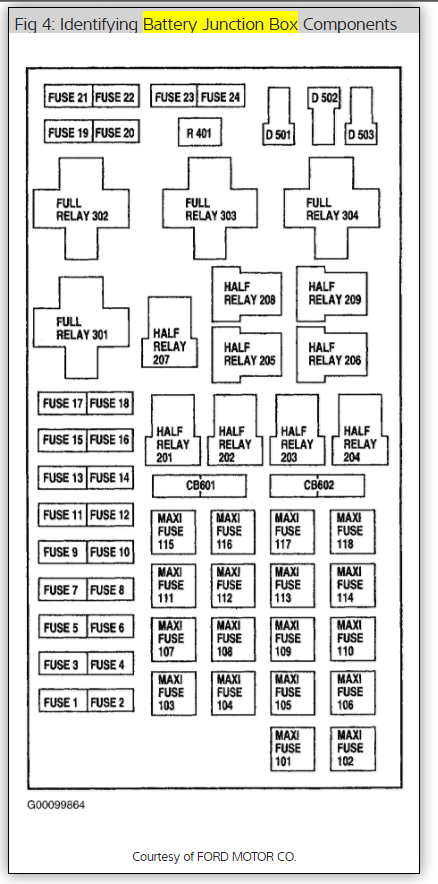
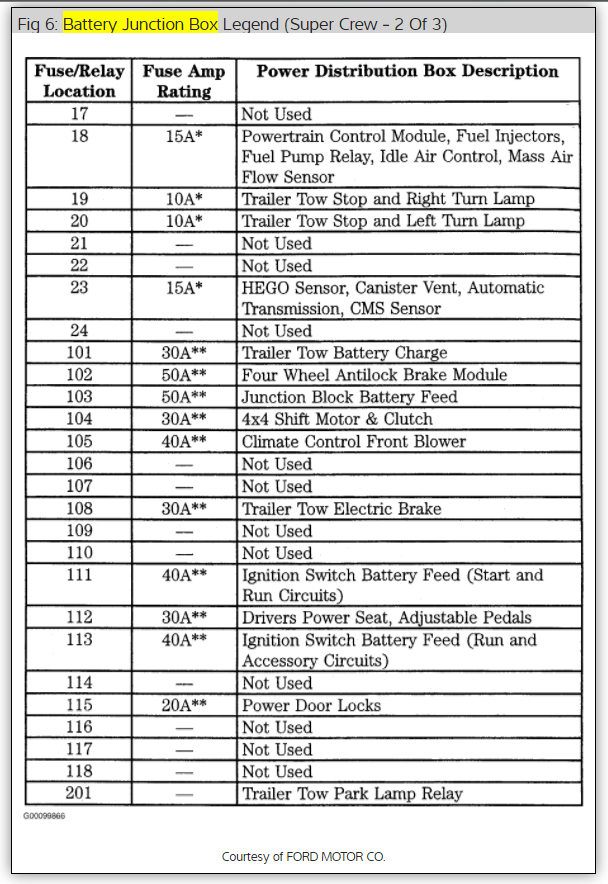
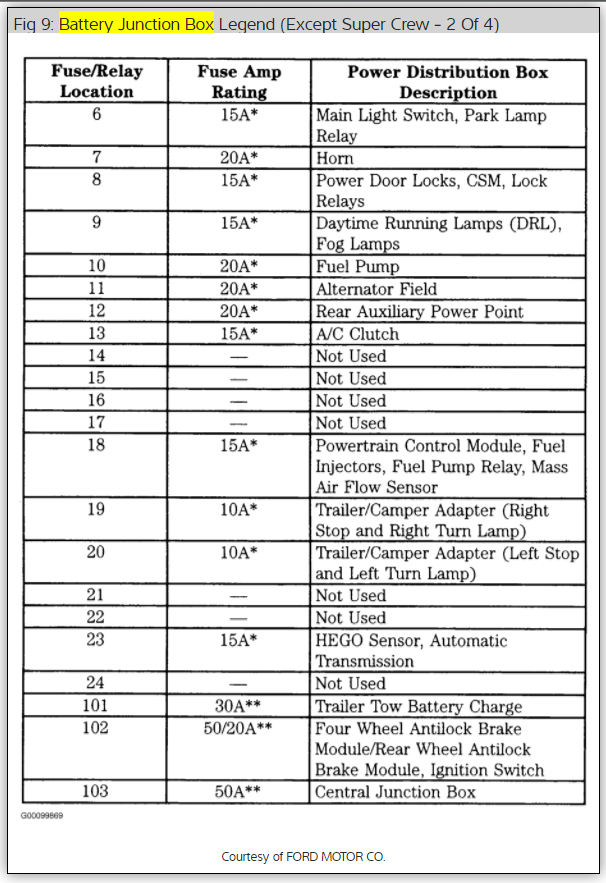
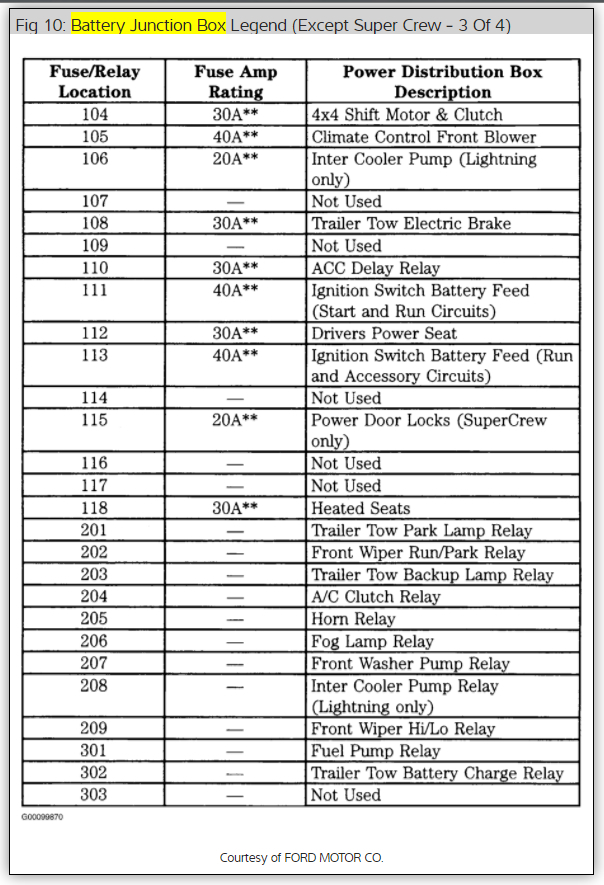
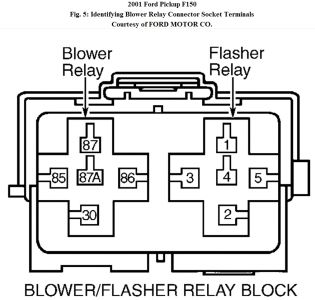
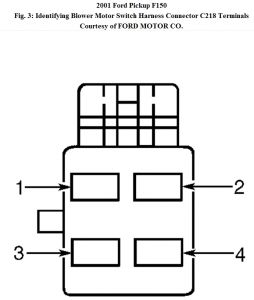
TEST B: BLOWER MOTOR INOPERATIVE 1. Turn ignition off. Check Central Junction Box (CJB) fuse No. 22 (10-amp). If fuse is okay, go to step 3 . If fuse is blown, go to next step. 2. Remove A/C blower relay from blower/flasher relay block (located behind center of instrument panel). Disconnect function selector switch 4-pin harness connector C217. Measure resistance between ground and function selector switch harness connector C217 terminal No. 1 (Brown/Orange wire). See Fig. 4 . If resistance is 10 k/ohms or more, repair short to ground in White/Violet wire between function selector switch and CJB. See WIRING DIAGRAMS . 3. Check Battery Junction Box (BJB) fuse No. 105 (40-amp). If fuse is blown, go to next step. If fuse is okay, go to step 7 . 4. Disconnect blower motor 2-pin harness connector C190. Turn ignition switch to RUN position. Measure resistance between ground and blower motor harness connector C190 terminal No. 2 (Brown/Yellow wire) while moving function selector switch through all positions. See Fig. 2 . If resistance is 10 k/ohms or more in all positions except off, replace blower motor. If resistance is less than 10 k/ohms in all positions except off, go to next step. Fig. 4: Identifying Function Selector Switch Harness Connector C217/C220 Terminals Courtesy of FORD MOTOR CO. 5. Turn ignition off. Remove blower motor relay from blower/flasher relay box (located behind center of instrument panel). Measure resistance between ground and blower motor harness connector terminal No. 2 (Brown/Yellow wire). See Fig. 2 . If resistance is 10 k/ohms or more, go to next step. If resistance is less than 10 k/ohms, repair short to ground in Brown/Yellow wire between blower motor relay and blower motor. See WIRING DIAGRAMS . 6. Measure resistance between ground and BJB fuse No. 105 (40-amp) terminal No. 2 (Black/Light Green wire). If resistance is 10 k/ohms or more, replace A/C blower motor relay. If resistance is less than 10 k/ohms, repair short to ground in Black/Light Green wire. See WIRING DIAGRAMS . 7. Disconnect blower motor 2-pin harness connector C190. Turn ignition switch to RUN position. Measure voltage between ground and blower motor harness connector C190 terminal No. 2 (Brown/Yellow wire) while moving function selector switch through each mode. See Fig. 2 . If more than 10 volts exists in all switch positions except off, go to next step. If more than 10 volts does not exist in all switch positions except off, go to step 10 . 8. Turn ignition off. Turn blower motor switch to HI position. Measure resistance between ground and blower motor harness connector terminal No. 1 (Orange/Black wire). See Fig. 2 . If resistance is less than 10 ohms, replace blower motor. If resistance is 10 ohms or more, go to next step. 9. Disconnect blower motor resistor 4-pin harness connector C191. Measure resistance of Orange/Black wire between blower motor harness connector terminal No. 1 and blower motor resistor harness connector terminal No. 2. See Fig. 1 and Fig. 2 . If resistance is less than 5 ohms, repair Black wire between blower relay and ground. See WIRING DIAGRAMS . 10. Turn ignition off. Remove blower motor relay from blower/flasher relay block. Measure voltage between ground and blower motor relay socket terminal No. 87 (Black/Light Green wire). See Fig. 5 . If 10 volts or more exists, go to next step. If less than 10 volts exists, repair Black/Light Green wire between BJB and blower relay. See WIRING DIAGRAMS .Fig. 5: Identifying Blower Relay Connector Socket Terminals Courtesy of FORD MOTOR CO. 11. Turn ignition switch to RUN position. Measure voltage between ground and blower motor relay socket terminal No. 86 (Brown/Orange wire). See Fig. 5 . While selecting each mode on function selector switch. If 10 volts or more exists in all positions except off, go to step 14 . If 10 volts or more does not exist in all positions except off, go to next step. 12. Turn ignition off. Disconnect function selector switch 4-pin harness connector C217. Turn ignition switch to RUN position. Measure voltage between ground and function selector switch harness connector C217 terminal No. 2 (White/Violet wire). See Fig. 4 . If 10 volts or more exists, go to next step. If less than 10 volts exists, repair open in White/Violet wire between CJB and function selector switch. See WIRING DIAGRAMS . 13. Turn ignition off. Measure resistance of Brown/Orange wire between function selector switch harness connector C217 terminal No. 1 and blower motor connector socket terminal No. 86. See Fig. 4 and Fig. 5 . If resistance is less than 5 ohms, replace function selector switch. If resistance is 5 ohms or more, repair open in Brown/Orange wire. See WIRING DIAGRAMS . 14. Turn ignition off. Measure resistance between ground and blower motor relay socket terminal No. 85 (Black wire). If resistance is less than 5 ohms, go to next step. If resistance is 5 ohms or more, repair open in Black wire. 15. Disconnect blower motor 2-pin harness connector C190. Measure resistance of Brown/Yellow wire between blower motor relay socket terminal No. 30 and blower motor harness connector C190 terminal No. 2. See Fig. 2 and Fig. 5 . If resistance is less than 5 ohms, replace blower motor relay. If resistance is 5 ohms or more, repair open in Brown/Yellow wire. See WIRING DIAGRAMS .


Jun 30, 2010 at 4:19 PM