Hi, Christa,
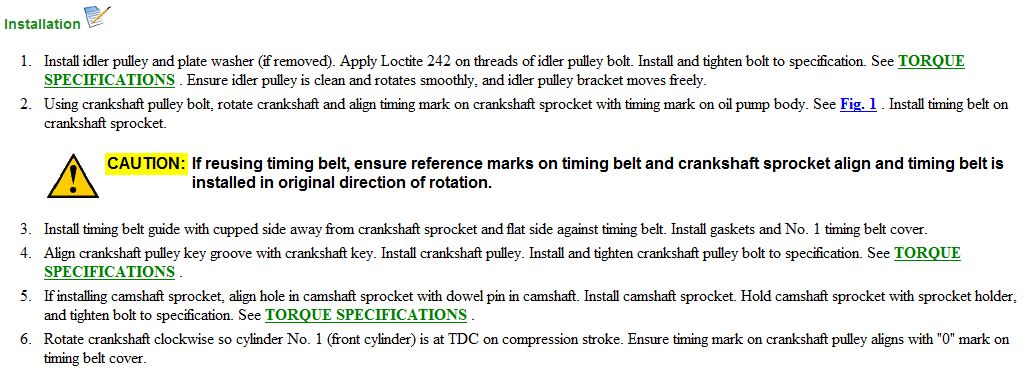
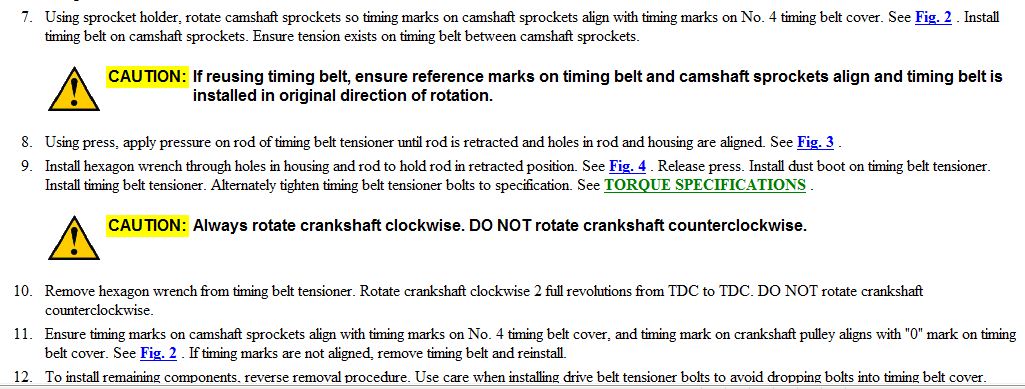
I'm not sure what happened, but we have had other posts added to yours. I have to be honest, I'm not sure I understand what you are asking. So, I decided to add all the directions for replacement with pics to help.
Here are the directions for belt replacement. The attached pics correlate with the directions.
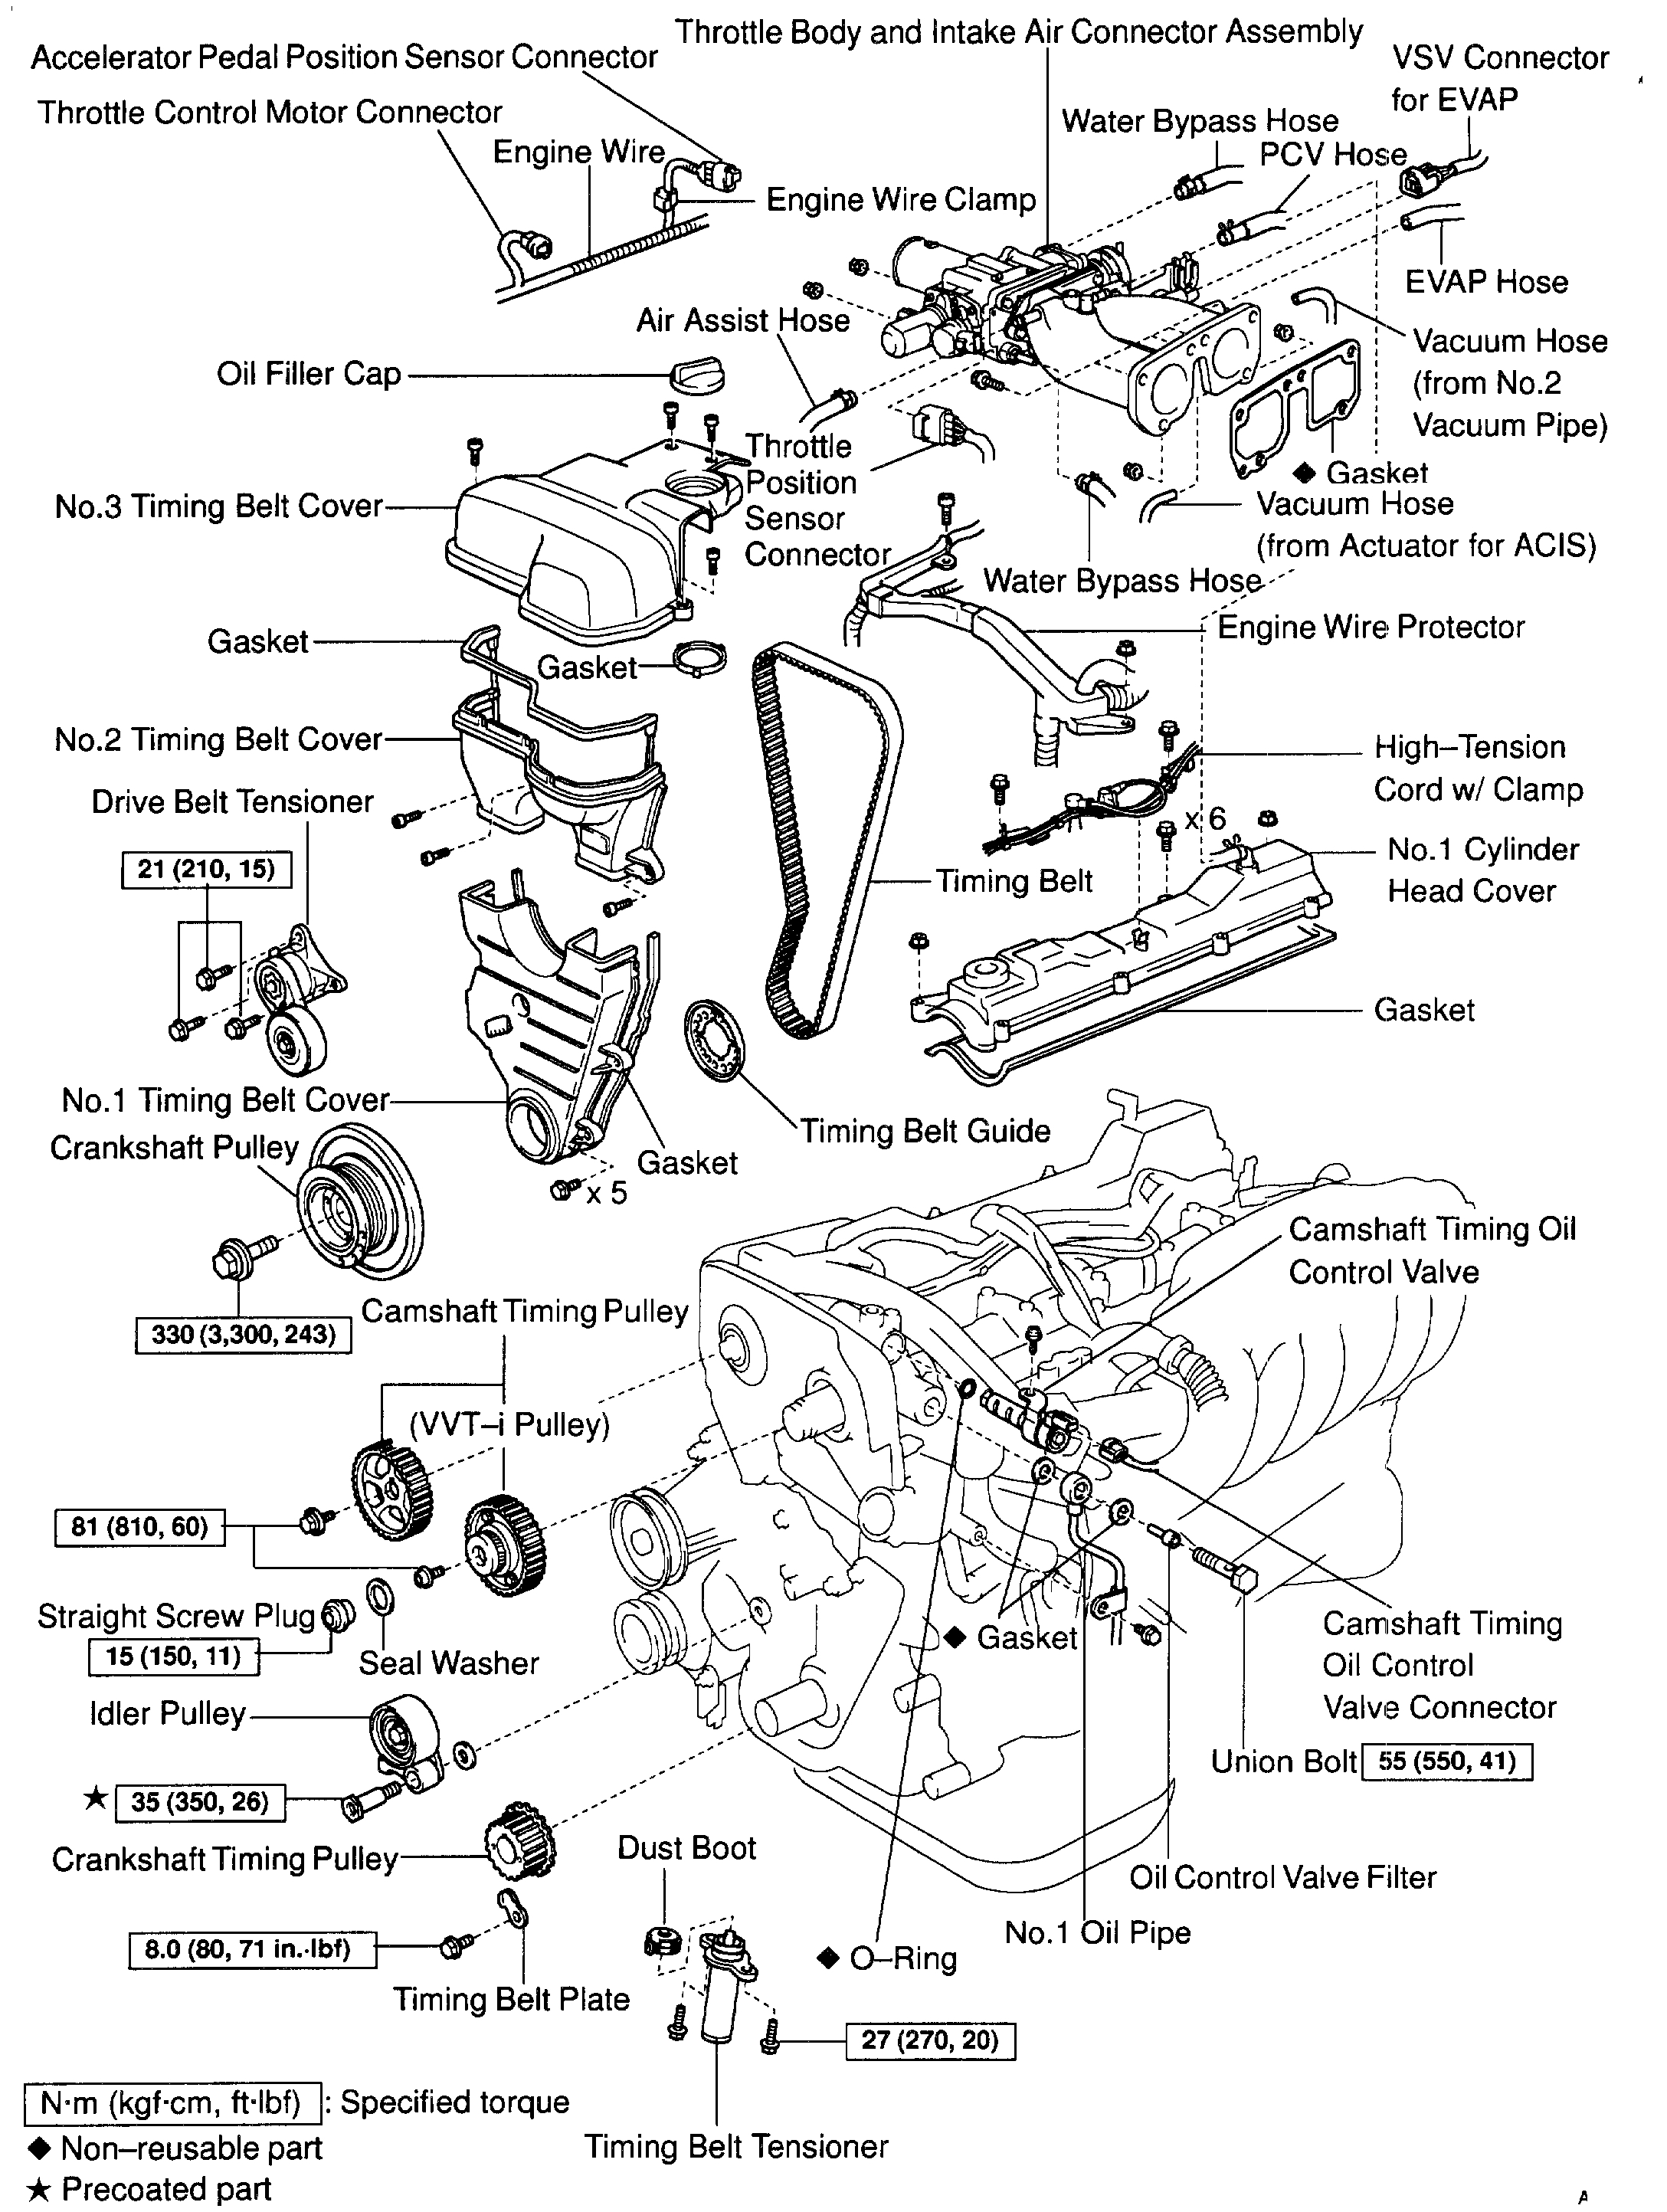
1998 Lexus GS 300 L6-3.0L (2JZ-GE)
Installation
Vehicle Engine, Cooling and Exhaust Engine Timing Components Timing Belt Service and Repair Removal and Replacement Installation
INSTALLATION
pic 1
pic 2
INSTALLATION
pic 3
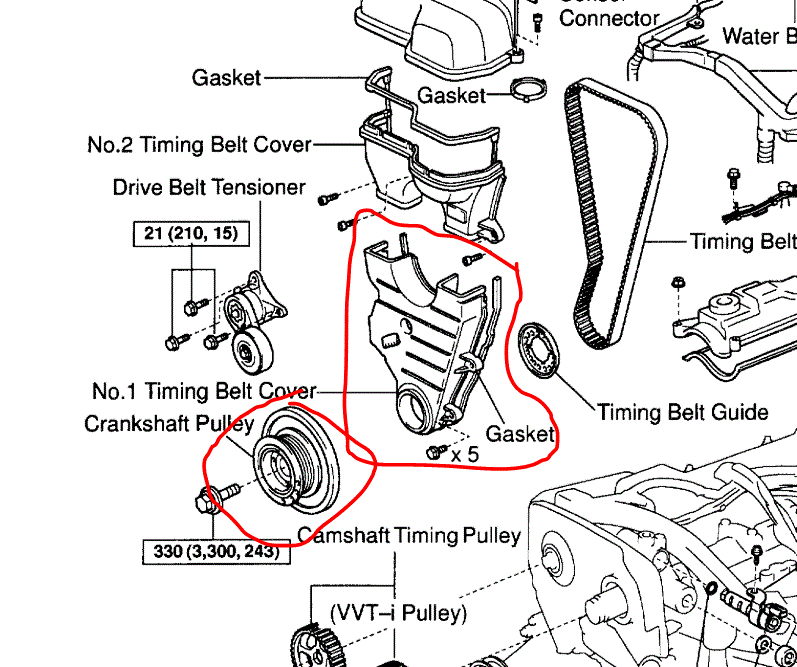
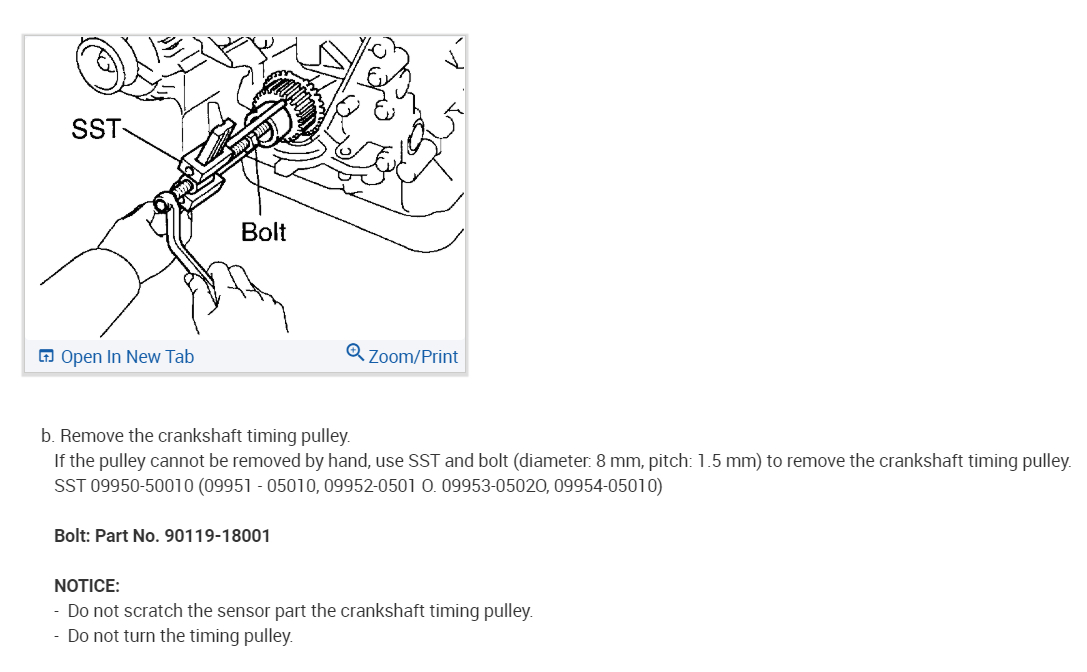
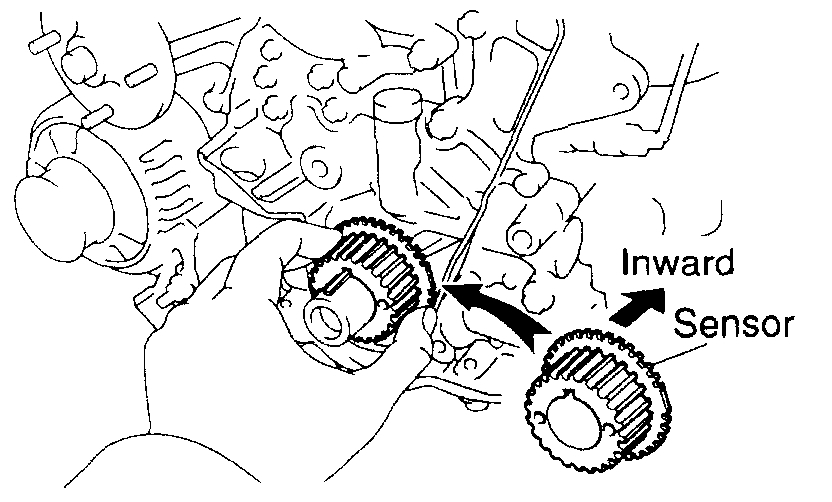
1. Install crankshaft timing pulley.
a. Align the pulley set key with the key groove of the pulley.
b. Slide on the timing pulley facing the flange side inward.
NOTICE: Do not scratch the sensor part of the crankshaft timing pulley.
pic 4
c. Install the timing belt plate with the bolt.
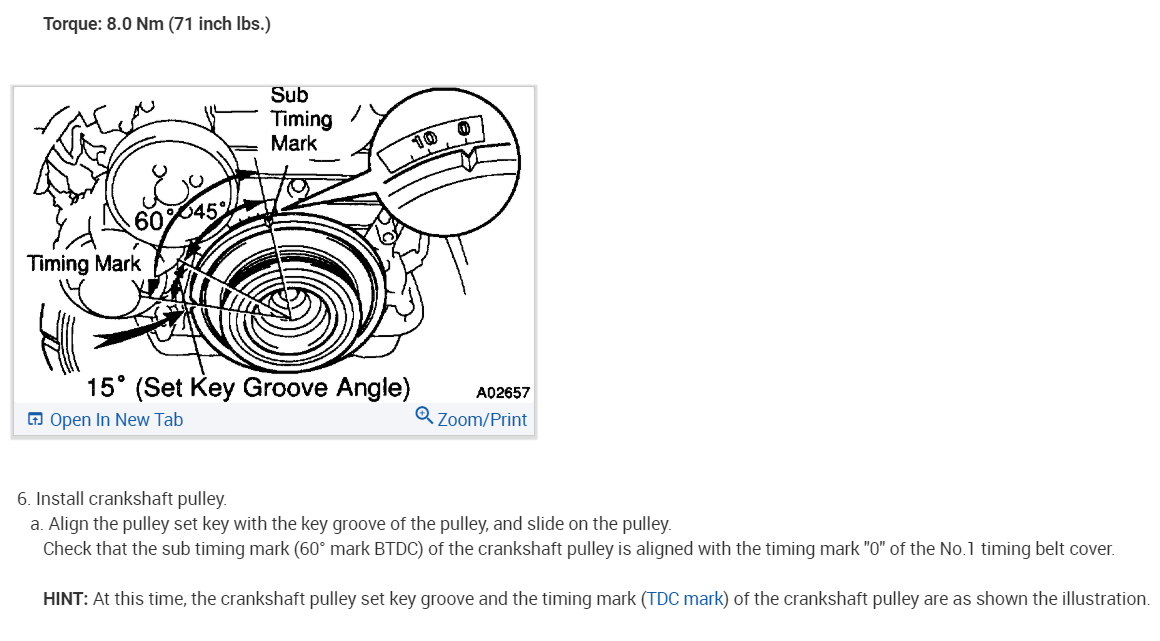
Torque: 8.0 Nm (71 inch lbs.)
pic 5
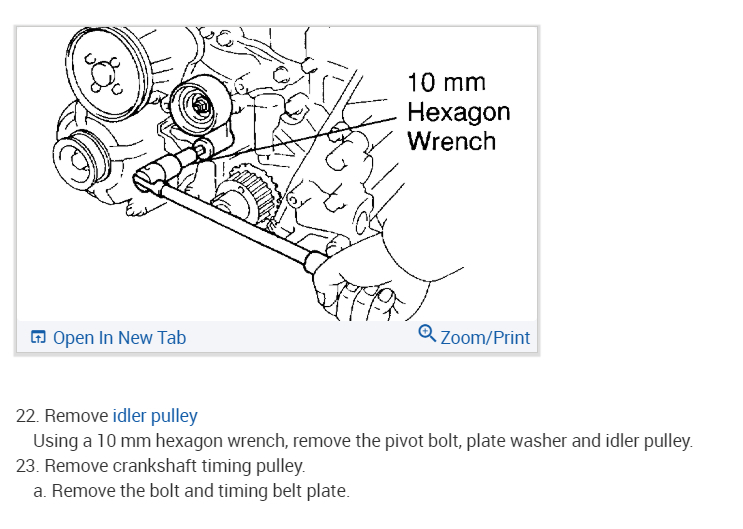
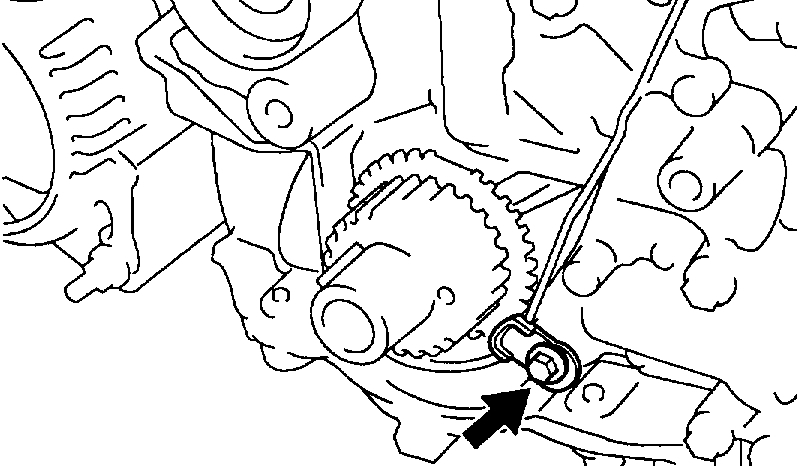
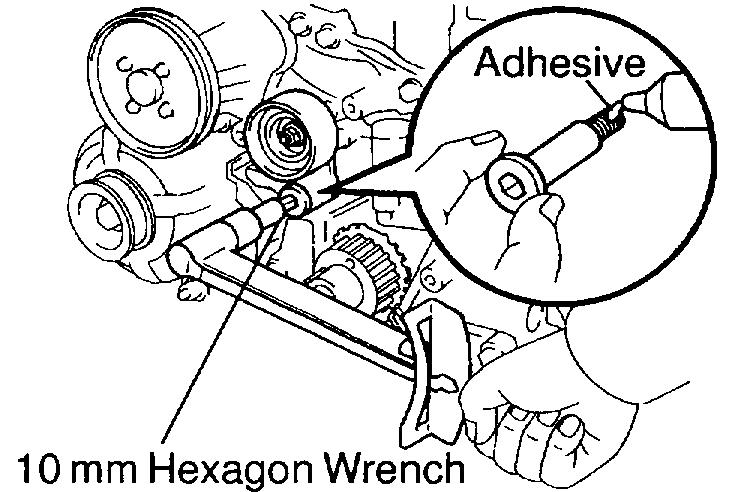
2. Install idler pulley.
a. Apply adhesive to 2 or 3 threads of the pivot bolt.
Adhesive: Part No. 08833-00080, THREE BOND 1344, LOCTITE 242 or equivalent
b. Using a 10 mm hexagon wrench, install the plate washer and pulley with the pivot bolt.
Torque: 35 Nm (26 ft. lbs.)
c. Check that the pulley bracket moves smoothly.
pic 6
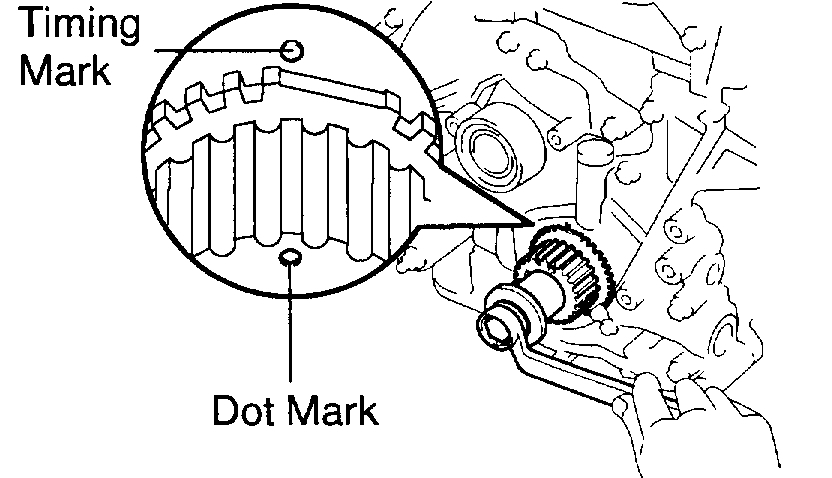
3. Temporarily install timing belt.
NOTICE: The engine should be cold.
a. Use the crankshaft pulley bolt to turn the crankshaft, and align the dot mark on the crankshaft timing pulley and the timing mark on the oil pump body.
b. Remove any oil or water on the crankshaft timing pulley and idler pulley, and keep them clean.
pic 7
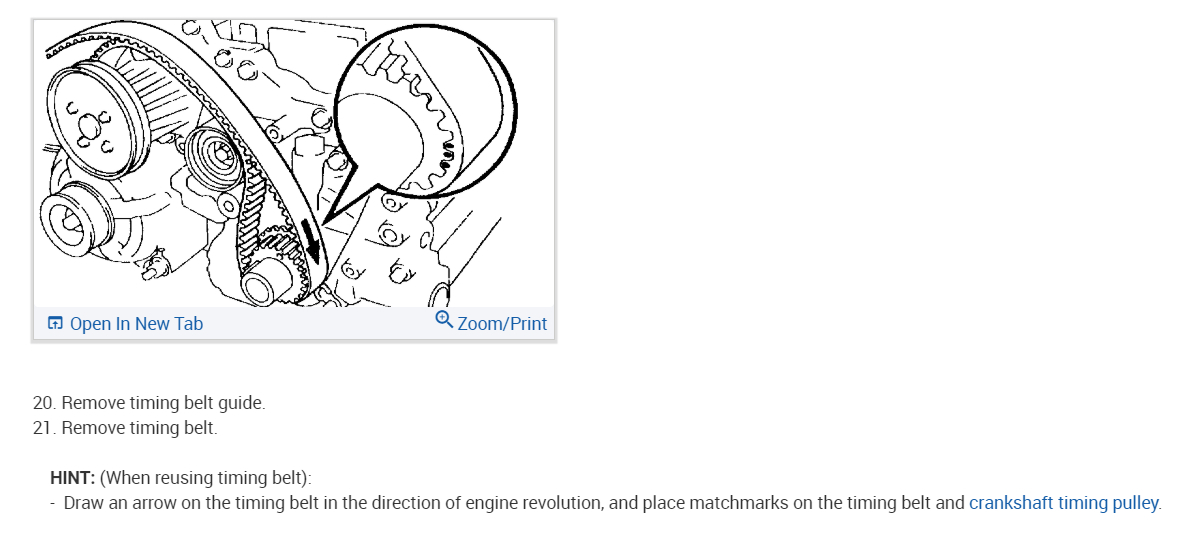
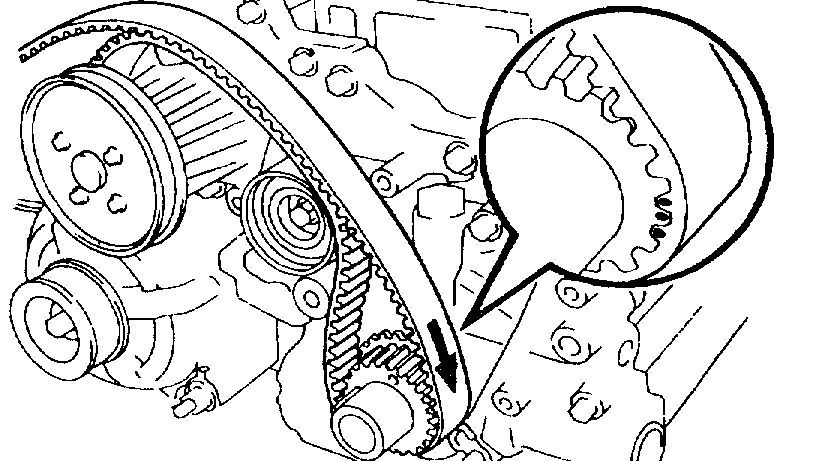
c. Install the timing belt on the crankshaft timing pulley and idler pulley.
HINT: When reusing timing belt:
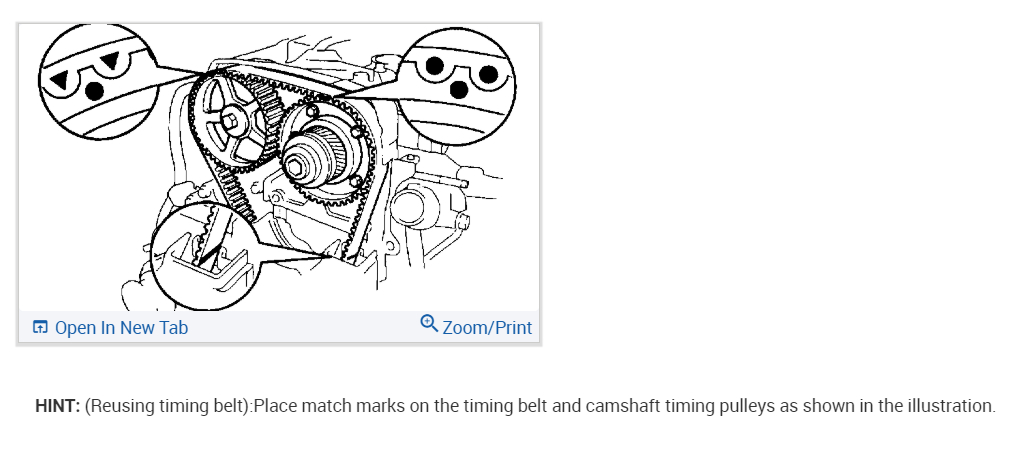
Align the matchmarks of the crankshaft timing pulley and timing belt, and install the belt with the arrow pointing in the direction of engine revolution.
pic 8
4. Install timing belt guide.
Install the guide, facing the cup side outward.
5. Install No.1 timing belt cover
a. Install the gasket to the timing belt cover.
b. Install the timing belt cover with the 5 bolts.
Torque: 8.0 Nm (71 inch lbs.)
pic 9
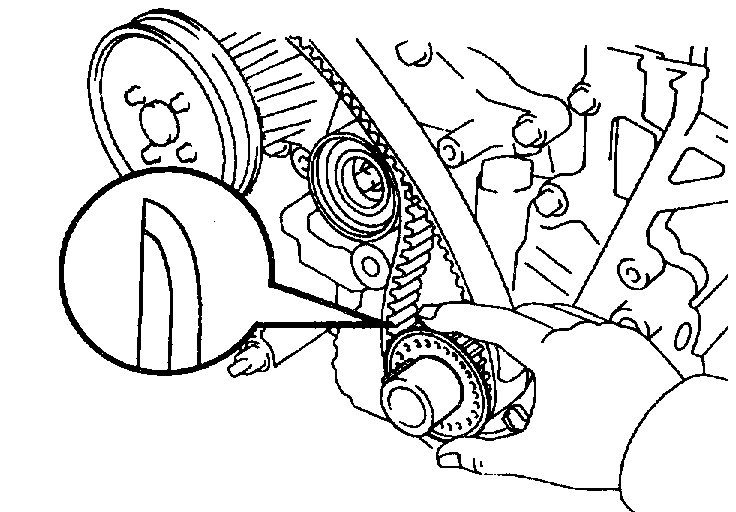
6. Install crankshaft pulley.
a. Align the pulley set key with the key groove of the pulley, and slide on the pulley.
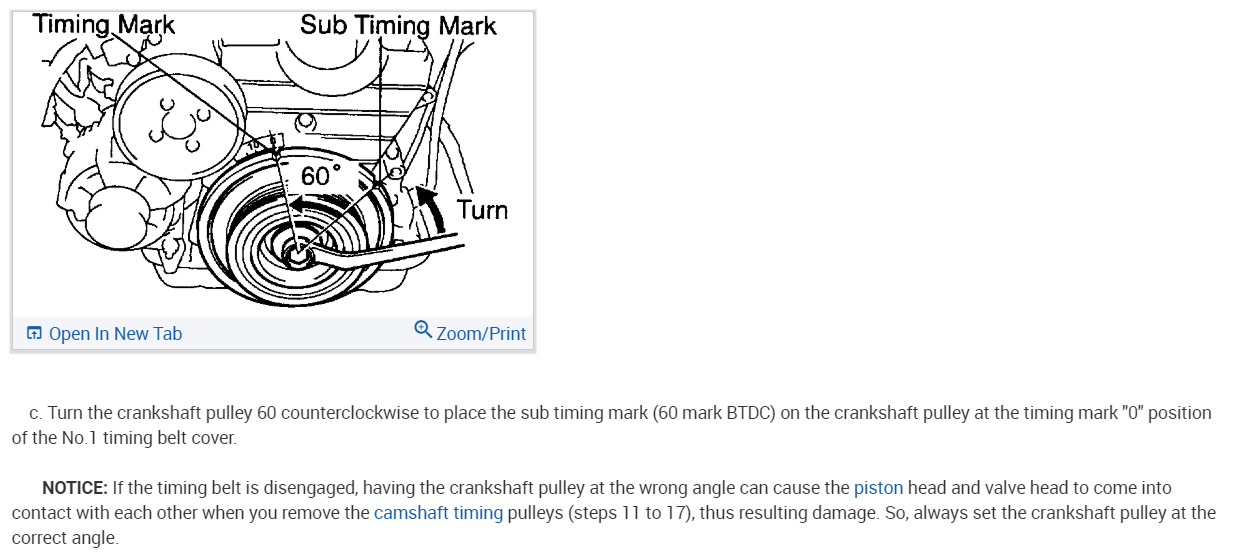
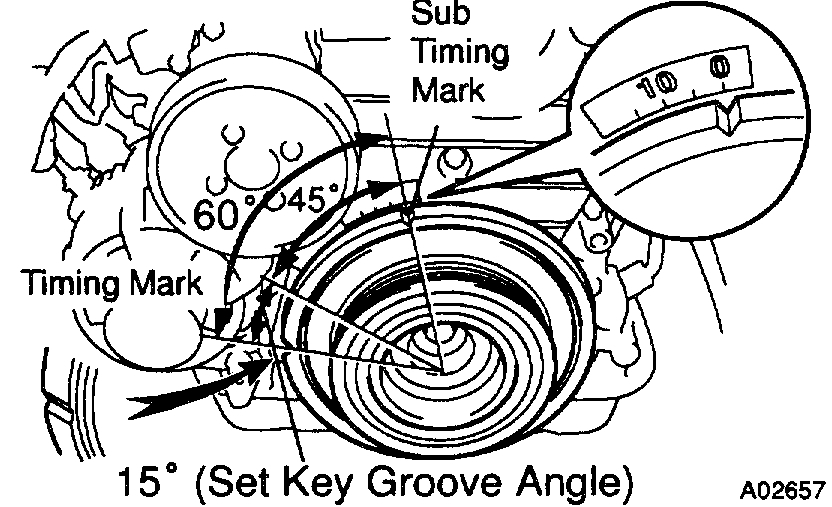
Check that the sub timing mark (60° mark BTDC) of the crankshaft pulley is aligned with the timing mark "0" of the No.1 timing belt cover.
HINT: At this time, the crankshaft pulley set key groove and the timing mark (TDC mark) of the crankshaft pulley are as shown the illustration.
pic 10
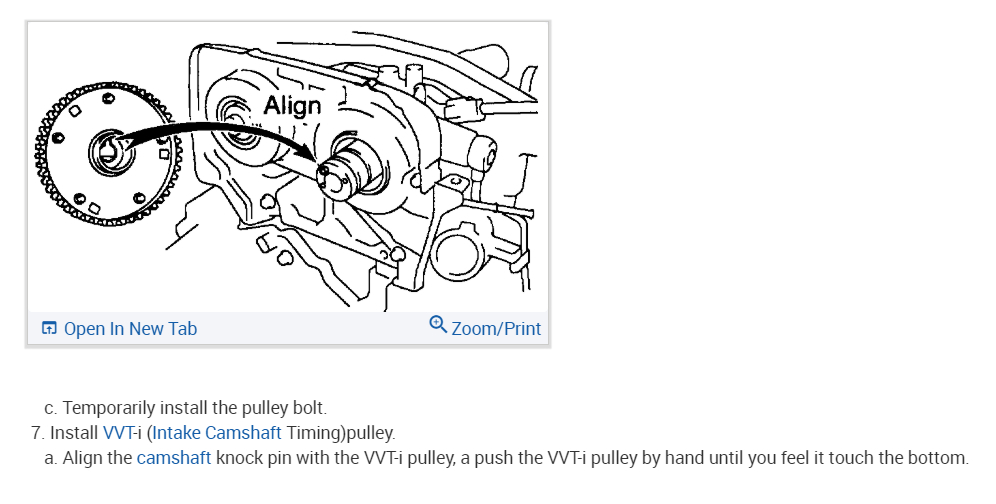
c. Temporarily install the pulley bolt.
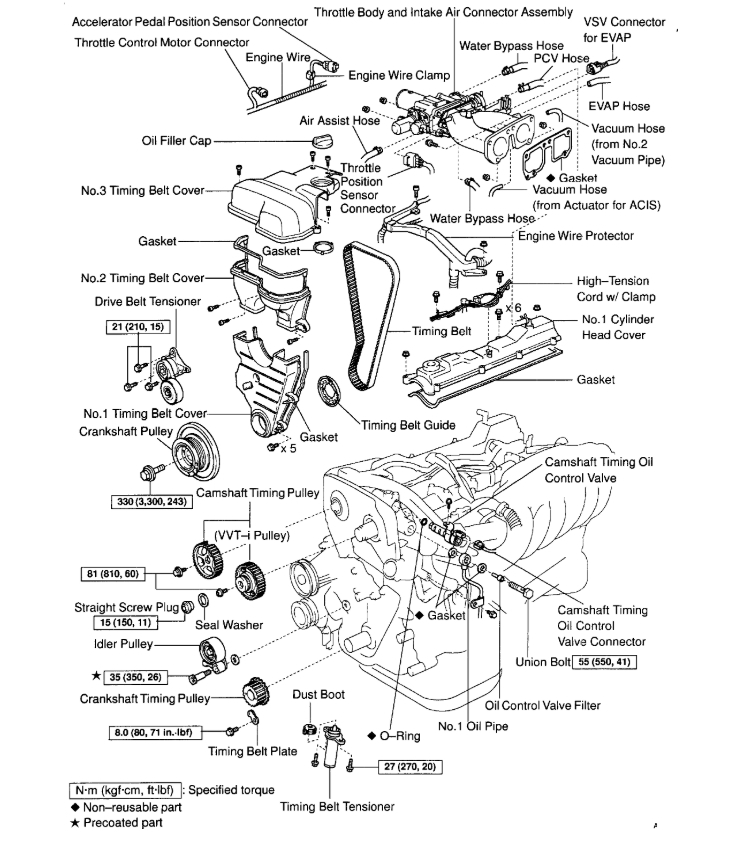
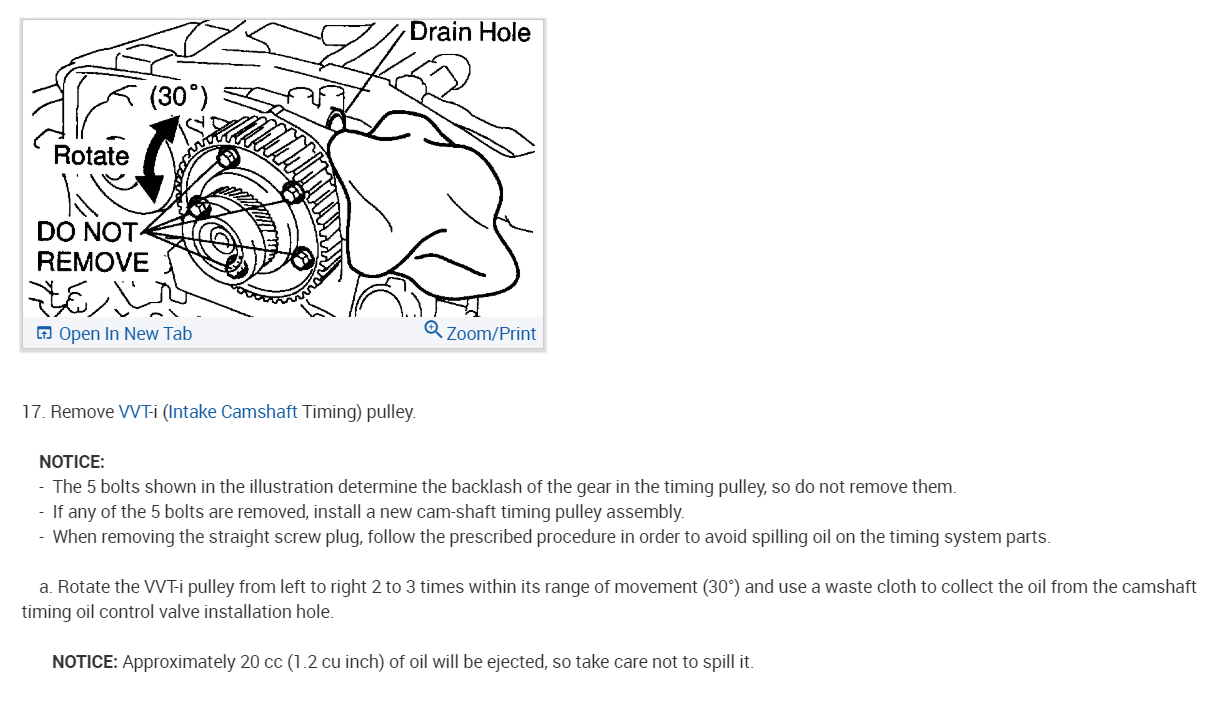
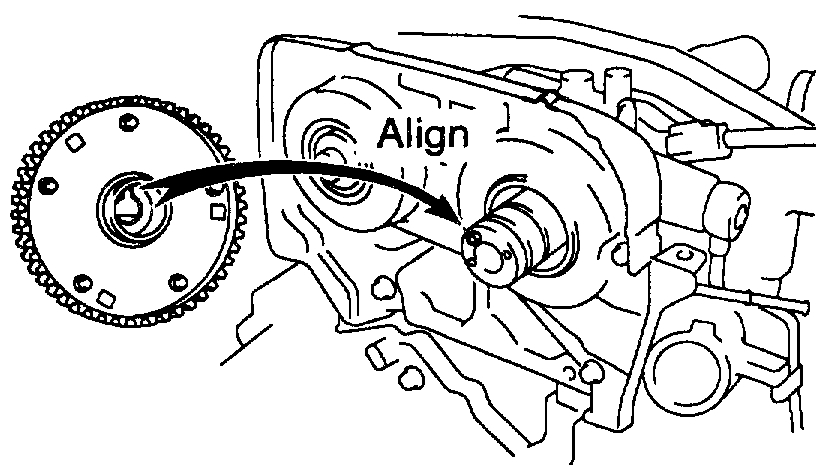
7. Install VVT-i (Intake Camshaft Timing)pulley.
a. Align the camshaft knock pin with the VVT-i pulley, a push the VVT-i pulley by hand until you feel it touch the bottom.
pic 11
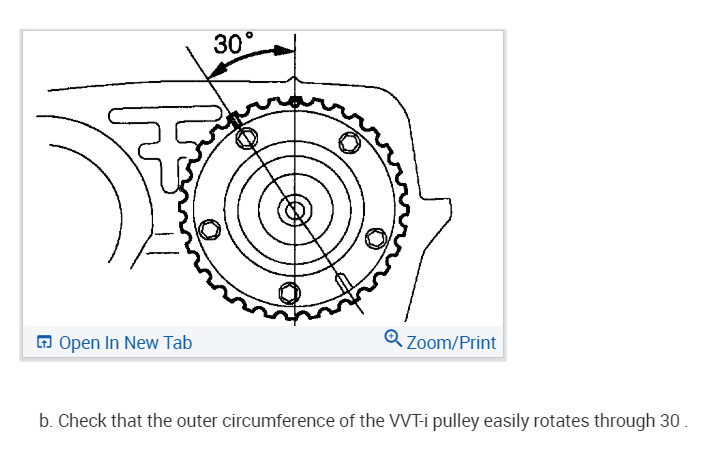
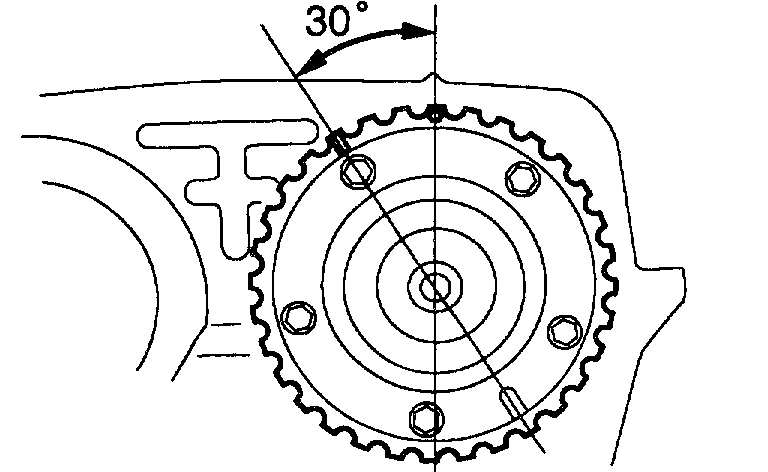
b. Check that the outer circumference of the VVT-i pulley easily rotates through 30 .
pic 12
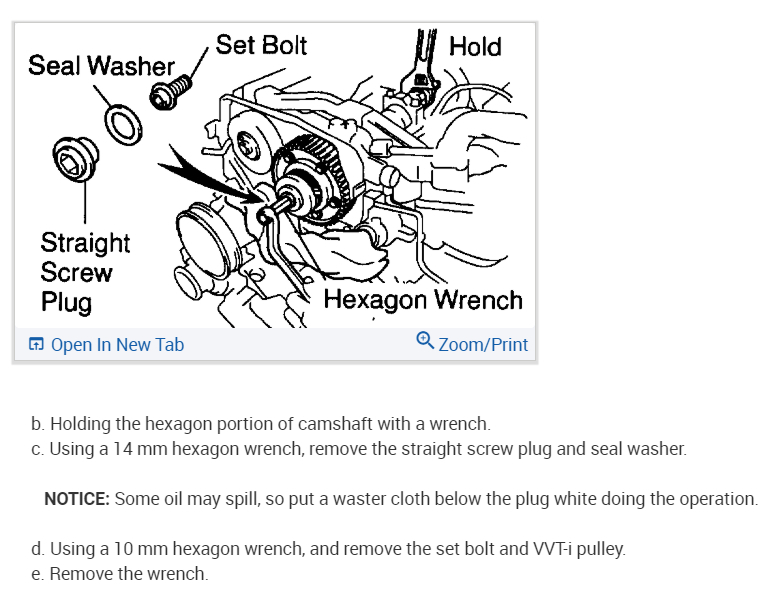
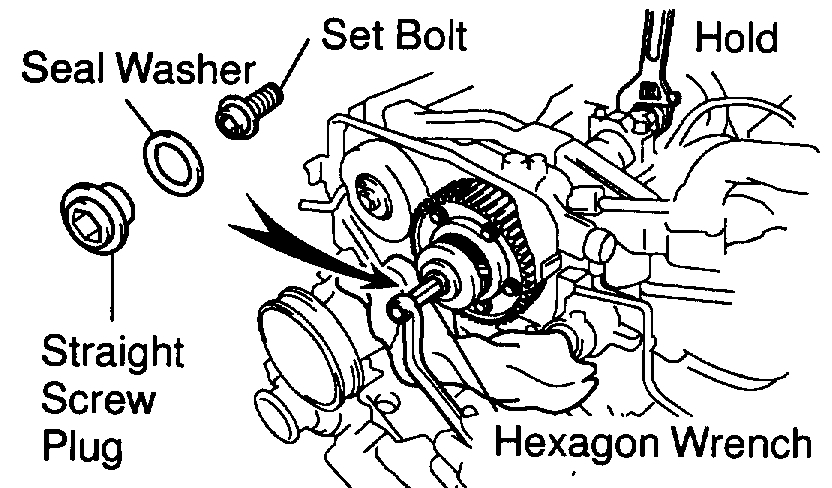
c. Holding the hexagon portion of the camshaft with a wrench.
d. Using a 10 mm hexagon wrench, and the set bolt.
Torque: 81 Nm (60 ft. lbs.)
Using a 14 mm hexagon wrench, install the straight screw plug with the seal washer to the set bolt.
Torque: 15 Nm (11 ft. lbs.)
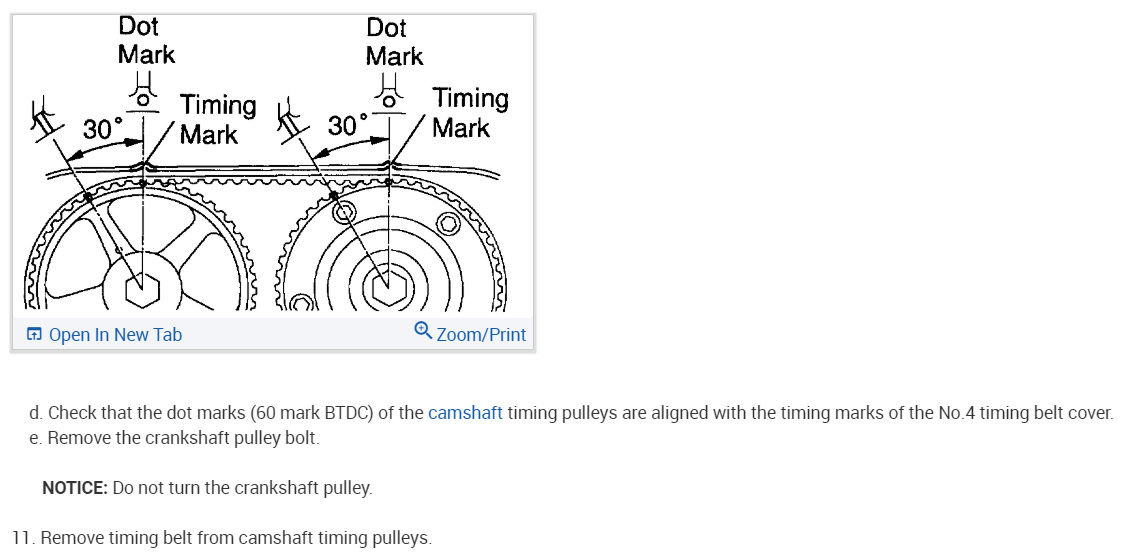
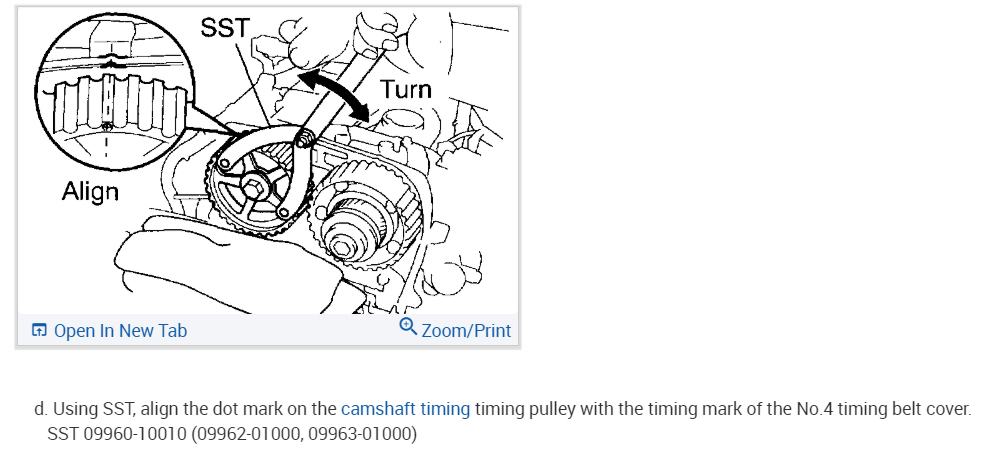
e. Align the dot mark on the camshaft timing pulley with the timing mark of the No.4 timing belt cover.
f. Remove the wrench.
pic 13
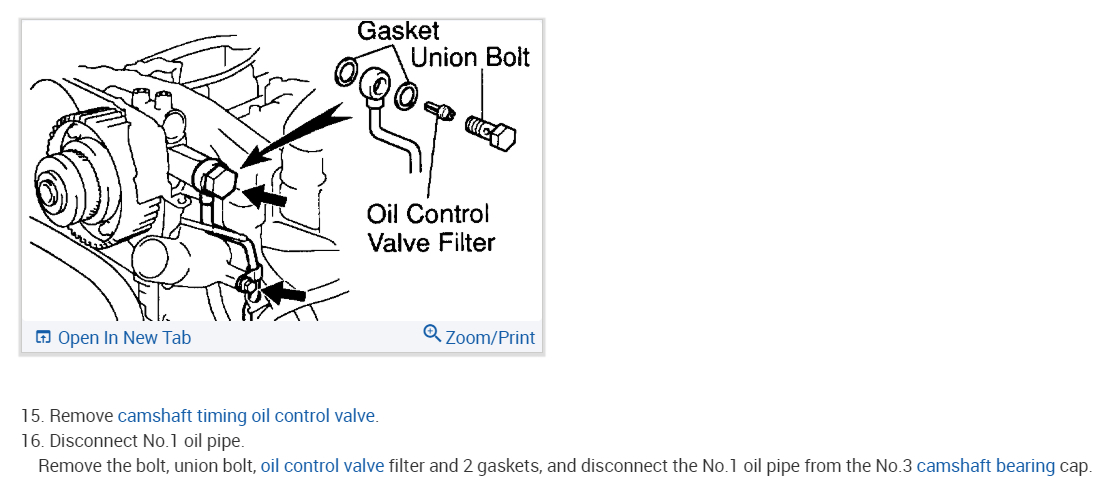
8. Connect No.1 oil pipe.
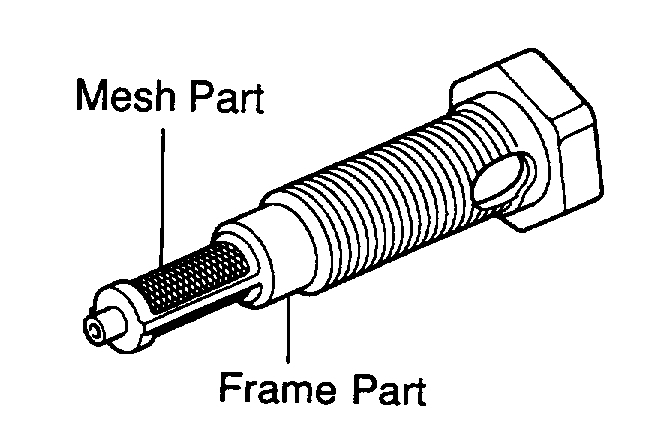
a. Install the union bolt to the oil control valve filter.
NOTICE: In case of touching the filter, avoid holding the mesh part and holding the frame part.
b. Install the oil pipe with 2 new gasket and the union bolt to the No.3 camshaft bearing cap.
Torque: 55 Nm (41 ft. lbs.)
9. Install camshaft timing oil control valve.
pic 14
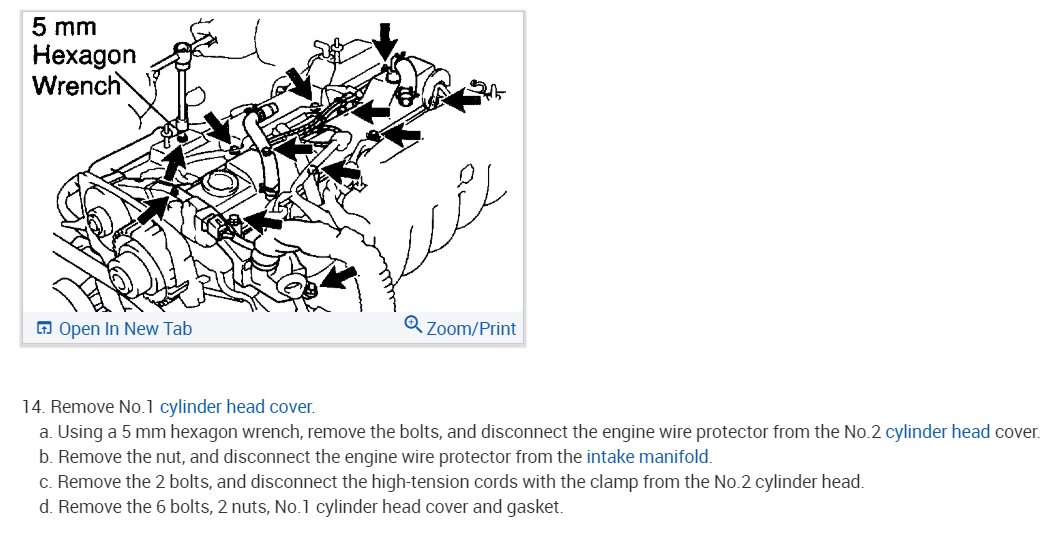
10. Install No.1 cylinder head cover.
a. Install the cylinder head and gasket with the 6 bolts and 2 nuts.
Torque: 8.5 Nm (75 inch lbs.)
b. Install the high-tension cords and clamps with the 2 bolts.
Torque: 8.0 Nm (71 inch lbs.)
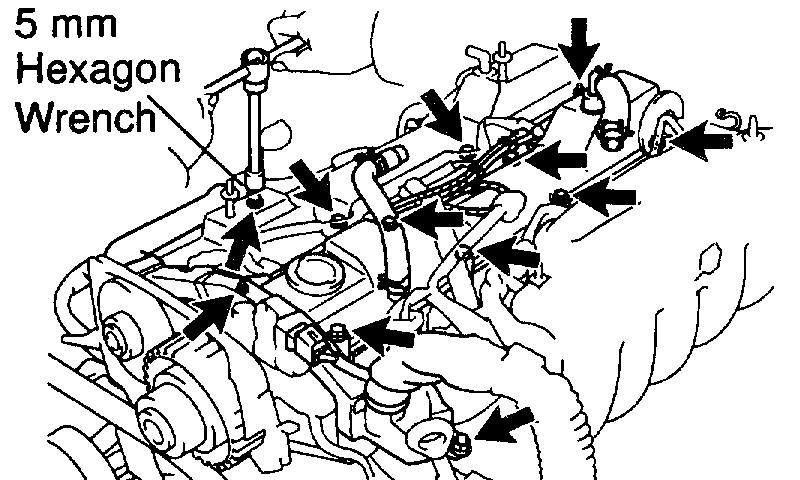
c. Using a 5 mm hexagon wrench, install the engine wire protector with the bolt and nut.
11. Install throttle body and intake air connector assembly.
pic 15
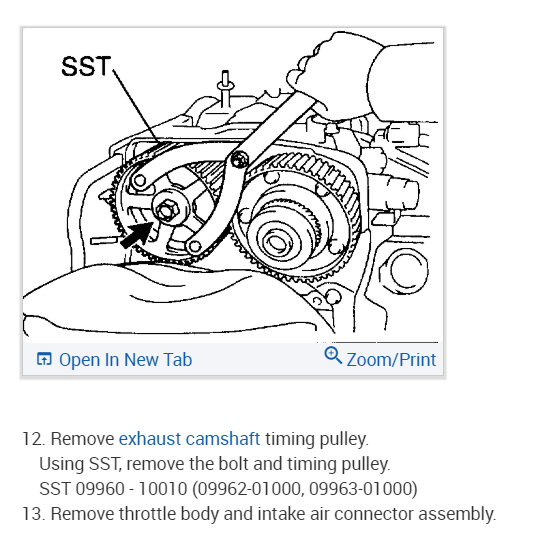
12. Install exhaust camshaft timing pulley.
a. Align the camshaft knock pin with the groove on the pulley, and slide on the timing pulley.
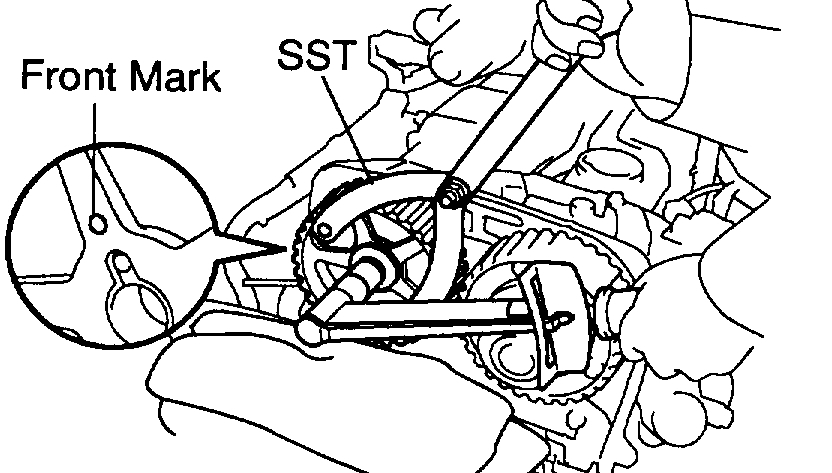
b. Slide the timing pulley on the camshaft, facing the front mark forward.
c. Using Special Service Tool (SST), install the pulley bolt.
SST 09960-10010 (09962 - 01000, 09963 - 01000)
Torque: 81 Nm (60 ft. lbs.)
pic 16
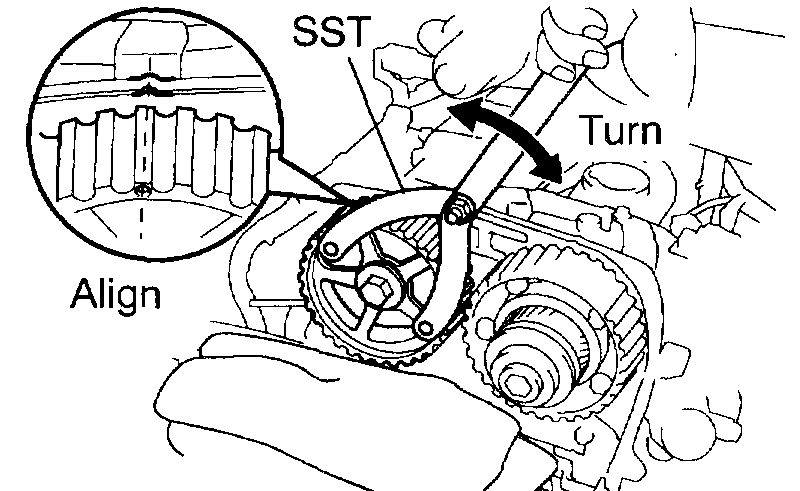
d. Using SST, align the dot mark on the camshaft timing timing pulley with the timing mark of the No.4 timing belt cover.
SST 09960-10010 (09962-01000, 09963-01000)
pic 17
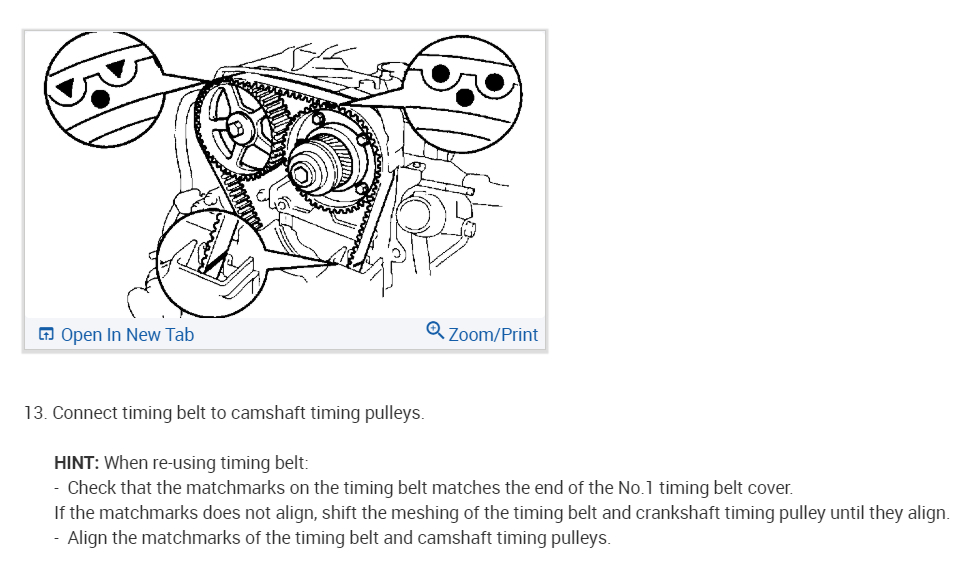
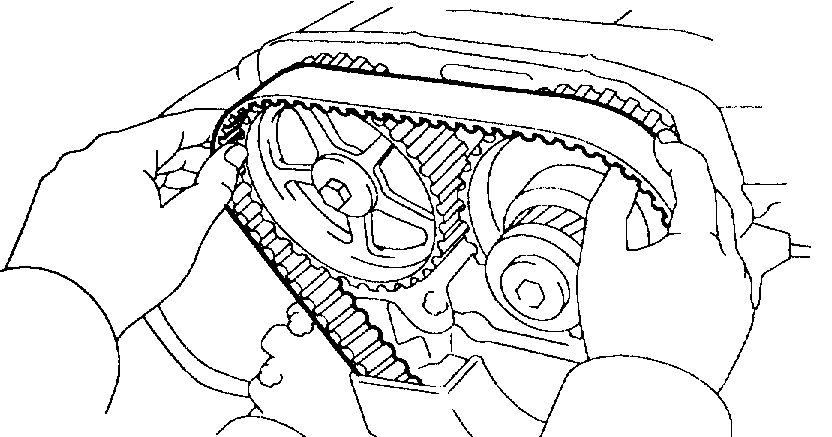
13. Connect timing belt to camshaft timing pulleys.
HINT: When re-using timing belt:
- Check that the matchmarks on the timing belt matches the end of the No.1 timing belt cover.
If the matchmarks does not align, shift the meshing of the timing belt and crankshaft timing pulley until they align.
- Align the matchmarks of the timing belt and camshaft timing pulleys.
pic 18
a. Remove any oil or water on the camshaft timing pulley, and keep it clean.
b. Install the timing belt, checking the tension between the crankshaft timing pulley and intake camshaft timing pulley.
pic 19
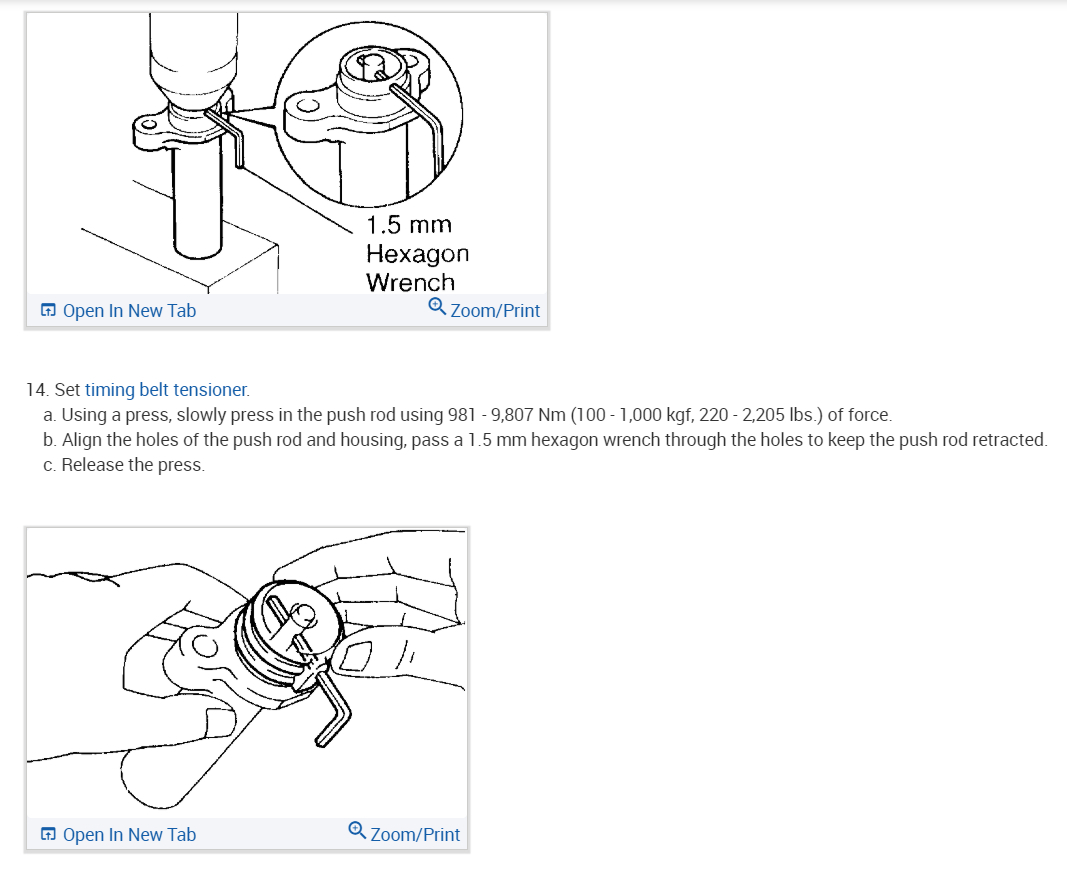
14. Set timing belt tensioner.
a. Using a press, slowly press in the push rod using 981 - 9,807 Nm (100 - 1,000 kgf, 220 - 2,205 lbs.) of force.
b. Align the holes of the push rod and housing, pass a 1.5 mm hexagon wrench through the holes to keep the push rod retracted.
c. Release the press.
pic 20
d. Install the dust boot onto the tensioner.
pic 21
15. Install timing belt tensioner.
a. Temporarily install the tensioner with the 2 bolts.
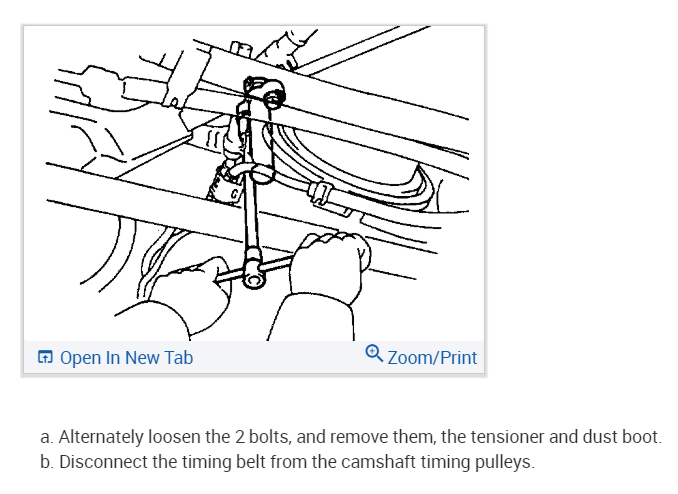
b. Alternately tighten the 2 bolts.
Torque: 27 Nm (20 ft. lbs.)
pic 22
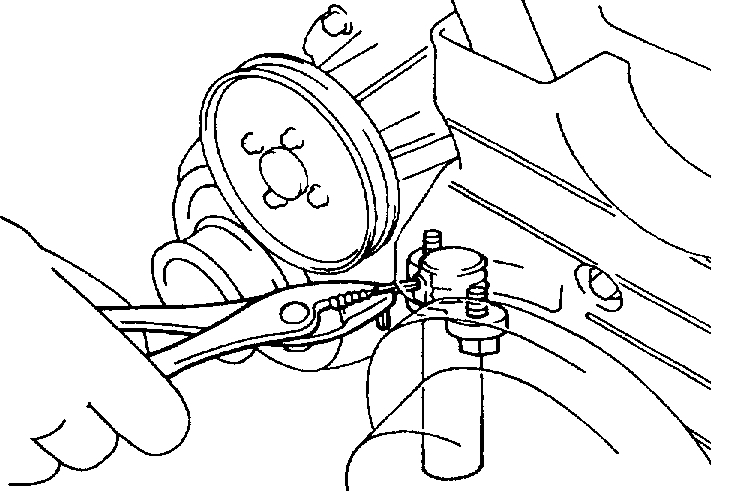
c. Remove the 1.5 mm hexagon wrench from the tensioner with pliers.
pic 23
16. Check valve timing.
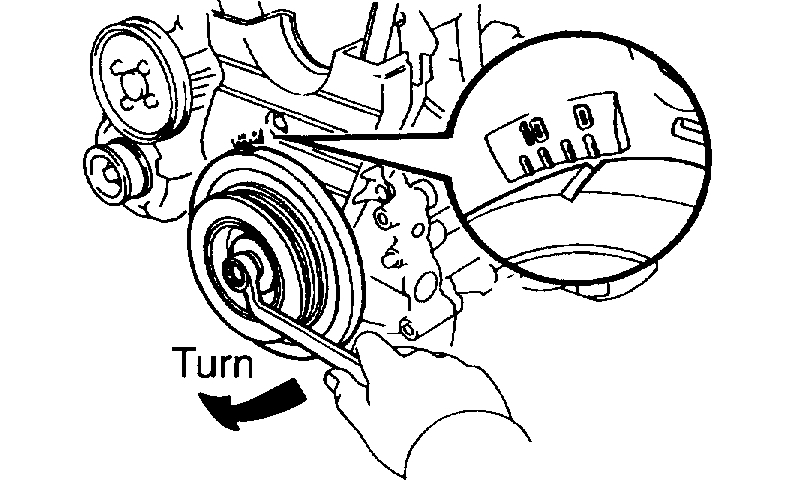
a. Slowly turn the crankshaft pulley 2 revolutions from TDC to TDC.
NOTICE: Always turn the crankshaft clockwise.
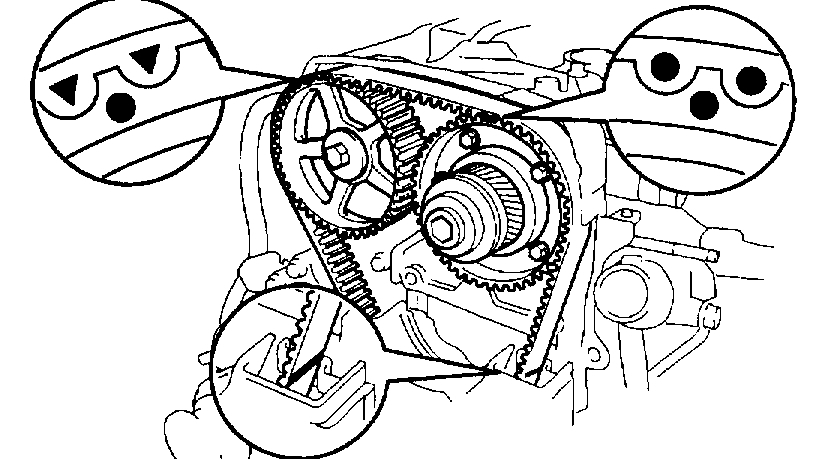
pic 24
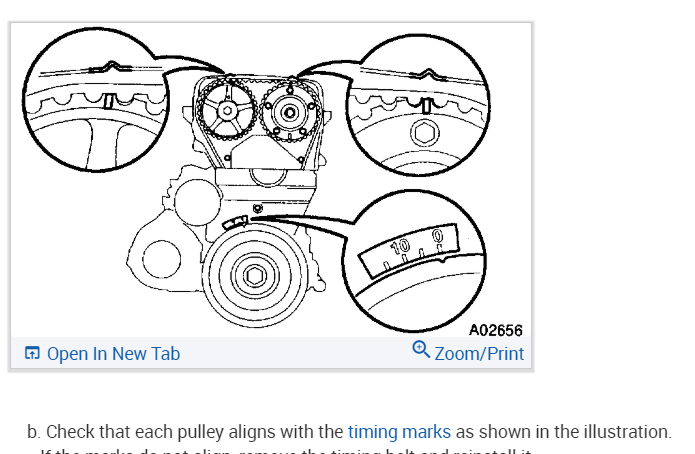
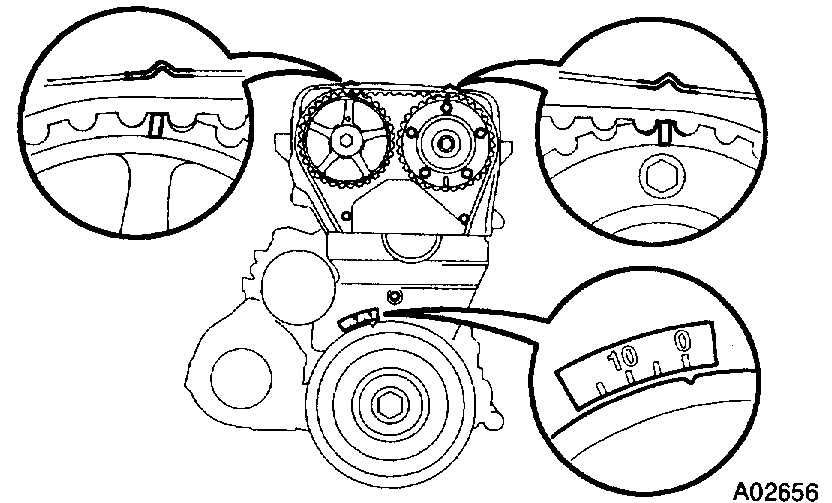
b. Check that each pulley aligns with the timing marks as shown in the illustration.
If the marks do not align, remove the timing belt and reinstall it.
pic 25
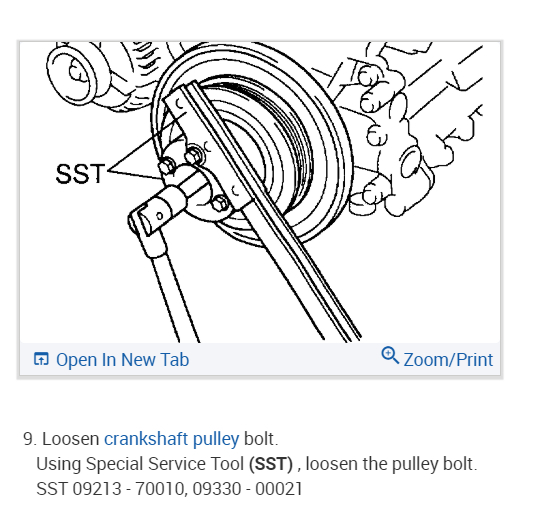
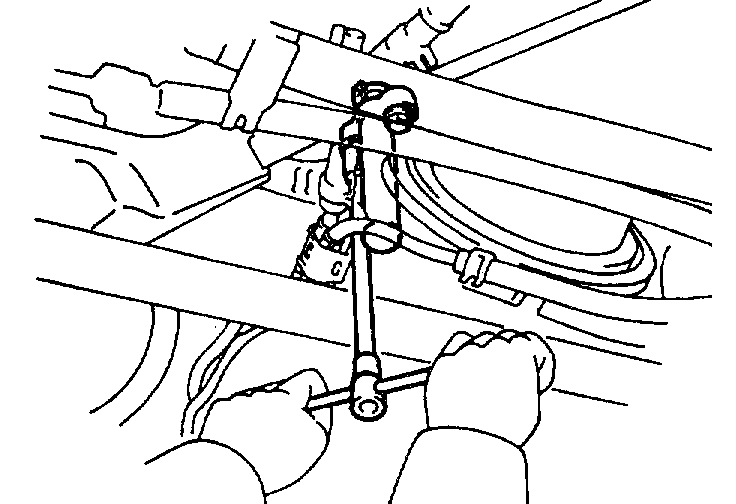
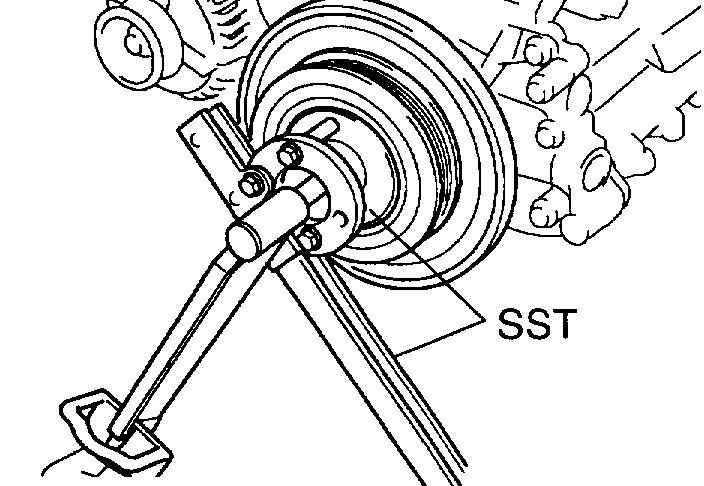
17. Tighten crankshaft pulley bolt.
Using SST, install the pulley bolt.
SST 09213-70010, 09330-00021
Torque: 330 Nm (243 ft. lbs.)
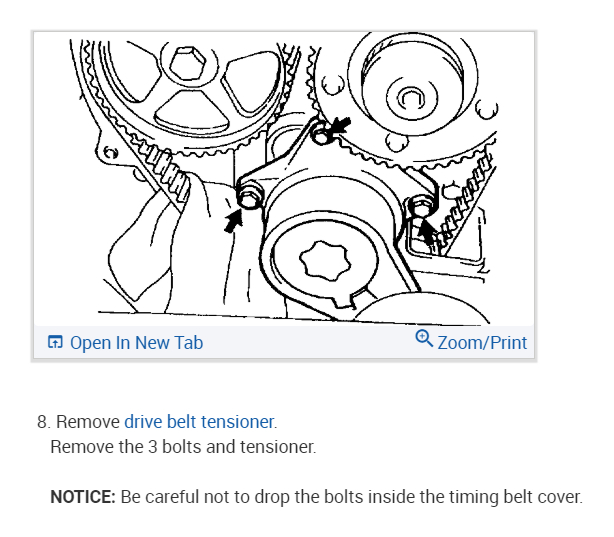
18. Install drive belt tensioner.
Install the tensioner with the 3 bolts.
Torque: 21 Nm (15 ft. lbs.)
NOTICE: Be careful not to drop the bolts inside the timing belt cover.
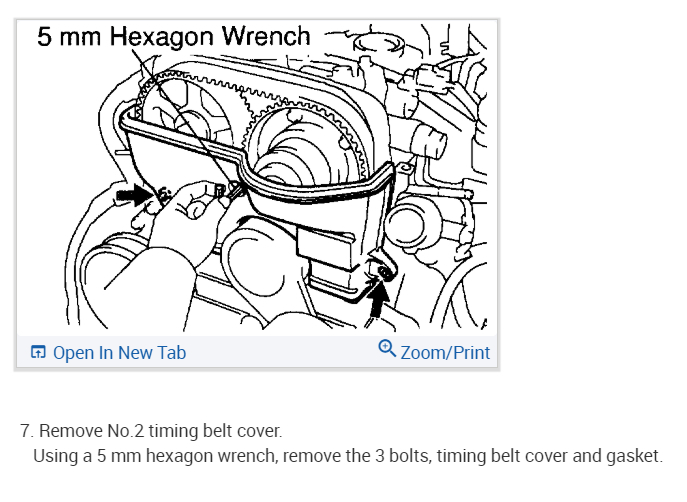
19. Install No.2 timing belt cover.
a. Install the gasket on the timing belt cover.
b. Using a 5 mm hexagon wrench, install the timing belt cover with the 3 bolts.
Torque: 8.0 Nm (71 inch lbs.)
pic 26
20. Install No.3 timing belt cover.
a. Install the gasket on the timing belt cover.
b. Using a 5 mm hexagon wrench, install the timing belt cover with the 4 bolts.
Torque: 8.0 Nm (71 inch lbs.)
c. Install the oil filler cap.
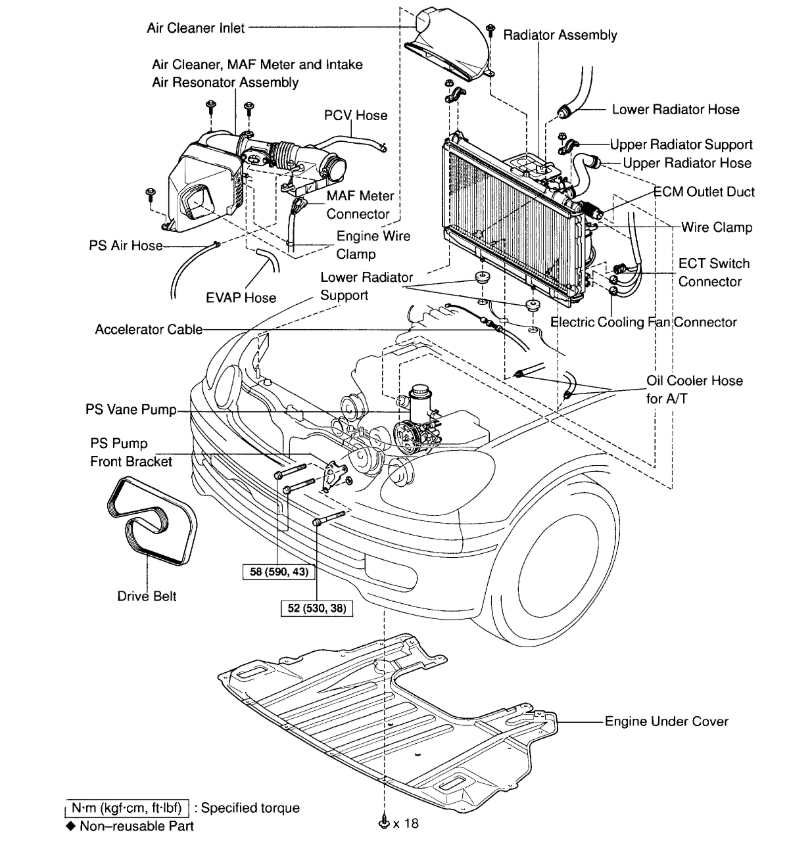
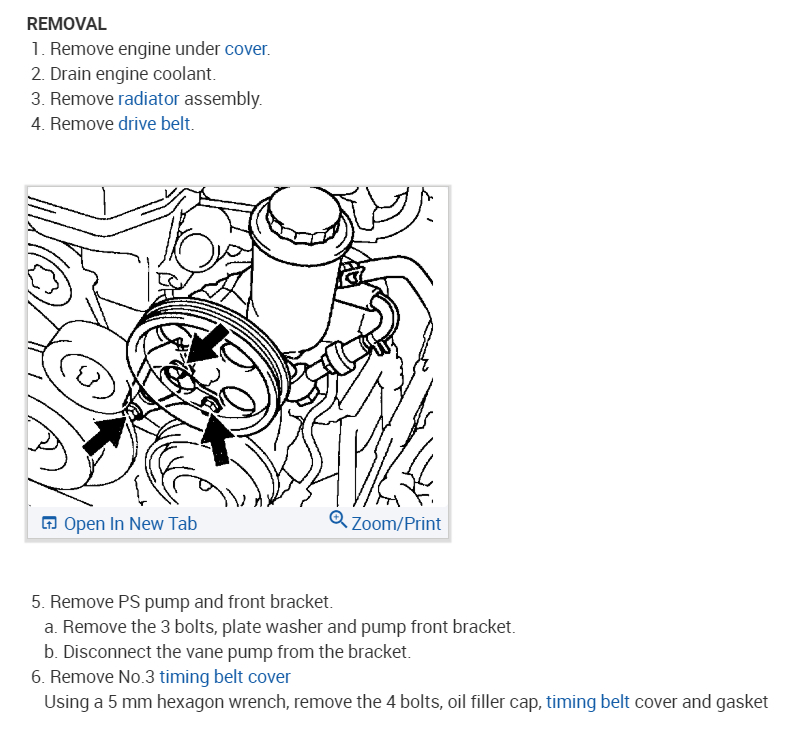
21. Install PS pump and front bracket.
a. Temporarily install the vane pump to the bracket.
b. Install the plate washer and front bracket with the 3 bolts.
Torque:
58 Nm (43 ft. lbs.) for A bolts
52 Nm (38 ft. lbs.) for B bolt
22. Install drive belt.
23. Install radiator assembly.
24. Fill engine with coolant.
25. Start engine check for leaks.
26. Install engine under cover.
27. Road test.
Check for abnormal noise, shock, slippage, correct shift points and smooth operation.
28. Recheck engine coolant level.
__________________________________________
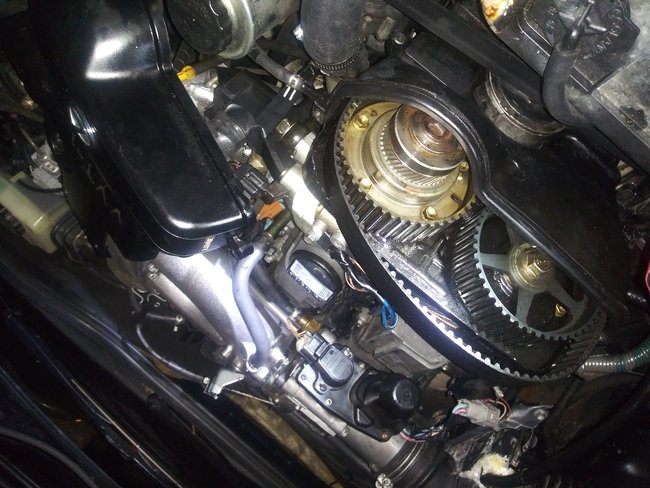
If you look at the next to the last pic below, you will see where the timing marks all need to align for proper timing.
Let me know if that answers your question. Please let me know how things are going or if you have other questions.
Joe
Images (Click to enlarge)
May 17, 2020 at 7:43 PM