The speedometer issue is more than likely a fault within the cluster. There was a special coverage adjustment made to your vehicle to address cluster issues, unfortuately yours is out by miles, it only went to 7yrs/70k miles.
When your hvac system acts up, does it eventually correct itself, more so after ignition cycling? There are a couple bulletins regarding this, and I have also addressed it on a 2004 Tahoe of a friends. If it stays around for a while, perform this recalibration procedure(ignore step 3), and see if proper operation resumes, it may only be for a short time.
Important: Do not adjust any controls on the HVAC control module while the HVAC control module is self-calibrating. If interrupted, improper HVAC performance will result.
Alternate Method (w/o Scan Tool)
Place the ignition switch to the OFF position.
Remove the HVAC/ECAS fuse for a minimum of 10 seconds.
Install the HVAC/ECAS fuse.
Start the vehicle.
Wait 40 seconds for the HVAC control module to self-calibrate.
Verify that no DTCs have set as current DTCs.
If that corrects it, but it is only temporary, you more than likely have an actuator that is overtraveling. This is what I ended up having to do with the friends tahoe, and he has had no issues since(been about a year or more).
#06-01-38-003: Intermittent Ticking Noise from I/P, Poor A/C Performance, HVAC DTCs B0229, B0414, B0424, B3770, (Reprogram HVAC Control Module) - (Apr 27, 2006)
Subject: Intermittent Ticking Noise from I/P, Poor A/C Performance, HVAC DTCs B0229, B0414, B0424, B3770 (Reprogram HVAC Control Module)
Models: 2004-2006 Cadillac Escalade Models
2004-2006 Chevrolet Avalanche, Silverado, Suburban, Tahoe
2004-2006 GMC Sierra Models, Yukon Models
with Air Conditioning (RPOs CJ2, CJ3)
--------------------------------------------------------------------------------
Condition
Some customers may comment on one or more of the following concerns:
• Intermittent ticking/clicking noise from the instrument panel.
• Recirculation mode does not work or Air Conditioning (A/C) system performance is poor during high ambient temperatures.
• Unable to control the driver side temperature.
• Unable to control the passenger side temperature.
• Unable to change the front system modes.
Cause
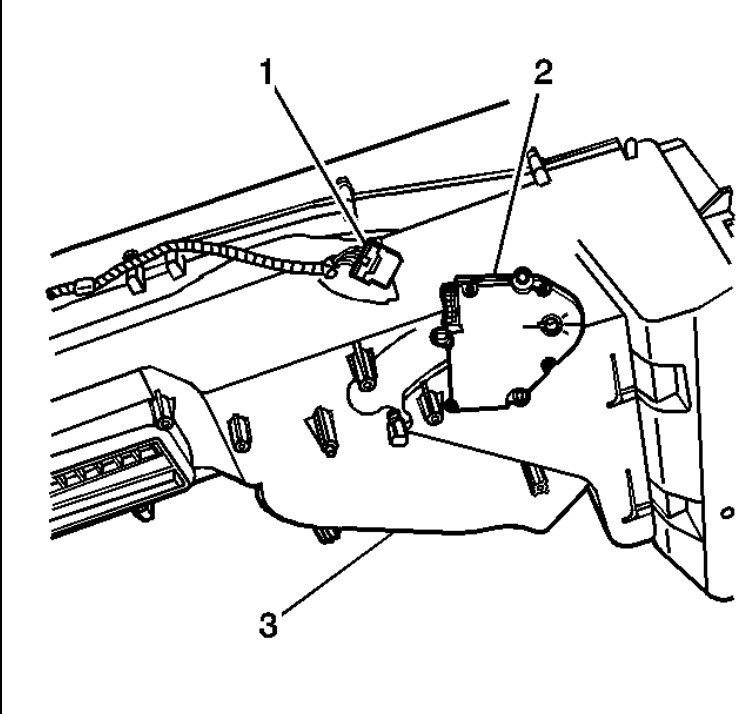
This condition may be caused by the Heating, Ventilation and Air Conditioning (HVAC) actuators that may hunt for the correct commanded position. This cycling may cause a clicking or ticking noise.
An overtravel of the HVAC system control doors may cause one or more of the concerns listed above. If an overtravel occurs, a Diagnostic Trouble Code (DTC) will be set, and the door will go to a preset default position. When a system door defaults, that door will stay at the default position until the DTC is cleared. After the DTC is cleared, the door will operate properly until the overtravel condition re-occurs.
The following table lists the HVAC system doors and the DTC associated with it.
System Door
Overtravel DTC
Air inlet door (recirculation door)
B0229
Left temperature door
B0414
Right temperature door
B0424
Front system mode door
B3770
Correction
Technicians are to perform the normal diagnostic procedures in SI for these concerns. If diagnostics show that the HVAC system door(s) travel below 5 counts (out of the lower range) or above 250 counts (out of the upper range), then update the software calibrations in the HVAC control module. The new calibrations were made available to dealerships as part of TIS2000 incremental satellite update version 2.5, which was broadcast to dealers in February 2006.
The new calibrations have been updated to compensate for the actuator overtravel condition, the actuator hunting and the ticking/clicking noises. The new calibrations effectively eliminate the codes listed above, the default position of the doors associated with the DTCs and opens up the feedback position value. The new calibrations should not be used unless the vehicle has one or more of the customer concerns listed above or a DTC listed above has been set. The new calibrations will not correct any other DTC or A/C system performance concern.
Your programming of the HVAC control module will more than likely have to be carried out from a dealer terminal, this type of stuff is somewhat proprietary to GM.
Dec 3, 2020 at 10:03 AM
(Merged)