Delay in first gear

2004 ACURA MDX
186,000 MILES • 6 CYL • 4WD • AUTOMATIC
Avatar
NASER NASER
  • MEMBER
  • 836 POSTS
No jerking no slipping and no other issues in other gears. If you drive it slowly first to second will change normally but if you take off a bit harder it wont change before it passes 3 rpm. Changed the fluid recently but didn't help. Where the solenoid to this 1-2 gear? I want to clean it first and then maybe replace it.
Aug 9, 2020 at 2:17 PM
Advertisement
Avatar
NASER NASER
  • MEMBER
  • 836 POSTS
found 2 of them, one on top of the transmission with a cylinder like, 4 bolts, the other one on side of the transmission with 6 bolts and 2 cylinders.. removed this second one but noticed there was one plastic o-ring only, either I dropped them off while removing it or someone was cleaning it before and put it back with only one.. see pics. I can't find anything on my end, I will try to find a couple of those around here.
Aug 9, 2020 at 5:31 PM
Avatar
NASER NASER
  • MEMBER
  • 836 POSTS
I still want to know which controls first gear the one on top or on side? i found where those washers were.
Aug 9, 2020 at 6:06 PM
Advertisement
Avatar
JACOBANDNICKOLAS
  • CERTIFIED EXPERT
  • 110,175 POSTS
Naser,

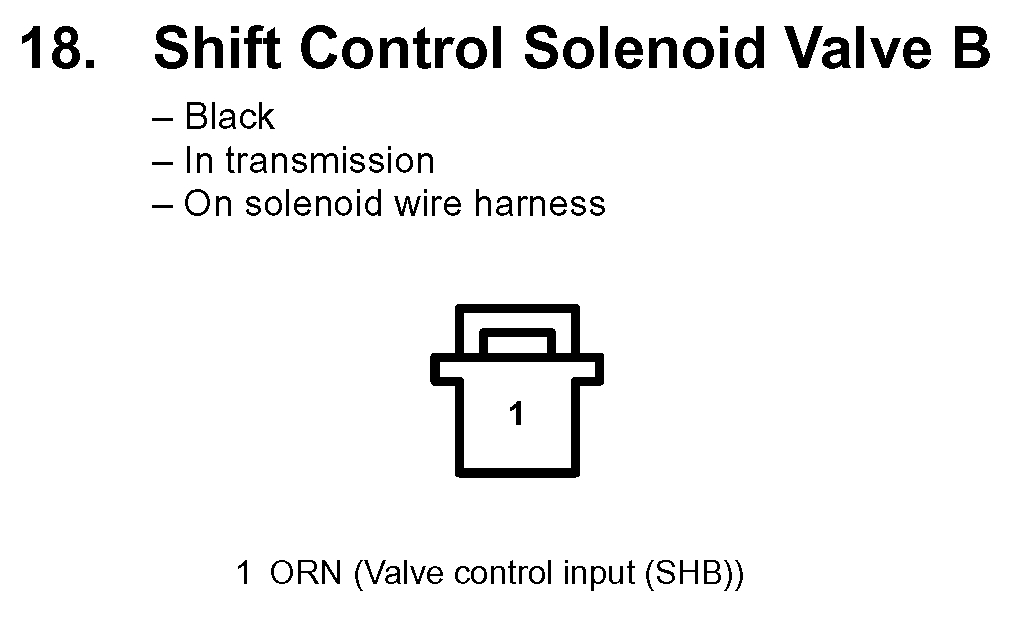
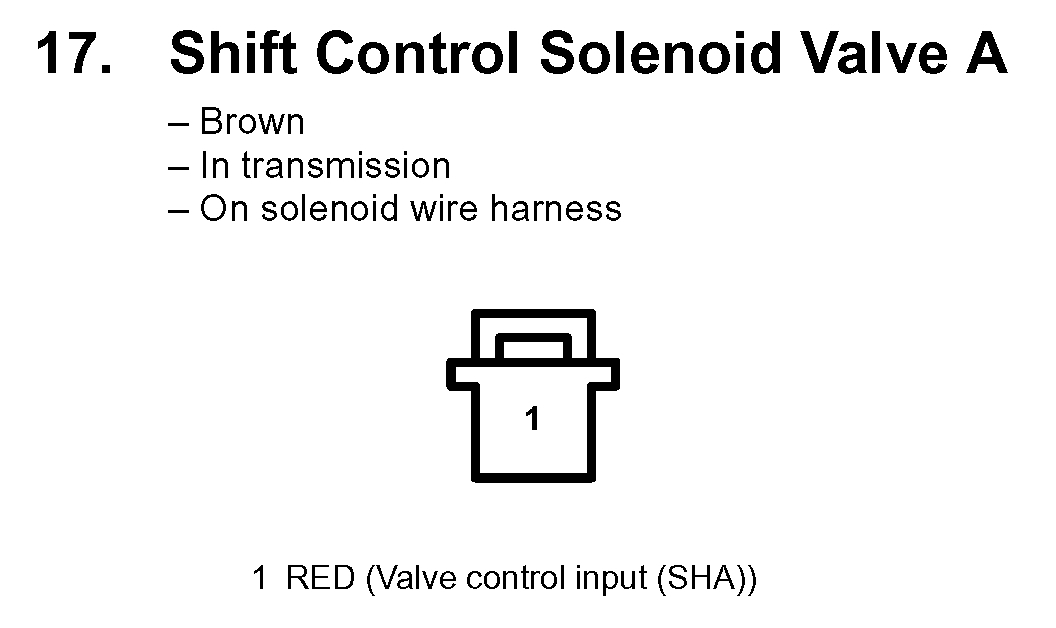
I looked this up for you. The first three pics below show each of the three shift solenoids and identify each by the color of the connector.

Here are the directions for testing:

_____________________________________

2004 Acura Truck MDX V6-3471cc 3.5L
Procedures
Vehicle Power-train Management Transmission Control Systems Actuators and Solenoids - Transmission and Drive-train Actuators and Solenoids - A/T Shift Solenoid Service and Repair Procedures
PROCEDURES
Shift Solenoid Valve, Torque Converter Clutch Solenoid Valve Test/Replacement


pic 4


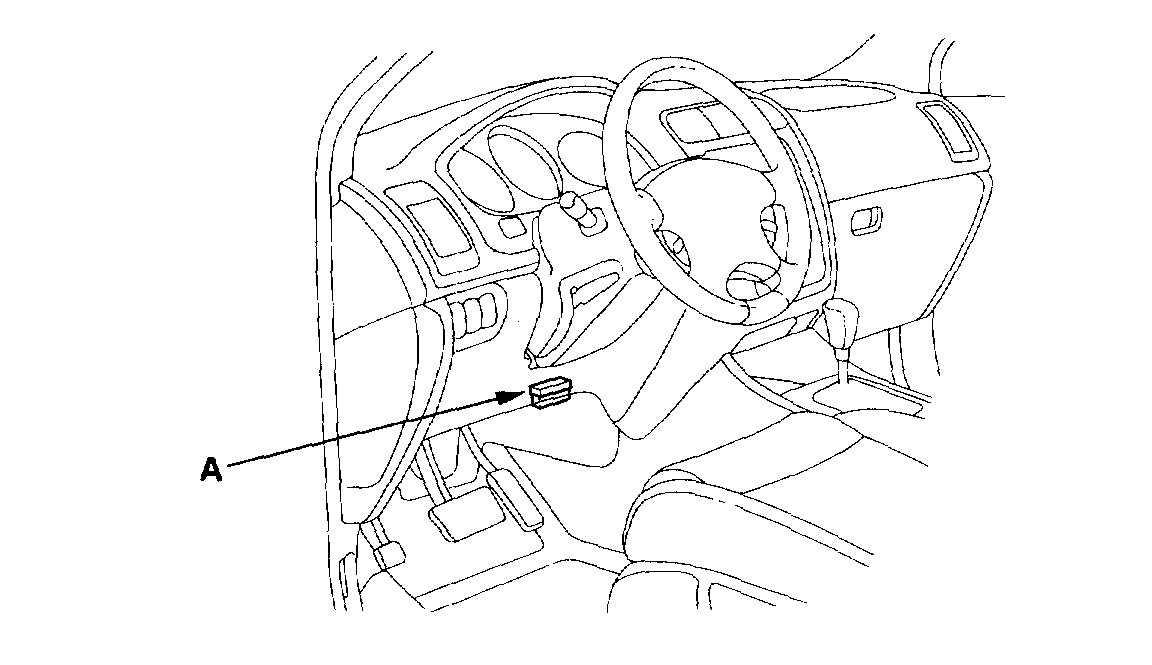
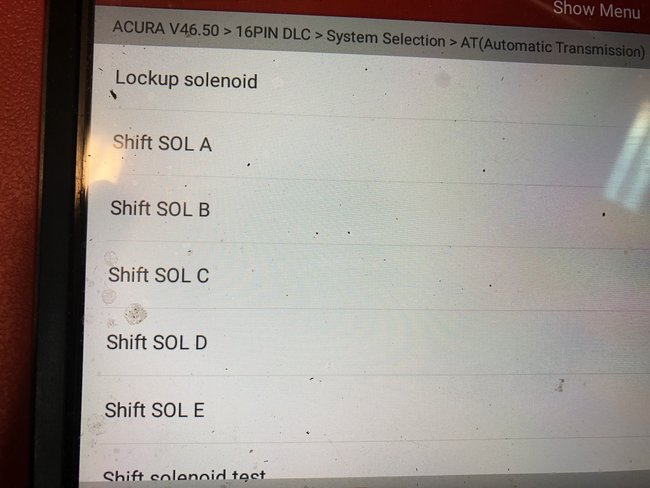
1. Connect the HDS to the DLC (A).
2. Select SHIFT SOL TEST in MISC. TEST MENU on the HDS.
3. Carry out A/T SHIFT SOL A, B, and C tests in SHIFT SOL TEST MENU with the HDS. A clicking sound should be heard.
4. Select LOCKUP SOL TEST in MISC. TEST MENU on the HDS.
5. Carry out A/T LOCKUP SOL A test in LOCKUP SOL TEST MENU with the HDS. A clicking sound should be heard.
6. Shift solenoid valve test and torque converter clutch solenoid valve test have finished if the tests are OK. If no sound is heard, remove the shift solenoid valves or torque converter clutch solenoid valve, and test the solenoid valve.
7. Remove the intake air duct.
8. Disconnect the battery negative terminal, then remove the battery positive terminal.
9. Remove the battery hold-down bracket, then remove the battery and battery tray.
10. Remove the four bolts securing the battery base in the engine compartment, then remove the battery base.
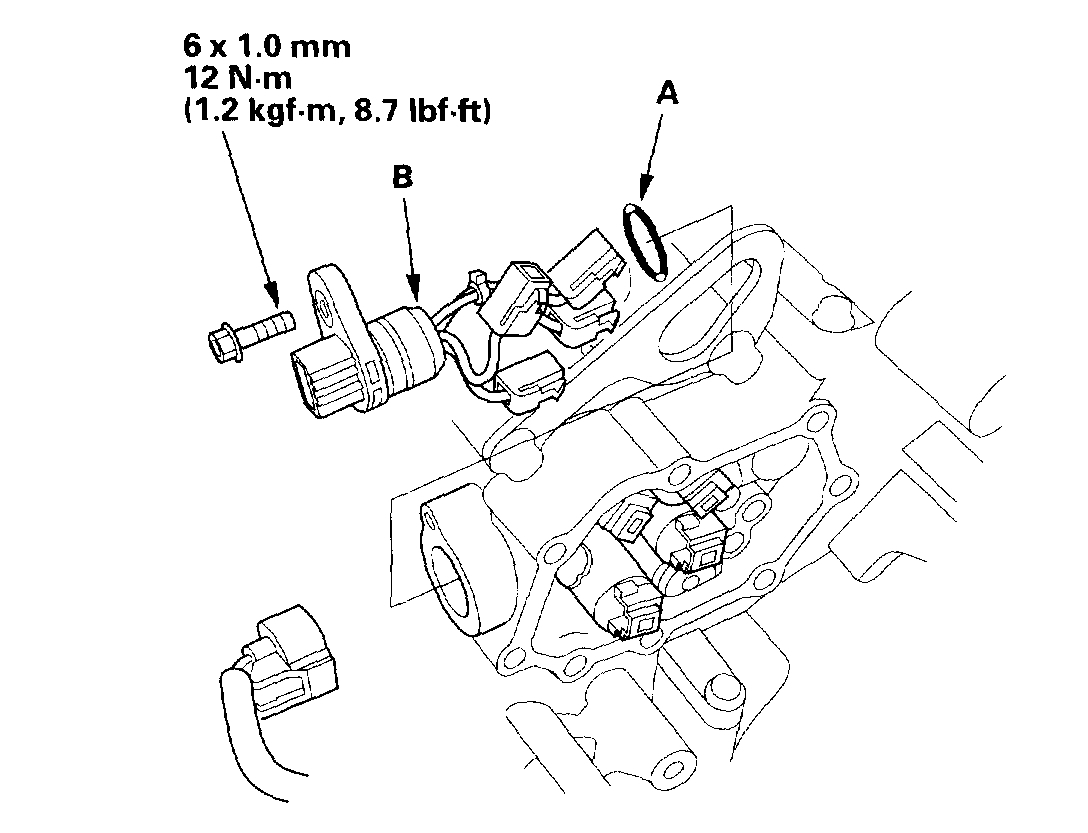

pic 5


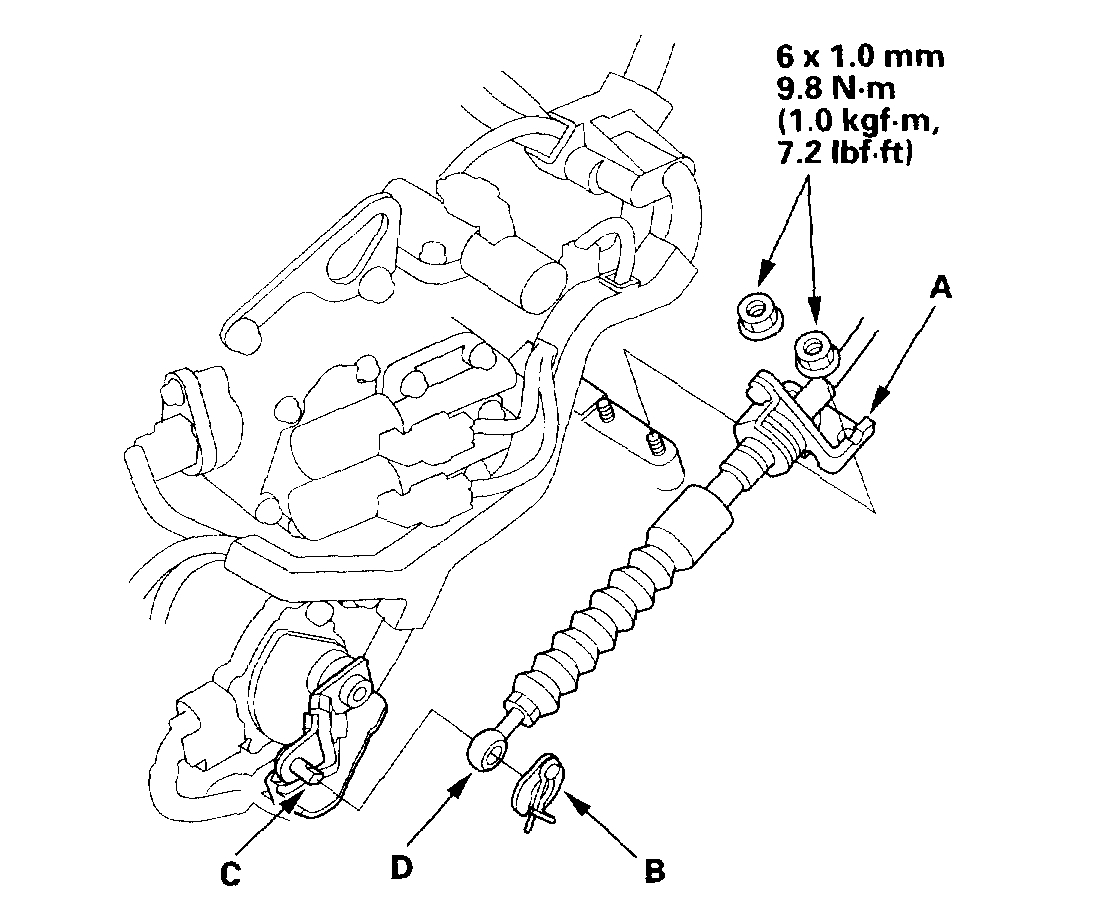
11. Remove the nuts securing the shift cable bracket (A).
12. Remove the spring clip/washer (B) from the control lever (C), and disconnect the shift cable end (D) from the control lever.


pic 6


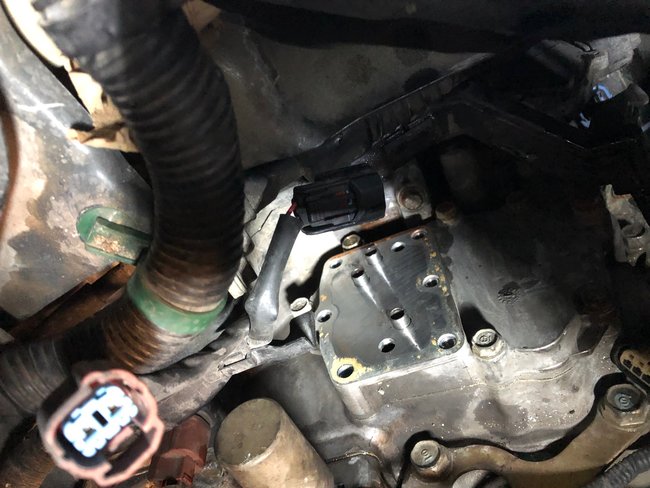
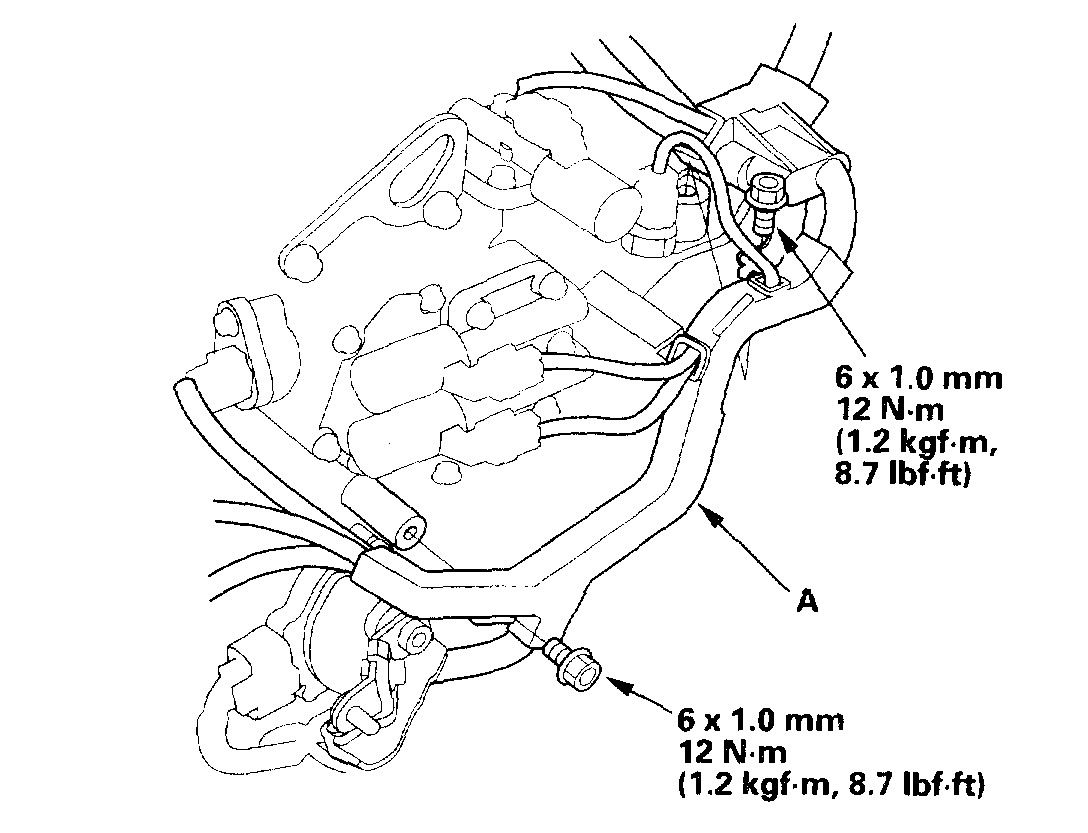
13. Remove the bolts securing the harness cover (A).


pic 7


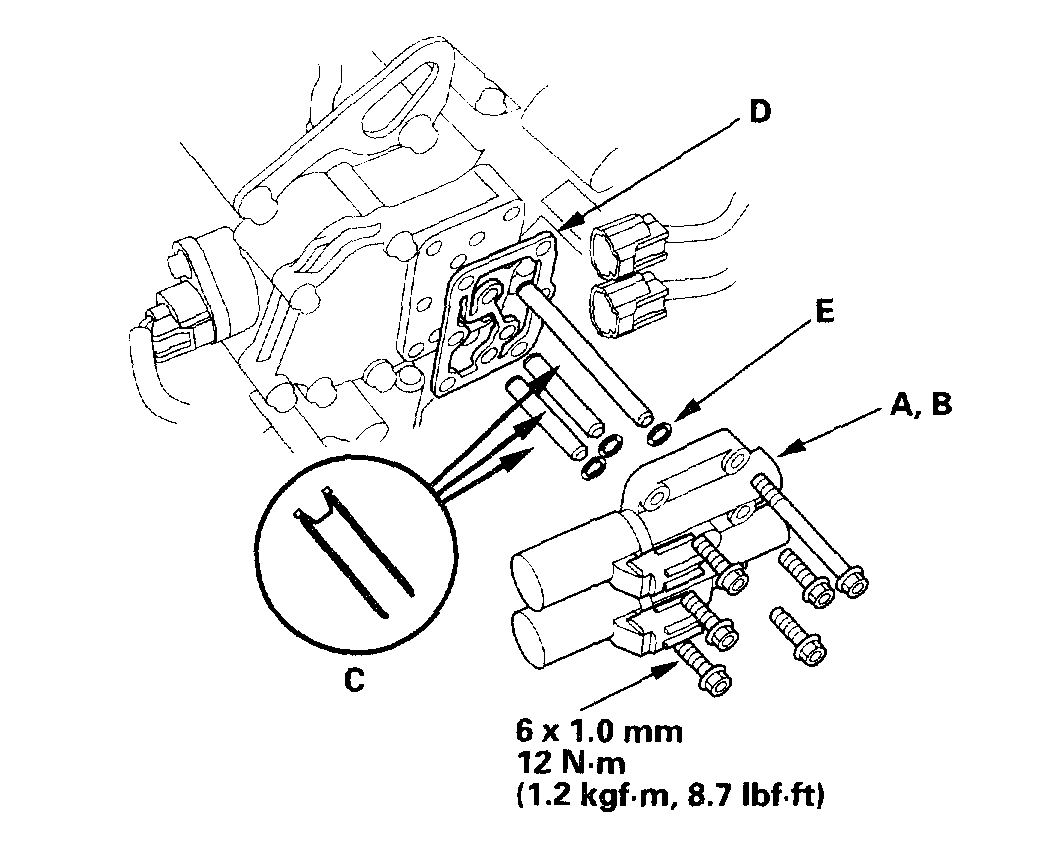
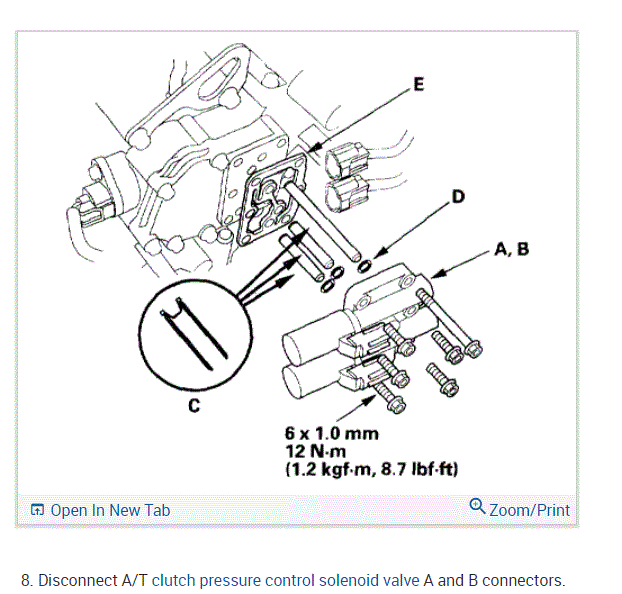
14. Disconnect the connectors from A/T clutch pressure control solenoid valve A and B, and remove the solenoid valves, ATF pipes (C), and gasket (D).
15. Replace the gasket and O-rings (E) with new ones when installing the A/T clutch pressure control solenoid valve A and B.
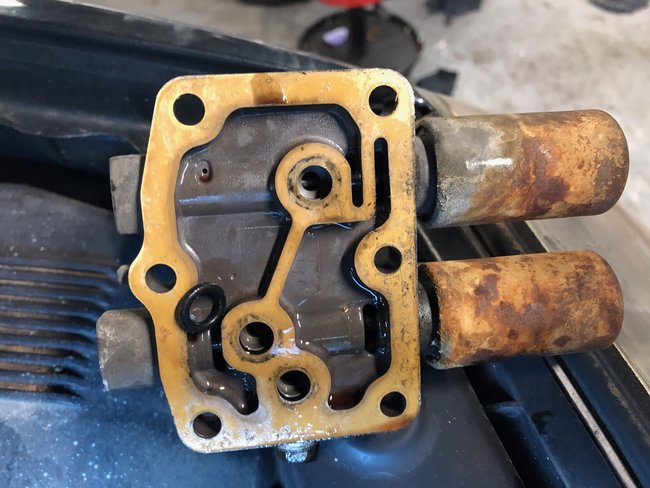
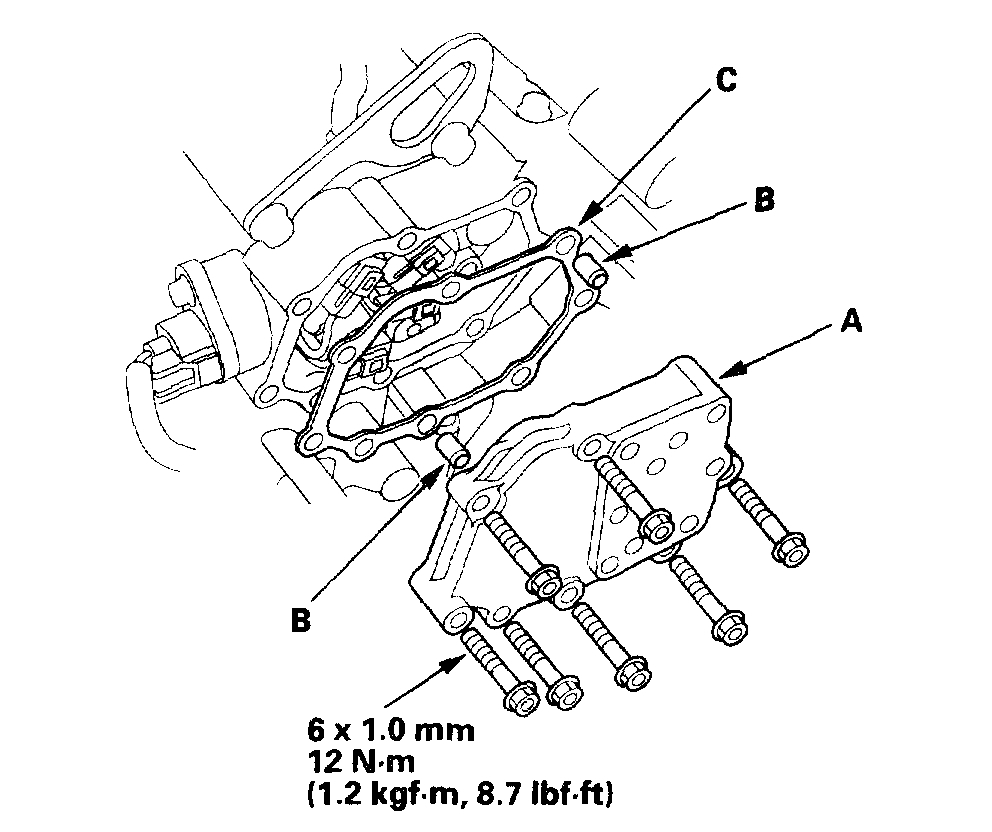

pic 8


16. Remove the solenoid valve cover (A), dowel pins (B), and gasket (C).
17. Replace the gasket with new one when installing solenoid cover.
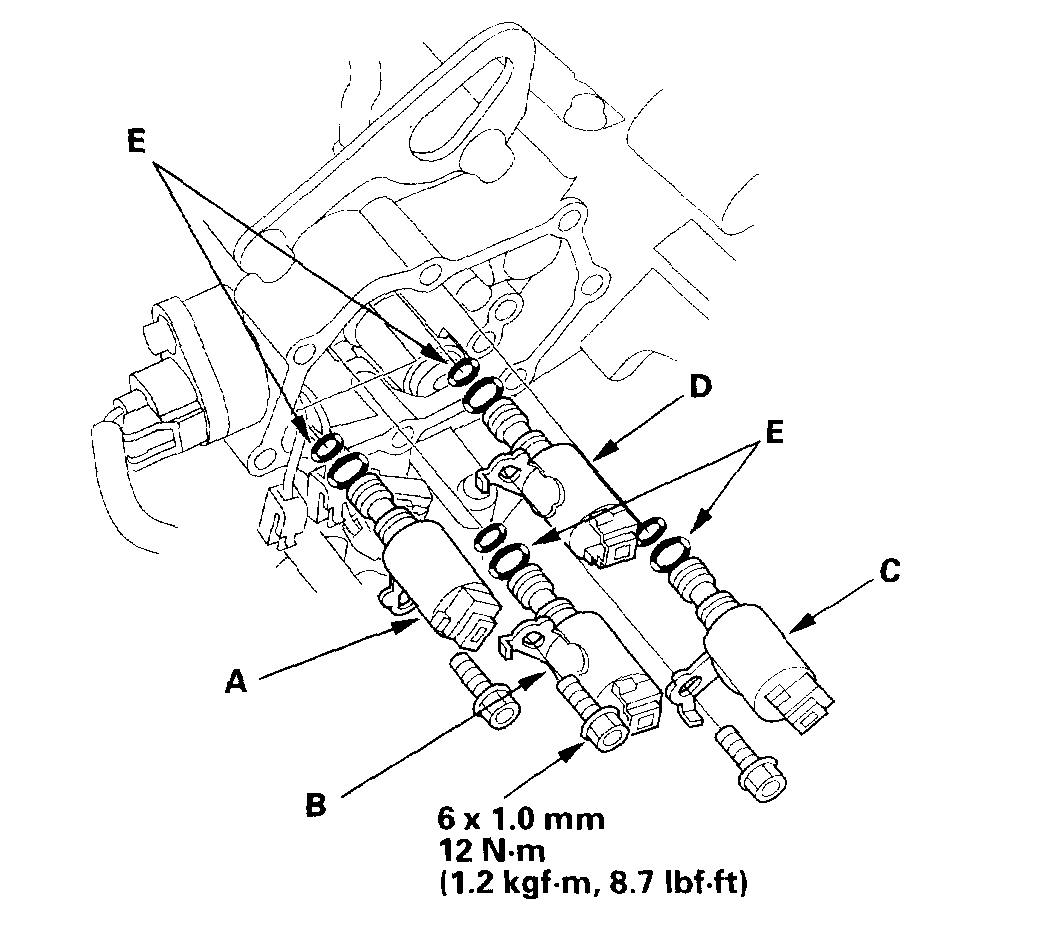

pic 9


18. Disconnect each solenoid valve connector.
19. Measure the resistance of shift solenoid valve A, B, C, and torque converter clutch solenoid valve (D) between each connector terminal and body ground.
Standard: 12 - 25 ohms
20. Replace the solenoid valve if the resistance is out of standard.
21. Connect the battery negative terminal to body ground, then connect the battery positive terminal to each solenoid terminal individually.
22. Replace the solenoid valve if no clicking sound is heard.


pic 10


23. Replace the solenoid harness if the test results are OK.
24. Install a new O-ring (A) on the solenoid harness connector (B), and install the connector in the transmission housing.
25. If the solenoid valve is faulty, go to step 26 for solenoid valves replacement. If the solenoid valves and solenoid harness are OK, go to step 32, and connect the connectors and install the removed parts.
26. Remove the mounting bolts, then remove the solenoid valves.


pic 11


27. Install the new O-rings (E) on each solenoid valves.

NOTE: The new solenoid valve is equipped with the new O-rings. If you install the new solenoid valve, it is no need to replace the new O-rings on it.

28. Install shift solenoid valve B (black connector) by holding the shift solenoid valve body; be sure to install mounting bracket contacts to the accumulator body.

NOTE: Do not hold the solenoid valve connector to install the solenoid valve. Be sure to hold the solenoid valve body. Do not install the shift solenoid valve C before installing the torque converter clutch solenoid valve (D). If solenoid valve C is installed before torque converter clutch solenoid valve, it may damage to hydraulic control system.

29. Install torque converter clutch solenoid valve (black connector) by holding the solenoid valve body; be sure to install mounting bracket contacts to the accumulator body.
30. Install shift solenoid valve C (brown connector) by holding the shift solenoid valve body; be sure to install mounting bracket contacts to the bracket of torque converter clutch solenoid valve.
31. Install shift solenoid valve A (brown connector) by holding the shift solenoid valve body; be sure to install mounting bracket contacts to the accumulator body.
32. Connect RED harness to shift solenoid valve A, ORN harness to shift solenoid valve B. GRN harness to shift solenoid valve C, and YEL harness to torque converter clutch solenoid valve (D).
33. Install the shift solenoid valve cover, dowel pins and a new gasket.
34. Install the new solenoid valve body gasket on the solenoid valve cover, and install the ATF pipes with their filter side into the transmission housing. Install the new O-rings over the ATF pipes.
35. Install A/T clutch pressure control solenoid valves A and B,
36. Check the connectors for rust, dirt, or oil, clean or repair if necessary, then connect the connectors securely.
37. Secure the harness cover with the bolts.
38. Connect the shift cable end to the control lever, and secure the cable end with the spring clip/washer.
39. Secure the shift cable bracket with the nuts.
40. Install the battery base and intake air duct.
41. Install the battery tray and battery, then secure the battery with its hold-down bracket. Connect the battery terminals.

_____________________________________

If you noticed, they show the solenoids as A. B, C, and D. D is the torque converter clutch solenoid. The others are in order. (A= 1-2 shift, B=2-3 shift, C=3-4 shift)

Let me know if this helps.

Take care. By the way, this isn't a German car. What's up with that? LOL

Joe
Aug 9, 2020 at 8:49 PM
Avatar
NASER NASER
  • MEMBER
  • 836 POSTS
Thanks for the info. There are so many labeled A. So which one controls 1-2nd gear? Which solenoid in the pictures?
Aug 10, 2020 at 8:56 AM
Avatar
NASER NASER
  • MEMBER
  • 836 POSTS
the 10th picture, where is that, behind the solenoid with 6 bolts?
Aug 10, 2020 at 9:37 AM
Avatar
NASER NASER
  • MEMBER
  • 836 POSTS
Measure the resistance of shift solenoid valve A, B, C, and torque converter clutch solenoid valve (D) between each connector terminal and body ground.
Standard: 12 - 25 ohms....does that mean measure resistance between any ground and one of the pins on each solenoid? if 2 pins available which one? (this is done while battery is connected?
Aug 10, 2020 at 9:41 AM
Avatar
NASER NASER
  • MEMBER
  • 836 POSTS
I bought it for a friend, he wants a cheap car and i know these solenoids usually go out, but i usually do it on Accord's or Pilot's, Acura's are a bit different, lol. that delay is all i need to fix. i am guessing the solenoid a is bad or dirty or the harness is bad. that was a pita to remove the solenoid behind the harness connectors as i did not remove the harness of shiter cable...
Aug 10, 2020 at 9:45 AM
Avatar
NASER NASER
  • MEMBER
  • 836 POSTS
I used my scanner to actuate the solenoids and these in the picture did click.
Aug 10, 2020 at 12:07 PM
Avatar
JACOBANDNICKOLAS
  • CERTIFIED EXPERT
  • 110,175 POSTS
Hi,

They should click because we know it is shifting, just not at the right time. I suspect you will need to check resistance.

Joe
Aug 10, 2020 at 9:35 PM
Avatar
NASER NASER
  • MEMBER
  • 836 POSTS
All of them have 17 as far as resistance. If the wire is recommended to be replaced, how would the wire go bad?
Aug 13, 2020 at 2:59 PM
Avatar
NASER NASER
  • MEMBER
  • 836 POSTS
Logic says if the wire is bad the car wont even shift, or am i wrong?
Aug 13, 2020 at 3:07 PM
Avatar
NASER NASER
  • MEMBER
  • 836 POSTS
My guess is that these steps are fir diagnosis of specific codes, maybe no signal going to the solenoid, hence why they say replace the harness after making sure the solenoids are ok, makes sense? I doubt the harness in my case will make a difference.
Aug 14, 2020 at 9:20 AM
Avatar
JACOBANDNICKOLAS
  • CERTIFIED EXPERT
  • 110,175 POSTS
Hi,

Chances are you are correct. However, I dealt with (and don't laugh) a fire truck that would accelerate on it's own. Ugh!!! Everything checked good. The manufacturer recommended replacing the throttle control wiring harness. (Note that there was no indication of a wire issue). Well, it fixed the problem. Now they can stop the truck.

Joe
Aug 14, 2020 at 12:36 PM
Avatar
NASER NASER
  • MEMBER
  • 836 POSTS
Maybe, but doubt it. Quick questions. Are the two brown and 2 black solenoids the same? Say if i switch them?
Aug 14, 2020 at 12:51 PM
Avatar
JACOBANDNICKOLAS
  • CERTIFIED EXPERT
  • 110,175 POSTS
Hi,

Naser, that's a good question. I believe they are. They perform the same type of job, so I'm going to say give it a try.

Joe
Aug 14, 2020 at 5:03 PM
Avatar
NASER NASER
  • MEMBER
  • 836 POSTS
changed the two solenoids around, replaced the harness as well, same results, was worth a try. Thanks for your help.
Aug 24, 2020 at 4:07 PM
Avatar
JACOBANDNICKOLAS
  • CERTIFIED EXPERT
  • 110,175 POSTS
Naser,

Are there any codes? Have you scanned the CAN system?

Joe
Aug 24, 2020 at 8:39 PM
Avatar
NASER NASER
  • MEMBER
  • 836 POSTS
I will do a full scan.
Aug 25, 2020 at 6:20 AM
Avatar
JACOBANDNICKOLAS
  • CERTIFIED EXPERT
  • 110,175 POSTS
Honestly, that is what the future holds. Scanning the CAN system seems to be what is needed anymore.

If you have a chance, let me know if you find codes.

Joe
Aug 25, 2020 at 8:00 PM
Avatar
NASER NASER
  • MEMBER
  • 836 POSTS
took it to the dealer and they came with VTM-4 and check engine light are both on due to P2237 O2 bank 1(B1, S1).P0752 shift solenoid A and P0747 pressure control solenoid A. Can you pinpoint to were these solenoids are? I cleaned both, the one on top of transmission and the bigger one on side of transmission by the shifter cable. I want to remove them and test them again. Also, which oxygen sensor is it? They said the D was flashing after driving it 8 miles, it never did the with me, even after i picked it up and driven it it never did that.
Sep 2, 2020 at 2:29 PM
Avatar
JACOBANDNICKOLAS
  • CERTIFIED EXPERT
  • 110,175 POSTS
Naser, the first pic below shows the pressure control solenoid. Here are directions for shift solenoid A for diagnostics. The code indicates it is stuck open.

_______________________________

2004 Acura Truck MDX V6-3471cc 3.5L
P0752
Vehicle ALL Diagnostic Trouble Codes ( DTC ) Testing and Inspection P Code Charts P0752
P0752
DTC P0752: Shift Solenoid Valve A Stuck ON

NOTE: Record all freeze data and review General Troubleshooting Information before you troubleshoot.

1. Warm up the engine to normal operating temperature (the radiator fan comes on).
2. Check to be sure that the transmission is filled to the proper level, and check for fluid leaks.
3. Drain the ATF through a strainer. Inspect the ATF and strainer for metal debris or burnt fluid.
Has the ATF deteriorated ?
YES - Replace ATF, and test-drive the vehicle under the same conditions as those indicated by the freeze data, then recheck.
NO - Go to step 4.
4. Clear the DTC with the HDS.
5. Test-drive the vehicle in the D5 position in all five gears at speeds over 12 mph (20 km/h) for more than 20 seconds, then slow down to a stop.
6. Retest-drive the vehicle in the D5 position in all five gears at speeds over 12 mph (20 km/h) for more than 20 seconds, then slow down to a stop.
7. Check the OBD STATUS in DTCs MENU for a pass/fail test of code P0752.
Did the result indicate a fail?
YES - Go to step 8.
NO - Intermittent failure, the system is OK at this time. If the tester indicates NOT COMPLETE, return to step 5 and recheck.
8. Clear the DTC with the HDS.
9. Select SHIFT SOL TEST in MISC. TEST MENU, then carry out A/T SHIFT SOL A test in SHIFT SOL TEST MENU with the HDS.
Is a clicking sound heard ?
YES - Go to step 6.
NO - Replace shift solenoid valve A, then go to step 12.

___________________________________


10. Test-drive the vehicle in the D5 position in all five gears at speeds over 12 mph (20 km/h) for more than 20 seconds, then slow down to a stop.
11. Retest-drive the vehicle in the D5 position in all five gears at speeds over 12 mph (20 km/h) for more than 20 seconds, then slow down to a stop.
12. Check the OBD STATUS in DTCs MENU for a pass/fail test of code P0752.
Did the result indicate a fail?
YES - Repair hydraulic system related with shift valves A and E, then go to step 13.
NO - Intermittent failure, the system is OK at this time. If the tester indicates NOT COMPLETE, return to step 10 and recheck.
13. Clear the DTC with the HDS.
14. Test-drive the vehicle in the D5 position in all five gears at speeds over 12 mph (20 km/h) for more than 20 seconds, then slow down to a stop.
15. Retest-drive the vehicle in the D5 position in all five gears at speeds over 12 mph (20 km/h) for more than 20 seconds, then slow down to a stop.
16. Check the OBD STATUS in DTCs MENU for a pass/fail test of code P0752.
Did the result indicate a pass?
YES - The problem has been corrected.
NO - Return to step 1 and recheck.

_________________________

See pic 2 for shift valve.

Joe
Sep 2, 2020 at 7:09 PM