Cruise control wire colors diagram

2012 CHEVROLET CAMARO
48,600 MILES • 3.6L • V6 • 2WD • AUTOMATIC
Avatar
ROBERT MASELLI JR.
  • MEMBER
  • 52 POSTS
Being i changed my steering wheel to a custom wheel, i lost my cruise control. I need to wire up new switches on the dashboard. I need to know which wire is the ignition, cruise on/off, set, resume and accelerate, whether in the column or under the dash. I bought 3 LED switches. One on/off and two momentary switches. I believe the ignition wire needs to be connected to all switches other the correct wire to control that action. Thank you.
Jun 9, 2020 at 9:10 AM
Advertisement
Avatar
KASEKENNY
  • CERTIFIED EXPERT
  • 18,907 POSTS
You may have a bit of an issue with your planned set up. The reason I say that is the cruise is operated by varying the voltage on the Cruise Control Switch Signal in the BCM.

Basically the cruise is set by the "On" button on the wheel and it sends a 5 volt reference to the BCM to tell it to turn on. So this will work by using a simple toggle switch.

The "Set" "+" "-" buttons are all operated off of resistance. This means the BCM sees a varying voltage and depending on the voltage it knows what -speed to set the cruise control at. As you press the "+" or "-" it increases and decreases the resistance which changes the voltage that the BCM sees which tells it to increase or decrease the speed.

Does that make sense? Check out the diagrams (Below). Please let us know what happens. Let me know what questions you have. Thanks
Jun 9, 2020 at 10:10 AM
Avatar
ROBERT MASELLI JR.
  • MEMBER
  • 52 POSTS
It makes complete sense what you are saying. I did a lot of research on it, but I've seen videos of someone doing this to their Honda with just 3 switches and nothing else. I hardly ever use Cruise, but if I could restore it, that would be great.
Jun 9, 2020 at 11:07 AM
Advertisement
Avatar
KASEKENNY
  • CERTIFIED EXPERT
  • 18,907 POSTS
Okay. Seeing as I have never done this, it may work with the momentary switches that you are using. Clearly I am not sure the actual logic the module is using. I am just looking at the wiring diagram and based on that making the determination that it is resistance based due to there being resistors inline.

If you have seen this work, then go for it and let me know what happens. Thanks for the update.
Jun 10, 2020 at 5:40 PM
Avatar
ROBERT MASELLI JR.
  • MEMBER
  • 52 POSTS
I was wondering if you could tell me which wire colors go to each function of the cruise control. I believe the plug that contains these wires lie underneath the clock spring. From what I was able to get off the internet, a gray, a dark blue and a gray with a black stripe are the correct colors, though I'm not to sure about that. I attached a pic of the wire cluster. If I knew which went to what, I can hook this up easily. I also need to know the 12v ignition wire color because it gets hooked up to each of the 3 buttons. Thank you so much for your help on this.
Jun 11, 2020 at 12:01 PM
Avatar
KASEKENNY
  • CERTIFIED EXPERT
  • 18,907 POSTS
I think we can figure that out. However, can you get a little further away so I can see what it actually plugs into? From what I can tell the gray wire is the cancel/set/res buttons but I would like to try and get the connector view of this connector but I just need to know what it hooks to.
Jun 11, 2020 at 7:04 PM
Avatar
ROBERT MASELLI JR.
  • MEMBER
  • 52 POSTS
The connector is connected to the bottom center of the clock spring, but does not rotate with it.
Jun 12, 2020 at 3:39 AM
Avatar
ROBERT MASELLI JR.
  • MEMBER
  • 52 POSTS
If you do find the correct 3 wires, plus the ignition wire, here's my other mind boggling thing. The guy that did this on his Honda had an orange wire that provided the 12v constant power. He wired this to one terminal of the switches. The corresponding Cruise control wires were connected to the other terminals. All of these wires were on the column right near the ignition. He used 2 terminal switches. I will be using 5 pin Halo switches which need a positive and negative to light up the switch. I know what all the terminals on the switch are for, but need to know how to wire this. Take your time trying to figure all of this out. I want to get it right on my first attempt and really appreciate all of the help you are giving me.
Jun 12, 2020 at 4:52 AM
Avatar
KASEKENNY
  • CERTIFIED EXPERT
  • 18,907 POSTS
How many total wires are on that connector? Is it just 6? I show three connectors on the clock spring. 2 of them have 10 connection terminals (not all filled) and the third has 4.
Jun 12, 2020 at 7:17 PM
Avatar
ROBERT MASELLI JR.
  • MEMBER
  • 52 POSTS
Sorry for not getting back sooner because I've been a bit busy. The pic I sent you was the terminal on the bottom of the clock spring that doesn't rotate with it. Then there are the 2 airbag connectors and the other is the female side of where I unplugged the steering wheel from. This connector does rotate with the wheel and is where I found the pins to connect my horn. I believe there is another connector behind the clock spring, but I didn't need to remove it because the new NRG Hub accommodates the clock spring when installed.
Jun 15, 2020 at 3:13 PM
Avatar
ROBERT MASELLI JR.
  • MEMBER
  • 52 POSTS
My mistake. The lower plug does have 6. The top plug that rotates has 7.
Jun 16, 2020 at 11:03 AM
Avatar
ASEMASTER6371
  • CERTIFIED EXPERT
  • 52,796 POSTS
If I can throw in my 2 cents, I attached the connector diagrams for the clock spring.

Can you verify the connectors on the car side?

Roy
Jun 16, 2020 at 12:09 PM
Avatar
ROBERT MASELLI JR.
  • MEMBER
  • 52 POSTS
Your second diagram corresponds with the plug on the clock spring that rotates with it. This is where I found the positive and negative lead for the horn which is in pic number 1 from me. The other plug is bottom dead center of the clock spring which doesn't rotate with it. Pic number 2 from me. I am at work right now and can't provide you with other photos other than past ones from the last project you helped me with.
Jun 16, 2020 at 12:45 PM
Avatar
ROBERT MASELLI JR.
  • MEMBER
  • 52 POSTS
The other 4 pin connector in your pic might be behind the clock spring. There are other plugs behind it that need to be disconnected if I were to remove the clock spring, but my new hub accomadates the clock spring inside of it and I have it all wired nice and tucked away from the horn project.
Jun 16, 2020 at 12:56 PM
Avatar
ASEMASTER6371
  • CERTIFIED EXPERT
  • 52,796 POSTS
Well, let us see if we can use those wires or the ones from the connector under the dash.

Roy
Jun 16, 2020 at 1:02 PM
Avatar
ROBERT MASELLI JR.
  • MEMBER
  • 52 POSTS
Awesome. Thankyou for your time Roy.
Jun 16, 2020 at 1:06 PM
Avatar
ASEMASTER6371
  • CERTIFIED EXPERT
  • 52,796 POSTS
Anytime my friend.

Roy
Jun 16, 2020 at 1:07 PM
Avatar
ROBERT MASELLI JR.
  • MEMBER
  • 52 POSTS
Hello Roy, hope I'm not being a pain. I thought you were going to get back to me with more info. Here's a diagram that I found online for the present GM Cruise Control. On top you'll see the Cruise Control Switch and the color wires that go to it. Also is the pic again of the lower connector to the clock spring that doesn't rotate with it. Are those the correct colors wires you are seeing in the diagram and can they be found in this connector. What's throwing me off, is can't tell the if one of them is blue because they seem faded. If I knew what each of those wires go to, I can figure this out. The other diagram you sent me, which is the connector that my horn is attached to, shows 1 gray wire for the cruise control, but I need 3. If you can be some help it'd be awesome.
Jun 23, 2020 at 11:59 AM
Avatar
ASEMASTER6371
  • CERTIFIED EXPERT
  • 52,796 POSTS
The very first response form the other tech had the cruise diagram.

Do you have more than one connector at the clock spring from the body?

Roy
Jun 23, 2020 at 12:07 PM
Avatar
ROBERT MASELLI JR.
  • MEMBER
  • 52 POSTS
Yes, the one that rotates with the clock spring, the one in pic I just sent you, and a third that may have 4 pins in the back.
Jun 23, 2020 at 12:51 PM
Avatar
ASEMASTER6371
  • CERTIFIED EXPERT
  • 52,796 POSTS
I attached the connectors in a previous post.

Did you see the cruise wires in the other connector?

Roy
Jun 23, 2020 at 1:08 PM
Avatar
ROBERT MASELLI JR.
  • MEMBER
  • 52 POSTS
The diagram you sent me shows only one gray wire for cruise control. The other one you sent is for the 4 pin connector, which I don't know what any of those are for. I'm just looking for the 3 correct wires. 1)On/Off, 2)Set, 3)Resume/Accel. They have to be together somewhere. The other guys diagram shows only 2 wires. A gray and a pink.
Jun 23, 2020 at 1:36 PM
Avatar
ASEMASTER6371
  • CERTIFIED EXPERT
  • 52,796 POSTS
When I first came in the question, I attached the 3 connectors with the wires and the identification of them and what they control.

Did you get them?

Roy
Jun 23, 2020 at 2:03 PM
Avatar
ROBERT MASELLI JR.
  • MEMBER
  • 52 POSTS
I did not receive that one Roy.
Jun 23, 2020 at 2:13 PM
Avatar
ROBERT MASELLI JR.
  • MEMBER
  • 52 POSTS
Yes, I received these. You sent 6 diagrams where 2 of them were doubles. So I got 4. After looking at that, which is why I contacted you again, is because other than the pin that says Cruise Signal (gray), I haven't the slightest clue which the other two wires I need are. No other pins in the diagrams say anything about cruise control.
Jun 23, 2020 at 2:52 PM
Avatar
ROBERT MASELLI JR.
  • MEMBER
  • 52 POSTS
I'm not a mechanic Roy. I worked Auto body all my life until I blew my back out.
Jun 23, 2020 at 2:54 PM
Avatar
ASEMASTER6371
  • CERTIFIED EXPERT
  • 52,796 POSTS
No, they are not the same. the pin arrangement is different and the they are marked X1 and X2.

Roy
Jun 23, 2020 at 3:02 PM
Avatar
ROBERT MASELLI JR.
  • MEMBER
  • 52 POSTS
I'm done Roy. None of those 6 diagrams, other than a gray wire, tells me anything of which wires to use. Simple question: Which 3 do I tap into? You still haven't answered that. Have a nice evening.
Jun 23, 2020 at 3:15 PM
Avatar
ASEMASTER6371
  • CERTIFIED EXPERT
  • 52,796 POSTS
It is not as easy as you think to do this.

The wires are clearly marked for what you need.

I do not know what else to tell you if you cannot locate them.

Roy
Jun 23, 2020 at 3:37 PM
Avatar
ROBERT MASELLI JR.
  • MEMBER
  • 52 POSTS
Roy, I don't mean to be disrespectful at all. This is easy as heck to do if I just know where the 3 wires are. I've seen plenty of videos on this, but unfortunately none 9n the Camaro. All one has to do is tap into these 3 wires, connect each one to one one side of a switch and the other to 12v power. Your diagrams tell me nothing. I can find all of these connectors. I sent pics of them, but if you don't tell me which 3 wires I need to tap into, I'm in the dark. There's one wire for ON/OFF, one for SET and one for RESUME/ACCEL. Your diagrams show none of this except for a gray wire for Cruise Control signal, which means what? Is that for ON/ OFF? I too just don't know what else to say or any other way to put it.


Jun 23, 2020 at 3:57 PM
Avatar
ROBERT MASELLI JR.
  • MEMBER
  • 52 POSTS
I have the 3 switches in already. One latching, two momentary. Just need the 3 correct wires.
Jun 23, 2020 at 4:04 PM
Avatar
KASEKENNY
  • CERTIFIED EXPERT
  • 18,907 POSTS
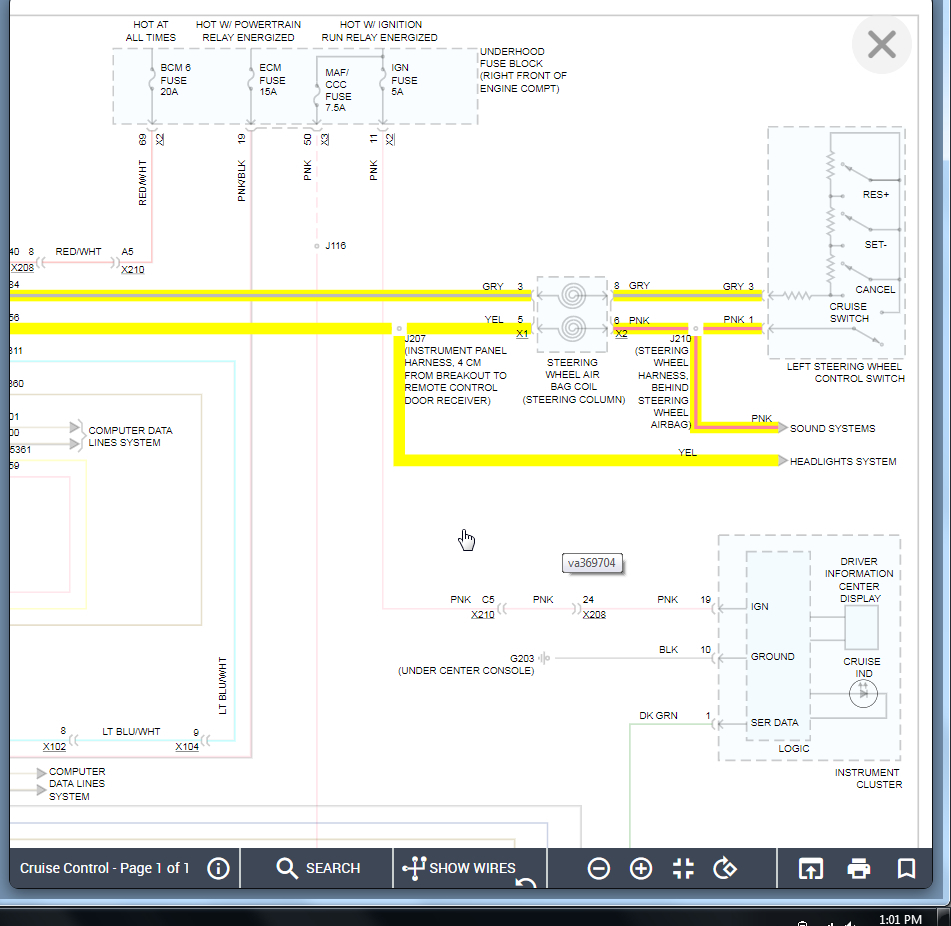
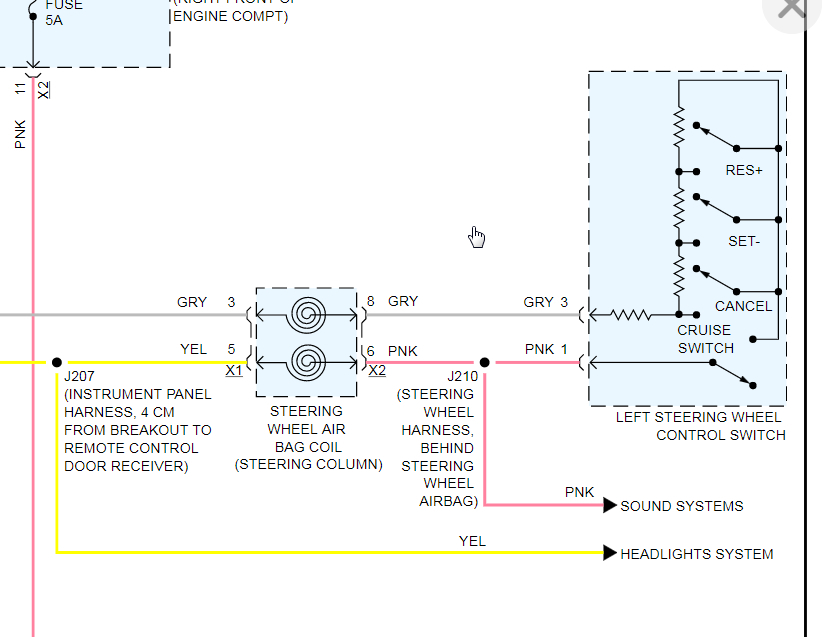
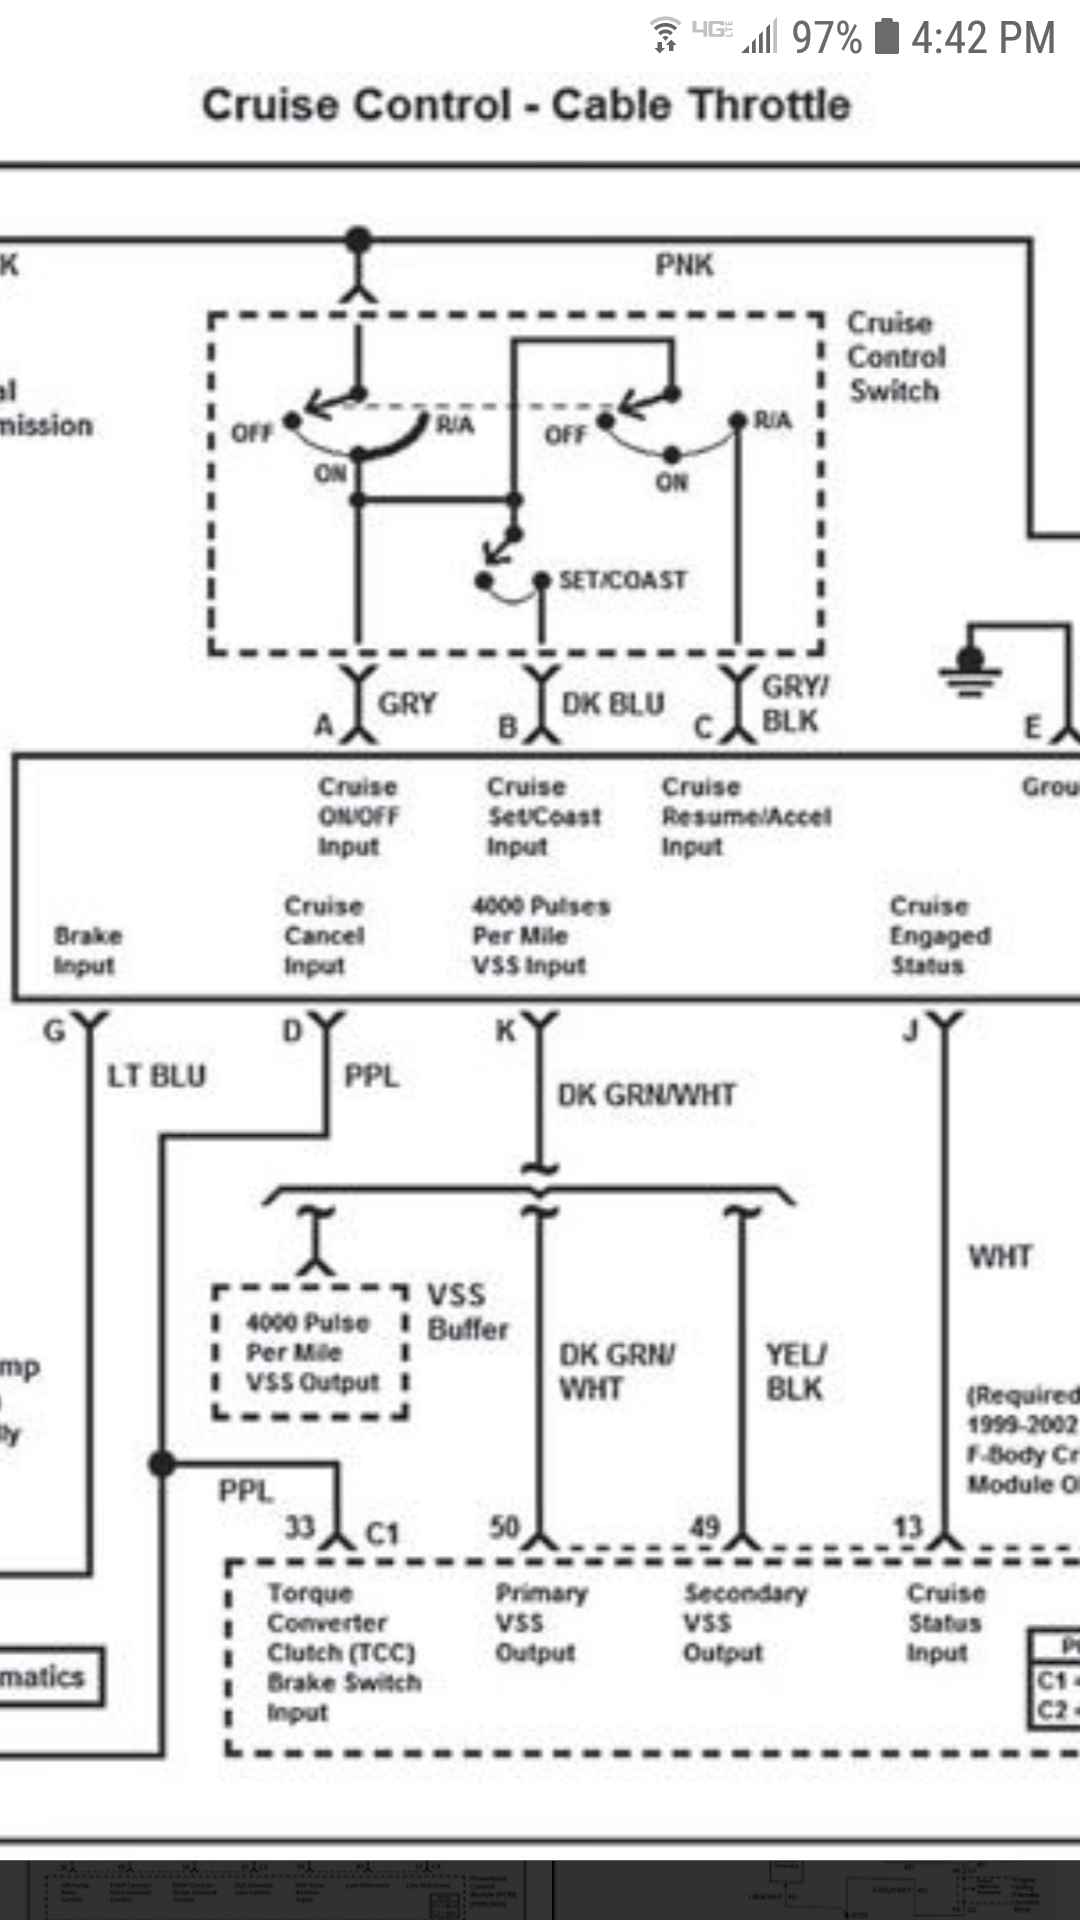
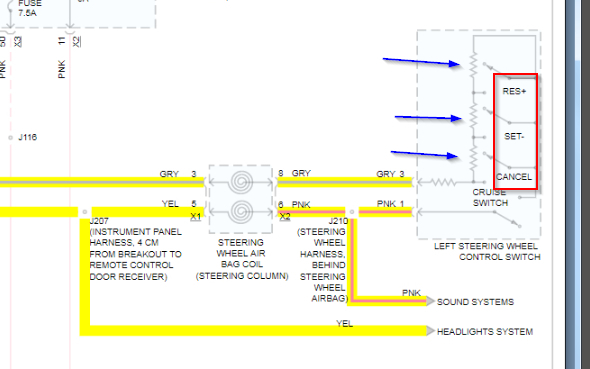
I think the issue is you saw a video on a different vehicle. Is that correct? If so, I suspect the confusion is coming in that the system in that vehicle was wired differently then your vehicle. If you take a look at these wiring diagrams, you are not able to find any wire for RES/SET/Cancel except the cruise signal wire because that is the only wire that is used. You don't have 3 separate wires that when the button is pressed it sends a signal to the BCM. You have a signal wire that the BCM will read the voltage on this single wire and depending on what it is, it knows what button is being pressed.

If you look at what the blue arrows I added are pointing too, those are resistors in the switch. This tells us that when the cancel button is pressed it grounds the signal wire and then BCM sees a voltage signal. When one of the other buttons are pressed, it grounds the signal wire but the voltage passes through other resistors and it changes the voltage the BCM sees so it knows that a different button has been pressed.

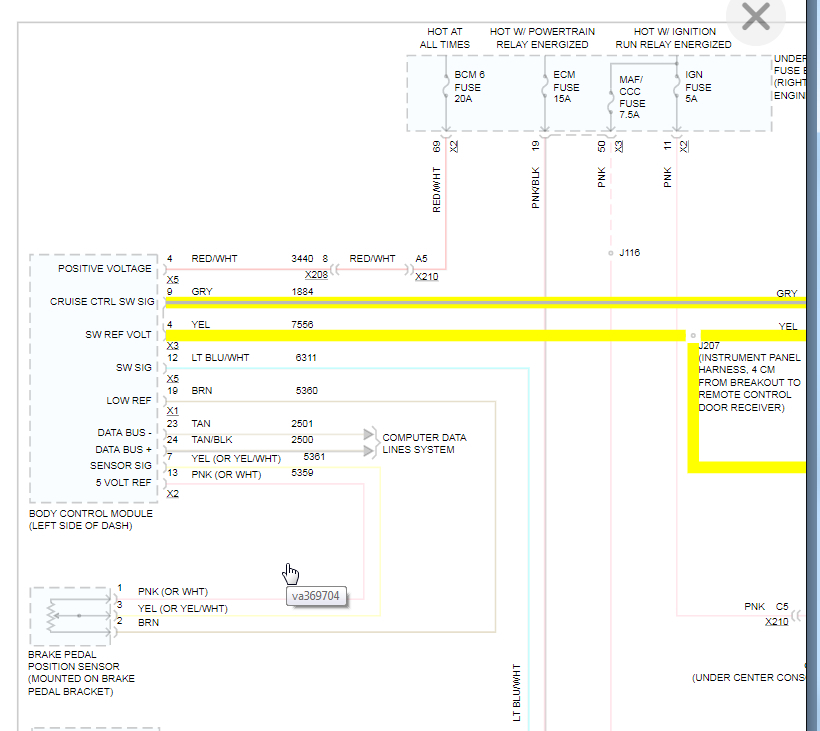
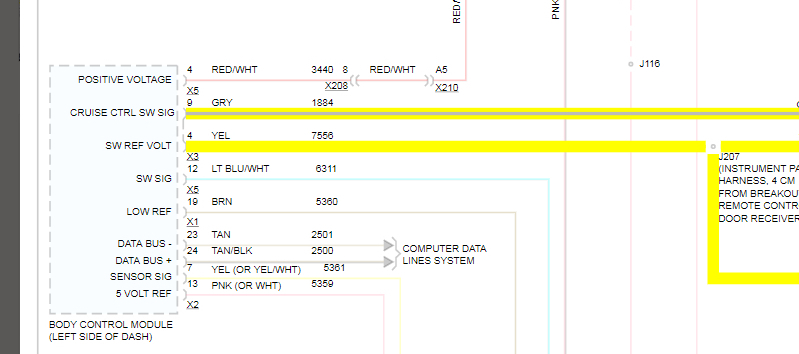
I imagine we can trick the BCM into thinking that your buttons are the stock buttons, we just need to know what the voltage is on the signal wire at the BCM when each button is pressed. Then you tap all three of your new buttons into this signal wire but you will need to add your own resistors to each wire so that when you press your new button it gives the same voltage to the BCM so it knows what button that is supposed to be.

Hopefully that makes sense. It is not the easiest thing because I don't know what the starting voltage is (I suspect it is 5 volts) to know what size resistors you need for each button in order to cut the voltage down to match the stock buttons.

First thing to do is monitor the voltage on that wire at the BCM and press each button to find out starting voltage and then how each button effects it.
Jun 23, 2020 at 8:17 PM
Avatar
ROBERT MASELLI JR.
  • MEMBER
  • 52 POSTS
Okay, that absolutely makes sense to me. I don't know how to read wiring schematics, so I didn't know that resistors were needed for this. Thank you for helping me to understand this a little bit better. I obviously have more work to do on this.
Jun 24, 2020 at 2:15 AM
Avatar
KASEKENNY
  • CERTIFIED EXPERT
  • 18,907 POSTS
Okay. Glad we are on the same page. Let us know as you make progress with this and how we can help. Thanks
Jun 24, 2020 at 7:26 PM
Avatar
ROBERT MASELLI JR.
  • MEMBER
  • 52 POSTS
I'm going to see if I can find an electronics pro, to see if maybe he can use the board inside of the original switches and solder new wiring to it. Then I can just hide it in the column. Thanks again for your help.
Jun 25, 2020 at 2:14 AM