Will not start

1981 JEEP CJ7
150,000 MILES • 5.0L • V8 • 4WD • MANUAL
Avatar
SICHOT
  • MEMBER
  • 34 POSTS
Engine cranks but looks like no spark takes place. Changed coil, ignition switch, Ignition Control Module, distributor cap, rotor.
Mar 25, 2020 at 8:18 PM
Advertisement
Avatar
CJ MEDEVAC
  • CERTIFIED EXPERT
  • 11,004 POSTS
Do you have a voltmeter?
can you tell me what is showing on the positive side of the coil with the key turned to on?
The medic
Mar 26, 2020 at 3:30 PM
Avatar
SICHOT
  • MEMBER
  • 34 POSTS
Thanks for getting back. I do have a voltmeter. It does not show any voltage when key is turned to on. I have a Ford system and I have been told this is normal. When I turned the key to crank it does shoe 12.9 V. Engine cranks without a problem.
Thanks
Mar 26, 2020 at 5:34 PM
Advertisement
Avatar
CJ MEDEVAC
  • CERTIFIED EXPERT
  • 11,004 POSTS
You have one of the three years of CJ's that I consider the best years, that is 1979-1981

How long ago did it run?

Did it run well?

Any modifications from original?

Anything added or messed with prior to this issue, like a coil, removing or turning the distributor, etc?

Even though this is sounding like "ignition issues" of some sort (which we will address real soon) Lets try this below first, as it is an easy test and might rule out fuel as an issue.

Just to rule out a fuel possibility, 2 teaspoons of gas down the carburetor throat, attempt to start. Does it start or try to (spit or pop)? Or does it just do dry monotone over and overs?

I want to do a few tests before we start spending money!

Report findings!

How about well lit pics, left/ right/ overhead of the engine (or more!) with the hood against the windshield frame and the breather removed. Sometimes I can spot problems.

The Medic
Mar 26, 2020 at 6:18 PM
Avatar
SICHOT
  • MEMBER
  • 34 POSTS
Thanks for replying back and quick response. Good to know that 1981´s CJ-7´s are considered one of the best. Let me point out that this is a Mexican vehicle. It originally came with 6 in line and now has a V8 Ford. Not sure if after know this, you can still say 81 is a good model =P.
Engine will only crank if I pour some gasoline or starter liquid directly to the carburetor. Engine will just do dry monotone over and overs. I did change the starter because it was not working. After this, nightmare started. Starter is exactly the same it used to have (AutoZone refurbished). I´m attaching a quick sketch of my wiring, which by the way is really crappy. Looks like AC did a huge mess. It´s definitely after market. It´s completely disconnected. I´m also attaching pictures of engine, hope they help. I believe it´s a TFI (Ignition Control Module mounted directly in carburetor). Several wires are without any connection. No ballast resistor or ignition coil wire resistor. Any guidance is sincerely appreciated.
Thanks,

JC
Mar 26, 2020 at 8:17 PM
Avatar
SICHOT
  • MEMBER
  • 34 POSTS
Forgot to mention. I also tested compression and found all cylinders okay.
Thanks

JC
Mar 26, 2020 at 8:29 PM
Avatar
CJ MEDEVAC
  • CERTIFIED EXPERT
  • 11,004 POSTS
Crank (turns over using the starter).

Start- runs/ busts off.

Tries/ attempts to start- kind of in between cranks and start, it spits and pops and really sounds like it wants to start but does not.

Runs well, but only for seconds before it shuts off.

Which one of these happens when you pour in a little gas?

It was a little unclear in your last reply.

The Medic
Mar 27, 2020 at 6:38 PM
Avatar
SICHOT
  • MEMBER
  • 34 POSTS
It just cranks (turns over using the starter).
Thanks
Mar 27, 2020 at 7:46 PM
Avatar
SICHOT
  • MEMBER
  • 34 POSTS
Here are more pictures.
Not really sure if they´ll help since as you noticed. Wiring extremely bad.
Thanks
Mar 27, 2020 at 8:00 PM
Avatar
CJ MEDEVAC
  • CERTIFIED EXPERT
  • 11,004 POSTS
I have not abandoned you!

A lot going on over this way and I'm going to "save" your pics onto my desktop and edit them so I can see everything well.

Try this with the key start/on, and a little shot of gas.

Positive battery to positive coil.

Results?

The Medic
Mar 28, 2020 at 8:58 AM
Avatar
SICHOT
  • MEMBER
  • 34 POSTS
Did what you recommended. Please refer to picture. I´m attaching two videos after pouring some gasoline. One showing result of positive battery to positive coil. It does run! Horray! but only for few seconds. =´(
Second video without wire connected from battery positive to coil positive.
Does this mean starter relay is not working?
Thanks Mr. Medic for your help and no worries. I´m patient but really anxious to have my CJ7 running again. hehe =D

JC
Mar 28, 2020 at 2:46 PM
Avatar
CJ MEDEVAC
  • CERTIFIED EXPERT
  • 11,004 POSTS
On 2nd video,

Did you spoon in some gas for that test or did you leave it alone from test 1?

One more time- for giggles- key "ON" test positive side of coil with voltmeter.

We are trying to determine whether it's a fuel issue or an ignition issue.

I have further tests once I kind of know which is lacking.

I have you jumper from the battery and add the fuel. If it ran (at all) I knew it would motivate you! You would know it is still alive and you would not resemble my pic.

Results this go 'round?

The Medic
Mar 28, 2020 at 4:50 PM
Avatar
SICHOT
  • MEMBER
  • 34 POSTS
LOL
It´s a live! =D
On second test I did pour more gasoline and engine just crank.
Did the voltage test again, and when key is "on", no voltage at all in coil positive (voltmeter´s black probe in negative from battery and red probe in positive coil). Cranked engine and registered voltage in coil +.
Ignition problem? =S
Thanks

JC
Mar 28, 2020 at 8:26 PM
Avatar
CJ MEDEVAC
  • CERTIFIED EXPERT
  • 11,004 POSTS
My Gosh!

Did a raccoon arrange your wiring?

Still need to decide which way to go when you post your new findings (insure you remove the temporary battery/coil jumper wire when you take your reading!)

A few questions below from looking at your pics.
First) heater (for my own learning)

Second) is this wire touching and shouldn't?/ others soldered or twisted?

Third) PCV hole visible/ I do not see a fresh air hole in either cover (where is this engine getting fresh air for the PCV?) See my pictures 4 and 5) Even though it is a inline 6, it gets fresh air into the engine cavities as the PCV sucks out the bad gasses and water vapor. (send pic of the fresh air hole)

The Medic
Mar 28, 2020 at 8:36 PM
Avatar
CJ MEDEVAC
  • CERTIFIED EXPERT
  • 11,004 POSTS
pic 1) wire originating from no where?

pic2) disregard everything except the explanation of "I" (this is a diagram for a stock 258 6 cylinder)

pic 3) My 1977 ignition switch, my steering does not tilt. Located on the other side of the firewall, it sits on top of the steering column.

If it comes to it, Key "on" test the metal terminal that the marked wire runs into (if it's dead- the switch is most likely bad). It also might be "slid" in it's anchor holes and just be out of adjustment (not synced to its proper position)

For now, the easiest thing to try will be start at the positive side of the coil and start tracing that wire back. Look for breaks, connectors loose or bad, fuses? etc. That wire will eventually wind up at the ignition switch.

That "jumper" we temporarily stuck on just bypassed the ignition switch- happy hunting!

Keep us posted.

The Medic
Mar 28, 2020 at 9:29 PM
Avatar
SICHOT
  • MEMBER
  • 34 POSTS
LOL
I think a raccoon would have done a much better work! =D
Answers to your first reply:
1. Yes, these are from heater. I was not able to capture too much from other side of firewall. Second picture shows hoses from the aftermarket A/C (I´m attaching also picture of the A/C console).
2. Wires do not touch. They are soldered (picture 3). I do have twisted wires on wire that goes to solenoid located on the left side of the carburetor (picture attached). Not sure what this is for. The next picture is showing connector that the wire for crank has. You can also see on this same picture slightly to the left an open wire which I indicated on my initial "wire diagram" (right next to the choke - green-).
3. The next picture shows the PCV hole. I´m also attaching two pictures showing open outlets (or inlets?) from rear and front of carburetor. Hope the last picture also shows a hose that goes from brake booster. Not sure of its purpose.

For your second reply, here are my answers:
1. It goes to the "I" terminal in the starter relay.
2. I´ll review your diagram. Thanks for sharing
3. Ignition switch is the same as yours mounted in the steering column. Did validate positions matches key position (e.g. accessories, ON, etc.). Removed it to ensure this and put it back all the way to the accessory position. Once I place key on accessory voltmeter of dash indicates 12V. I´ll double check the voltage on the ignition itself when key is "ON".

I´ll trace the ignition once it gets to the fuse box and will get back to you as soon as I´m done (hopefuly before day ends).
Sincerely appreciate all our help!

JC

PS1: Jumper was removed.
PS2: I´m seriously thinking in removing OE´s harness and replace it with Painless 10110 kit. Yesterday I compared this kit with the harnesses in place and I think there is minimum differences (e.g. indicator for wipers in kit has only two wires and also switch harness is different). This was a gift from PO. But hey, CJ used to run fine. Want to make it run before I start this adventure.
Mar 29, 2020 at 10:04 AM
Avatar
SICHOT
  • MEMBER
  • 34 POSTS
Confirmed, 12V when key has "on" position and power from battery cable constantly has 12V, both in ignition switch.
As shown in diagram (first picture), tracing back from coil positive (+), wire will join blue wire that goes to relay. Where these two are joined, a third cable that comes from the choke is joined (brown cable). Out of this relay we have a black and yellow cable not connected to anything, a red wire will come out as well and join to a purple wire that comes from voltage regulator. Once joined it goes to the positive of the battery (red wire). From this relay, there´s another white cable that goes to balast.
There´s no wire going to the ignition switch from coil positive. The crank wire is the only one going from fuse box to "S" in the starter relay.
First picture shows the whole "diagram". Second picture shows union of choke (brown), coil (red) and relay (blue). Third picture shows top view. Fourth picture is another view of "Bosch" relay.
Does the "I" in starter relay needs a wire to get to the fuse box?
Not sure what´s the function of the relay (Bosch) but it´s sure preventing for Coil (+) to be connected directly to (+) in battery (jumper that you suggested at the beginning).
Thanks for your help. =D

JC
Mar 29, 2020 at 5:25 PM
Avatar
SICHOT
  • MEMBER
  • 34 POSTS
Forgot to mention that I removed all electrical wire insulating tape just for better appreciation. I´ll for sure place it back once we are opening champagne celebrating. =D
Thanks

JC
Mar 29, 2020 at 5:36 PM
Avatar
CJ MEDEVAC
  • CERTIFIED EXPERT
  • 11,004 POSTS
I have found a few issues in your pics that may affect the way your engine is running.

I need a little time to assemble something for you.

Meanwhile! Here's some other stuff.

Any idea what that heater came out of?

You may be up to par with this (or not)

This feller goes over things well, there are other videos near this one.

https://www.youtube.com/watch?v=kjSGCSwNuAg&t=1232s

Crimping your stuff correctly and using proper stake-ons (such as un-do-able connectors that fully conceal the metal when it's joined together) This will prevent accidental shorts onto metal stuff (ground)

Wires that are unused and the wire end just dangles might be protected from a short by simply squeezing one end of a butt splice onto it. The other end of the butt splice will connect to nothing. Like in pic 1.(sorry, it was hard to construct this one)

More pics coming soon!

The Medic
Mar 29, 2020 at 5:37 PM
Avatar
SICHOT
  • MEMBER
  • 34 POSTS
As always, I appreciate your help and advises! Great job on the picture showing how I should protect unused wires! =D As clear as water. I´ll for sure work on this once nightmare is over.
I do have some tools and connectors that will for sure help me with this.
Thanks for your awesome help!

JC
Mar 29, 2020 at 7:32 PM
Avatar
SICHOT
  • MEMBER
  • 34 POSTS
Forgot to mention, awesome video! Thanks for sharing.

JC
Mar 29, 2020 at 7:33 PM
Avatar
CJ MEDEVAC
  • CERTIFIED EXPERT
  • 11,004 POSTS
Long time to make this G.I.!

I only concentrated on the ignition part.

Accessories may be hooked up fine (if not, we will work on that later). Work with/ around them leaving connected as you use my ignition diagram.

I used your hand made diagram, several pics (yours and mine) to come up with this.

It looks as though the relays on the left side of your diagram is where the battery voltage fed the ignition (looks like the wire goes nowhere now.

You will see how simple this can work. I think I could have just ran the system pretty quick from scratch than to try to trace down what you have!

If you can make install back to the ignition switch, Your Jeep may perform like his brothers.

I'm beat, I'll try to make the other diagrams that I hope will make your Jeep run smoother/better tomorrow.

I tried to edit-what a cluster- I have one wrong diagram and two good (the same diagram) I hope the 1st two delete as I tried to do. The last one is right. I need to check back and insure you have the right one.

I will post it again below!

And?

The Medic
Mar 29, 2020 at 7:48 PM
Avatar
CJ MEDEVAC
  • CERTIFIED EXPERT
  • 11,004 POSTS
I thought I submitted this?

Here is the absolute correct diagram that I reworked several times!

The Medic
Mar 29, 2020 at 8:11 PM
Avatar
SICHOT
  • MEMBER
  • 34 POSTS
Thanks for your information. I now my wiring is even crappy on paper. LOL
Great idea of creating one from scratch. =D
I´ll work in wiring as suggested. I´ll run a wire directly from the ignition switch (on) to the ballast resistor (no fuses in between). I will then wire the ballast resistor to coil´s (+). I do not have an Accel resistor. I only have two cheap ballast resistors. One with 0.633 ohms (first picture) and another one with 1.25 ohms (second picture). I´m sure the second one will work for now. I´ll then try to get a hold of an Accel one. I´ll report results shortly.
Thanks for your help Mr Medic!

JC
Mar 30, 2020 at 4:47 PM
Avatar
SICHOT
  • MEMBER
  • 34 POSTS
So I routed wire from "Ignition ON" to (+) on coil with ballast in between. As expected I do have a voltage in (+) coil of around 10.4 V.
Some pictures attached. Left all accessories untouched.
Next step is to crank it?
Thanks

JC

PS: Some tips from suggested previous video put into practice =D
Mar 30, 2020 at 5:51 PM
Avatar
CJ MEDEVAC
  • CERTIFIED EXPERT
  • 11,004 POSTS
This rebuilt 1979 Carter BBD was used on mine for a few months till I got my Holley 390 4 barrel put on.

There are 2 ports on top that are vents for the bowl, they did run to the charcoal filter. I removed them from that and basically let them breathe through a fuel filter (pic 1 a simulation for you). The fuel filter is just open on the bottom side it just keeps trash out of the vent ports.

In the past I found that if they were completely plugged shut, upon driving then shutting off the engine, the bowl fuel in the bowl would expand/ boil and the carburetor would pour fuel from every hole/ crack it could run out of!

Where I'm going with this is your vacuum booster, distributor, etc, require either manifold vacuum or ported vacuum. This is a given and must happen.

I noticed some vacuum ports on your carburetor are open (not good! These are vacuum leaks! Poor performance/runs rough)

They need to be plugged!

On my first 2 pictures notice I plugged most every port! This was to keep dirt daubers from filling them with mud nests when I stored it!

I recommend vinyl vacuum caps over rubber ones, the rubber type rot away pretty fast (then you have a unseen vacuum leak). Next best deal is a short fuel hose with a small bolt shoved in to seal it off tight.

Here's what I did with the fuel tank vent line (last pic) It used to connect to the charcoal canister. Now that I eliminated the vacuum to it, I eliminated the whole canister too.

Once it will run on it's own, after you get all of this fixed, lets see if you can make it much better than now,

The procedures will work the same as I explain in this post of long ago!

https://www.2carpros.com/questions/jeep-cj7-1985-jeep-cj7-stalls-when-hot

Your turn,

The Medic
Mar 30, 2020 at 6:54 PM
Avatar
SICHOT
  • MEMBER
  • 34 POSTS
Thanks, again excellent information.
Before moving forward, I have the following questions from previous reply.
Was wiring ballast resistor without going through a fuse okay?
I did not start the engine. Should I try it? Anxious in doing it! LOL

In regards to your latest recommendations, I think I have a small section of fuel hose. I´ll work in plugging all open vacuum vents from carburetor, and will try to identify which are vents for the bowl that used to run to the to the charcoal canister (which by the way is still there but completely disconnected) and leave those open. I´ll then attach a fuel filter just like you showed in your picture.
Fuel tank vents in CJ´s fuel tank are just connected to each other with a small piece of hose (imagine a small hose bent in "U" connecting both fuel tank vents). What problems might this cause?
I´ll for sure take a deep look to post you are recommending.
Thanks Mr. Medic!

JC
Mar 30, 2020 at 8:44 PM
Avatar
CJ MEDEVAC
  • CERTIFIED EXPERT
  • 11,004 POSTS
Return when you start making some headway!

The Medic
Mar 31, 2020 at 5:30 PM
Avatar
CJ MEDEVAC
  • CERTIFIED EXPERT
  • 11,004 POSTS
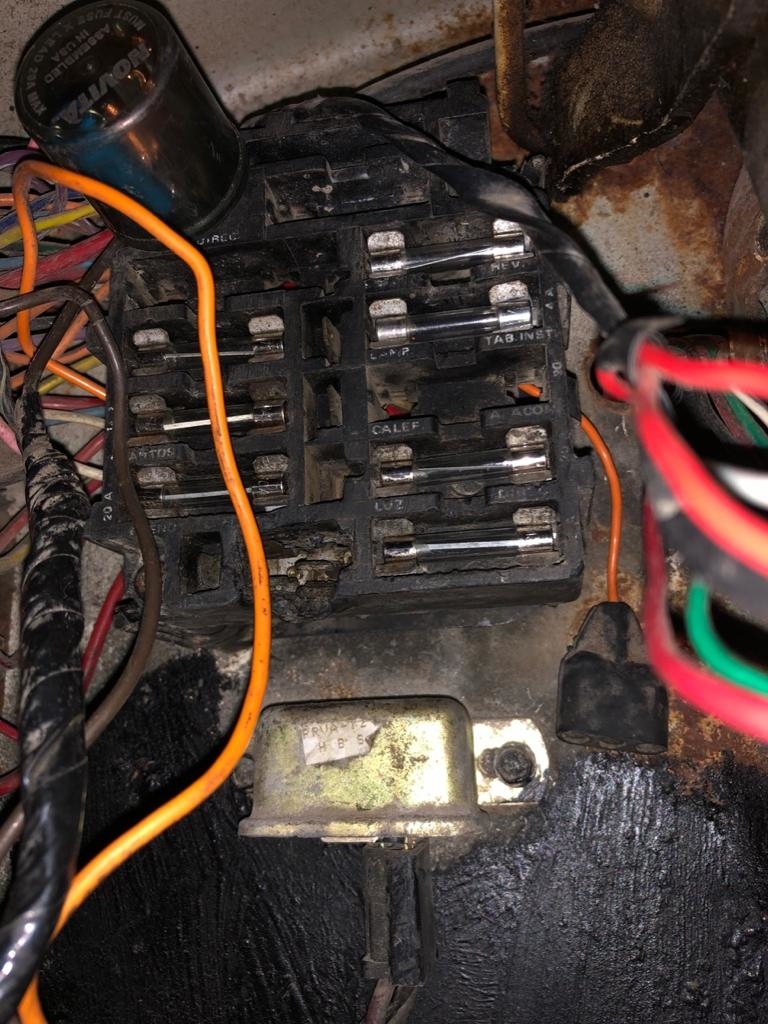
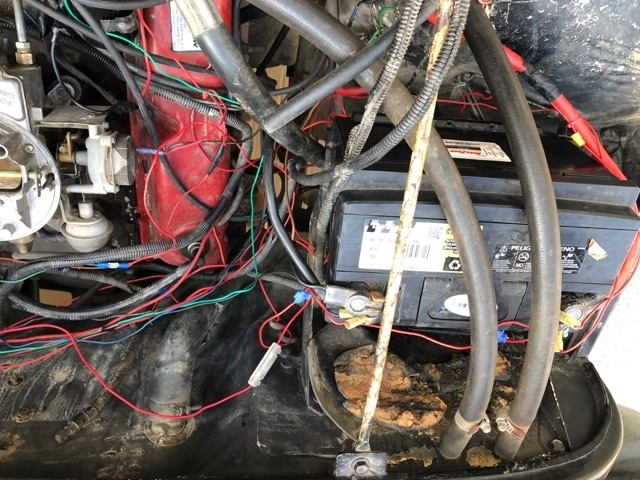
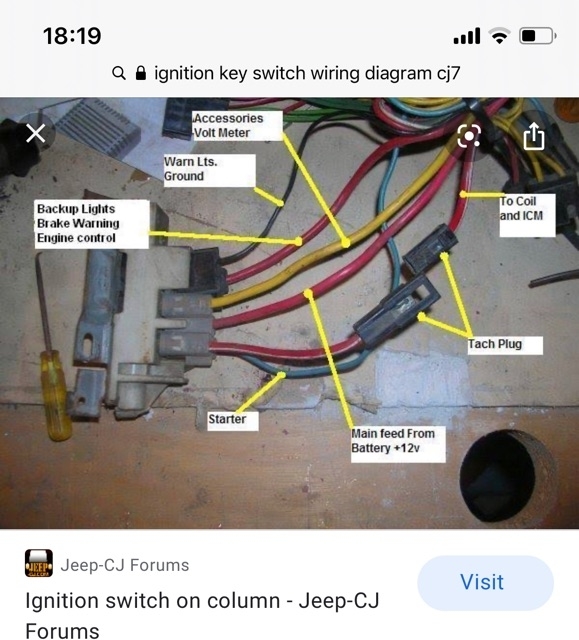
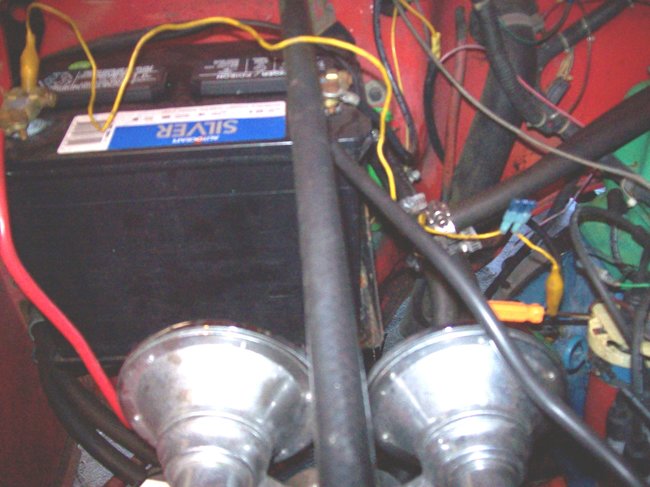
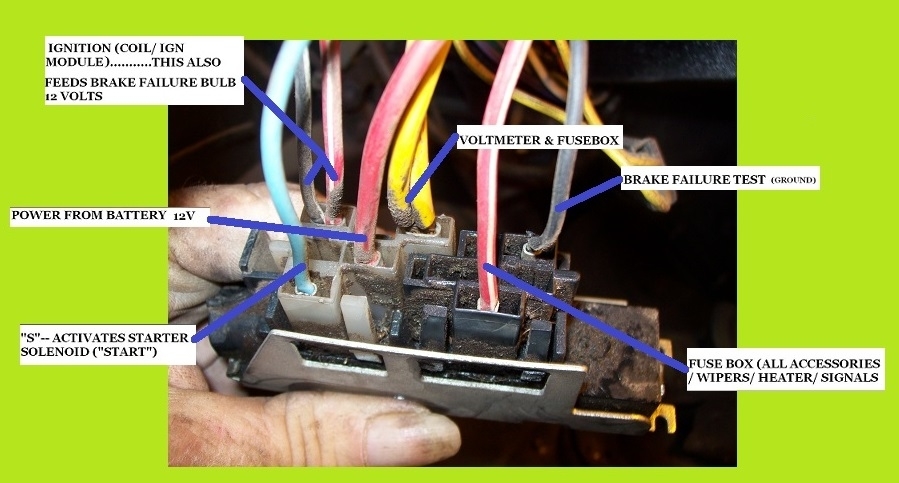
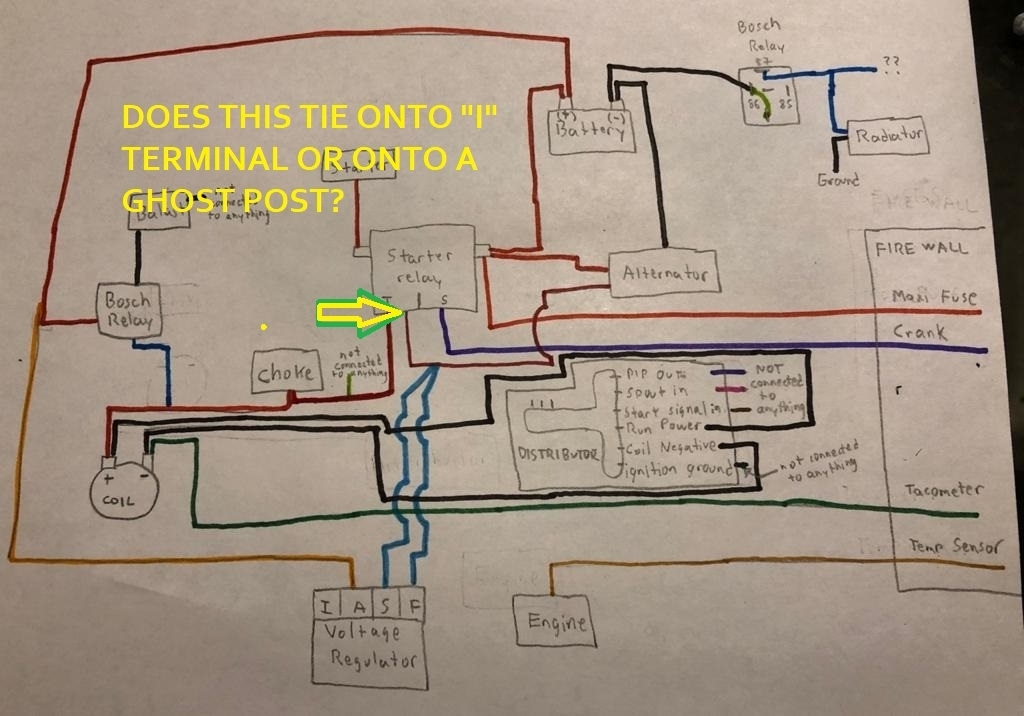
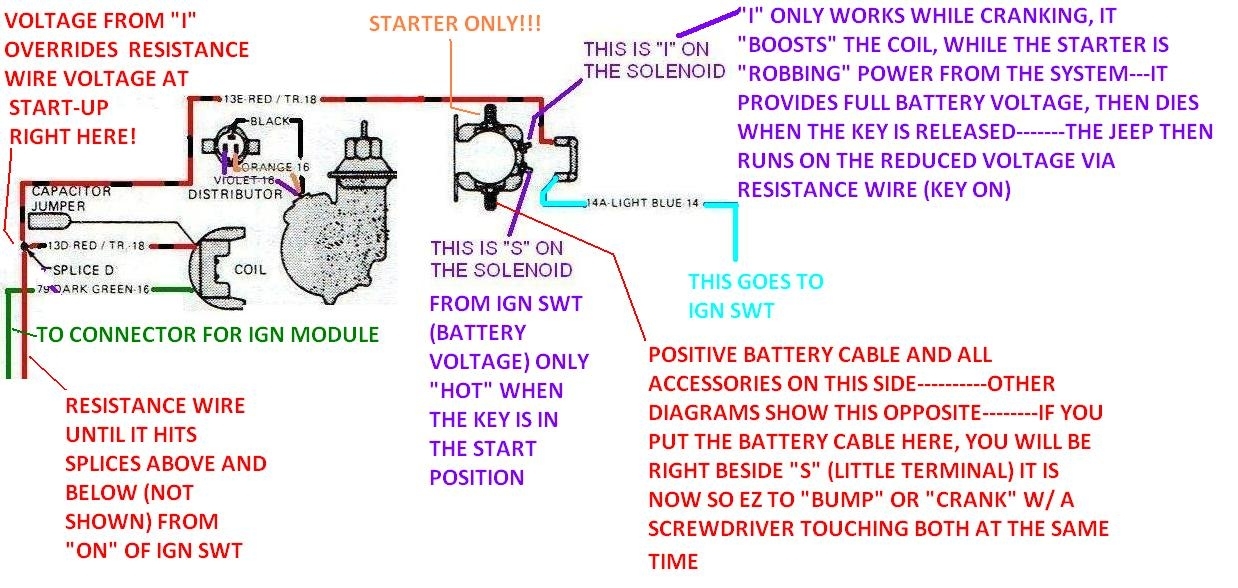
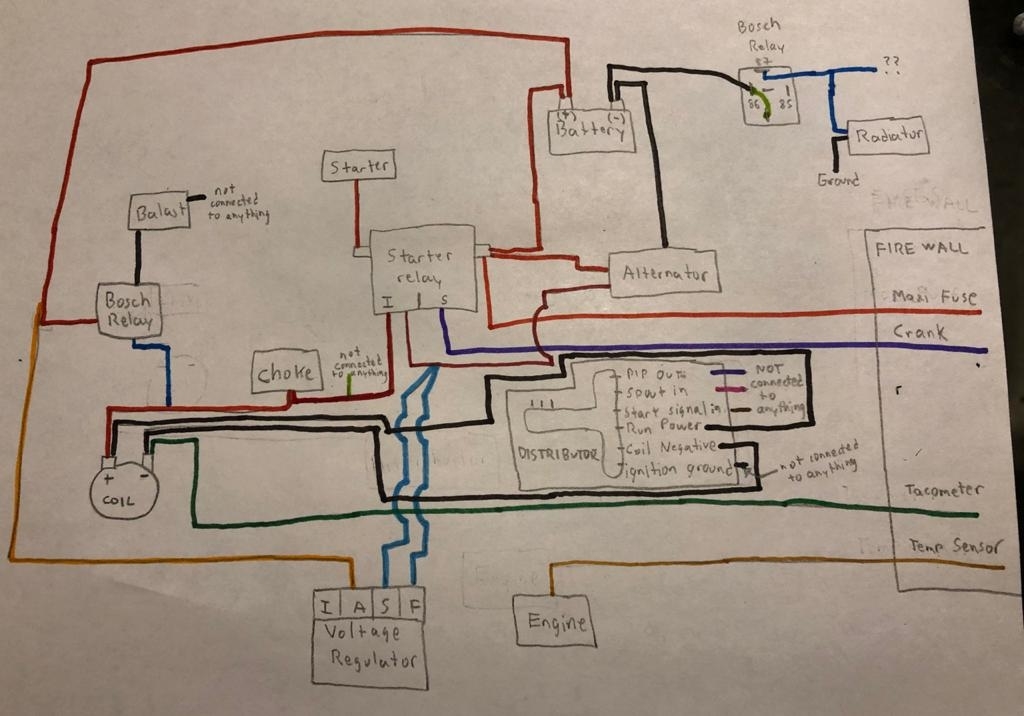
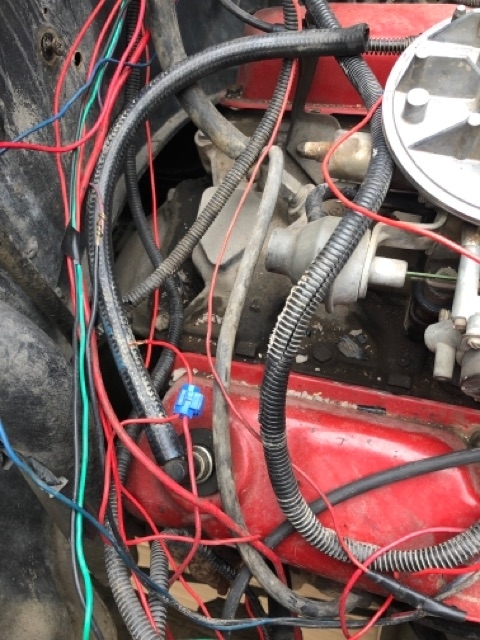
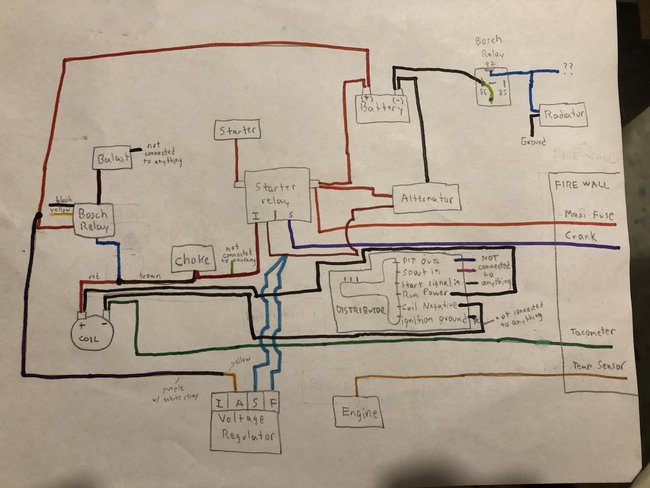
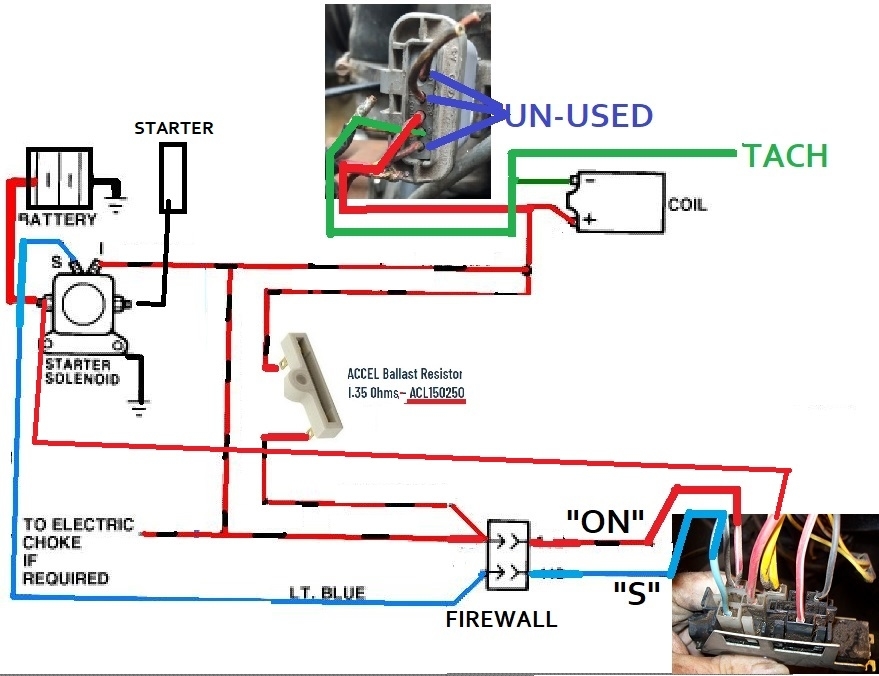
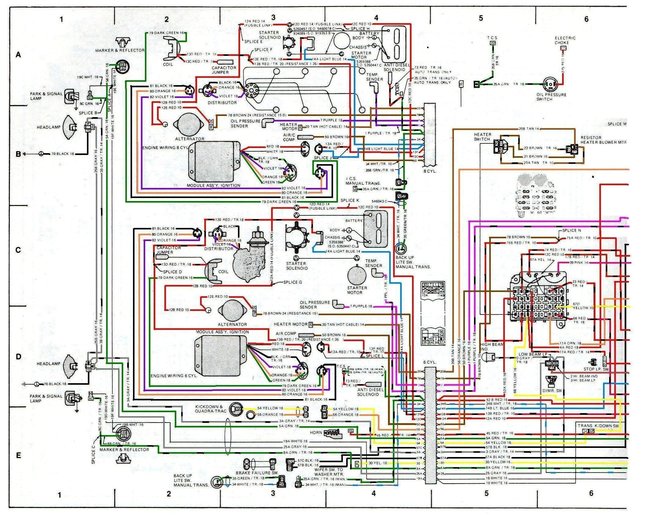
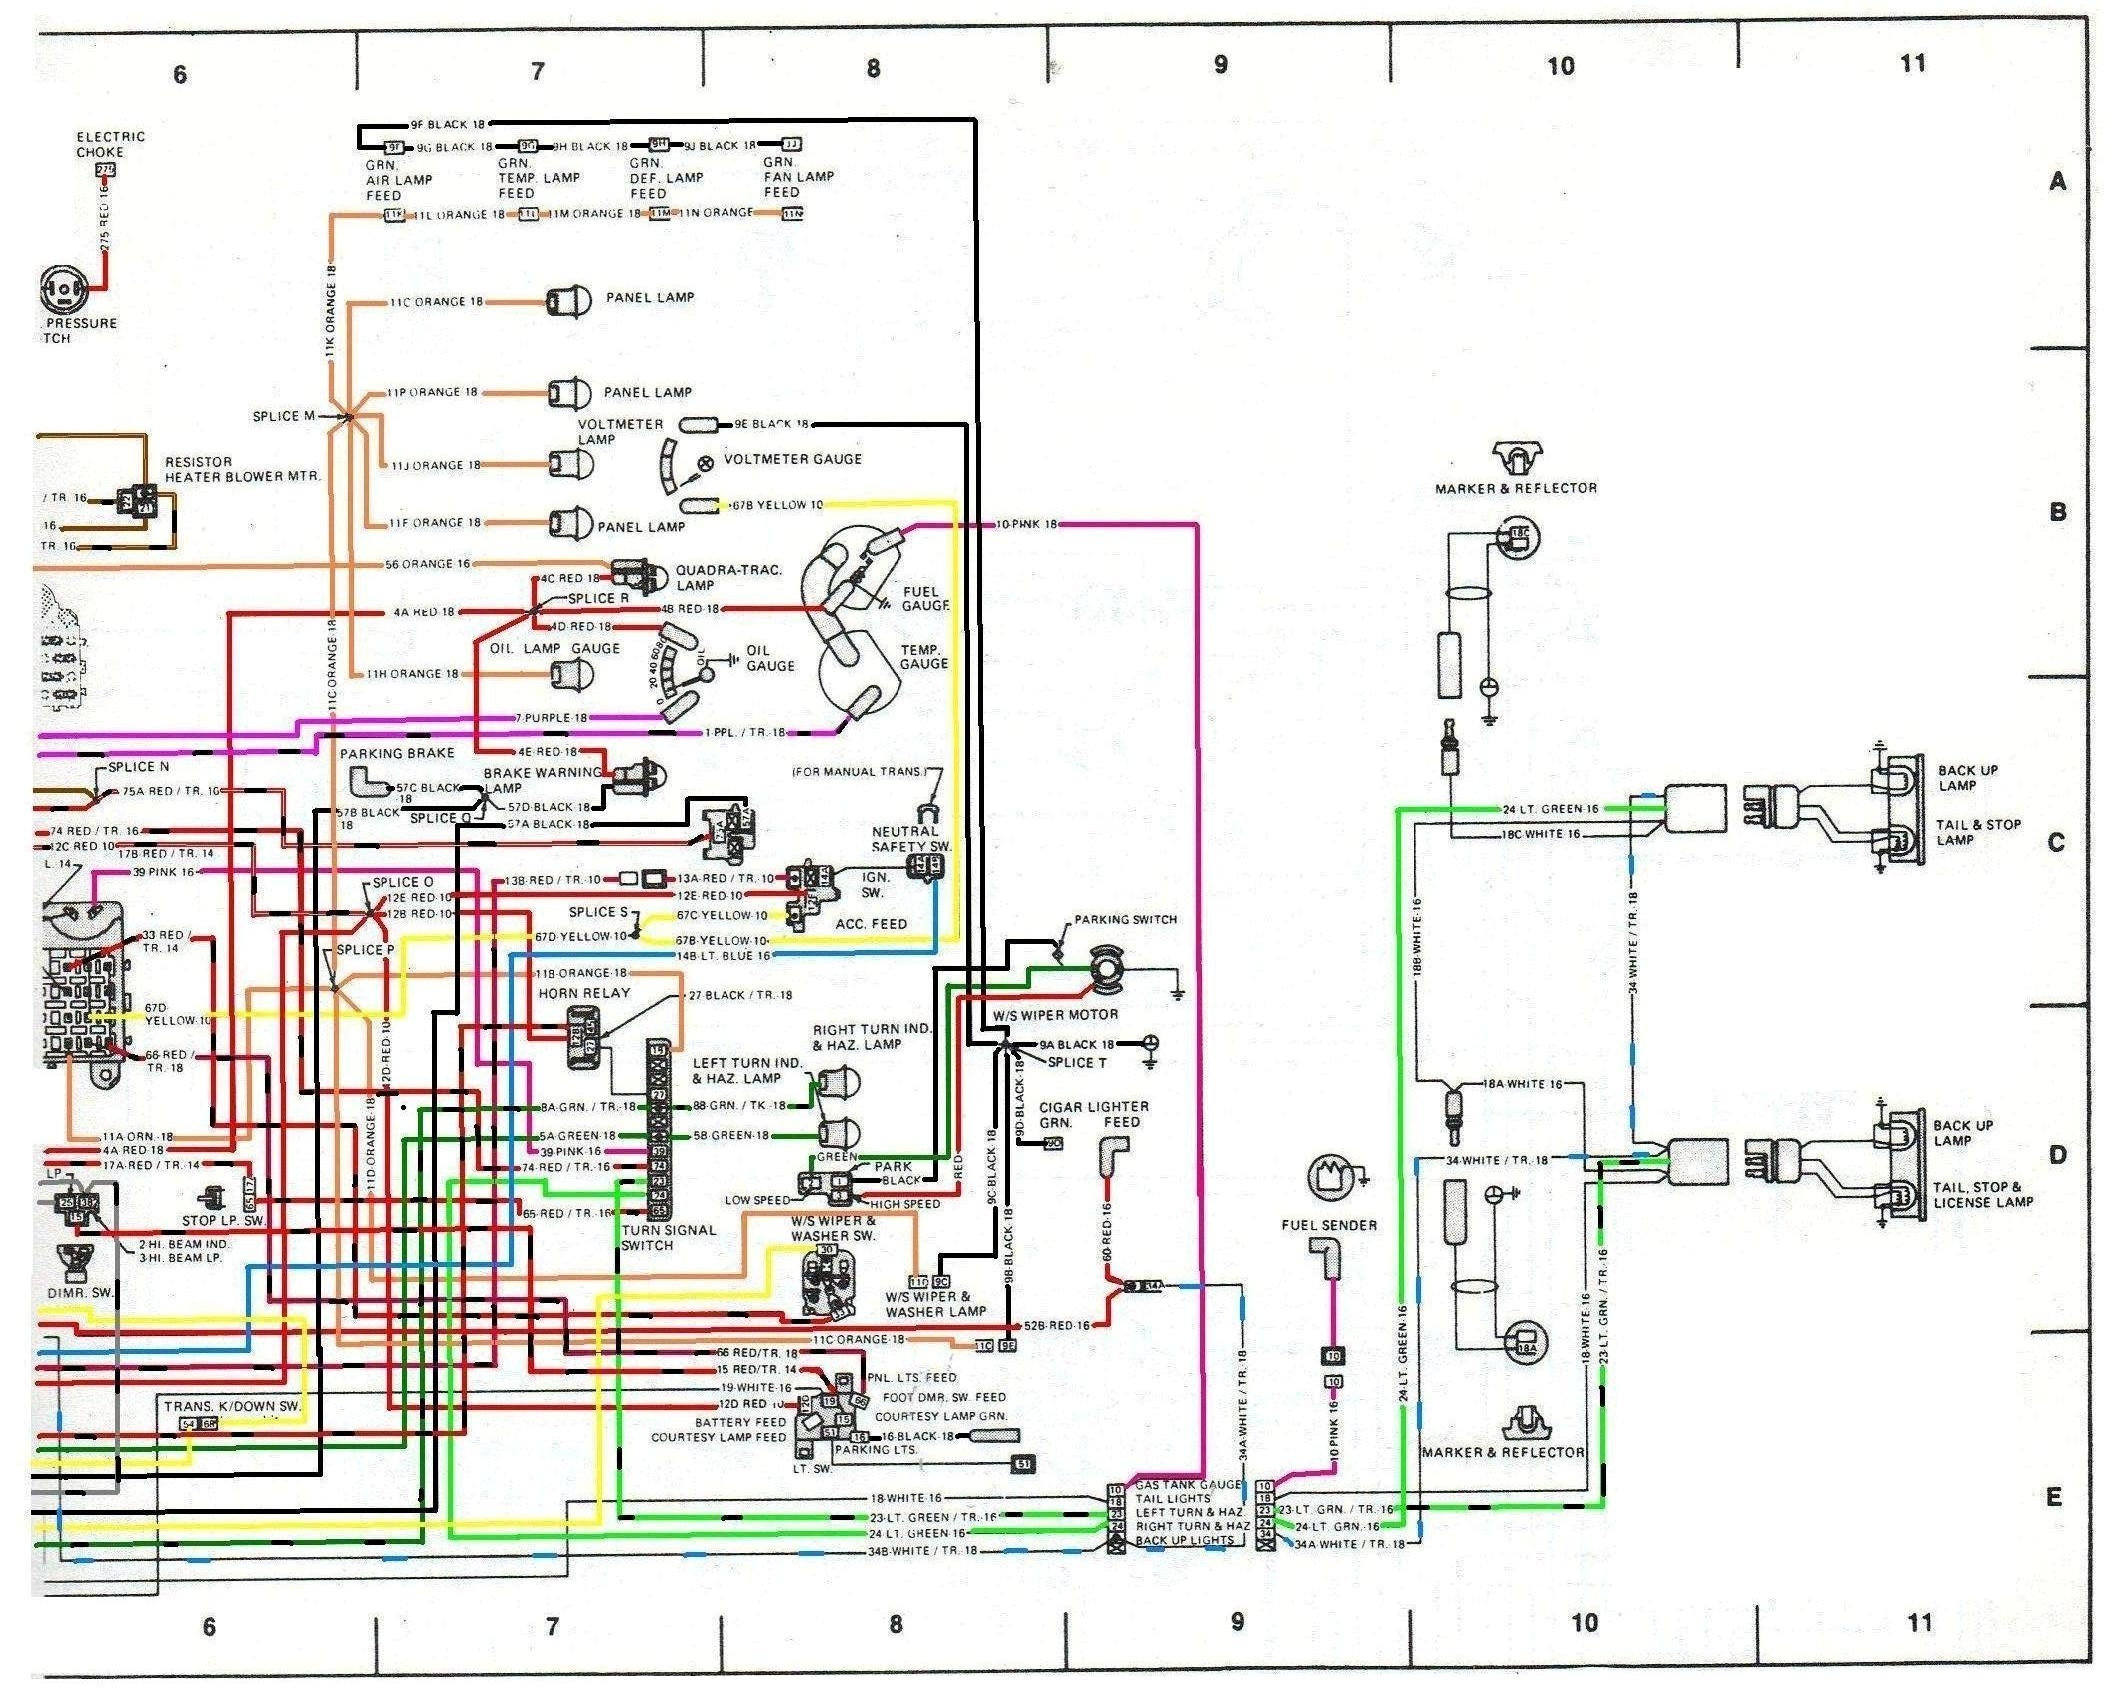
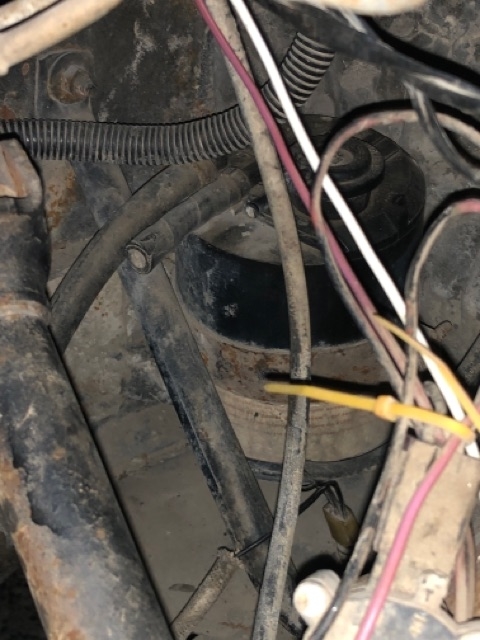
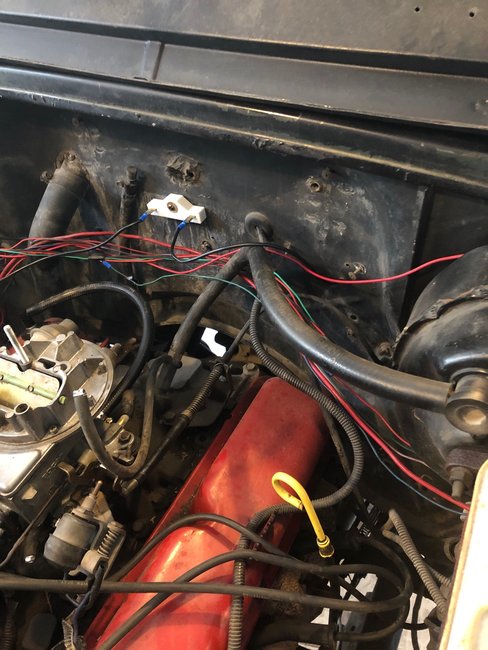
Just so you have this reference, you can follow wires, there are not any fuses in the wires you mentioned. Below is a 1979, I had to sort of modify it so it could be understood. Here's the explanations that might make it clearer.

Most '76-'86 CJ's have a lot of common wiring. This is good one to use for these years.

Yep, I scanned a 2 piece diagram from a paper manual.

I took it to "microsoft paint" and colored the wires the best that I could.

Here's things you must know to read it accurately:

A) along each wire [maybe several places] is "wording" or a "label" with the size and color(s) for the wire.

B) a "white wire" will show up black!

C) a solid color wire will be labeled like this "12a red 10".

12a is a numerical reference # / red is the color / 10 is the gauge of the wire.

Here's the part that will be sorta confusing.

D) some wires have tracer stripes, the manual did not tell what color the stripe was (on any of the striped wires) they are labeled like this "8a grn / tr-18".

8a being a numerical reference # / grn, meaning green wire / tr meaning it has a colored stripe down the wire (stripe color unknown )

So so so so so to make it ez to know/ see there was a wire with a tracer stripe, I simply put black dashes along those wires (exception was on the white wires)

But still, the actual stripe color will not be known till you find the actual wire, where it starts or ends on the jeep (sorry! It does work for me!)

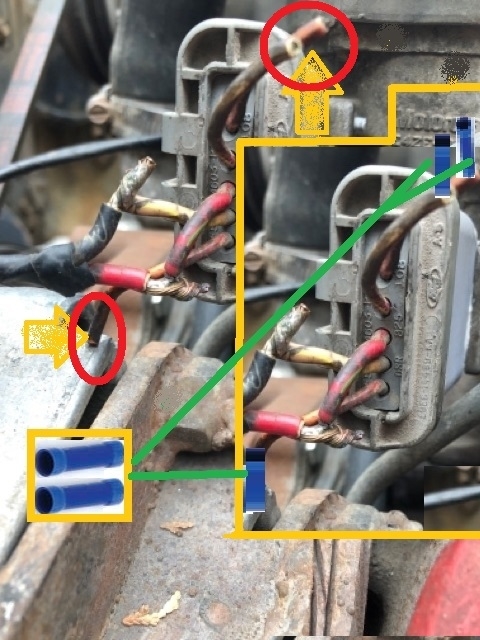
E) illusions! Sometimes it may look like a wire stops, an example might be 3 red wires going into a splice, well one of 'em has a "label" right at the splice (the red color does not go thru the label)

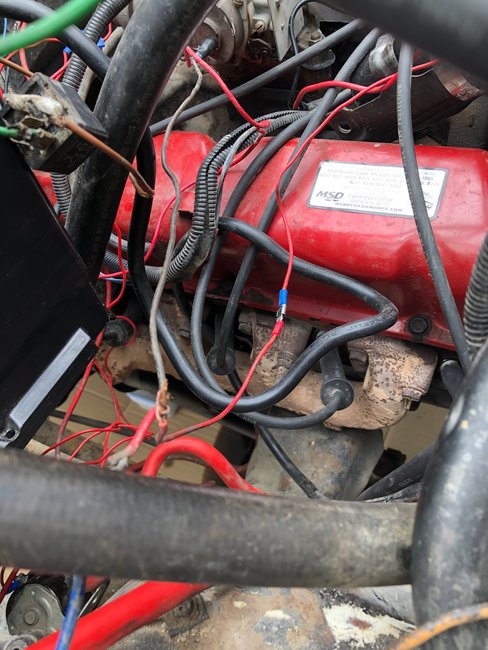
So 2 "red wires" hit the splice along with a "label"- at a glance you only see 2 red wires when there are actually 3. Just be aware of the label "still being" a wire. You can see one example of this in one place where the ignition module gets it's power at "splice l"

My 2 diagrams overlap about on the line between "5 and 6" of the outer rim reference lines. To me it looks like the right side diagram fits better on top of the left side diagram at the overlap. You will notice the fuse box is the area of the overlap.

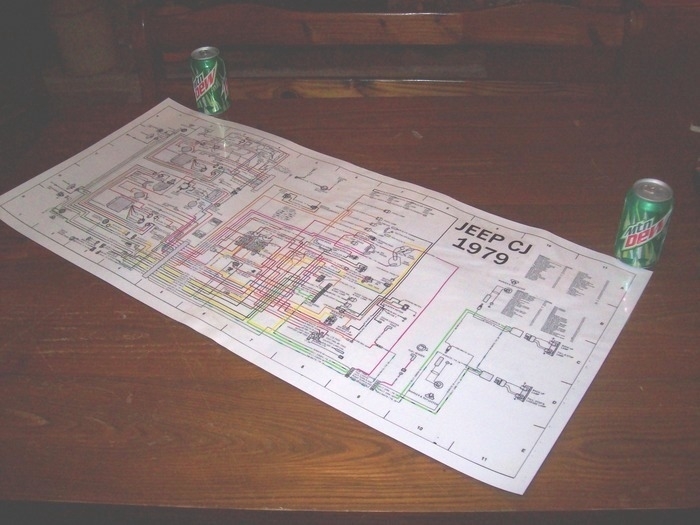
I sent my 2 parts to the office store via email, had 'em blown up, I taped them together at the overlap, then the office store laminated the one big diagram for me. It's so much easier to read it now!

I'm not perfect, you will find some mistakes!

The Medic
Mar 31, 2020 at 6:16 PM
Avatar
SICHOT
  • MEMBER
  • 34 POSTS
Okay, so there´s not too much of progress today, however....started the engine and voila!! It runs just fine!!! Refer to video! Hooray!! Thanks for your help Mr. Medic! Not sure how was engine able to run before if there was no line fed to coil (+). Well, maybe I will not be able to solve that mystery hehe. Once situation with COVID-9 gets way better, I´ll start looking for Accel ballast, but for now, looks like one in place is working =D
Okay, so I did some quick research and I believe this is how hoses are to be connected to the carburetor. First picture shows hose I´m planning to connect to the open port. Not sure if I should plug it or just connect it, but based on your recommendation, vacuum lines must be plugged so that´s how I´ll proceed. Then, in the front of the carburetor, I believe this is the one I should connect to the open port (second picture). Once again, this is a vacuum so I´ll plug it as well. I´ll continue investigating to ensure this is the right ones to be plugged because of being (vacuum). For other port in the front of the carburetor will investigate if this is the one I should be placing a filter just like yours (vents for the bowl). I´m also attaching picture (third picture) of front ports that are open. One of them (right in picture) will be plugged to hose shown in second picture. I believe carburetor is a 2 barrel Motorcraft 2100. I´ll keep sharing progress.
Just for reference, and complement to my previous reply, I´m attaching two pictures from charcoal canister. Last picture show how fuel tank vents are currently in place.
Thanks

JC
Mar 31, 2020 at 8:15 PM
Avatar
SICHOT
  • MEMBER
  • 34 POSTS
Not sure what happened but I just saw your last reply coming in. I´ll take for sure a detail look into it. Thanks for sharing! This is extremely good information. It will definitely take some time for me to go through all of it but for sure will. Thanks Mr. Medic!
JC

PS: I´m editing my reply, I need a big favor. Could you please reload your first diagram picture. For any strange reason, after saving picture to my desktop and then zoom in, resolution is lost so I´m not able to identify any text. Second picture works just fine after zoom in. Thanks for your help.
Mar 31, 2020 at 8:49 PM
Avatar
SICHOT
  • MEMBER
  • 34 POSTS
Hello,

Asking once again for your help based on your expertise. I have problems with front turning lights. They just do not blink. Rear ones do work. I have set good grounds, validated bulbs are okay, changed flasher. Any guidance you can provide will be more than appreciated.
Thanks

JC
Apr 9, 2020 at 6:05 PM
Avatar
CJ MEDEVAC
  • CERTIFIED EXPERT
  • 11,004 POSTS
I'm dealing with the diagram situation now!

As far as your vacuum lines, hook up what requires vacuum, plug the rest. An open "sucking air" port is a vacuum leak! It will interfere with idle and performance.

Okay!


Regarding your question for front turning lights.

Site policy each question's issue needs to be about one issue only in order for the site to properly index the questions. (At present, yours is making your engine run)

Other issues like turn signals/ suspension/ overheating/ etc. etc. needs to be a whole separate "new" question.


For your convenience here is the link:

https://www.2carpros.com/questions/new

Make sure you are logged into the site before clicking on the link.

If you want me to aid you in the new question (which is super fine with me!) Please ask for me, "CJ MEDEVAC", during your new question submission. Be sure to ask like it's your first question (not assuming everyone already knows your background info.)

In the past, we just kept on answering on the same thread. Thanks!

The Medic
Apr 9, 2020 at 7:01 PM
Avatar
SICHOT
  • MEMBER
  • 34 POSTS
Roger that. I´ll proceed with new post for issue with parking lights.
I´ll connect vacuum lines. Still looking for information that could definitely confirm how vacuum lines should be connected.
Thanks

JC
Apr 9, 2020 at 7:32 PM
Avatar
CJ MEDEVAC
  • CERTIFIED EXPERT
  • 11,004 POSTS
As you progress with this fix, keep posting on this thread (you do not have to respond yet!).

The Medic
Apr 11, 2020 at 8:13 AM
Avatar
SICHOT
  • MEMBER
  • 34 POSTS
Here´s a quick update: So I connected hose to port 1 (picture 1). I also connected hose to port 2 (picture 2). Left port 3 open (picture 3). Started engine and idle was not that good.
Second try was with port 1 connected, ports 2 and 3 open. Idle was way better. I´ll do the test of plugging port three and will let you know how it goes. I do recall that before doing maintenance to carburetor, gasoline came out through this port. Not if I should leave this open.
Thanks

JC
Apr 15, 2020 at 7:21 PM
Avatar
CJ MEDEVAC
  • CERTIFIED EXPERT
  • 11,004 POSTS
Reply got lost.

Trying again.

See pic I made below.

The Medic
Apr 17, 2020 at 8:00 AM
Avatar
SICHOT
  • MEMBER
  • 34 POSTS
Thanks.
So I did what you suggested. Please refer to first three pictures showing how Port 2 was plugged and also intake manifold port as well. First video shows how engine behaved. REvs are very low. And second video shows how it behaves with both ports open. Last picture shows how intake port is connected to brake booster.
So not sure if I should leave both ports open based on this.
Thanks for your help

JC
Apr 18, 2020 at 8:57 AM
Avatar
CJ MEDEVAC
  • CERTIFIED EXPERT
  • 11,004 POSTS
No wanty any vacuum leaks (not only cracked hoses/ etc.) Any open sucking port is a "vacuum leak"!

If idle lacks, surely you can screw in the idle adjustment screw?

When the Jeep is fully warmed up to operating temperature, and you actuate the throttle a bit, does the choke plate fully stand up vertically? Or does it remain partially shut as in your videos?

We have to properly adjust it to get it to fully be off (un-choked) and to operating temperature when tuning. Mix screws/ idle speed.

Ya?

The Medic
Apr 18, 2020 at 7:09 PM
Avatar
SICHOT
  • MEMBER
  • 34 POSTS
Hello,

Here are some videos of how plate looks when engine is warm.
Last video shows how will it behave if I plug some ports. Engine will not start or will die right away.
On my previous videos, I did notice that when ports are plugged, fumes are darker. I even place a rag few inches away of muffler and dark was present.
Should we plug ports and adjust carburetor?
Thanks

JC
Apr 20, 2020 at 7:36 PM
Avatar
CJ MEDEVAC
  • CERTIFIED EXPERT
  • 11,004 POSTS
There should only be one vacuum leak (a hose actually sucking air) That would be the PCV (Positive Crankcase Ventilation), it will suck out harmful gases and water vapor inside the engine. It should receive fresh air from a 2nd port in the valve cover(s).

Depriving the fresh air pretty much makes the PCV where it cannot suck air at all. The line might as well be plugged off if it cannot suck air!

Make it work properly!

The carburetor idles not only by using a little air down the carburetor, but the CFMs that are generated through the PCV are factored into the air fuel mix that moves in the carburetor!

Even using the wrong PCV may affect the CFMs that makes the carburetor run properly!

I know this link was crude.

https://www.2carpros.com/questions/jeep-cj7-1985-jeep-cj7-stalls-when-hot

Did you plug off the distributor's vacuum line while timing?

Correct idle speed while timing?

Both mix screws are even?

Mix screws (seats) were not damaged in the past (by others) from over-tightening?

Wish I had some hands on, this seems to be the most frustrating part of online fixing!

The Medic
Apr 20, 2020 at 8:17 PM