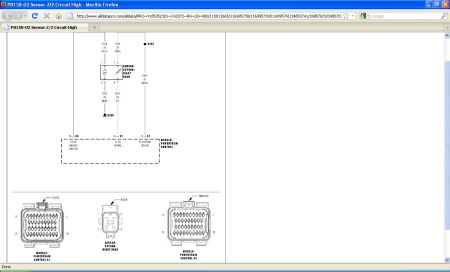
P0158-O2 SENSOR 2/2 CIRCUIT HIGH
P0158-O2 Sensor 2/2 Circuit High
WHEN MONITORED
O2 Sensor Heater Temperature is greater than 496 °C (925 °F) and battery voltage greater than 10.99 volts .
SET CONDITION
The Oxygen Sensor voltage is above 3.7 volts for 30 seconds . One Trip Fault. Three good trips to turn off the MIL.
POSSIBLE CAUSES
* (K243) O22/2 signal circuit shorted to battery voltage
* (K904) O2 downstream return circuit shorted to battery voltage
* (K243) O2 2/2 signal circuit open
* (K904) O2 downstream return circuit open
* O2 sensor
* PCM
Always perform the Pre-Diagnostic Troubleshooting procedure before proceeding.
Diagnostic Test
1. O2 SENSOR ABOVE 3.7 VOLTS
NOTE: When only one O2 Sensor is shorted to voltage, the scan tool will display all O2 Sensor voltage readings at approximately 5.0 volts . When diagnosing this DTC, only diagnose the O2 Sensor that set the DTC.
Start the engine.
Allow the engine to reach normal operating temperature.
With a scan tool, read the 2/2 O2 Sensor voltage.
Q: Is the voltage above 3.7 volts?
YES: Go To 2
NO: Refer to the INTERMITTENT CONDITION Diagnostic Procedure. See: Component Tests and General Diagnostics
Perform the POWERTRAIN VERIFICATION TEST. See: Verification Tests\Powertrain Verification Test
2. (K243) O2 2/2 SIGNAL CIRCUIT SHORTED TO BATTERY VOLTAGE
Start the engine and allow the engine to idle.
Disconnect the 2/2 O2 Sensor harness connector.
Measure the voltage on the (K243) O2 Sensor 2/2 Signal circuit in the O2 Sensor harness connector.
NOTE: Measure the voltage in reference to ground, not the (K904) O2 Downstream Return circuit.
Q: Is the voltage above 5.2 volts?
YES: Repair the short to battery voltage in the (K243) O2 Sensor 2/2 Signal circuit. Perform the POWERTRAIN VERIFICATION TEST. See: Verification Tests\Powertrain Verification Test
NO: Go To 3
3. (K904) O2 DOWNSTREAM RETURN CIRCUIT SHORTED TO BATTERY VOLTAGE
Turn the ignition off.
Disconnect the PCM harness connectors.
Ignition on, engine not running.
Measure the voltage on the (K904) O2 Downstream Return circuit in the 2/2 O2 Sensor harness connector.
Q: Is there any voltage present?
YES: Repair the short to battery voltage in the (K904) O2 Downstream Return circuit. Perform the POWERTRAIN VERIFICATION TEST. See: Verification Tests\Powertrain Verification Test
NO: Go To 4
4. O2 SENSOR
Turn the ignition off.
Connect the PCM harness connectors.
Connect a jumper wire between the (K243) O2 2/2 Signal circuit and the (K904) O2 Downstream Return circuit in the 2/2 O2 Sensor harness connector.
Ignition on, engine not running.
With a scan tool, monitor the 2/2 O2 Sensor voltage.
Q: Is the voltage between 2.3 and 2.7 volts with the jumper wire installed?
YES: Replace the O2 Sensor. Perform the POWERTRAIN VERIFICATION TEST. See: Verification Tests\Powertrain Verification Test
NO: Go To 5
NOTE: Remove the jumper wire before continuing.
5. (K243) O2 2/2 SIGNAL CIRCUIT OPEN
Turn the ignition off.
CAUTION: Do not probe the PCM harness connectors. Probing the PCM harness connectors will damage the PCM terminals resulting in poor terminal to pin connection. Install Miller Special Tool #8815 to perform diagnosis.
Measure the resistance of the (K243) O2 2/2 Signal circuit from the O2 Sensor harness connector to the appropriate terminal of special tool #8815.
Q: Is the resistance below 5.0 ohms?
YES: Go To 6
NO: Repair the open in the (K243) O2 2/2 Signal circuit. Perform the POWERTRAIN VERIFICATION TEST. See: Verification Tests\Powertrain Verification Test
6. (K904) O2 DOWNSTREAM RETURN CIRCUIT OPEN
Measure the resistance of the (K904) O2 Downstream Return circuit from the O2 Sensor harness connector to the appropriate terminal of special tool #8815.
Q: Is the resistance below 5.0 ohms?
YES: Go To 7
NO: Repair the open in the (K904) O2 Downstream Return circuit. Perform the POWERTRAIN VERIFICATION TEST. See: Verification Tests\Powertrain Verification Test
7. PCM
NOTE: Before continuing, check the PCM harness connector terminals for corrosion, damage, or terminal push out. Repair as necessary.
Using the schematics as a guide, inspect the wire harness and connectors. Pay particular attention to all Power and Ground circuits.
Q: Were there any problems found?
YES: Repair as necessary. Perform the POWERTRAIN VERIFICATION TEST. See: Verification Tests\Powertrain Verification Test
NO: Replace and program the Powertrain Control Module. Perform the POWERTRAIN VERIFICATION TEST. See: Verification Tests\Powertrain Verification Test
P0420-CATALYST 1/1 EFFICIENCY
Theory of Operation
The State of Change (SOC) catalyst monitor uses the signals from both the upstream and downstream O2 sensors to detect aging of the catalyst. Based on the fact that when a catalyst ages, it loses some of its Oxygen Storage Capacity (OSC). As a result, part of the untreated exhaust gases can breakthrough the catalyst and causes the downstream O2 sensor to deviate from its neutral (Stoichiometric) position. By observing the activities in the downstream O2 signal, the degradation level of catalyst can be detected. In general, the higher the downstream O2 sensor SOC value, the more exhaust gas breakthrough and the lower the OSC of the catalytic converter.
WHEN MONITORED
The monitor will run at between 1400 and 2300 RPM . It also runs between 40 and 70 KPA .
SET CONDITION
If the final State of Change index is within the calibrated fail threshold. Two trip fault. Three good trips to turn off the MIL.
POSSIBLE CAUSES
* Exhaust leak
* Engine mechanical condition
* Aging O2 sensor
* Catalytic converter
Always perform the Pre-Diagnostic Troubleshooting procedure before proceeding.
Diagnostic Test
1. ACTIVE DTC
NOTE:
* A new rear O2 Sensor along with an aging front O2 Sensor may cause the DTC to set. Review the repair history of the vehicle before continuing.
* If an O2 Sensor DTC set along with the Catalytic Converter Efficiency DTC diagnose the O2 Sensor DTC(s) before continuing.
* Check for contaminants that may have damaged the O2 Sensor and Catalytic Converter: contaminated fuel, unapproved silicone, oil and coolant, repair necessary.
Ignition on, engine not running.
With a scan tool, read DTCs.
Q: Is the DTC active at this time?
YES: Go To 2
NO: Refer to the INTERMITTENT CONDITION Diagnostic Procedure. See: Component Tests and General Diagnostics
Perform the POWERTRAIN VERIFICATION TEST. See: Verification Tests\Powertrain Verification Test
2. VISUALLY INSPECT CATALYTIC CONVERTER
NOTE: Ensure the top and bottom of the Catalytic Converter are thoroughly inspected.
Inspect the Catalytic Converter for the following damage.
Damage Catalytic Converter, dents or holes.
Severe discoloration caused by overheating the Catalytic Converter.
Catalytic Converter broke internally.
Leaking Catalytic Converter.
Q: Were any problems found?
YES: Replace the Catalytic Converter. Repair the condition that may have caused the failure. Perform the POWERTRAIN VERIFICATION TEST. See: Verification Tests\Powertrain Verification Test
NO: Go To 3
3. EXHAUST LEAK
Start the engine.
Inspect the exhaust for leaks between the engine and the O2 Sensor.
Inspect the exhaust for leaks between the engine and the O2 Sensor.
Turn the ignition off.
If a leak is heard but unable to be located, it may be necessary to use special tool Miller Tool #8404A Evaporative Emissions Leak Detector (EELD) on the exhaust system to find leaks.
Connect the SMOKE supply tip (black hose) to the exhaust cone adapter (if equipped) and place it into the tail pipe. Set the smoke/air control switch to SMOKE.
Press the remote smoke/air start button.
While still holding the remote smoke/air start button, use the white light (#8404-CLL) to follow the EVAP system path, and look for the source of the leak indicated by exiting smoke.
If a leak is concealed from view, release the remote smoke/air start button, and use the ultraviolet (UV) black light #8404-UVL and the yellow goggles 8404-20 to look for residual traces of dye that is left behind by the smoke.
The exiting smoke deposits a residual fluid that is either bright green or bright yellow in color when viewed with a UV light.
Be sure to check the exhaust manifold to cylinder head connection for leaks.
Q: Are there any exhaust leaks?
YES: Repair or replace the leaking exhaust parts as necessary. Perform the POWERTRAIN VERIFICATION TEST. See: Verification Tests\Powertrain Verification Test
NO: Go To 4
4. ENGINE MECHANICAL CONDITION
Check the exhaust for excessive smoke caused by an internal problem in the engine.
Q: Is an engine mechanical condition present?
YES: Repair the engine mechanical condition as necessary. Perform the POWERTRAIN VERIFICATION TEST. See: Verification Tests\Powertrain Verification Test
NO: Go To 5
5. AGING O2 SENSOR
A new rear O2 Sensor along with an aging front O2 Sensor may cause the DTC to set. Review the vehicles repair history.
Q: Has the rear O2 Sensor been replaced without replacing the front O2 Sensor?
YES: Replace the Front O2 Sensor as necessary. Perform the POWERTRAIN VERIFICATION TEST. See: Verification Tests\Powertrain Verification Test
NO: Go To 6
6. CATALYTIC CONVERTER
If there are no possible cause remaining, view repair .
Repair
Replace the Catalytic Converter. Perform the POWERTRAIN VERIFICATION TEST. See: Verification Tests\Powertrain Verification Test
There are the trouble tree's for both of those code's i would fix the P0158 first and see if the P0420 come's back.
Oct 16, 2010 at 11:25 PM