2002 Buick Rendezvous Blower fan

2002 BUICK RENDEZVOUS
130,000 MILES • 6 CYL • FWD • AUTOMATIC
Avatar
TRUSS53
  • MEMBER
  • 2 POSTS
The heater fan on this vehicle only works on full speed. I believe there is a resistor in the circuit that controls the fan speed, but I have no idea where it is or what it looks like. I am fairly competent with tools but I don't want to take out the dash. Can you give me an idea what to do to replace this part, if indeed it is the problem?
Dec 27, 2009 at 7:17 PM
Advertisement
Avatar
OBXAUTOMEDIC
  • CERTIFIED EXPERT
  • 3,711 POSTS
Hello,

It is located behind the glove box in front of blower motor.


.
Dec 27, 2009 at 7:26 PM
Avatar
IMPALASS
  • CERTIFIED EXPERT
  • 3,112 POSTS
Hello

To better assist you is your model just the Rendezvous CX or CXL and what is the engine size in liter.
Dec 27, 2009 at 7:29 PM
Advertisement
Avatar
IMPALASS
  • CERTIFIED EXPERT
  • 3,112 POSTS
Thanks for the assistance obxautomedic
Dec 27, 2009 at 8:17 PM
Avatar
TRUSS53
  • MEMBER
  • 2 POSTS
Thanks for the quick reply. I wasn't expecting it so soon. I'll try to locate the device and replace it. Is this something that I could find at an auto parts store, or will it have to come from a dealer?
Dec 27, 2009 at 8:19 PM
Avatar
OBXAUTOMEDIC
  • CERTIFIED EXPERT
  • 3,711 POSTS
Your local parts store should be able to get it if they don't have it in stock.
Dec 27, 2009 at 8:30 PM
Avatar
IMPALASS
  • CERTIFIED EXPERT
  • 3,112 POSTS
Hello - Obxautomedic were working together on this........here is more info for you. BLOWER MOTOR RESISTOR ASSEMBLY Removal 
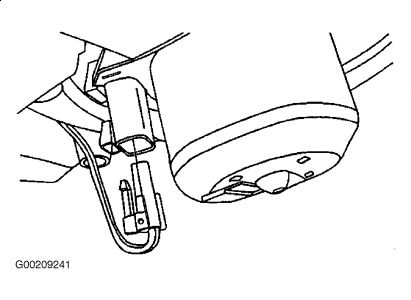
1. Remove the right side instrument panel insulator. Disconnect the blower motor electrical connector. See Fig. 24 . Remove the blower motor mounting screws.


https://www.2carpros.com/forum/automotive_pictures/248015_24_4.jpg

NOTE: Only loosen both of the forward blower resistor assembly mounting screws. The blower motor resistor assembly mounting holes are slotted. 
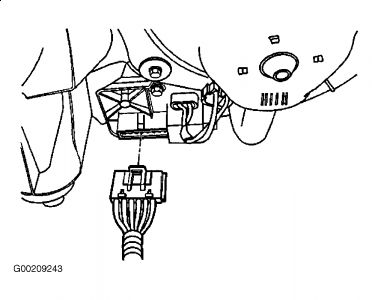
2. Remove the blower motor from the HVAC module assembly. Disconnect the electrical connector from the blower motor resistor assembly. See Fig. 26 . Loosen the forward blower resistor assembly mounting screws.


https://www.2carpros.com/forum/automotive_pictures/248015_26_3.jpg

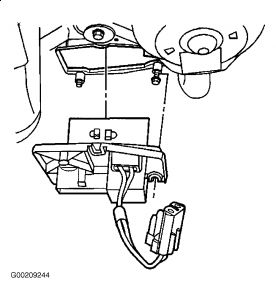
3. Remove the rearward blower resistor assembly mounting screw. Remove the blower motor resistor assembly from the HVAC module assembly. See Fig. 27 .


https://www.2carpros.com/forum/automotive_pictures/248015_27_2.jpg

Installation 1. Install the blower motor resistor assembly to the HVAC module assembly. See Fig. 27 . Install the rearward blower resistor assembly mounting screw.


https://www.2carpros.com/forum/automotive_pictures/248015_27_3.jpg

2. Connect the electrical connector to the blower motor resistor assembly. Install the blower motor to the HVAC module assembly. Install the blower motor mounting screws. See Fig. 26 . Tighten to specified torque.


https://www.2carpros.com/forum/automotive_pictures/248015_26_4.jpg

3. Connect the blower motor electrical connector. See Fig. 24 . Install the right side instrument panel insulator.


https://www.2carpros.com/forum/automotive_pictures/248015_24_5.jpg

Dec 27, 2009 at 8:44 PM
Avatar
OBXAUTOMEDIC
  • CERTIFIED EXPERT
  • 3,711 POSTS
Team Work is a great thing...

I was at my full time job and am still hesitant on signing into Mitchell1 from there.

Thanks for posting pics ImpalaSS


.
Dec 28, 2009 at 1:44 PM