Blend door actuator location?

2012 CHEVROLET CAMARO
55,000 MILES • V8 • 2WD • MANUAL
Avatar
BSIERRAS
  • MEMBER
  • 19 POSTS
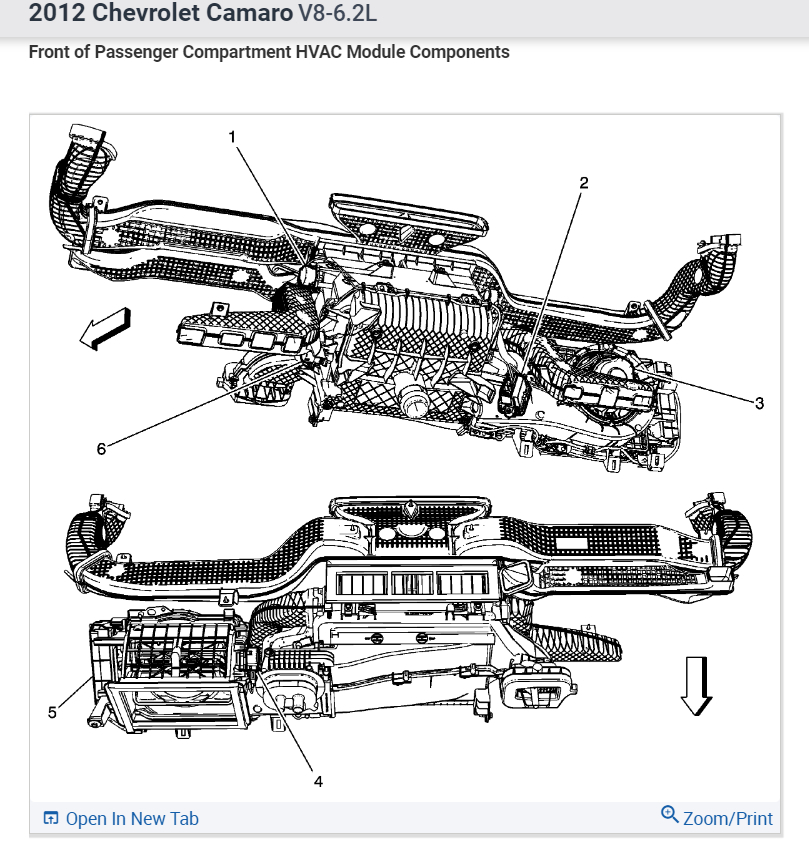
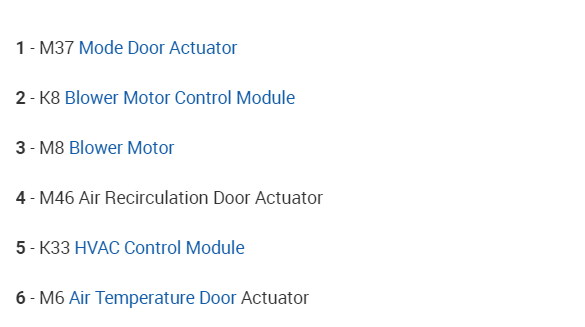
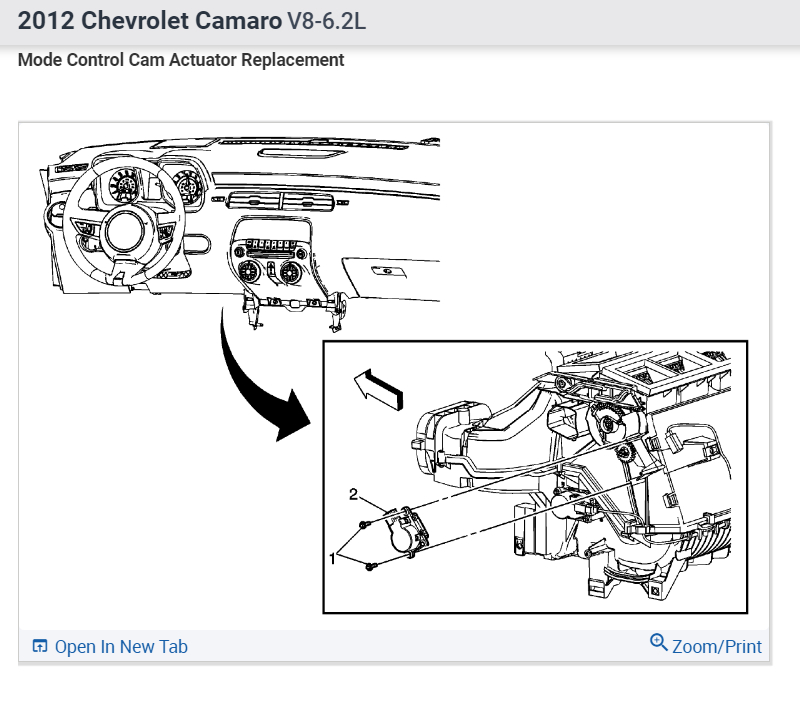
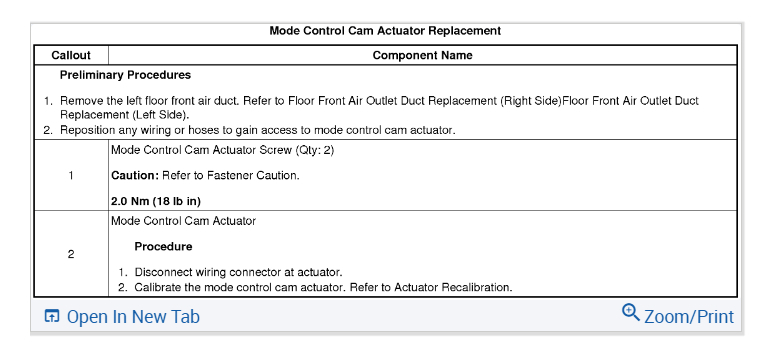
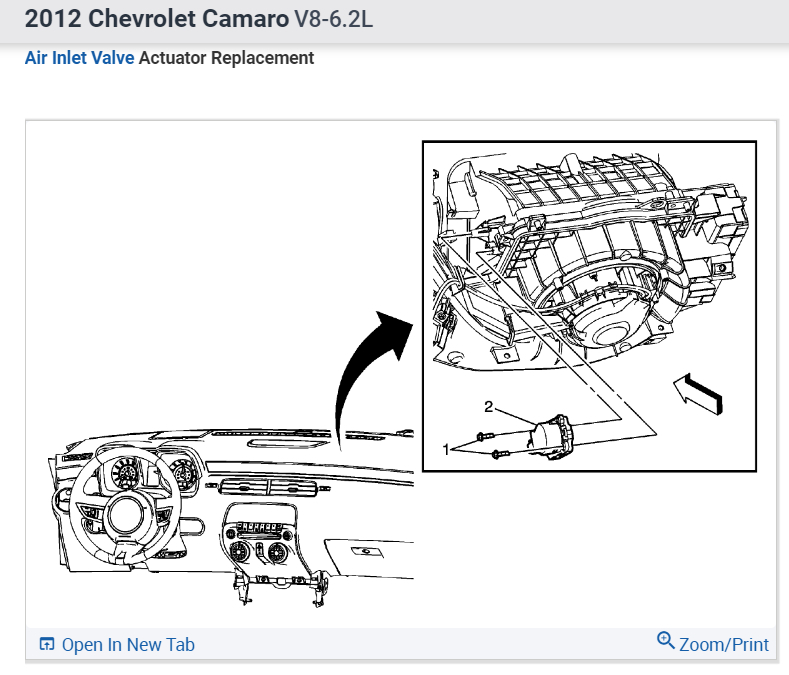
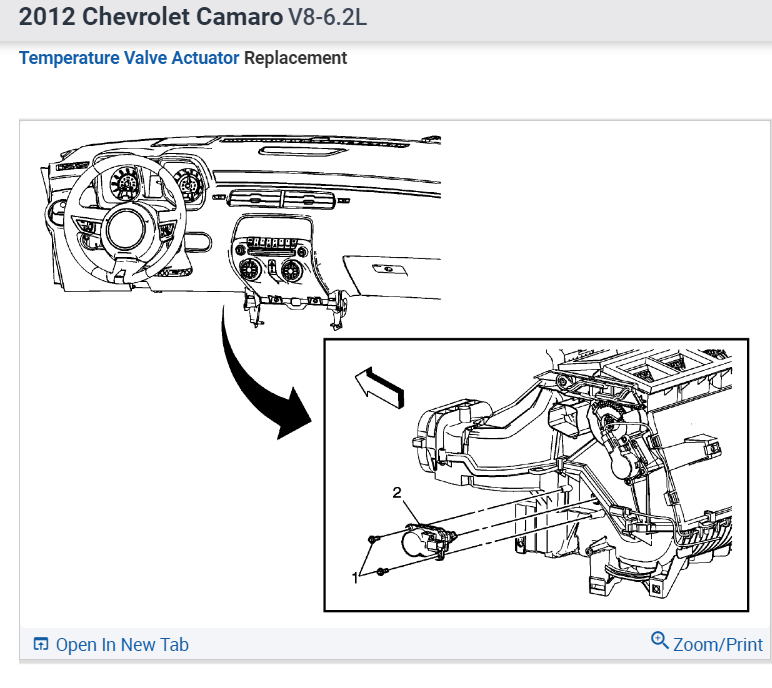
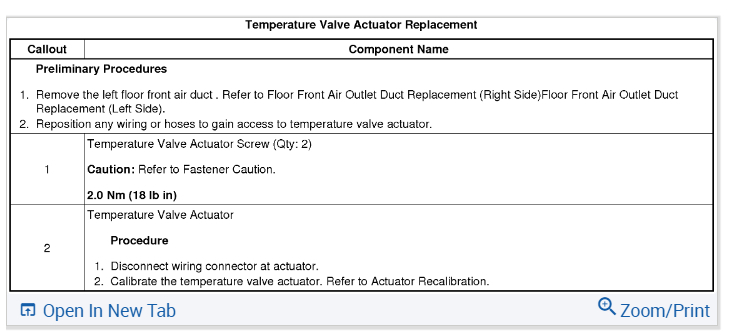
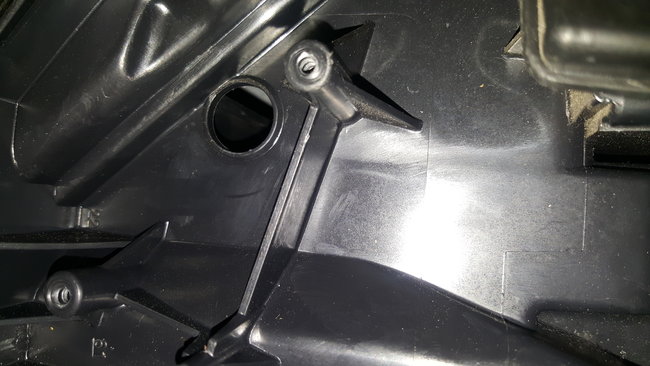
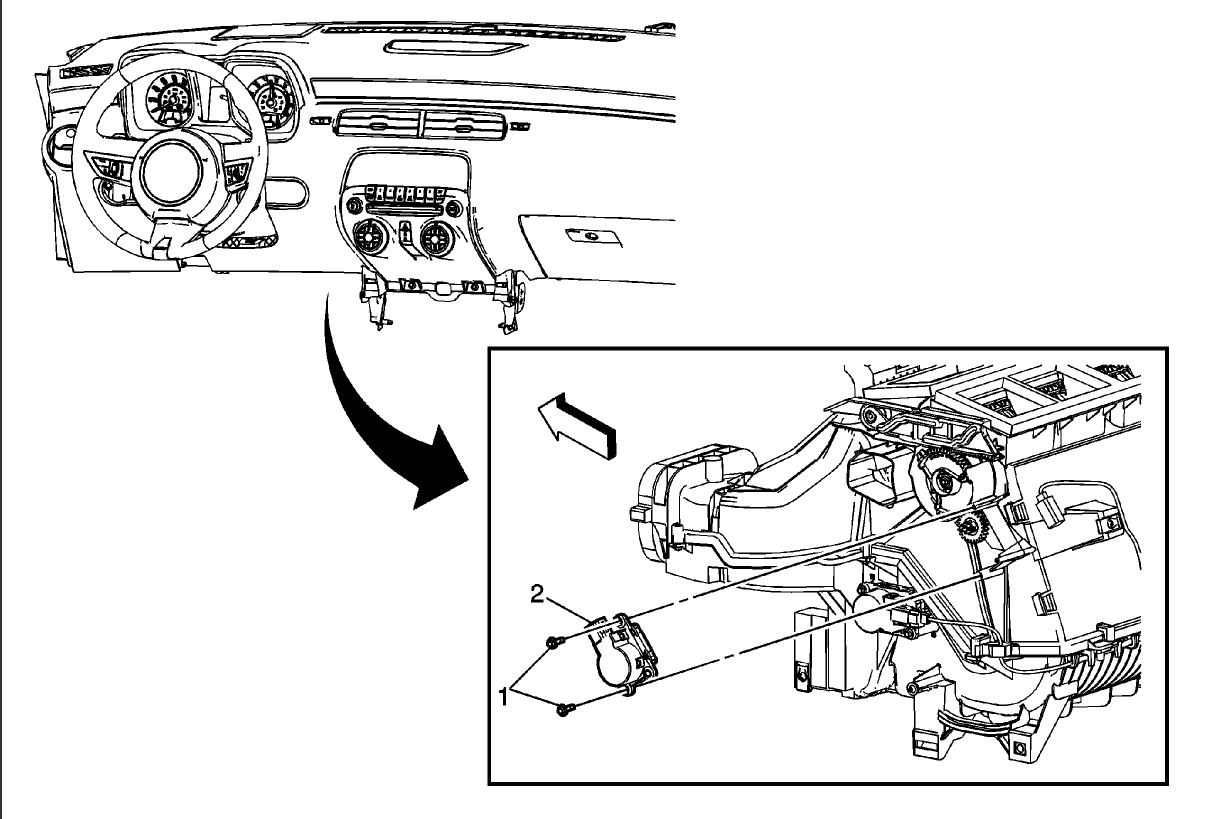
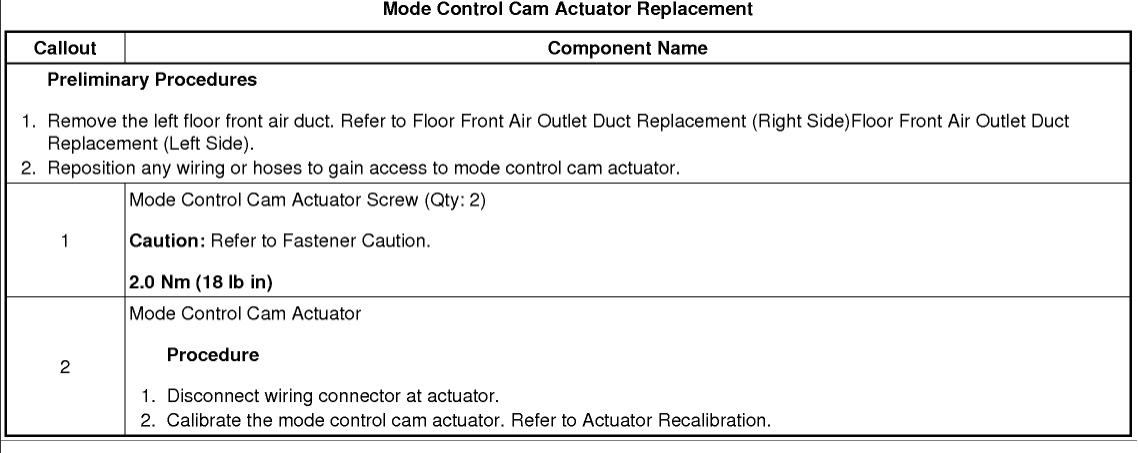
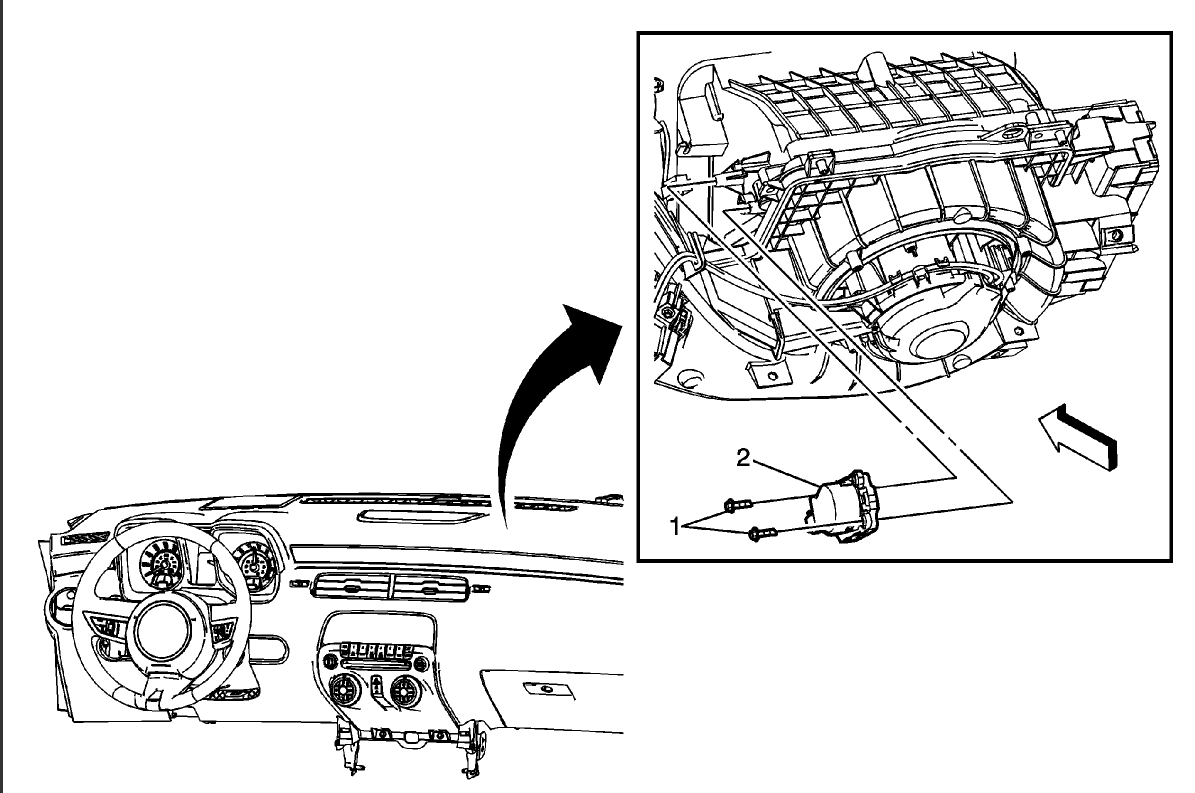
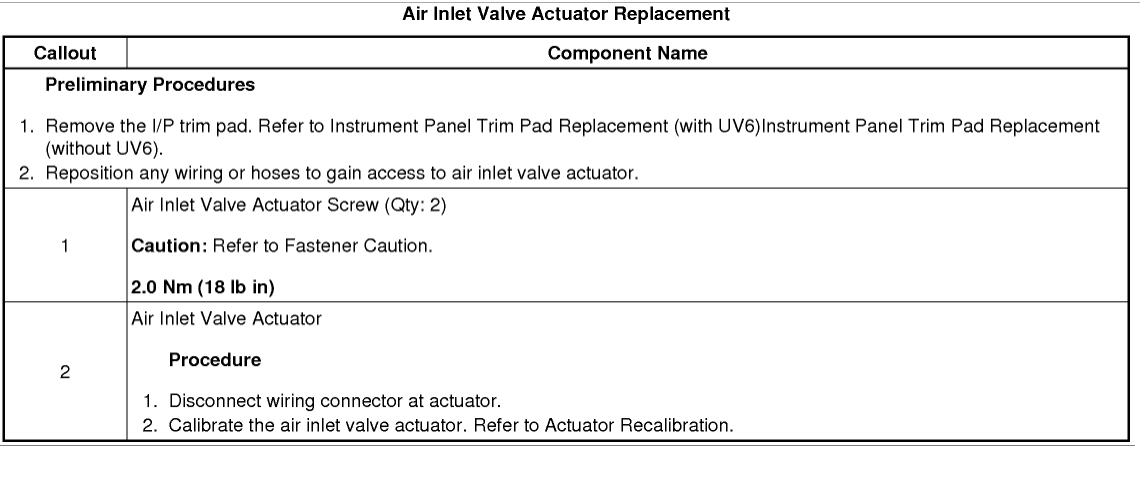
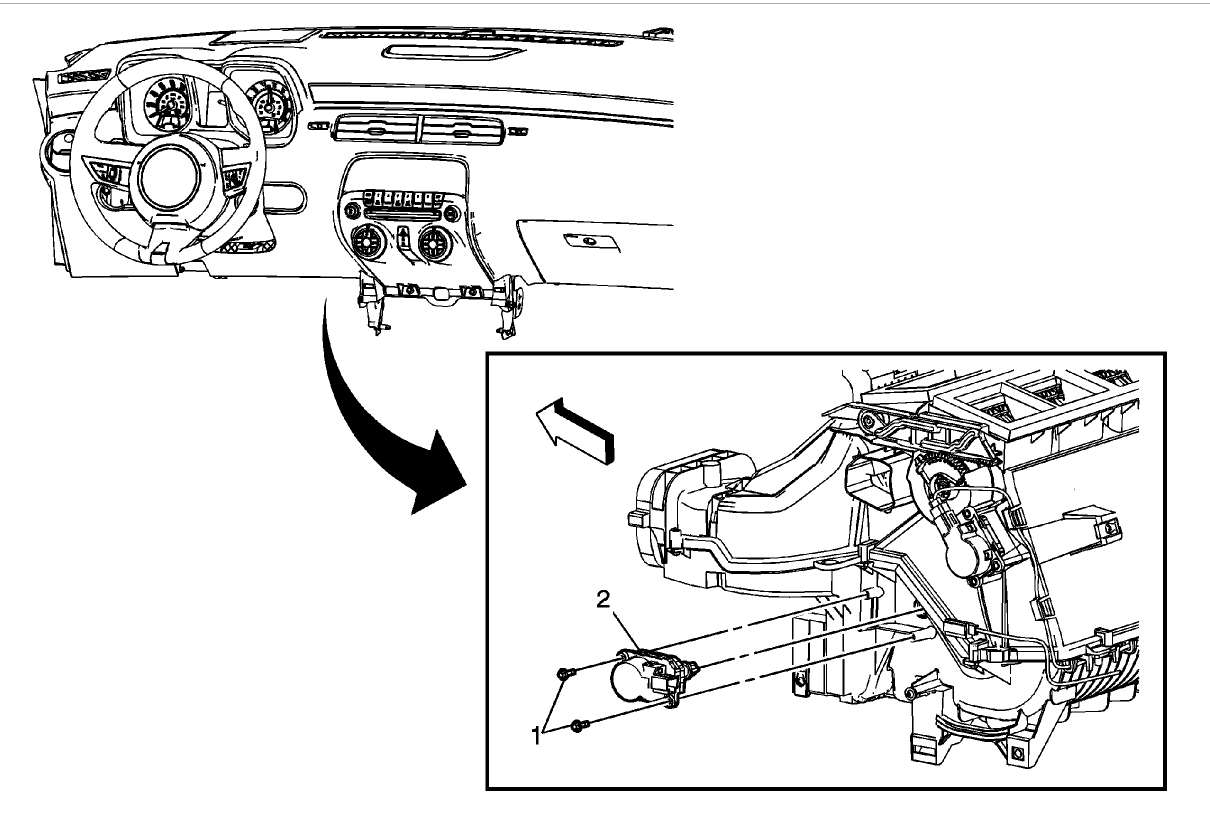
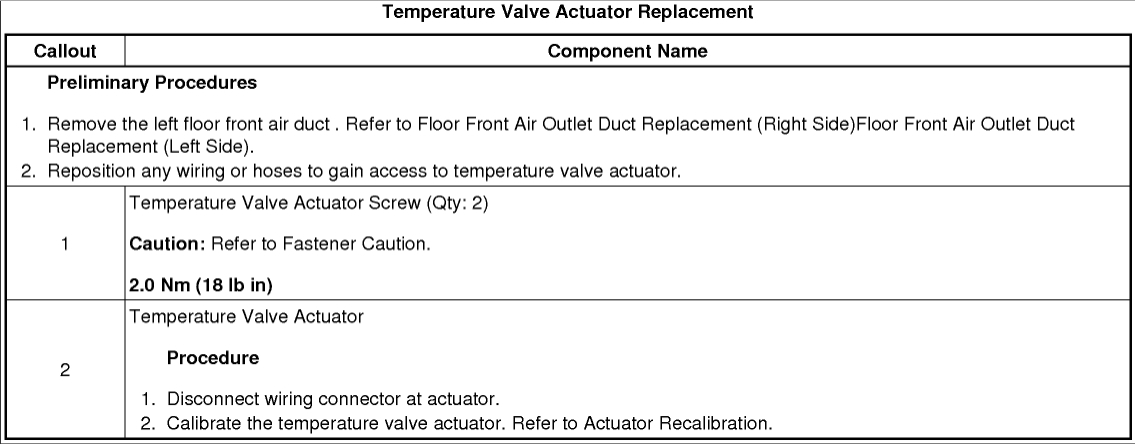
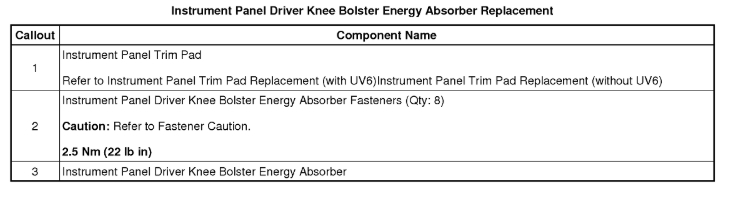
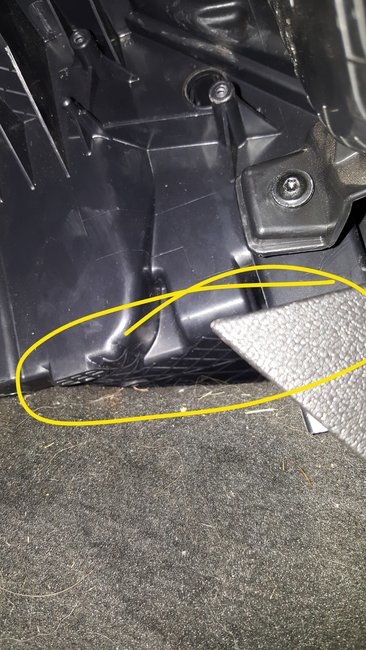
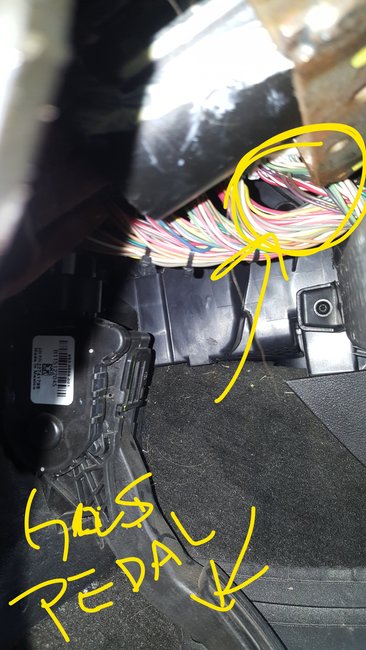
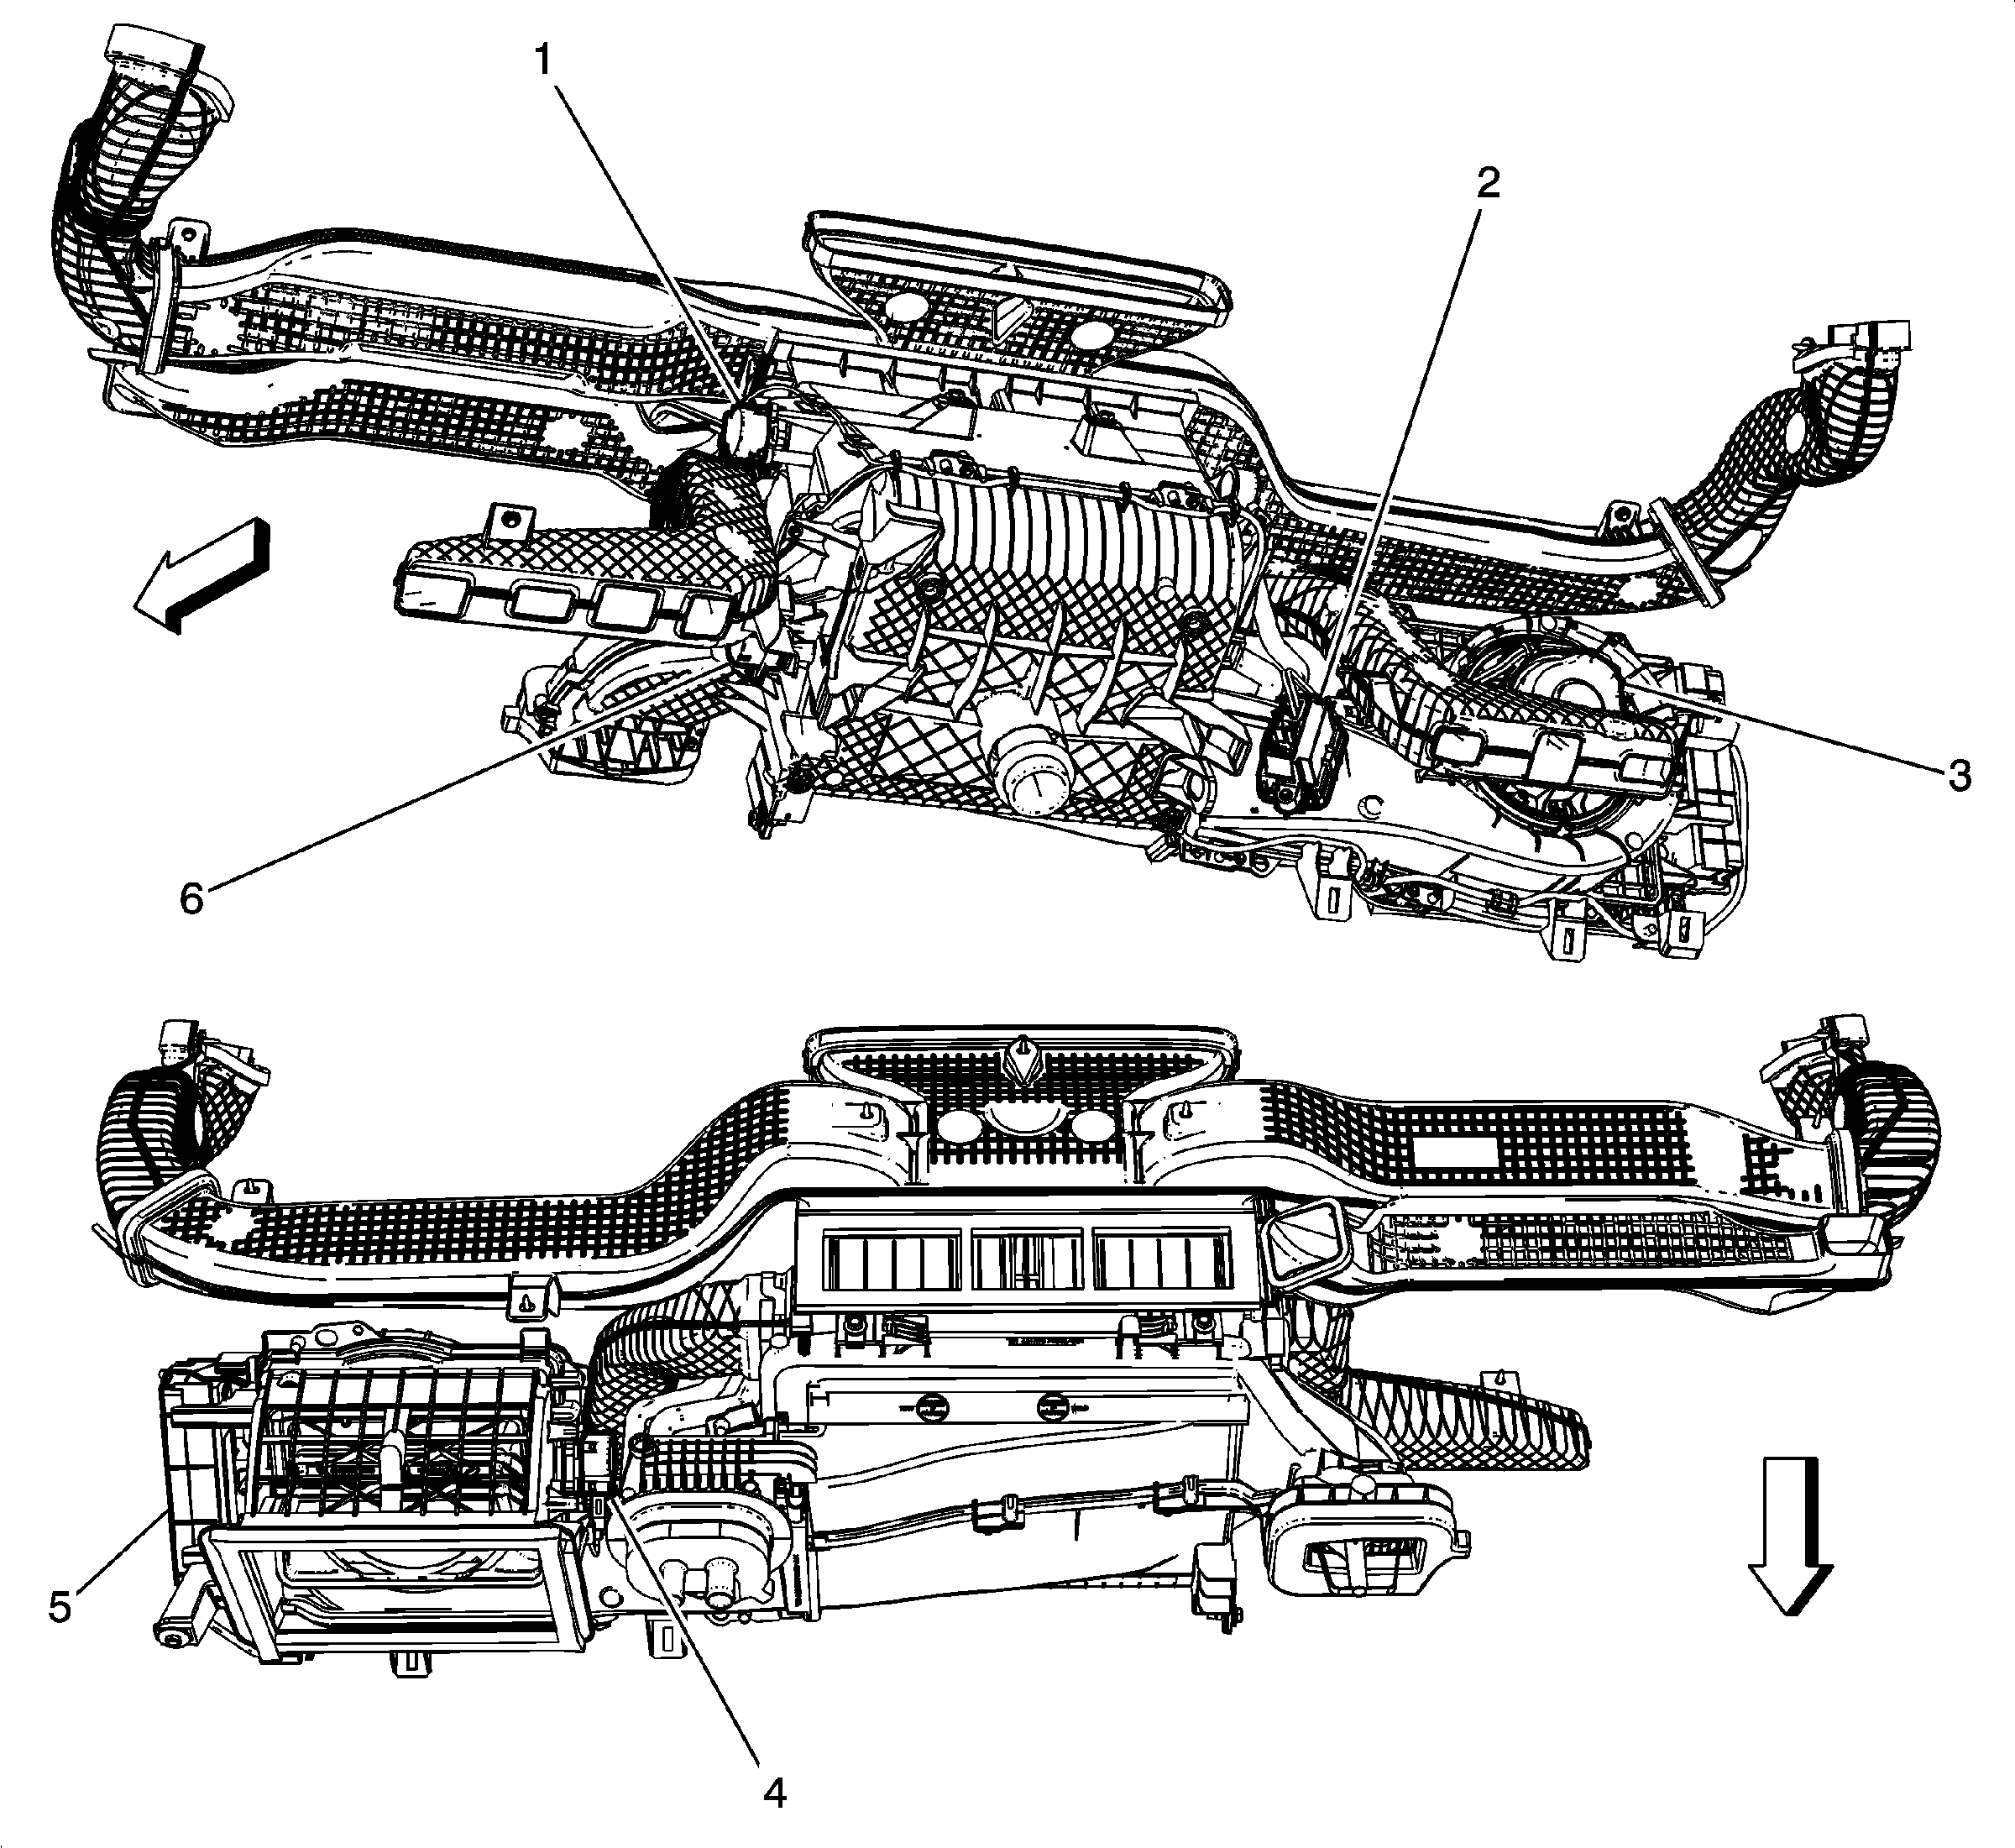
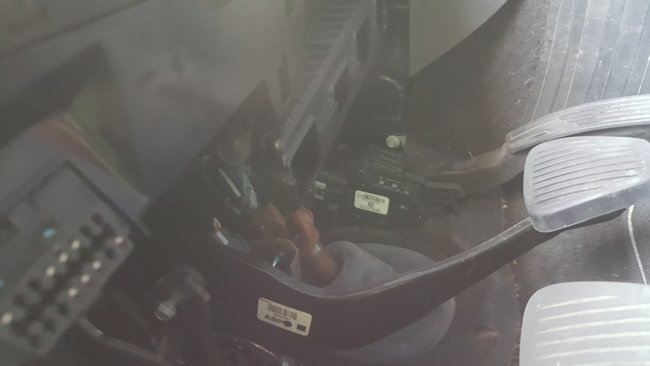
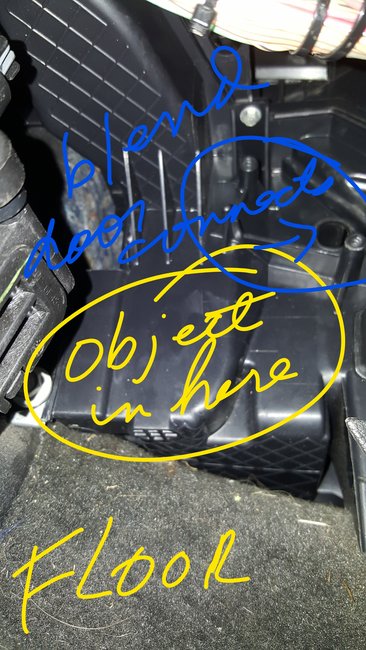
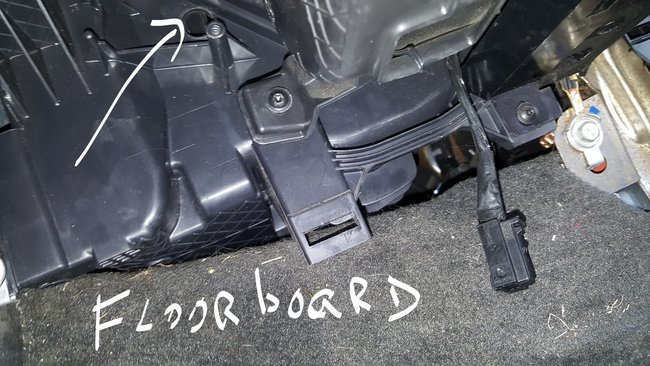
I am having the same issue described in your posting regarding the blend door actuator, however, my vehicle is listed above SS model. I have been searching the web to find the location of where the blend door actuator is located. Do you have a video or demonstration for my car?
May 28, 2018 at 11:25 AM
Advertisement
Avatar
ASEMASTER6371
  • CERTIFIED EXPERT
  • 52,796 POSTS
Good afternoon.

The actuator is under the drivers side dash above the fuel pedal. I attached a picture and procedure for you. Check out the images (Below). Please let us know if you need anything else to get the problem fixed.

May 29, 2018 at 9:24 AM
Avatar
BSIERRAS
  • MEMBER
  • 19 POSTS
Thank you, Roy! I was not sure, but you have confirm it. The reason I could not be certain was apparently the other part (not sure of the name) that connects with the actuator has fallen. Any suggestions on how to connect without tearing up the inside to connect the two.
May 30, 2018 at 5:45 AM
Advertisement
Avatar
ASEMASTER6371
  • CERTIFIED EXPERT
  • 52,796 POSTS
Do you mean the part the actuator attaches at?

Can you upload a picture of what you see?

Roy
May 30, 2018 at 5:51 AM
Avatar
BSIERRAS
  • MEMBER
  • 19 POSTS
Yes, that is correct. Where the actuator attaches at, but not the electrical connection. Yes, I can upload a photo, but I will need some time to get it uploaded. Many thanks!
May 30, 2018 at 5:56 AM
Avatar
ASEMASTER6371
  • CERTIFIED EXPERT
  • 52,796 POSTS
You are welcome.

I will wait for your upload and then get as much information for you.

Roy
May 30, 2018 at 6:07 AM
Avatar
BSIERRAS
  • MEMBER
  • 19 POSTS
Hey Roy, I do not know what happen. I was certain I uploaded the image the day we have been corresponding. But here it is again. Many thanks! Have a wonderful day!
Jun 1, 2018 at 4:59 AM
Avatar
STRAILER
  • CERTIFIED EXPERT
  • 53,854 POSTS
It looks like there was something there at one time. Do you not have the part or the wiring? Is this a track SS? Some of these cars are stripped down. Do you have the old part and you are not weening the wiring? Please give more details.

Cheers, Ken
Jun 4, 2018 at 10:44 AM
Avatar
BSIERRAS
  • MEMBER
  • 19 POSTS
Hey, Ken.

Thanks for responding. I do have the blend door actuator, and I felt inside the hole, and there is something inside there. If you are asking if I have an SS, yes I do have an SS.

I was wondering how to be able to attach the actuator to the part that is on the other side of that barrier without having to tear open the dashboard.
Jun 8, 2018 at 3:45 PM
Avatar
STRAILER
  • CERTIFIED EXPERT
  • 53,854 POSTS
You should be able to. Here is a guide that can help with diagrams for what it will take in your car:

https://www.2carpros.com/articles/replace-blend-door-motor

Here are all blend door actuators so you do not get mixed up (below):

1 - M37 Mode Door Actuator.

2 - K8 Blower Motor Control Module.

3 - M8 Blower Motor.

4 - M46 Air Re-circulation Door Actuator.

5 - K33 HVAC Control Module.

6 - M6 Air Temperature Door Actuator.

Check out the diagrams (below). Please let us know what happens.

Cheers, Ken
Jun 8, 2018 at 3:54 PM
Avatar
BSIERRAS
  • MEMBER
  • 19 POSTS
Hey, Ken.

It has been a while and I am still struggling with the issue. Thanks for the detail instructions. It was great but it seems that my blend door actuator comes from the driver side near the fuel pedal. Do you have instructions for attaching it to whatever is on the other side of the barrier?

Many thanks for your time!
Bonnie
Aug 2, 2018 at 12:28 PM
Avatar
STRAILER
  • CERTIFIED EXPERT
  • 53,854 POSTS
Hi Bonnie,

It will help to remove the knee bolster, here is a diagrams to help you see how. If this is not correct can you shoot a quick picture of the problem and upload it?

Check out the diagrams (below). Please let us know what happens.

Cheers, Ken
Aug 3, 2018 at 12:24 PM
Avatar
BSIERRAS
  • MEMBER
  • 19 POSTS
Thanks, Ken! The diagram looks helpful. I will be working on my car this weekend. I will keep you posted.
Aug 11, 2018 at 11:18 AM
Avatar
STRAILER
  • CERTIFIED EXPERT
  • 53,854 POSTS
Please do, let us know. ;)
Aug 11, 2018 at 11:22 AM
Avatar
ASEMASTER6371
  • CERTIFIED EXPERT
  • 52,796 POSTS
Just to add what Ken told you. I am concerned the actual door inside the case has a problem.

It should have the end attached to the door sticking through the case.

See if can lift the door and examine the end for any damage.

Roy
Aug 11, 2018 at 4:38 PM
Avatar
BSIERRAS
  • MEMBER
  • 19 POSTS
Hey, Roy and Ken.

Thanks for the information, I will keep an eye out for it.

Unfortunately, the weather was not cooperating this weekend for me. I am going to shoot for this week. Wish me luck!

Many thanks!
Bonnie
Aug 13, 2018 at 7:44 AM
Avatar
ASEMASTER6371
  • CERTIFIED EXPERT
  • 52,796 POSTS
Okay. Let us know if we can help you anymore, Bonnie.

Roy
Aug 13, 2018 at 7:55 AM
Avatar
BSIERRAS
  • MEMBER
  • 19 POSTS
Here are some more photos to give you an idea of what I am up against. As you view the first photo, there is seperation from the floorboard and the part I am working with. I am trying to get into that part above the floorboard.
Aug 13, 2018 at 9:01 AM
Avatar
ASEMASTER6371
  • CERTIFIED EXPERT
  • 52,796 POSTS
That hole in the case is what concerns me. Where is the door hook up?

Roy
Aug 13, 2018 at 9:16 AM
Avatar
BSIERRAS
  • MEMBER
  • 19 POSTS
So, I tried using the diagram provided to remove panel driver knee bolster energy absorber, and I got stuck on a concern. By reviewing the photo attached, am I to remove everything that is within the yellow lines? I started to remove the studs and screws when I noticed that the panel goes upward. So I stop the procedure to inquire if I was on the right path.
Also, will removing this panel get me into the housing where the blend door actuator attaches?
Aug 16, 2018 at 10:24 AM
Avatar
STEVE W.
  • CERTIFIED EXPERT
  • 15,113 POSTS
The knee bolster close out is the panel underneath that area. If you put your head into the drivers foot well and look up at the area under the steering column you will see the panel you need to remove. There are 6-8 screws that come out and the panel drops down.
The blend door actuator is number 6, with the lower panel off it should be above the gas pedal area on the case, tucked into the area between the case halves.
Aug 20, 2018 at 10:48 AM
Avatar
BSIERRAS
  • MEMBER
  • 19 POSTS
Thanks Steve! I am giving it another try!

B. :)
Aug 25, 2018 at 2:31 PM
Avatar
BSIERRAS
  • MEMBER
  • 19 POSTS
So, I reviewed the images for the knee booster, and I do not know if I am seeing what you are seeing, but if I remove this knee booster will it allow me to get into the housing where the door actuator connects? I read somewhere on the net that the door actuator connects to another part that is inside this housing. That is what I can't seem to get to, and I need to connect the door actuator to it. Here is also a video that I came across with the issue that I am having: https://youtu.be/sG2JrEmvJ9A

My dilemma is not wanting to tear the housing apart the way this guy did in his video to get to the blend door actuator connected to that part that is inside that housing.
I really appreciate your experience and knowledge in helping me with this.
Aug 25, 2018 at 6:23 PM
Avatar
STEVE W.
  • CERTIFIED EXPERT
  • 15,113 POSTS
Okay, went back through your information. From your description it sounds like the actual blend door has failed. They are nothing but a plastic flap with a pivot pin molded on two corners. One of the pivots goes into a hole in the case and the actuator connects to it, the other sets into a blind hole on the opposite side of the air passage. I suspect you have the same issue as the video, the door pivot broke off. If it dropped into the case there is no real easy way to get to it to fish it out and get it back into place. If it broke as I suspect getting it back into place will not really help as it would not stay in place and work.
The options are to cut the housing open, replace the door and glue the housing back together or remove the entire dash to remove the case and replace the door. Not really any other way. If you cut it open you do not need to worry so much about strength, you can always glue a section of plastic over the cut area as a reinforcement.
Aug 26, 2018 at 8:31 AM
Avatar
BSIERRAS
  • MEMBER
  • 19 POSTS
Yes! Thanks for reviewing over the information. I am relieved now that I know what I have to do. I may just have to go the route the way the guy in the YouTube did. Thank you all for your help! And thank you, Steve, for reviewing over the information and keeping me from going back and forth.

Cheers! Bonnie
Aug 27, 2018 at 7:29 AM
Avatar
STRAILER
  • CERTIFIED EXPERT
  • 53,854 POSTS
Steve W is one of your best! Use 2CarPros anytime, we are here to help. Please tell a friend.

Cheers, Ken
Aug 27, 2018 at 10:45 AM
Avatar
BSIERRAS
  • MEMBER
  • 19 POSTS
Will do!
Aug 27, 2018 at 10:52 AM
Avatar
STEVE W.
  • CERTIFIED EXPERT
  • 15,113 POSTS
One thing you could do to make sure of what you have would be to buy one of the cheap bore cameras that hook to a smart phone and use the hole in the case to see what is wrong inside. You could see what is in the case and if you opt for cutting it would let you plan the lines better.
Aug 28, 2018 at 6:08 AM
Avatar
LORIANDTIM MCGEE
  • MEMBER
  • 1 POST
I have a 2012 camero RS that has cold air coming out of the passenger side and hot air coming out of the driver side ..... what’s the problem?
Jul 5, 2019 at 4:51 AM
Avatar
STEVE W.
  • CERTIFIED EXPERT
  • 15,113 POSTS
That would be the same actuator and blend door covered in the posting above. Either the actuator or door has failed.
Jul 5, 2019 at 11:00 AM
Avatar
NERVOUSWRECK32
  • MEMBER
  • 1 POST
Please help. I know this is 1 year later but the same problems still exist in the Gen5's.
I completed the entire task of replacing the broken blend door. Now, I'm confused. How do you remount the blend door motor to the new blend door making sure that it's time/synchronized correctly??
I've read so many different methods online and I really don't want to replace another blend door within a week due to not having it synchronized correctly. Any and all advise would be greatly appreciated right now.

Thank you in advance
Jul 28, 2019 at 7:11 AM
Avatar
STEVE W.
  • CERTIFIED EXPERT
  • 15,113 POSTS
If you mean you replaced the actuator and door and got it all together, the actuator will self calibrate it's location. If you don't have a high level scan tool you can follow this procedure.

Do not adjust any controls on the HVAC control module while the HVAC control module is self-calibrating. If interrupted, improper HVAC performance will result.
1. Place the ignition switch to the OFF position.
2. Install the HVAC actuator.
3. Connect all previously disconnected components.

4. Remove the HVAC control module fuse for a minimum of 30 s.
5. Install the HVAC control module fuse.

6. Turn the ignition ON.
7. Wait 60 s for the HVAC control module to self-calibrate.

It will move all of the actuators to full open/closed and then set them to the points that match the settings.
Jul 28, 2019 at 10:13 AM