Servicing Tires and Wheels
BALANCING
The tire and wheel assemblies should be balanced using a dynamic balance either on the car or
off the car.
The dynamic type produces a more accurately balanced tire and wheel assembly than does the
static type and is therefore recommended.
Once you have properly mounted and inflated a tire, you must balance the assembly. Balancing
your performance customers’ tires and wheels is another area where attention to service can pay
off. These customers are driving vehicles with steering and suspension systems that are so
sensitive that even the average driver can feel minor handling problems. Poorly balanced tires are
what will drive them to other tire dealerships.
Proper balancing is critical for optimal vehicle performance, especially at highway speeds. When
tire and wheel assembly are unbalanced, a vibration can result from wheel shimmy (shaking from
side to side) or wheel tramp (tire and wheel hopping up and down). Therefore, it is important that
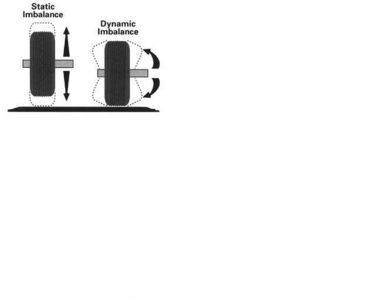
these assemblies are in both static and dynamic balance.
Static balance exists when the weight mass is evenly distributed around its axis of rotation. Static
imbalance can be detected from vibrations through the seat, floor and steering column. These
heavy or light spots in the tire should be eliminated by placing wheel weights, equally distributed,
on both the inside and outside rim flanges.
Dynamic balance exists when the weight is equally distributed both around its circumference and
on either side of its centerline. Dynamic imbalance is the result of heavy or light spots on the side
or off-center of the wheel, tire tread or sidewall.
Note: A tire can be in static balance and still have dynamic imbalance.
The best way to ensure proper balance is to use an off-the-car computer-balancing machine.
Follow the machine’s operating instructions step by step. The balance will measure the
assembly’s fluctuations in weight by stimulating its operating on a vehicle. The balance will
indicate that correct amount of weight to use and where to place each weight.
There are three types of weights – adhesive-backed lead weights, coated-lead clip weights and
uncoated lead clip weights. On steel wheels, any type of weight can be used. You should note,
however, that the uncoated lead clip-on weights scratch the steel, inviting rust.
Only adhesive-backed weights or coated-lead clip weights should be used on aluminum wheels as
uncoated lead clip-on weights can crack the clear coating on custom wheels, causing corrosion.
Remember that your high performance customer has invested heavily in his or her custom
wheels. Not only do you need to be careful not to scratch the wheels with weights, but you also
need to be aware of the customer’s preference for placement of the weights. Many high
performance customers do not want weights placed on the outside of the wheels.
Warning: Always make sure that weights used on the inside surface of a wheel do not
interfere with the brake calipers or other mechanical components.
Once the weights are placed on the wheel, place the assembly back on the balancer and verify that
it is correctly balanced.
Improving Handling Characteristics
In motorsports competition, adjustments to everything from tires to spoilers are commonly made
to give a vehicle specific handling qualities. One of the best ways to improve the handling of high
performance vehicles designed for competition is to modify tire and wheel variables.
Adjustments are commonly made to reduce oversteer and understeer. Oversteer is when the rear
of a vehicle loses grip before the front of the vehicle in a cornering situation. Understeer is the
opposite. It is when the front of a vehicle loses grip before the rear of the vehicle. To the drive,
understeer feels like the vehicle is resisting turning into a corner. The best cornering attitude is a
neutral steer where the tires are achieving optimum performance. Use the following chart when
making oversteer and understeer handling adjustments to performance vehicles. Remember that
when increasing or decreasing tire pressures, use 2 psi increments for best results.
Warning: Carrying any of the following adjustments to an extreme may magnify the
problem you are attempting to correct. For example, one way to reduce understeer is to add more
inflation pressure to the front tires. If you add too much pressure, you may create an even greater
understeer problem, as less tread will contact the road surface, providing less cornering ability.
Tire Rotation
To obtain even and maximum tire wear, it may be necessary to rotate your tires. (Please note: for
some tires like the Michelin® XH4®. X-One® radial and Uniroyal® NailGard, tire rotation is
required to maintain its warranty status.) Refer to your vehicle owner’s manual for instructions on
tire rotation.
Some tires have arrows on the sidewall showing the direction in which the tire should turn. When
rotating this type of tire, care must be taken to maintain the proper turning direction as indicated
by the arrows.
Unless otherwise recommended by the vehicle manufacturer’s owner’s manual, tires should be
inspected every 6,000-8,000 miles and rotated at the first sign of uneven or irregular wear. Any of
the rotation patterns shown can be used:
Following the tire rotation guidelines in the vehicle owner’s manual, and/or using the suggested
rotation patterns, will help to distribute wear equally among tires. Here are some other important
points to remember when rotating tires:
1. Be sure to adjust tire inflation pressures. Refer to the vehicle manufacturer’s tire placard
for recommended pressures. Make a special effort to verify the correct inflation pressure
for new wheel positions.
2. Never include a “Temporary use Only” spare tire in any of the previous rotation patterns.
If the vehicle’s owner has a spare that is a regular size tire and wants to include it in the
rotation pattern, follow this procedure:
Use one of the rotation patterns shown. Insert the spare in the right rear position and
place the tire that would have been rotated to the right rear position in the trunk as a new
spare.
3. Under normal driving conditions, the difference in wear rate can be substantial between
front and rear tires on front wheel drive vehicles. Always refer to the vehicle owner’s
manual for rotation recommendations.
4. Check the vehicle’s mechanical condition. Sagging suspensions, worn brakes, front-end
alignment, etc. can affect tire wear. Refer to the vehicle owner’s manual or recommended
maintenance.
Remember, unless otherwise recommended by the vehicle owner’s manual, tires should be
inspected every 6,000-8,000 miles and rotated at the first sign of uneven or irregular wear.
Any rotation pattern or procedure may be followed; including those indicted by the vehicle
manufacturer’s owner’s manual. Whenever only two tires are replaced, the new tires should be
put on the rear axle.
Telling your customers about recommended rotation intervals is another way to maintain
customer satisfaction. After customers purchase tires, you may want to follow up with them by
sending a postcard that reminds them of the rotation “rules of thumb.”
Tire Storage
All tires should be stored in a cool dry place indoors so there is no danger of water collecting
inside them. Serious problems occur with tube type tires when they are mounted with water
trapped between the tire and the tube.
Due to pressurization, the liquid can pass through the innerliner and into the casing plies. (This
can result in sudden tire failure.) Most of the problems of this nature, encountered with tube type
tires, have been due to improper storage, which permitted water to enter the casing between the
tire and tube prior to mounting.
Tires should be stored in a cool place away from direct sunlight, sources of heat and ozone such
as hot pipes and electric generators. Exposure to these elements during prolonged periods of time
will exhaust the tire’s oxidation and weathering agents within the rubber compounds and result in
cracking. Be sure that surfaces, on which tires are stored, are clean and free from grease, gasoline
or other substances, which could deteriorate the rubber. (Tires exposed to these materials during
storage or driving could be subject to sudden failure.)
Tire Repair
External, or outside in, repair methods using sealant, string, rubber bands or rivet type plugs are
not recommended. The tire must be demounted for inspection of possible internal damage. Refer
to the appropriate tire repair manual if available or follow the recommended RMA procedures.
Chains
Although MAST branded snow tires have proven to be quite capable on winter roads, sever
winter conditions sometimes necessitate the use of chains. Certain procedures must be followed
when utilizing chains inorder to optimize performance and minimize tire wear/damage.
1. Chains should be utilized only when necessary. The probability of damage to the tire
and/or the chains increase as the driving speed and distance traveled increase. Use on dry
pavement is especially conducive to wear since the lubricating feature of the water
(snow) is not present.
2. Chain manufacturers give size recommendations for radial ply tires, which must be
adhered to for optimum utility and performance. Size recommendations are usually given
for the highway tread design tire. If the chain is to be used on a snow tire, it may be
necessary to use the next large chain size to allow for the necessary amount of chain
movement relative to the tire. Check for proper clearances between chains and vehicle.
Consult the individual chain manufacturer for specific recommendation because sizing
and fitment may vary with the chain type.
3. Normally, the proper fit for any type of chain is achieved by hand tightening it and
locking it in place. After one or two miles of driving, the chain should be retightened by
hand. This will take up any slack, which may have formed due to the unraveling of
components tangled in storage.
Warning: Improper chain type or size may damage the sidewall of a tire, causing failure.
Nov 5, 2007 at 7:46 PM