no communication with the ABS module

2017 CHEVROLET SILVERADO
44,000 MILES • 6.6L • TURBO • 4WD • MANUAL
Avatar
EL SURDO ALANIS
  • MEMBER
  • 1 POST
My ABS light came on. took my truck so they can put the computer to see what was the problem. the computer has no communication with the ABS module. how can I check if there is power on the module and it has enough ground source? thank you
Dec 29, 2018 at 11:10 AM
Advertisement
Avatar
ASEMASTER6371
  • CERTIFIED EXPERT
  • 52,796 POSTS
Good afternoon,

The first thing I would check is the powers to the ABS module. if you have powers to the module, good chance the module is bad. I attached a diagram for you to view and a video that show the module being replaced.

https://youtu.be/lUotkKXG9dY

Check out the diagrams (Below). Please let us know what you find.
Dec 30, 2018 at 1:56 PM
Avatar
MARCUS BISHOP
  • MEMBER
  • 1 POST
My front brakes randomly lock up. Changed master brake cylinder, both tire sensors, and it is still doing the same thing. Thinking now it is either the calipers or the module. Leaning more so towards the module because when the brakes lock up both sides (front only) lock up. If it was bad calipers only one side would lock up (whichever caliper was bad) Also, sometimes the truck shakes extremely bad when driving and stopping, as if a wheel is about to fall off. Then yesterday it drove smooth as silk with no issues. I have been dealing with the random brake issue for a week now. My question is: I watched your YouTube video on how to change the module, but I read somewhere else that I would have to bleed my brake system if I swapped the module. In your video you did not say anything about it, so would I need to or not? Also, do you even think it is my brake module?
Feb 23, 2021 at 9:15 AM (Merged)
Advertisement
Avatar
JACOBANDNICKOLAS
  • CERTIFIED EXPERT
  • 110,175 POSTS
Hi and thanks for using 2CarPros.com.

If you are only replacing the module, you are not getting into the hydraulics, so no. Here are the directions for replacement. The attached pictures correlate with these directions.

_____________________

Electronic Brake Control Module Replacement
Removal Procedure

Caution: Refer to Battery Disconnect Caution in Service Precaution.

Important: After installation, calibrate the new electronic brake control module (EBCM) to the tire size that is appropriate to the vehicle.

1. Disconnect the negative battery cable.
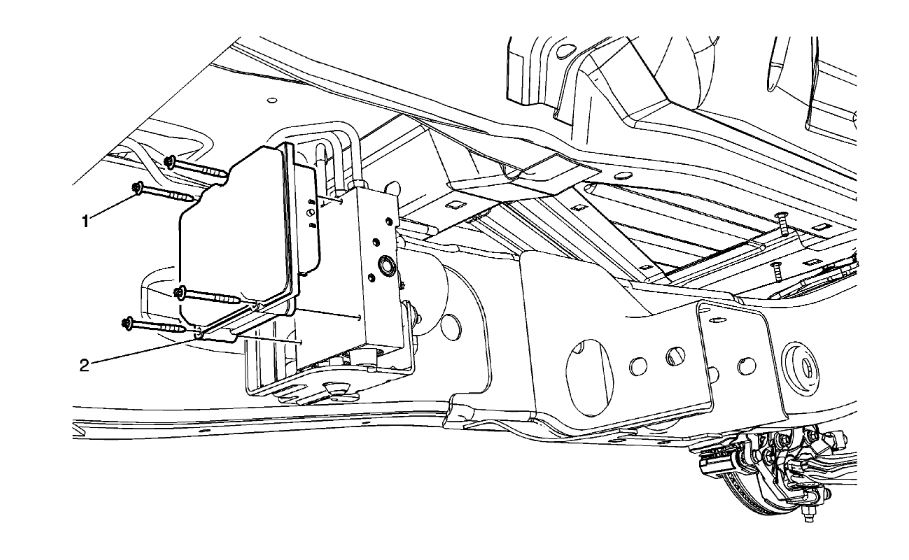
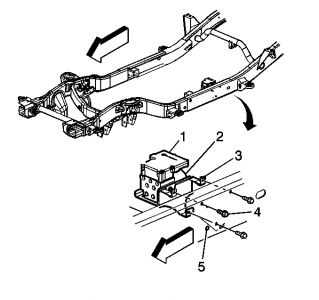
2. Raise and suitably support the vehicle.
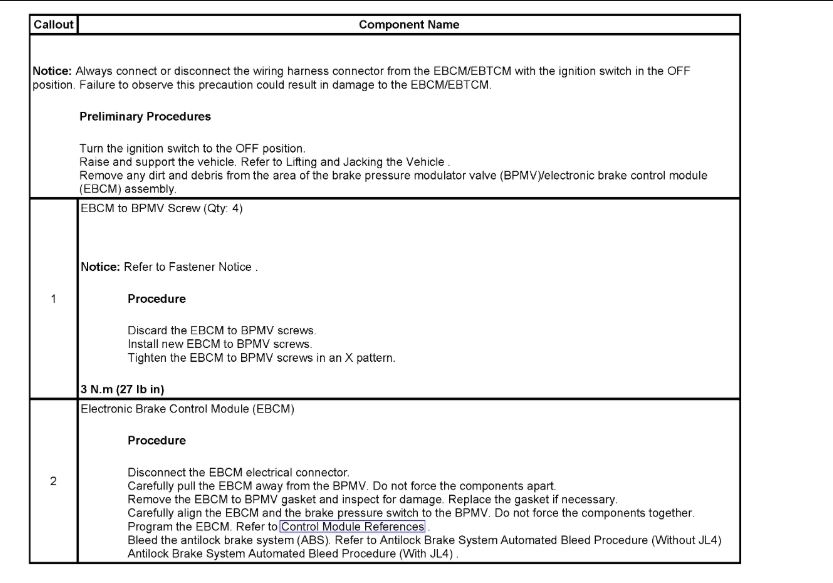
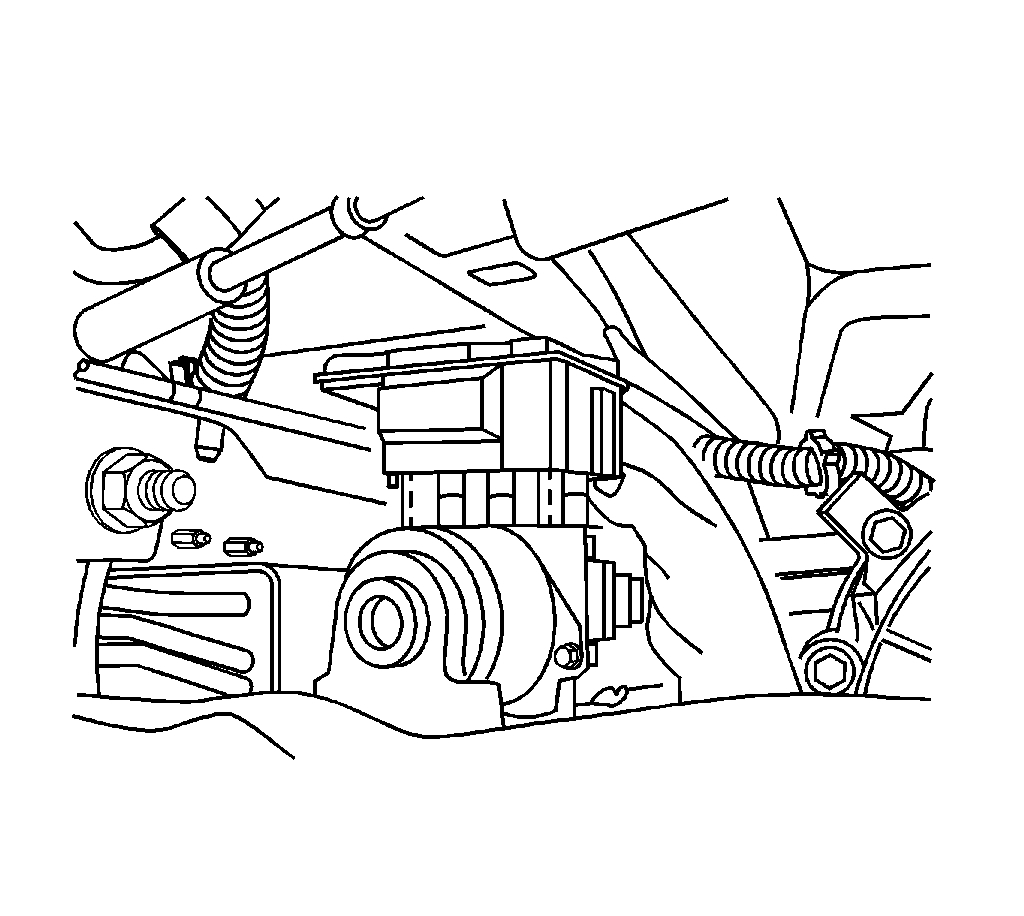
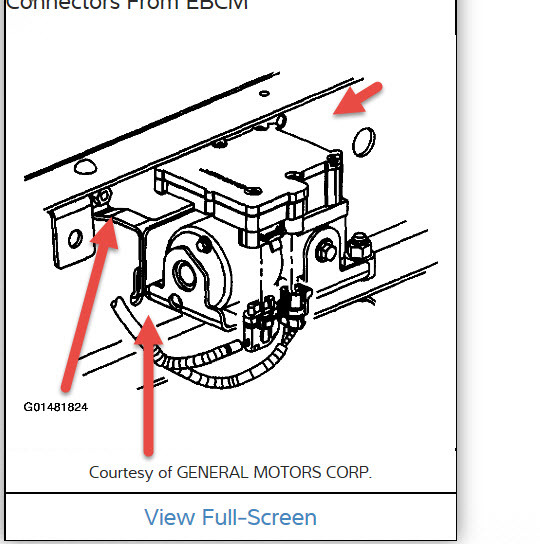
3. Important: The area around the electric hydraulic control unit (EHCU) MUST be free from loose dirt to prevent contamination of disassembled ABS components.

Thoroughly wash all contaminants from around the EHCU.
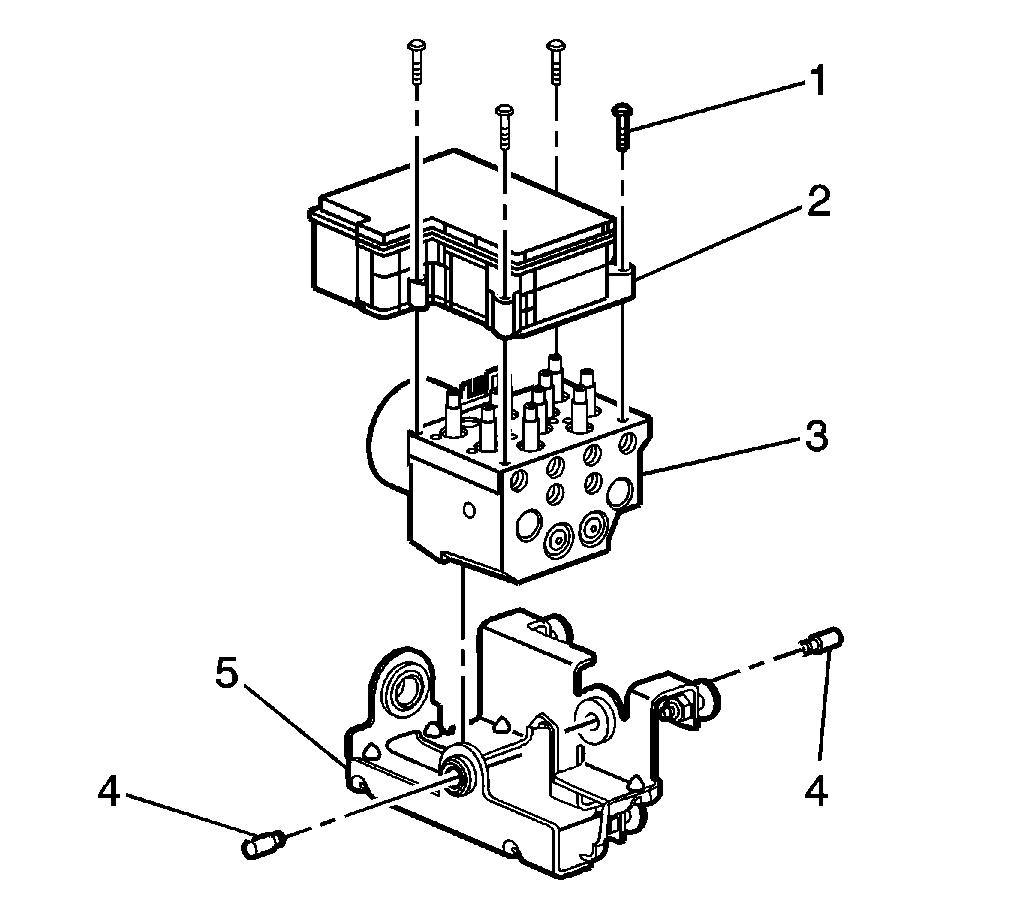
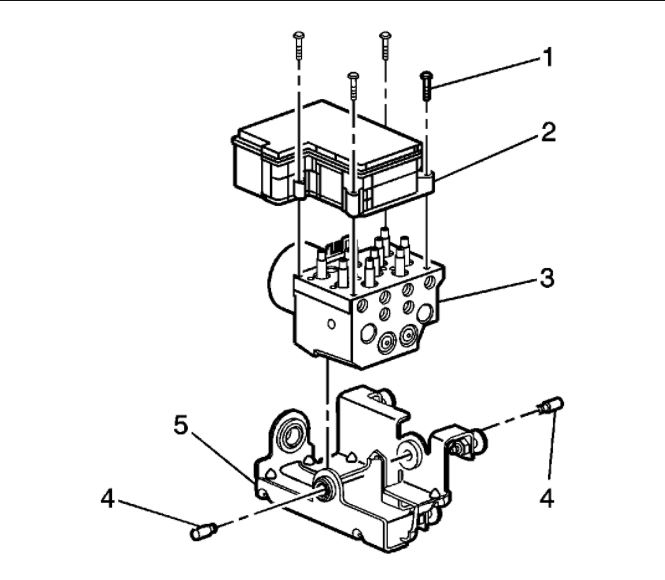
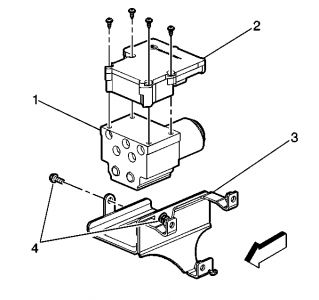
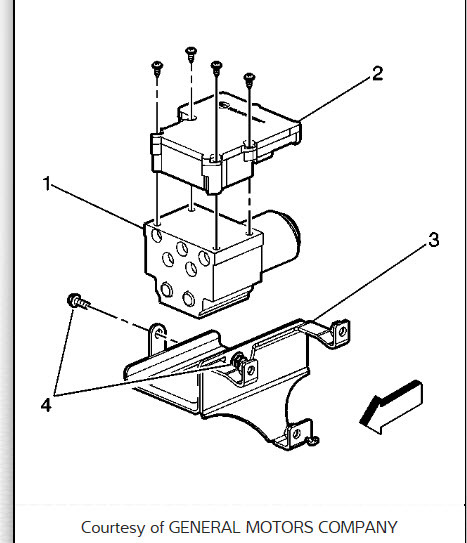
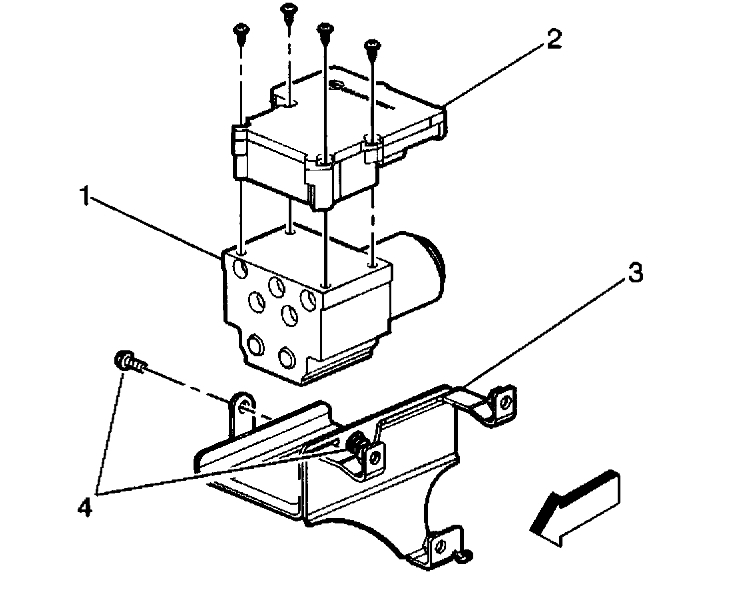
4. Remove the mounting screws (1) that fasten the EBCM (2) to the brake pressure modulator valve (BPMV) (3).
5. Remove the EBCM from the BPMV. Removal may require a light amount of force.
6. Remove the EBCM from the vehicle.
7. Clean the BPMV to EBCM mounting surfaces with a clean cloth.

Installation Procedure
1. Important:
^ Do not reuse the old mounting screws. Always install new mounting screws with the new EBCM.
^ Do not use RTV or any other type of sealant on the EBCM gasket or mating surfaces.

Install the EBCM to the BPMV.
2. Notice: Refer to Fastener Notice in Service Precautions.
Install the new EBCM screws (1).
^ Tighten the screws to 5 Nm (39 inch lbs.) in an X-pattern.
3. Lower the vehicle.
4. Connect the negative battery cable.
5. If a new EBCM was installed, the EBCM must be programmed.
6. Turn the ignition to the ON position. DO NOT start the engine.
7. Perform the Diagnostic System Check

_______________________________________________

I hope this helps. Let me know if you have other questions.

Take care,
Joe
Feb 23, 2021 at 9:15 AM (Merged)
Avatar
AUSTINHELMS10
  • MEMBER
  • 2 POSTS
I’ve tried removing the 4 torx bolts to remove it so you could match it to another module. But one of the back torx bolts seems to be stripped out and I can’t get anything to it. Please help!!!
Feb 23, 2021 at 9:15 AM (Merged)
Avatar
ASEMASTER6371
  • CERTIFIED EXPERT
  • 52,796 POSTS
Good morning,

You will need to get a sharp chisel and a hammer and try to knock the bolt loose in the counterclockwise direction.

If that does not work, you will need to cut the head off and remove the bolt after the module is removed.

https://www.2carpros.com/articles/how-to-replace-a-abs-controller

Roy
Feb 23, 2021 at 9:15 AM (Merged)
Avatar
AUSTINHELMS10
  • MEMBER
  • 2 POSTS
The gap between the module and under the cab is not much. Are you sure this is possible?
Feb 23, 2021 at 9:15 AM (Merged)
Avatar
ASEMASTER6371
  • CERTIFIED EXPERT
  • 52,796 POSTS
You will have to remove the bracket and hydraulic unit together and perform this on the bench if there is not enough room.

Can you post some pictures for me? I would like to see what you see.


Roy
Feb 23, 2021 at 9:15 AM (Merged)
Avatar
ROSENHAGEN
  • MEMBER
  • 1 POST
I have a z71 1500ls Silverado and can't get the abs module out due to no room for a small rachet.
Feb 23, 2021 at 9:16 AM (Merged)
Avatar
HMAC300
  • CERTIFIED EXPERT
  • 48,601 POSTS
the bracket that mounts the abs unit to the frame. Check out the diagrams (Below). Please let us know what happens.
Feb 23, 2021 at 9:16 AM (Merged)
Avatar
YAHWEH
  • MEMBER
  • 1 POST
This unit continuely runs even when the ignition is off. What precedures or matenance must I take before I take my truck in for service. And is there option to take of this problem. What tools would I need to use that would really help.
Feb 23, 2021 at 9:16 AM (Merged)
Avatar
DENNYP
  • CERTIFIED EXPERT
  • 1,824 POSTS
The ABS control module needs to be replaced. To get it to shut off, look for the large ABS fuse in the underhood fuse panel. Remove the fuse. You can remove the module from the hydraulic unit without removing any brake lines. You will need a torx bit (I think it's a T-15 or T-20).Remove the torx screws from the top of the module and lift the module off of the hydraulic unit. Put on the new module, bolt it down, and re-install the fuse.
Feb 23, 2021 at 9:16 AM (Merged)
Avatar
DENNYP
  • CERTIFIED EXPERT
  • 1,824 POSTS
xTooltipElement Service Information 2001 Chevrolet Chevy K Silverado - 4WD | Sierra, Silverado, Suburban, Tahoe, Yukon (VIN C/K) Service Manual | Brakes | Antilock Brake System | Repair Instructions | Document ID: 720110 Electronic Brake Control Module Replacement Removal Procedure Important: After installation, calibrate the new EBCM to the tire size that is appropriate to the vehicle. Caution: Unless directed otherwise, the ignition and start switch must be in the OFF or LOCK position, and all electrical loads must be OFF before servicing any electrical component. Disconnect the negative battery cable to prevent an electrical spark should a tool or equipment come in contact with an exposed electrical terminal. Failure to follow these precautions may result in personal injury and/or damage to the vehicle or its components. Disconnect the negative battery cable. Raise and suitably support the vehicle. Refer to Lifting and Jacking the Vehicle in General Information. Important: The area around the EHCU MUST be free from loose dirt to prevent contamination of disassembled ABS components. Thoroughly wash all contaminants from around the EHCU (1). Disconnect the electrical connectors from the EBCM. Loosen or remove the bolts (4) securing the EHCU mounting bracket (3) to the frame rail (5). Gently move the EHCU down enough to remove the mounting screws that fasten the EBCM (2) to the BPMV (1). Remove the EBCM (2) from the BPMV (1). Removal may require a light amount of force. Important: Do not use a tool to pry the EBCM or the BPMV. Excessive force will damage the EBCM. Clean the BPMV to EBCM mounting surfaces with a clean cloth. Installation Procedure Important: "¢ Do not reuse the old mounting screws. Always install new mounting screws with the new EBCM. "¢ Do not use RTV or any other type of sealant on the EBCM gasket or mating surfaces. Install the EBCM (2) on to the BPMV (1). Notice: Use the correct fastener in the correct location. Replacement fasteners must be the correct part number for that application. Fasteners requiring replacement or fasteners requiring the use of thread locking compound or sealant are identified in the service procedure. Do not use paints, lubricants, or corrosion inhibitors on fasteners or fastener joint surfaces unless specified. These coatings affect fastener torque and joint clamping force and may damage the fastener. Use the correct tightening sequence and specifications when installing fasteners in order to avoid damage to parts and systems. Install the new screws in the EBCM (2). Tighten Tighten the screws to 5 N ·m (39 lb in) in an X-pattern. Install or tighten the EHCU bracket mounting bolts (4). Tighten Tighten the EHCU bracket mounting bolts to 25 N ·m (18 lb ft). Connect the electrical connectors to the EBCM. Lower the vehicle. Connect the negative battery cable. Revise the tire calibration using the Scan Tool Tire Size Calibration function. Return to Diagnostic Starting Point - Antilock Brake System . © 2008 General Motors Corporation. All rights reserved.


https://www.2carpros.com/forum/automotive_pictures/102900_379478_1.jpg


https://www.2carpros.com/forum/automotive_pictures/102900_379484_1.jpg

Feb 23, 2021 at 9:16 AM (Merged)
Avatar
RICHIE D
  • MEMBER
  • 1 POST
The Motor associated with the ABS system keeps running after I shut off the engine, remove the key and exit the truck. ( It is under the truck with 4 hydraulic lines attached.) The only way to stop it from running,short of disconnecting the battery, is to remove the 60 amp fuse. I suspect that a relay is bad and stuck in the "On" position. What else could cause it to keep running ? What relay should I check
/ repl;ace ?
Any Ideas appreciated

Richie D
Feb 23, 2021 at 9:16 AM (Merged)
Avatar
SWILLIAMS
  • CERTIFIED EXPERT
  • 597 POSTS
Common failure on the Kelsey Hayes ABS unit. There is a control relay inside the unit that fails ON. The only real solution is to replace the ABS pump with a different one. You can buy NEW or you can get a rebuilt unit that has an upgraded part. Your choice. OR if you don't care if the ABS works you can pull the ABS fuse and ignore the light.

This video will show you how to fix it

https://youtu.be/lUotkKXG9dY

Please let us know if you need anything else to get the problem fixed.
Feb 23, 2021 at 9:16 AM (Merged)
Avatar
KENTUCKYCUB
  • MEMBER
  • 3 POSTS
I have the (4) bolts out of the Module What is the best way to get the two apart without prying?
Feb 23, 2021 at 9:16 AM (Merged)
Avatar
HMAC300
  • CERTIFIED EXPERT
  • 48,601 POSTS
Here is a video of the job being done

https://youtu.be/lUotkKXG9dY

Check out the diagrams (Below). Please let us know if you need anything else to get the problem fixed.
Feb 23, 2021 at 9:16 AM (Merged)
Avatar
KENTUCKYCUB
  • MEMBER
  • 3 POSTS
I have already got the (4)bolts out,issue is how to get the EBCM apart from the EHCU without prying,would using a razor knife to cut the seal be practical
Feb 23, 2021 at 9:16 AM (Merged)
Avatar
HMAC300
  • CERTIFIED EXPERT
  • 48,601 POSTS
if you have cleaned around it then try using a rubber mallet or similar and tapping around it lightly to remove it.
Feb 23, 2021 at 9:16 AM (Merged)
Avatar
KENTUCKYCUB
  • MEMBER
  • 3 POSTS
Thanks Hmac300 I got it ,I was a little hesitant about hammering around on it,thanks for your help.
Feb 23, 2021 at 9:16 AM (Merged)
Avatar
DALE KL
  • MEMBER
  • 2 POSTS
On the ABS box, the bleeder valve is leaks. Is there a cheap way to fix?
Feb 23, 2021 at 9:16 AM (Merged)
Avatar
ASEMASTER6371
  • CERTIFIED EXPERT
  • 52,796 POSTS
Good morning.

You could try removing the valve and cleaning the inside area where it seats. There may be debris on the surface the bleeder mounts.

If that does not work, then the ABS unit will have to be replaced.

Roy
Feb 23, 2021 at 9:16 AM (Merged)
Avatar
DALE KL
  • MEMBER
  • 2 POSTS
Thanks, l will try that.
Feb 23, 2021 at 9:16 AM (Merged)
Avatar
ASEMASTER6371
  • CERTIFIED EXPERT
  • 52,796 POSTS
You are welcome. keep us updated.

Roy
Feb 23, 2021 at 9:16 AM (Merged)
Avatar
LIONWOLF
  • MEMBER
  • 5 POSTS
I watched your video on replacing 1999 Chevy Silverado 1500 LS 2wd 5.3L ABS Module and I was told I have to flush the brake fluid after I put in new ABS Module. Is this true and where do I bleed the fluid from?
Feb 23, 2021 at 9:17 AM (Merged)
Avatar
AL514
  • CERTIFIED EXPERT
  • 5,462 POSTS
Hello thanks for using 2CarPros, has the brake fluid ever been replaced since you've had the truck? It is a good idea, if the fluid is black in the master cylinder, then bleed the master itself so that none of that old fluid goes into the ABS module, then refill it with new fluid and bleed the whole system. Start with the wheel closest to the master cylinder (so the front drive side) then the passenger side front, then the drivers side rear, and last the passenger side rear, since it's the farthest from the master cylinder. This way all the air will be able to escape. There should also be 2 bleed screws on the abs module, bleed the one closest to the firewall first,then the other.

this guide should help

https://www.2carpros.com/articles/how-to-bleed-or-flush-a-car-brake-system

Please run down this guide and report back.
Feb 23, 2021 at 9:17 AM (Merged)
Avatar
AL514
  • CERTIFIED EXPERT
  • 5,462 POSTS
I'm sorry I had the process reversed. Start with the wheel farthest from the master cylinder which is the passenger side rear, then the driver's side rear, then passenger side front ,then driver's side front. I'm sorry I had them backwards before, (this is edited) This way all the air will be able to escape. There should also be 2 bleed screws on the ABS module, bleed the one closest ,to the firewall first,then the other.
Feb 23, 2021 at 9:17 AM (Merged)
Avatar
LIONWOLF
  • MEMBER
  • 5 POSTS
Awesome thank you! I was just wondering how air gets into the line when replacing abs module because it’s only held on by four screws. Or is it just a good idea to change brake fluid cause usually the fluids been in the lines awhile when you replace ABS module?
Feb 23, 2021 at 9:17 AM (Merged)
Avatar
AL514
  • CERTIFIED EXPERT
  • 5,462 POSTS
It's just a good idea to flush the brake fluid since you're already replacing the module. It's part of routine maintenance, but also to make sure all the air is out of the new module. Does the new module have bleeder screws on it? Some don't.
Feb 23, 2021 at 9:17 AM (Merged)
Avatar
LIONWOLF
  • MEMBER
  • 5 POSTS
No bleeder screws on this one just 3 connectors and it’s under the truck. I was just thinking why bleed the lines when no fluid goes into the ABS Module. It’s literally a small flattish metal and plastic box with 3 connection spots and a circuit board inside.
Feb 23, 2021 at 9:17 AM (Merged)
Avatar
AL514
  • CERTIFIED EXPERT
  • 5,462 POSTS
Okay, I see. I thought you were replacing the whole hydraulic unit. Yes the modules just bolt right on top of the hydraulic unit. I think this the same module as you're doing in this video . I don't see why you would have to flush the fluid in this case. Unless it's black, that means the seals in the master cylinder are going bad.
https://youtu.be/lUotkKXG9dY
Feb 23, 2021 at 9:17 AM (Merged)
Avatar
AL514
  • CERTIFIED EXPERT
  • 5,462 POSTS
Just make sure the brake pedal is firm and not spongy. That would indicate air in the system. And may I ask who told you to flush the whole system?
Feb 23, 2021 at 9:17 AM (Merged)
Avatar
LIONWOLF
  • MEMBER
  • 5 POSTS
Thank you for your help I really appreciate it. The person while told me to flush it was someone I know who works at a local commercial garage, but I’m guessing he thought I was replacing the whole unit as well. Again thank you!
Feb 23, 2021 at 9:17 AM (Merged)
Avatar
AL514
  • CERTIFIED EXPERT
  • 5,462 POSTS
No problem, let us know if there's anything else we can help with.
Feb 23, 2021 at 9:17 AM (Merged)
Avatar
OLDCHAS
  • MEMBER
  • 1 POST
MY truck is a 1999 2wd ext cab. 56000 mi. 6cyl. The abs module has 5 ports for hydraulic lines. Three in a row near the top of one end of the unit and two spaced just below those. Two of these ports are for input lines and three are for output. I need to know which ports are input (one front input and one input for the rear) and which are output (one output rear, two output front.)


https://www.2carpros.com/forum/automotive_pictures/82139_KHABS_1.jpg

Feb 23, 2021 at 9:17 AM (Merged)
Avatar
DODGERAM333
  • MEMBER
  • 1 POST
Looking at your pict. Tr goes to rear brakes. Ct goes to rf,tl goes to lf. Bl goes thru proportioning valve and to the front of the master cylinder. Ll goes thru prop. Valve and to the rear of master cylinder. 02 dodge ram 3500..
Feb 23, 2021 at 9:17 AM (Merged)