Can you help me change out my alternator?

2007 FORD TAURUS
95,500 MILES • 6 CYL • FWD • AUTOMATIC
Avatar
SHAWNFILYAW
  • MEMBER
  • 1 POST
can you help me change out my alternator please?
Aug 15, 2011 at 12:46 PM
Advertisement
Avatar
KASEKENNY
  • CERTIFIED EXPERT
  • 18,907 POSTS
Here is a guide that will help with testing the alternator in case or someone else needs this:

https://www.2carpros.com/articles/how-to-check-a-car-alternator

Here is a guide that will show step by step instructions on how to replace an alternator:

https://www.2carpros.com/articles/how-to-replace-an-alternator

Below is the process from the manual that will show how to replace this.

Please let us know if you have any questions. Thanks
Jun 12, 2021 at 6:38 PM
Avatar
ALISON SUE ADAMS
  • MEMBER
  • 1 POST
Replaced the started about a month ago. had to jump the car (starts right up with jumpers so seems not to be starter-related). battery tests bad and the car place says the alternator is bad also, is 'charging at idle but not at speed.
Jul 28, 2021 at 1:58 PM (Merged)
Advertisement
Avatar
JACOBANDNICKOLAS
  • CERTIFIED EXPERT
  • 110,175 POSTS
Hi,

Replacing the alternator on this vehicle isn't too hard of a job. If you do it yourself, make sure to get a lifetime warranty replacement part. That way if it fails again in the future, you won't have to pay for a new one.

To get you started, here is a link that explains how in general to replace an alternator on a vehicle. You can use this to help guide you when replacing the alternator.

https://www.2carpros.com/articles/how-to-replace-an-alternator

If you look at the attachments below, they provide the directions specific to your vehicle for replacement.

I hope this helps. Let me know if you have other questions.

Take care,

Joe

See pics below.
Jul 28, 2021 at 1:58 PM (Merged)
Avatar
SHAWNTAYLOR
  • MEMBER
  • 1 POST
how do i replace the alternator
Jul 28, 2021 at 1:58 PM (Merged)
Avatar
DAVE H
  • CERTIFIED EXPERT
  • 13,384 POSTS
REMOVAL & INSTALLATION CAUTION:When battery is disconnected, vehicle computer and memory systems may lose memory data. Driveability problems may exist until computer systems have completed a relearn cycle. See appropriate COMPUTER RELEARN PROCEDURES article in GENERAL INFORMATION before disconnecting battery. GENERATOR Removal & Installation (3.0L 2-Valve) Disconnect negative battery cable. Disconnect wiring from generator. Remove accessory drive belt. Remove 3 bolts, and remove generator. To install, reverse removal procedure. Tighten fasteners to specification. See TORQUE SPECIFICATIONS . Removal & Installation (3.0L 4-Valve) NOTE:Numbers in parenthesis refer to numbers in illustration. Disconnect the battery. Rotate the accessory drive belt tensioner clockwise and position the accessory drive belt aside. Remove the power steering hose bracket nut from the generator mounting bolt. See Fig. 3 . Remove the upper generator bolts. See Fig. 4 . The left side bolt will come out with the generator. Remove the right front wheel and tire assembly. To remove the right front fender splash shield, remove the 4 pin-type retainers (1), remove the 3 fender screws (2) and remove the lower screw (3). See Fig. 5 . Remove the screws and the generator splash shield. See Fig. 6 . Remove the torque converter inspection cover. See Fig. 7 . Install the Flywheel Holding Tool (303-544). See Fig. 8 . The crankshaft pulley bolt has a reverse thread. The crankshaft pulley and bolt are a molded composite and are one piece. Remove the bolt and the crankshaft pulley. See Fig. 9 . To lower the generator to allow access to the electrical connectors, disconnect the crankshaft sensor, release the oxygen sensor connector locator from the bracket and remove the lower generator bolt. See Fig. 10 . Disconnect the regulator electrical connector. Remove the B+ connector nut. Disconnect the B+ connector and remove the generator. To install, reverse the removal procedure. 3)


https://www.2carpros.com/forum/automotive_pictures/266999_3_13.jpg

4)


https://www.2carpros.com/forum/automotive_pictures/266999_4_7.jpg

5)


https://www.2carpros.com/forum/automotive_pictures/266999_5_4.jpg

6)


https://www.2carpros.com/forum/automotive_pictures/266999_6_3.jpg

7)


https://www.2carpros.com/forum/automotive_pictures/266999_7_3.jpg

8)


https://www.2carpros.com/forum/automotive_pictures/266999_8_2.jpg

9)


https://www.2carpros.com/forum/automotive_pictures/266999_9_3.jpg

10)


https://www.2carpros.com/forum/automotive_pictures/266999_10_3.jpg

Jul 28, 2021 at 1:58 PM (Merged)
Avatar
JEFFB5000
  • MEMBER
  • 1 POST
Are there any special steps to removing an alternator for a 2002 Ford Taurus?
Jul 28, 2021 at 1:58 PM (Merged)
Avatar
SEVAG P
  • CERTIFIED EXPERT
  • 405 POSTS
hi,

I will send you procedure step by step.

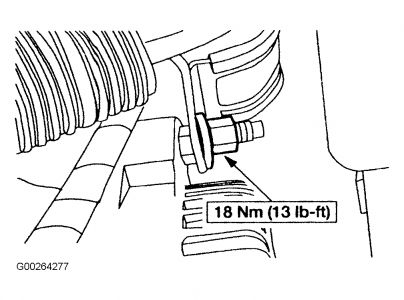
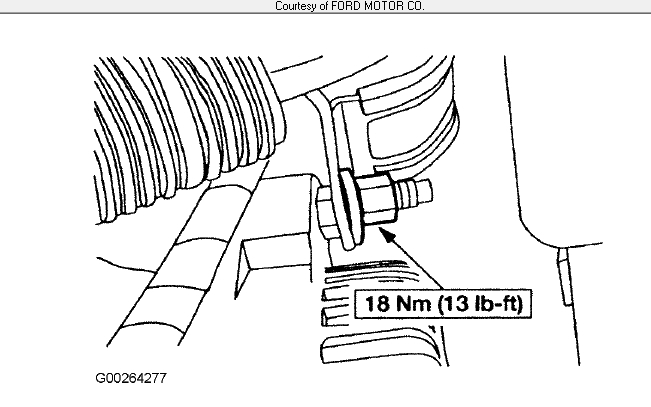
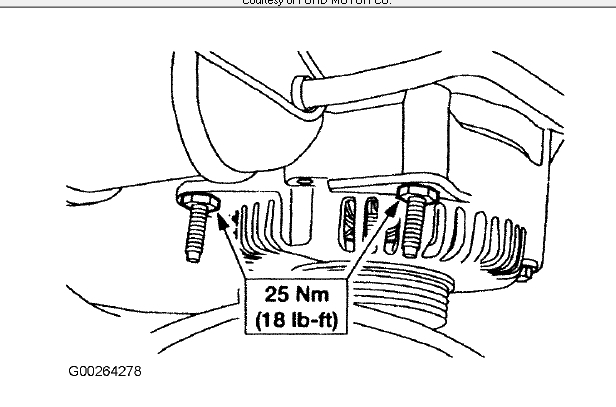
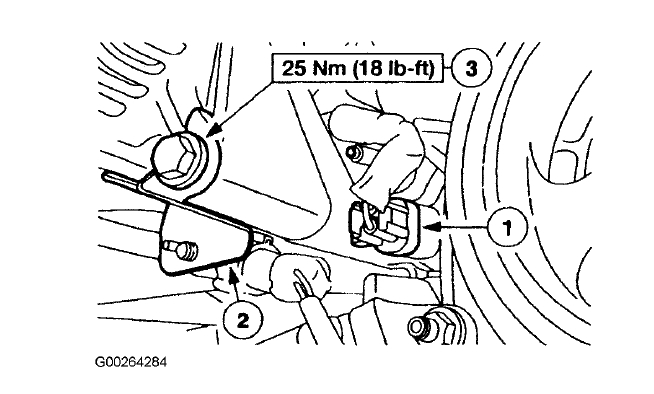
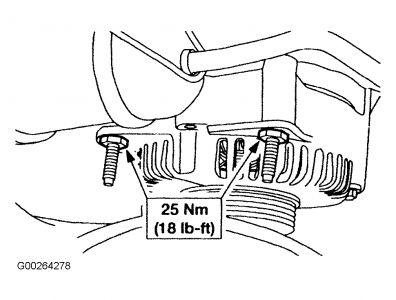
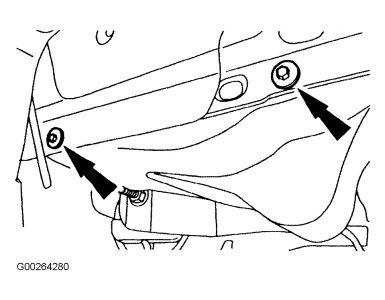
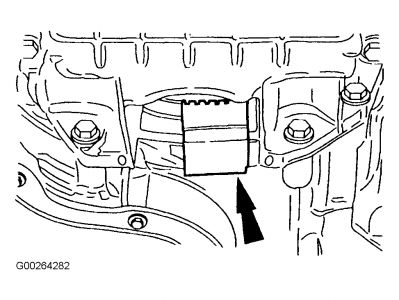
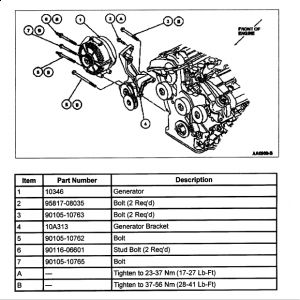
1. disconnect the battery. rotate the accessory drive belt tensioner clockwise and position the accessory drive belt aside. remove the power steering hose bracket nut from the generator mounting bolt. see fig1.remove upper generator bolts. see fig 2.the left side bolt will come out with the generator.

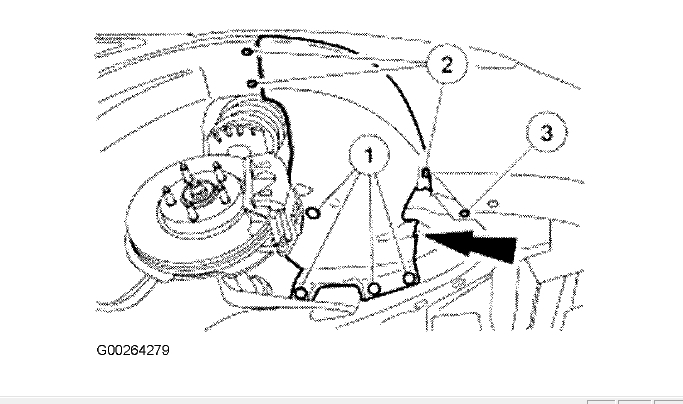
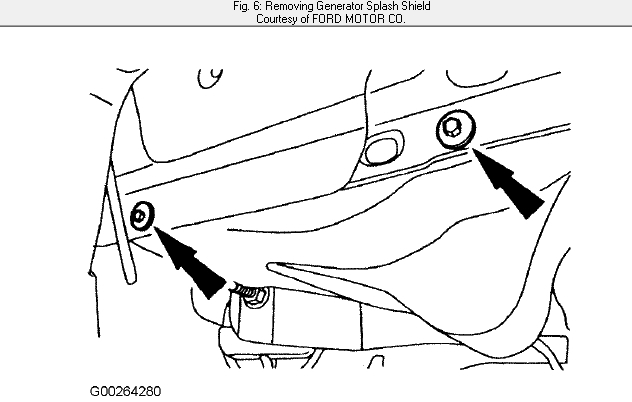
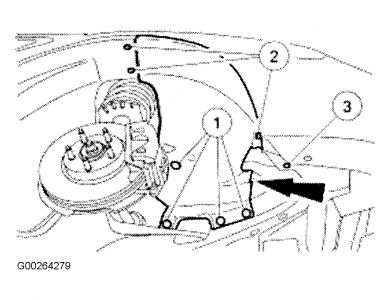
2. remove the right front wheel and tire assembly.to remove the right front fender splash shield. remove the 4 pin type retainers(1) remove the 3 fender screws(2)and remove the lower screw (3).see fig3.remove the screws and the generator splash shield see fig4

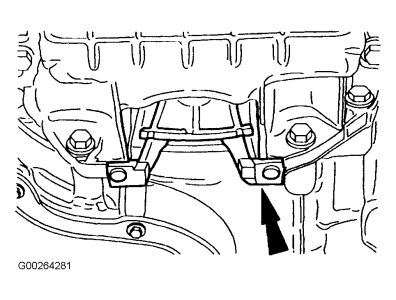
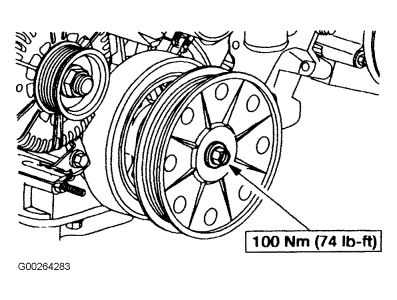
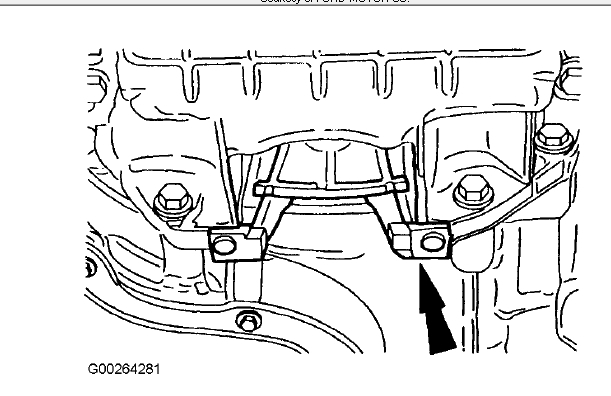
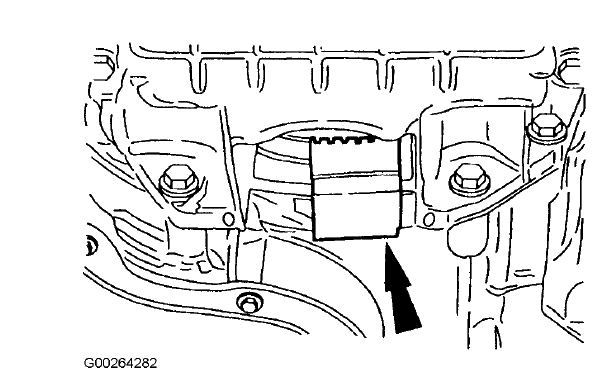
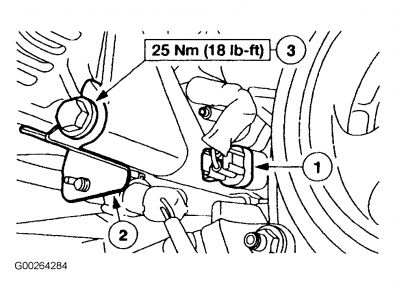
3. remove the torque converter inspection cover. see fig 5. install the flywheel holding tool(303-544).see fig 6.the crankshaft pully bolt has a reverse thread. the crankshaft pulley and bolt are a molded composite and are one piece. remove the bolt and the crankshaft pulley. see fig7.to lower the generator to allow access to the electrical connectors, disconnect the crankshaft sensor, release the oxygen sensor connector locator from the bracket and remove the lower generator bolt. see fig8.
4. disconnect the regulator electrical connector. remove the B+ connector nut. disconnect the B+ connector and remove the generator.to install reverse the removal procedure.
let us know if you need more help.
thank you.
Jul 28, 2021 at 1:58 PM (Merged)
Avatar
FLYNNINDAVIE
  • MEMBER
  • 2 POSTS
how do I replace an alternator and is it difficult?
Jul 28, 2021 at 1:59 PM (Merged)
Avatar
BMRFIXIT
  • CERTIFIED EXPERT
  • 19,053 POSTS
Alternator Removal & Installation (3.0L 2-Valve) Disconnect negative battery cable. Disconnect wiring from generator. Remove accessory drive belt. Remove 3 bolts, and remove generator. To install, reverse removal procedure. Tighten fasteners to specification. Removal & Installation (3.0L 4-Valve) 1.Disconnect the battery. Rotate the accessory drive belt tensioner clockwise and position the accessory drive belt aside. Remove the power steering hose bracket nut from the generator mounting bolt. See Fig. Remove the upper generator bolts. See Fig. The left side bolt will come out with the generator. 2.Remove the right front wheel and tire assembly. To remove the right front fender splash shield, remove the 4 pin-type retainers (1), remove the 3 fender screws (2) and remove the lower screw (3). See Fig. Remove the screws and the generator splash shield. See Fig. 3.Remove the torque converter inspection cover. See Fig. Install the Flywheel Holding Tool (303-544). See Fig. The crankshaft pulley bolt has a reverse thread. The crankshaft pulley and bolt are a molded composite and are one piece. Remove the bolt and the crankshaft pulley. See Fig. . To lower the generator to allow access to the electrical connectors, disconnect the crankshaft sensor, release the oxygen sensor connector locator from the bracket and remove the lower generator bolt. See Fig. 4.Disconnect the regulator electrical connector. Remove the B+ connector nut. Disconnect the B+ connector and remove the generator. To install, reverse the removal procedure.


https://www.2carpros.com/forum/automotive_pictures/99387_Graphic1_69.jpg


https://www.2carpros.com/forum/automotive_pictures/99387_Graphic2_38.jpg


https://www.2carpros.com/forum/automotive_pictures/99387_Graphic3_16.jpg


https://www.2carpros.com/forum/automotive_pictures/99387_Graphic4_8.jpg


https://www.2carpros.com/forum/automotive_pictures/99387_Graphic5_3.jpg


https://www.2carpros.com/forum/automotive_pictures/99387_Graphic6_1.jpg


https://www.2carpros.com/forum/automotive_pictures/99387_Graphic7_2.jpg


https://www.2carpros.com/forum/automotive_pictures/99387_Graphic8_2.jpg

Jul 28, 2021 at 1:59 PM (Merged)
Avatar
LAEAMIN
  • MEMBER
  • 1 POST
I would like to know how to replace the alternator?
Jul 28, 2021 at 1:59 PM (Merged)
Avatar
BLUELIGHTNIN6
  • CERTIFIED EXPERT
  • 16,542 POSTS
REMOVAL: Disconnect the negative battery cable. Remove the accessory drive belt. Disengage the electrical harness connector and output terminal wiring. Remove the engine control sensor nut and position the nut aside. Unfasten the two alternator bolts and one alternator stud bolt. Remove the alternator from the vehicle.


https://www.2carpros.com/forum/automotive_pictures/261618_1_52.jpg

INSTALLATION: Place the alternator into position and install the two mounting bolts and bolt stud. Tighten the bolts and stud bolt to 15-22 ft. lbs. (20-30 Nm). Place the engine control sensor in position and install its retaining nut. Tighten the nut to 11-14 ft. lbs. (15-20 Nm). Attach the electrical harness connector and output terminal wiring. Tighten the output wiring terminal retaining nut to 80-106 inch lbs. (9-12 Nm). Install the accessory drive belt. Connect the negative battery cable. Thanks for using 2CarPros.com!
Jul 28, 2021 at 1:59 PM (Merged)
Avatar
TAZZZDADDY
  • MEMBER
  • 1 POST
I need to know the removal procedure for this alternator, and where it needs to to come out in this car.
Jul 28, 2021 at 1:59 PM (Merged)
Avatar
RASMATAZ
  • CERTIFIED EXPERT
  • 75,992 POSTS
Removal


https://www.2carpros.com/forum/automotive_pictures/12900_alty1_26.jpg

Disconnect the battery ground cable. Remove the accessory drive belt from the generator pulley. Remove the power steering line bracket and heater hose support bracket from the generator. Remove the upper generator bolts. Partially raise the vehicle on a hoist. Remove the right front wheel. Remove the lower fender splash shield retainers and position the shield out of the way. Remove the generator splash shield. Raise the vehicle. Disconnect the electrical connector and remove the battery positive cable from the generator. Position an adjustable stand to the subframe. Remove the right subframe bolts. Remove the lower generator bolt. Lower the subframe to provide clearance. Remove the generator. Installation


https://www.2carpros.com/forum/automotive_pictures/12900_alty2_17.jpg

NOTE: Do not tighten the lower bolt Install the generator and the lower bolt. Raise the subframe and install the subframe bolts. Tighten the bolts to 90 Nm (66 lb-ft) . Remove the adjustable stand. Lower the vehicle. Install the upper generator bolts and tighten them to 25 Nm (18 lb-ft) . Install the power steering line bracket and the heater hose support bracket. Tighten the nut to 20 Nm (15 lb-ft) . Install the accessory drive belt. Partially raise the vehicle. Tighten the lower generator bolt to 25 Nm (18 lb-ft) . Connect the generator electrical connector. Install the battery positive B + cable and nut. Tighten the cable nut to 10 Nm (89 lb-in) . Install the generator splash shield. Install the fender splash shield and the retainers. Install the right front wheel. Lower the vehicle. Connect the negative battery cable.
Jul 28, 2021 at 1:59 PM (Merged)
Avatar
BMRFIXIT
  • CERTIFIED EXPERT
  • 19,053 POSTS
Support and lower subframe remove alternator bolts
lower subframe enough get the alternator out
or try and remove crank shaft pulley that also should give enough for the alternator to get out
Jul 28, 2021 at 1:59 PM (Merged)
Avatar
THIS IS MIKE
  • CERTIFIED EXPERT
  • 686 POSTS
We are glad to help and appreciate your email feedback:

"This was no job for the driveway in 6" of snow. My son had to get back to college and money was tight to say the least, especially after paying $200.00 for a new alternator. But, I followed your directions and 4 hours later, I had the new alternator installed and battery charging.

I can't thank you enough for your quick response and exact directions.

Thanks again guys,

Mike D
Jul 28, 2021 at 1:59 PM (Merged)
Avatar
SHANNONRANKIN181
  • MEMBER
  • 3 POSTS
How do you remove the crank shaft pulley?
Jul 28, 2021 at 1:59 PM (Merged)
Avatar
BRUSKII14
  • MEMBER
  • 1 POST
Where is the Alternator on a 1998 Ford Taurus
Jul 28, 2021 at 1:59 PM (Merged)
Avatar
IMPALASS
  • CERTIFIED EXPERT
  • 3,112 POSTS
Hello –

Not sure of the exact model you have, but the alternator will look the same. Look at your engine fan belt. The alternator will be connected to that and will look like the pic
Jul 28, 2021 at 1:59 PM (Merged)
Avatar
XZ2HTC
  • MEMBER
  • 1 POST
need instructions on how to remove alternator in 1998 Taurus DOHC. I can't figure it out! Thanks
Jul 28, 2021 at 1:59 PM (Merged)
Avatar
PEPPERMRJ
  • CERTIFIED EXPERT
  • 1,158 POSTS
A haynes or clymer manual is a good investment. See the links on the blue bar at the left. A library might have one also.

Good luck and let us know how it goes. :)
Jul 28, 2021 at 1:59 PM (Merged)
Avatar
KOZUBH
  • MEMBER
  • 7 POSTS
I had to replace my 99 taurus alternator last summer. I had the smae problem. Besides taking off the serpetine belt, and front passenger wheel, and tie rod, you have to support the front undercarriage (I used two floor jacks) and then remove two carriage bolts that attach the two subframes together. Once the the two carriage bolts are removed, you carefully lower the two jacks and allow the front sub assembly to drop down about a couple of inches. This provides just enough room to allow the alternator to sneak out though the front passenger side wheel well. Good luck!
Jul 28, 2021 at 1:59 PM (Merged)
Avatar
KOZUBH
  • MEMBER
  • 7 POSTS
Just some more claification regarding the reference to the Autozone linkthat was posted above. On my 3.0 liter DOHC engine, my removal procedure was more like the Autozone referenced 3.4 L DOHC engine picture,except the critival missing pience of information was that I couldn't get the alternator out of the side wheel well uncless, i removed two cariage bolts that held the sub assemblies together (while supporting them with a jacks) and careffully allowed the front sub assembly to drop down about an inch or so. Withoutout lowering the subassembly, there just wasn't enough room to allow the alternator to pass throught the right side cowl opening.
Jul 28, 2021 at 1:59 PM (Merged)