Engine shut off while driving?

2006 DODGE CHARGER
200,000 MILES • 2.7L • V6 • 2WD • AUTOMATIC
Avatar
SWIP3R
  • MEMBER
  • 12 POSTS
I was driving 60 MPH plus, and my car started losing power and would not shift gears. I slowed to the side and the car cut off. I jumped it and it cranked back up roughly and shit down again and never cranked again. I replaced crank and camshaft sensors. My belts turn. I hear the fuel pump turn on. Starter good. Only code I am getting is U1120. U1120-Lost wheel distance message.
Set Condition:
The PCM does not receive a wheel distance message from the Anti-lock brake Module or FCM (NON-ABS) over the CAN C bus. Is this stopping it from cranking? Did not get this code until I got it towed home. Please help! Was in a accident two months before. Sat the shop for a month getting fixed. A hose from my air filter was off when I got it back. Put it back on and never had a problem until now.
Dec 2, 2018 at 4:30 PM
Advertisement
Avatar
JACOBANDNICKOLAS
  • CERTIFIED EXPERT
  • 110,175 POSTS
Hi and thanks for using 2CarPros.

If it will not start, I doubt the brake code is preventing it from starting. First, you need to make sure you are getting spark and fuel to the engine. Take a look through this link:

https://www.2carpros.com/articles/car-cranks-but-wont-start

Keep this in mind. Just because the fuel pump is running does not mean it is producing enough pressure to run the engine. Here are specific links for checking spark and fuel:

https://www.2carpros.com/articles/how-to-check-fuel-system-pressure-and-regulator

https://www.2carpros.com/articles/how-to-test-an-ignition-system

Here are the specs for fuel pressure:

Fuel System Pressure
400 kpa ±34 kpa (58 psi ± 5 psi)

Let me know if any of this helps or if you have other questions.

Take care,
Joe
Aug 15, 2020 at 10:19 AM
Avatar
SWIP3R
  • MEMBER
  • 12 POSTS
Okay, I am going to take a look at it. I smell gas when I am trying to crank it. I also changed the throttle body I forgot to say.
Aug 15, 2020 at 10:19 AM
Advertisement
Avatar
SWIP3R
  • MEMBER
  • 12 POSTS
I just check all my fuses and relays. Still nothing. I tried to crank it once it just clicked. I turn the key off and did it again and it tried to crank actually sounded better but did not start. I also do not have a fuel pressure gauge, so I am asking around to some of my mobile mechanics. Just found out I got two fuel pumps and I only hear one come on so probably is my problem.
Aug 15, 2020 at 10:19 AM
Avatar
JACOBANDNICKOLAS
  • CERTIFIED EXPERT
  • 110,175 POSTS
Hi and welcome back:

Honestly, there is one pump. It is located in the fuel tank. As far as hearing it run, it may but be producing enough pressure or any at all.

I am not sure where you are located, but most parts stores will lend or rent you a fuel pressure gauge.

When you try to start it, do you get one click and then nothing? If so, make sure the battery terminals are clean and tight.

https://www.2carpros.com/articles/everything-goes-dead-when-engine-is-cranked

Also, make sure the battery is good, You may want it load tested at a parts store to confirm.

Let me know.

Joe
Aug 15, 2020 at 10:19 AM
Avatar
SWIP3R
  • MEMBER
  • 12 POSTS
My driver side fuel pump was not coming on. I changed my fuel pump today, looked pretty dirty. Now my battery keeps dying before I can see if it will crank. My car been sitting for awhile now since I been getting it worked on and I have gotten it recharged like five times now. Getting it checked first to make sure it needs charging and it does. So hopefully it will crank up once I let it charge for awhile at the auto store. I made sure everything is off so I am not sure what is draining it so quick. I will respond again before the night is over. Thanks
Aug 15, 2020 at 10:19 AM
Avatar
JACOBANDNICKOLAS
  • CERTIFIED EXPERT
  • 110,175 POSTS
Welcome back.

If you feel something is draining the battery, take a look through this link:

https://www.2carpros.com/articles/car-battery-dead-overnight

Let me know if it helps.

Joe
Aug 15, 2020 at 10:19 AM
Avatar
SWIP3R
  • MEMBER
  • 12 POSTS
So I got everything charged and hooked up. It still turns over without enough speed to crank. Pretty sluggish. Now when I attempt to crank all lights work on the dash. But no noise it just beeps when I let go of the key after trying to crank. I do not see any security lights. Just traction and ESP and I get the same check engine code U1120. No clicking from the starter. But it still could maybe be the starter. Before it broke down it took awhile to turn over before it caught sometimes.
Aug 15, 2020 at 10:19 AM
Avatar
JACOBANDNICKOLAS
  • CERTIFIED EXPERT
  • 110,175 POSTS
Welcome back.

Based on your last post, we need to check the starter to determine if it is bad or there is another issue. Follow this link:

https://www.2carpros.com/articles/starter-not-working-repair

Let me know what happens.

Joe
Aug 15, 2020 at 10:19 AM
Avatar
SWIP3R
  • MEMBER
  • 12 POSTS
Still nothing when I turn the key. Only hear the fuel pump come on. Check engine light blinks. My battery shows for a quick second and goes away. But I still have a lighting bolt that stays for awhile before it goes away. A friend of mine had the same problem and it turned out to be his accelerator sensor. Or pedal sensor I think it is called. Is it a way to tell if it is before buying a new one?
Aug 15, 2020 at 10:19 AM
Avatar
JACOBANDNICKOLAS
  • CERTIFIED EXPERT
  • 110,175 POSTS
Hi and welcome back.

The lightening bolt indicates an issue with the throttle position components. It really needs to be scanned to determine where the problem is coming from.

Here is a quick video that shows how it is done:

https://youtu.be/b2IJGfImVvw

I realize most people don't own a scanner, but often times parts stores will lend or rent one to you. That is really needs done at this point. Otherwise, it becomes a guessing game.

Let me know what you find or if you have other questions.

Joe
Aug 15, 2020 at 10:19 AM
Avatar
SWIP3R
  • MEMBER
  • 12 POSTS
I have recently brought one and I’ve scanned it multiple times and only get the same code but it says it’s two codes. This is word for word what the scanner says:

2 codes
U1120
U1120
Mil on
Monitors
5inc
Catylyst Evap o2 sensors
02 htr
EGR
3 ready missfire fuel comp
Aug 15, 2020 at 10:19 AM
Avatar
SWIP3R
  • MEMBER
  • 12 POSTS
.
Aug 15, 2020 at 10:19 AM
Avatar
JACOBANDNICKOLAS
  • CERTIFIED EXPERT
  • 110,175 POSTS
The code, U1120 means the abs module has lost communication with speed sensors You need a live data scanner to determine if one of the abs sensors has failed or all. If the module is bad, it won't communicate with the scanner. However, I don't feel that is why it won't start.

Are you certain you are getting spark and fuel to the engine? The things you listed indicate a few different things. It indicates several of the modules in the vehicle have not yet completed a cycle to know if they are working. Most likely, it is the result of either having the battery disconnected or if the codes were erased with a scanner.
Aug 15, 2020 at 10:19 AM
Avatar
SWIP3R
  • MEMBER
  • 12 POSTS
I just brought a new battery. so yes the battery has been disconnected. And I don’t have anyway to check and see if gas is getting to the head again. I’ll have to rent a gauge again.
Aug 15, 2020 at 10:19 AM
Avatar
JACOBANDNICKOLAS
  • CERTIFIED EXPERT
  • 110,175 POSTS
An easy way to check for fuel is using starting fluid. If the engine starts for a couple seconds using starting fluid, and then stalls, that would indicate there is spark to the plugs, but there is no fuel getting to the engine. It's quick and easy.
Aug 15, 2020 at 10:19 AM
Avatar
SWIP3R
  • MEMBER
  • 12 POSTS
Once again it doesn’t turn over so it’s no possible way for me to check that way.
Aug 15, 2020 at 10:19 AM
Avatar
JACOBANDNICKOLAS
  • CERTIFIED EXPERT
  • 110,175 POSTS
Okay,

I just read through every post. It did crank in one, but it was slow. Now, I watched the video and saw what is happening. Reconfirm that the starter relay is good. Switch it with a different relay in the power distribution box that has the same part number.

If that doesn't change anything, I need you to check the starter. In the first link you indicated it was good then mentioned it may be bad because you had problems prior. So, I'm a bit confused. Try the test in this link:

https://www.2carpros.com/articles/starter-not-working-repair

Now, you will need a helper to check that. Have the helper turn the key to the start position while you check for power to the smaller wire. If there is power, disconnect the battery and remove the starter and have it bench tested at a parts store. It most likely is bad.

Next, if there is no power to the smaller wire, we need to start at the power distribution box to see if power is available to the starter relay and then trace one way or the other to determine where power is being lost.

One last thought, make sure the ground between the battery and the engine block is in good condition as well as the power to the starter. However, since the starter was taking time to work or turning slower than it should prior to the problem, I feel that may be the problem.

Let me know what you find,.

Joe
Aug 15, 2020 at 10:19 AM
Avatar
SWIP3R
  • MEMBER
  • 12 POSTS
I checked the starter and it turns over when I manually check it but it still doesn’t start. I changed my ignition switch and my pin inside was still well intact. When I turn the key still nothing doesn’t crank either.
Aug 15, 2020 at 10:19 AM
Avatar
JACOBANDNICKOLAS
  • CERTIFIED EXPERT
  • 110,175 POSTS
Hi and welcome back.

From here, the only thing I suggest is checking the starter relay, ignition output fuse... Here are the directions:

______________________________________

STARTER RELAY

Warning: check to ensure that the transmission is in the park/neutral position with the parking brake applied. This may result in personal injury or death.

RELAY TEST
The starter relay is located in the Power Distribution Center (PDC) in the engine compartment. Refer to the PDC label for relay identification and location.

Remove the starter relay from the PDC as described to perform the following tests:

1. A relay in the de-energized position should have continuity between terminals 87A and 30, and no continuity between terminals 87 and 30. If okay, go to Step 2. If not okay, replace the faulty relay.
2. Resistance between terminals 85 and 86 (electromagnet) should be 75 ±5 ohms. If okay, go to Step 3. If not okay, replace the faulty relay.


3. Connect a battery B+ lead to terminals 85 and a ground lead to terminal 86 to energize the relay. The relay should click. Also test for continuity between terminals 30 and 87, and no continuity between terminals 87A and 30. If okay, refer to Relay Circuit Test procedure. See: Starting System > Component Tests and General Diagnostics > Relay Circuit Test . If not okay, replace the faulty relay.

Let me know what you find.

Joe
Aug 15, 2020 at 10:19 AM
Avatar
SWIP3R
  • MEMBER
  • 12 POSTS
Timing chain. It’s in the shop now being fixed.
Aug 15, 2020 at 10:19 AM
Avatar
JACOBANDNICKOLAS
  • CERTIFIED EXPERT
  • 110,175 POSTS
Wow! That was unexpected. Chains usually outlast the engine, but 200,000 is a lot.

I don't know if you want this, but here are the directions for replacement. All attached pictures correlate with these directions. Plus, the labor for this job shouldn't exceed 6.0 hours.

__________

TIMING CHAIN REMOVAL AND INSTALLATION
CHAIN AND SPROCKETS-TIMING

REMOVAL
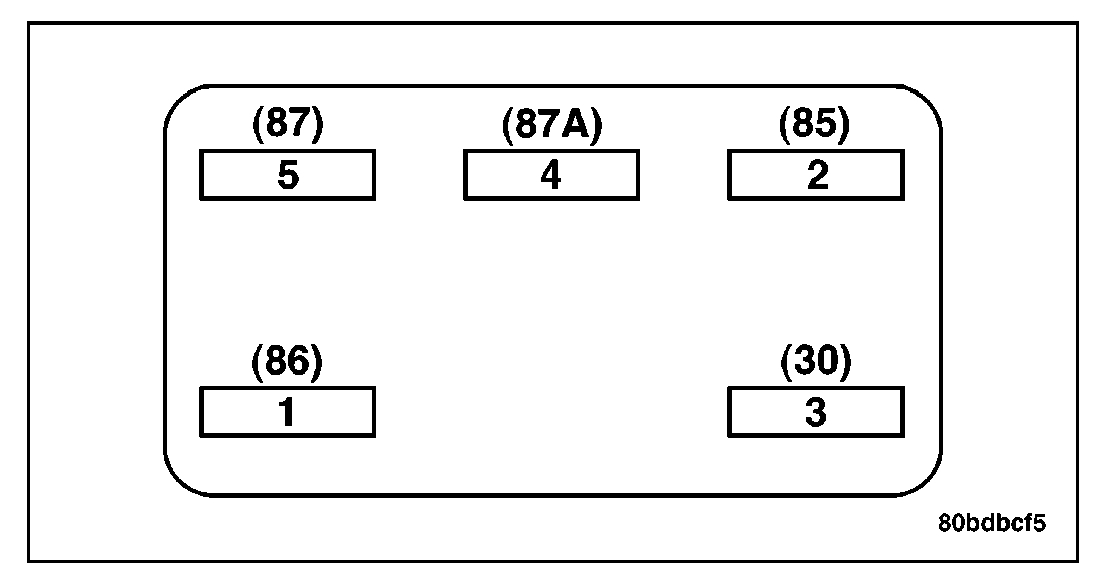
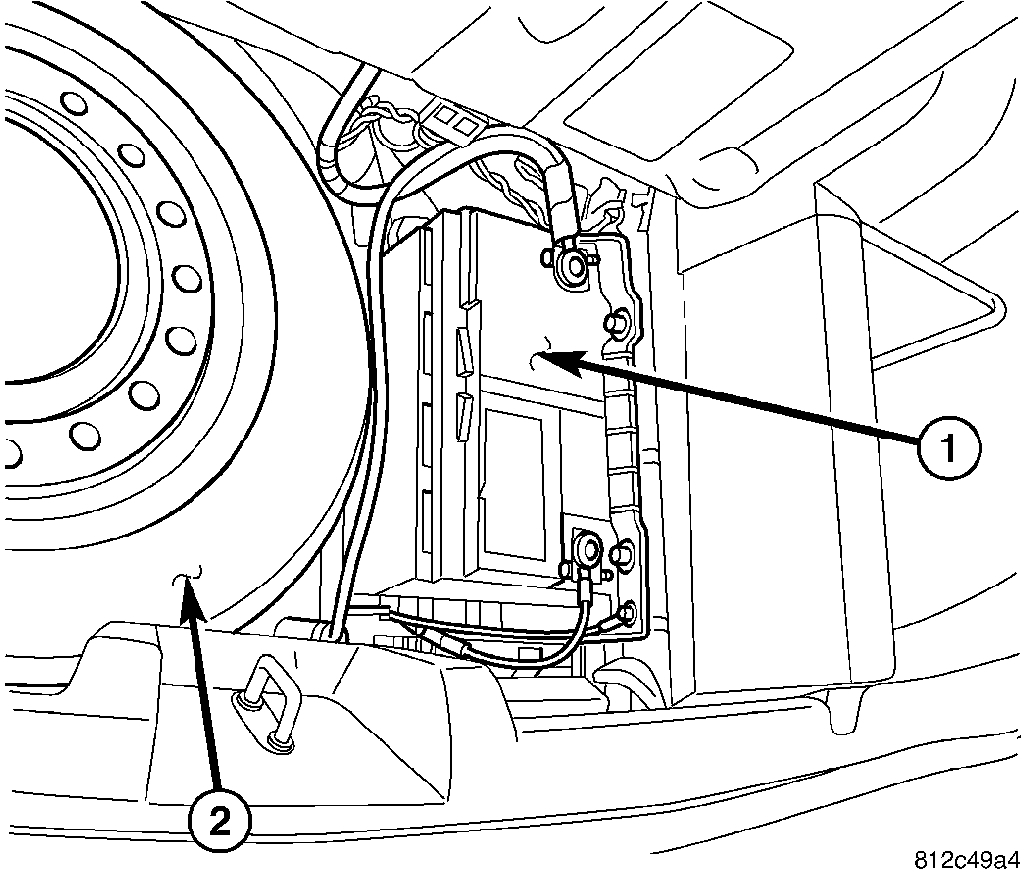
1. Disconnect negative battery (1)cable.
2. Drain cooling system.
3. Remove upper intake manifold.
4. Remove cylinder head covers, crankshaft vibration damper, and timing chain cover.

CAUTION: When aligning timing marks, always rotate engine by turning the crankshaft. Failure to do so will result in valve and/or piston damage.

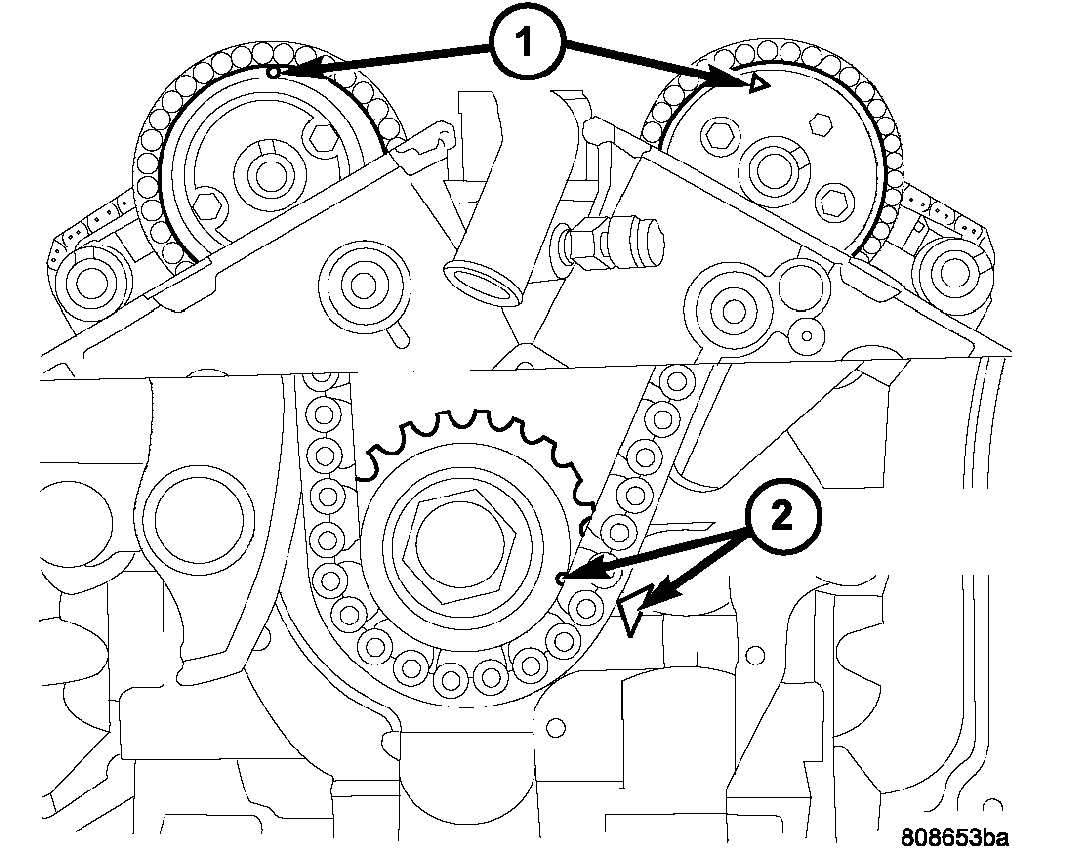
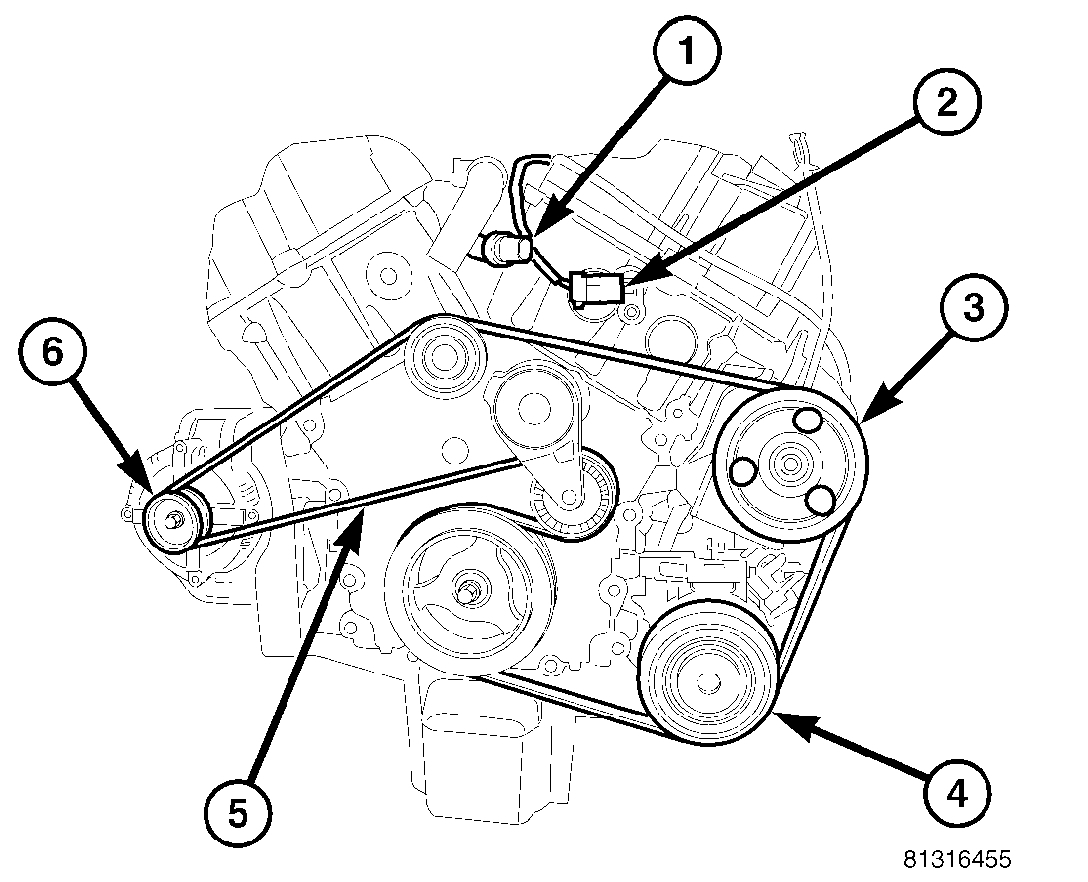
5. Align crankshaft sprocket timing mark to mark on oil pump housing (2). The mark on oil pump housing is 60° ATDC of #1 cylinder.

CAUTION: When the timing chain is removed and the cylinder heads are still installed, DO NOT rotate the camshafts or crankshaft without first locating the proper crankshaft position. Failure to do so will result in valve and/or piston damage.

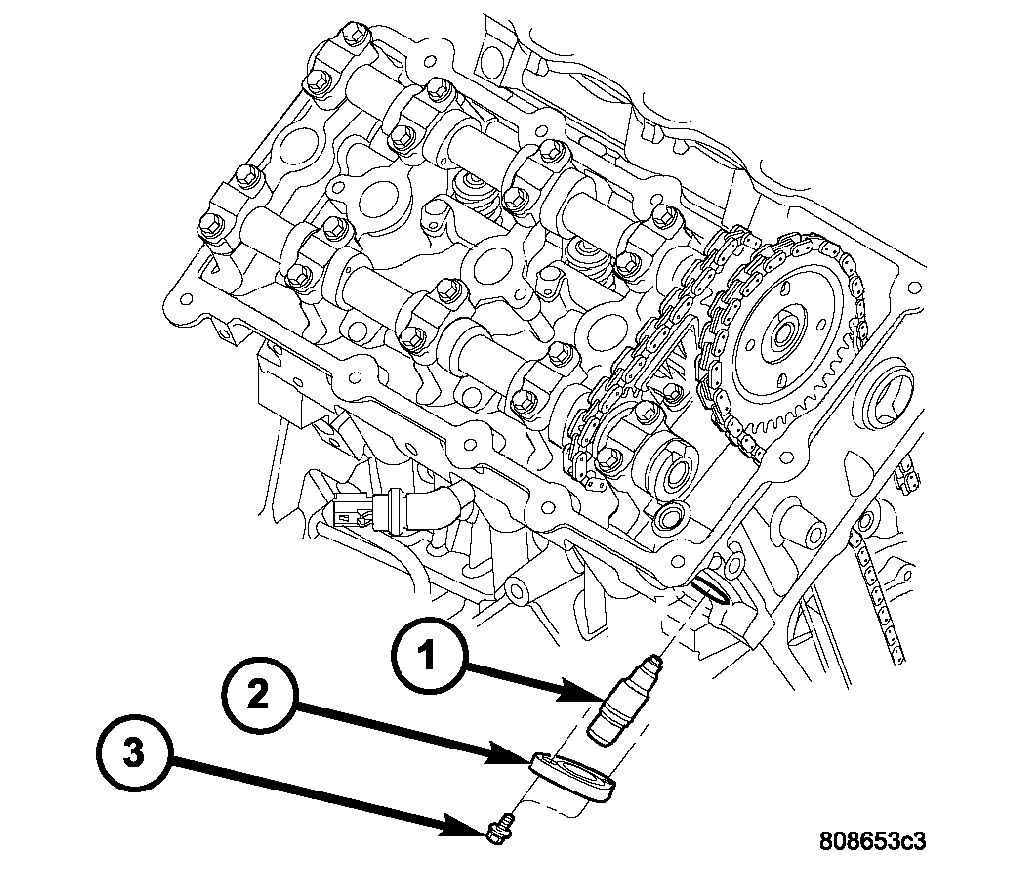
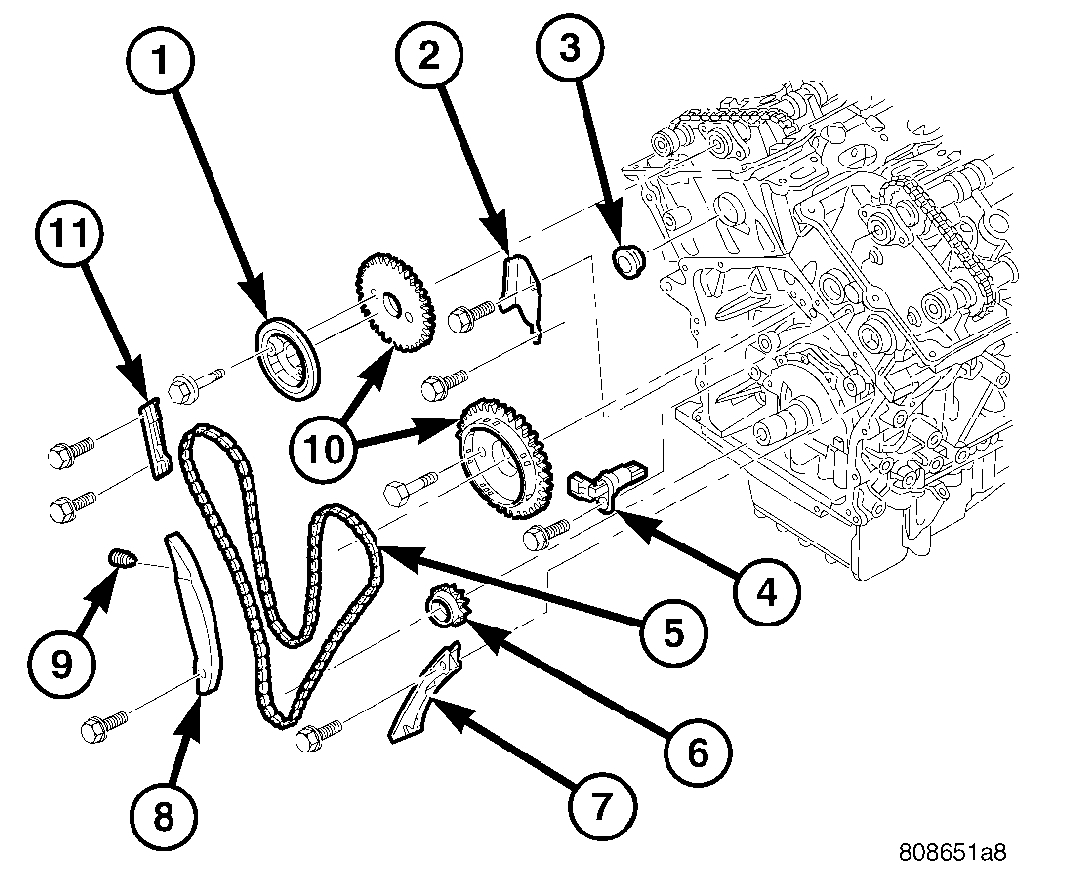
6. Remove primary timing chain tensioner retainer cap (2) and tensioner (1) from right cylinder head.

7. Disconnect and remove camshaft position sensor (4) from left cylinder head.
8. Remove timing chain guide access plugs (3) from cylinder heads.

NOTE: When camshaft sprocket bolts are removed, the camshafts will rotate in a clockwise direction.

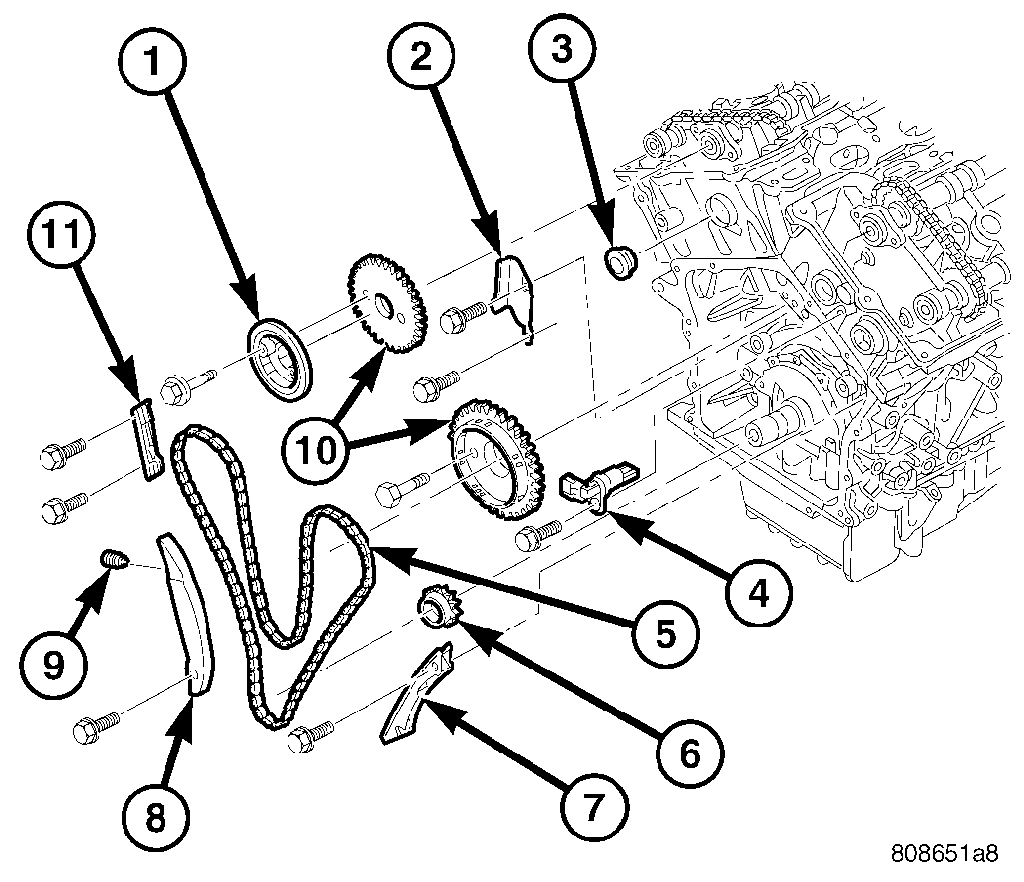
9. Starting with the right camshaft sprocket, remove the sprocket attaching bolts. Remove camshaft damper (1) (if equipped) and sprocket.
10. Remove left side camshaft sprocket attaching bolts and remove sprocket.
11. Remove lower chain guide (7) and tensioner arm (8).
12. Remove the primary timing chain (5).

REMOVAL - CRANKSHAFT SPROCKET

1. Remove primary timing chain.

CAUTION: Use care not to turn crankshaft while removing crankshaft sprocket, as damage to valves and or pistons could occur.

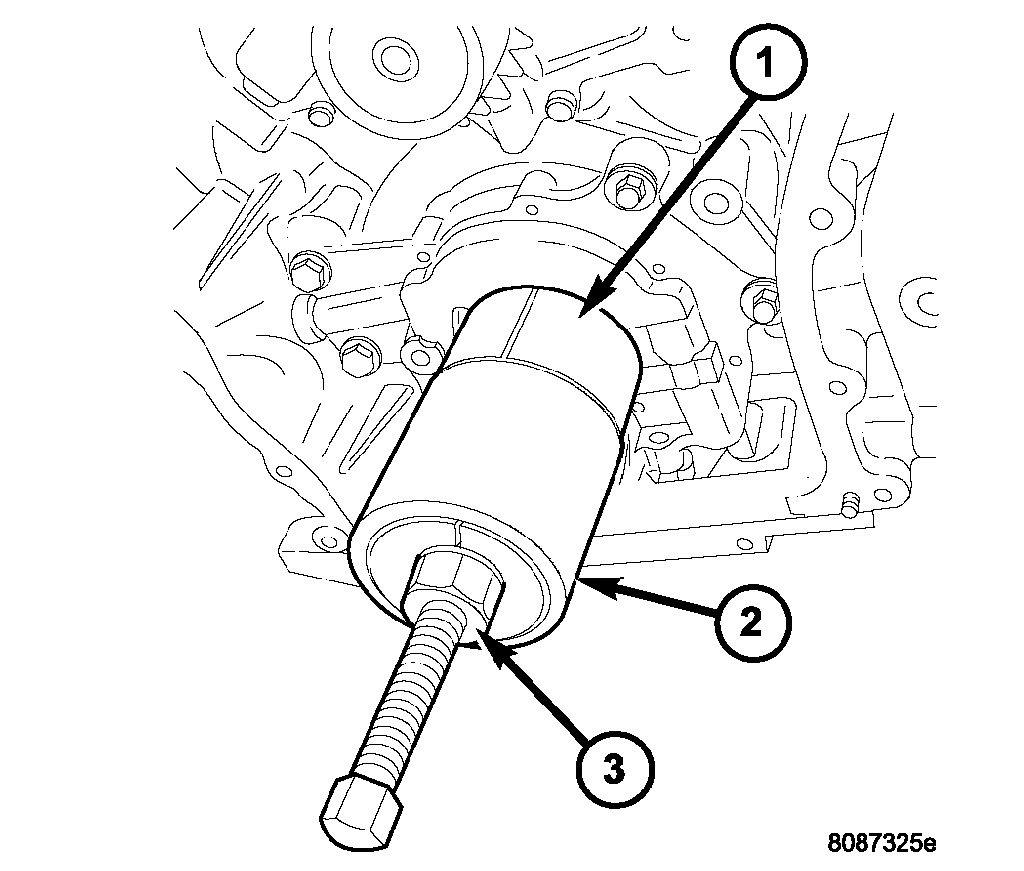
2. Remove crankshaft sprocket by first installing the crankshaft damper bolt. Apply grease or equivalent to damper bolt head and position Special Tools 5048-1(3), 5048-6 (2), and 8539 (1) on sprocket and crankshaft nose. Remove sprocket using care not to rotate the crankshaft.

INSTALLATION
TIMING CHAIN

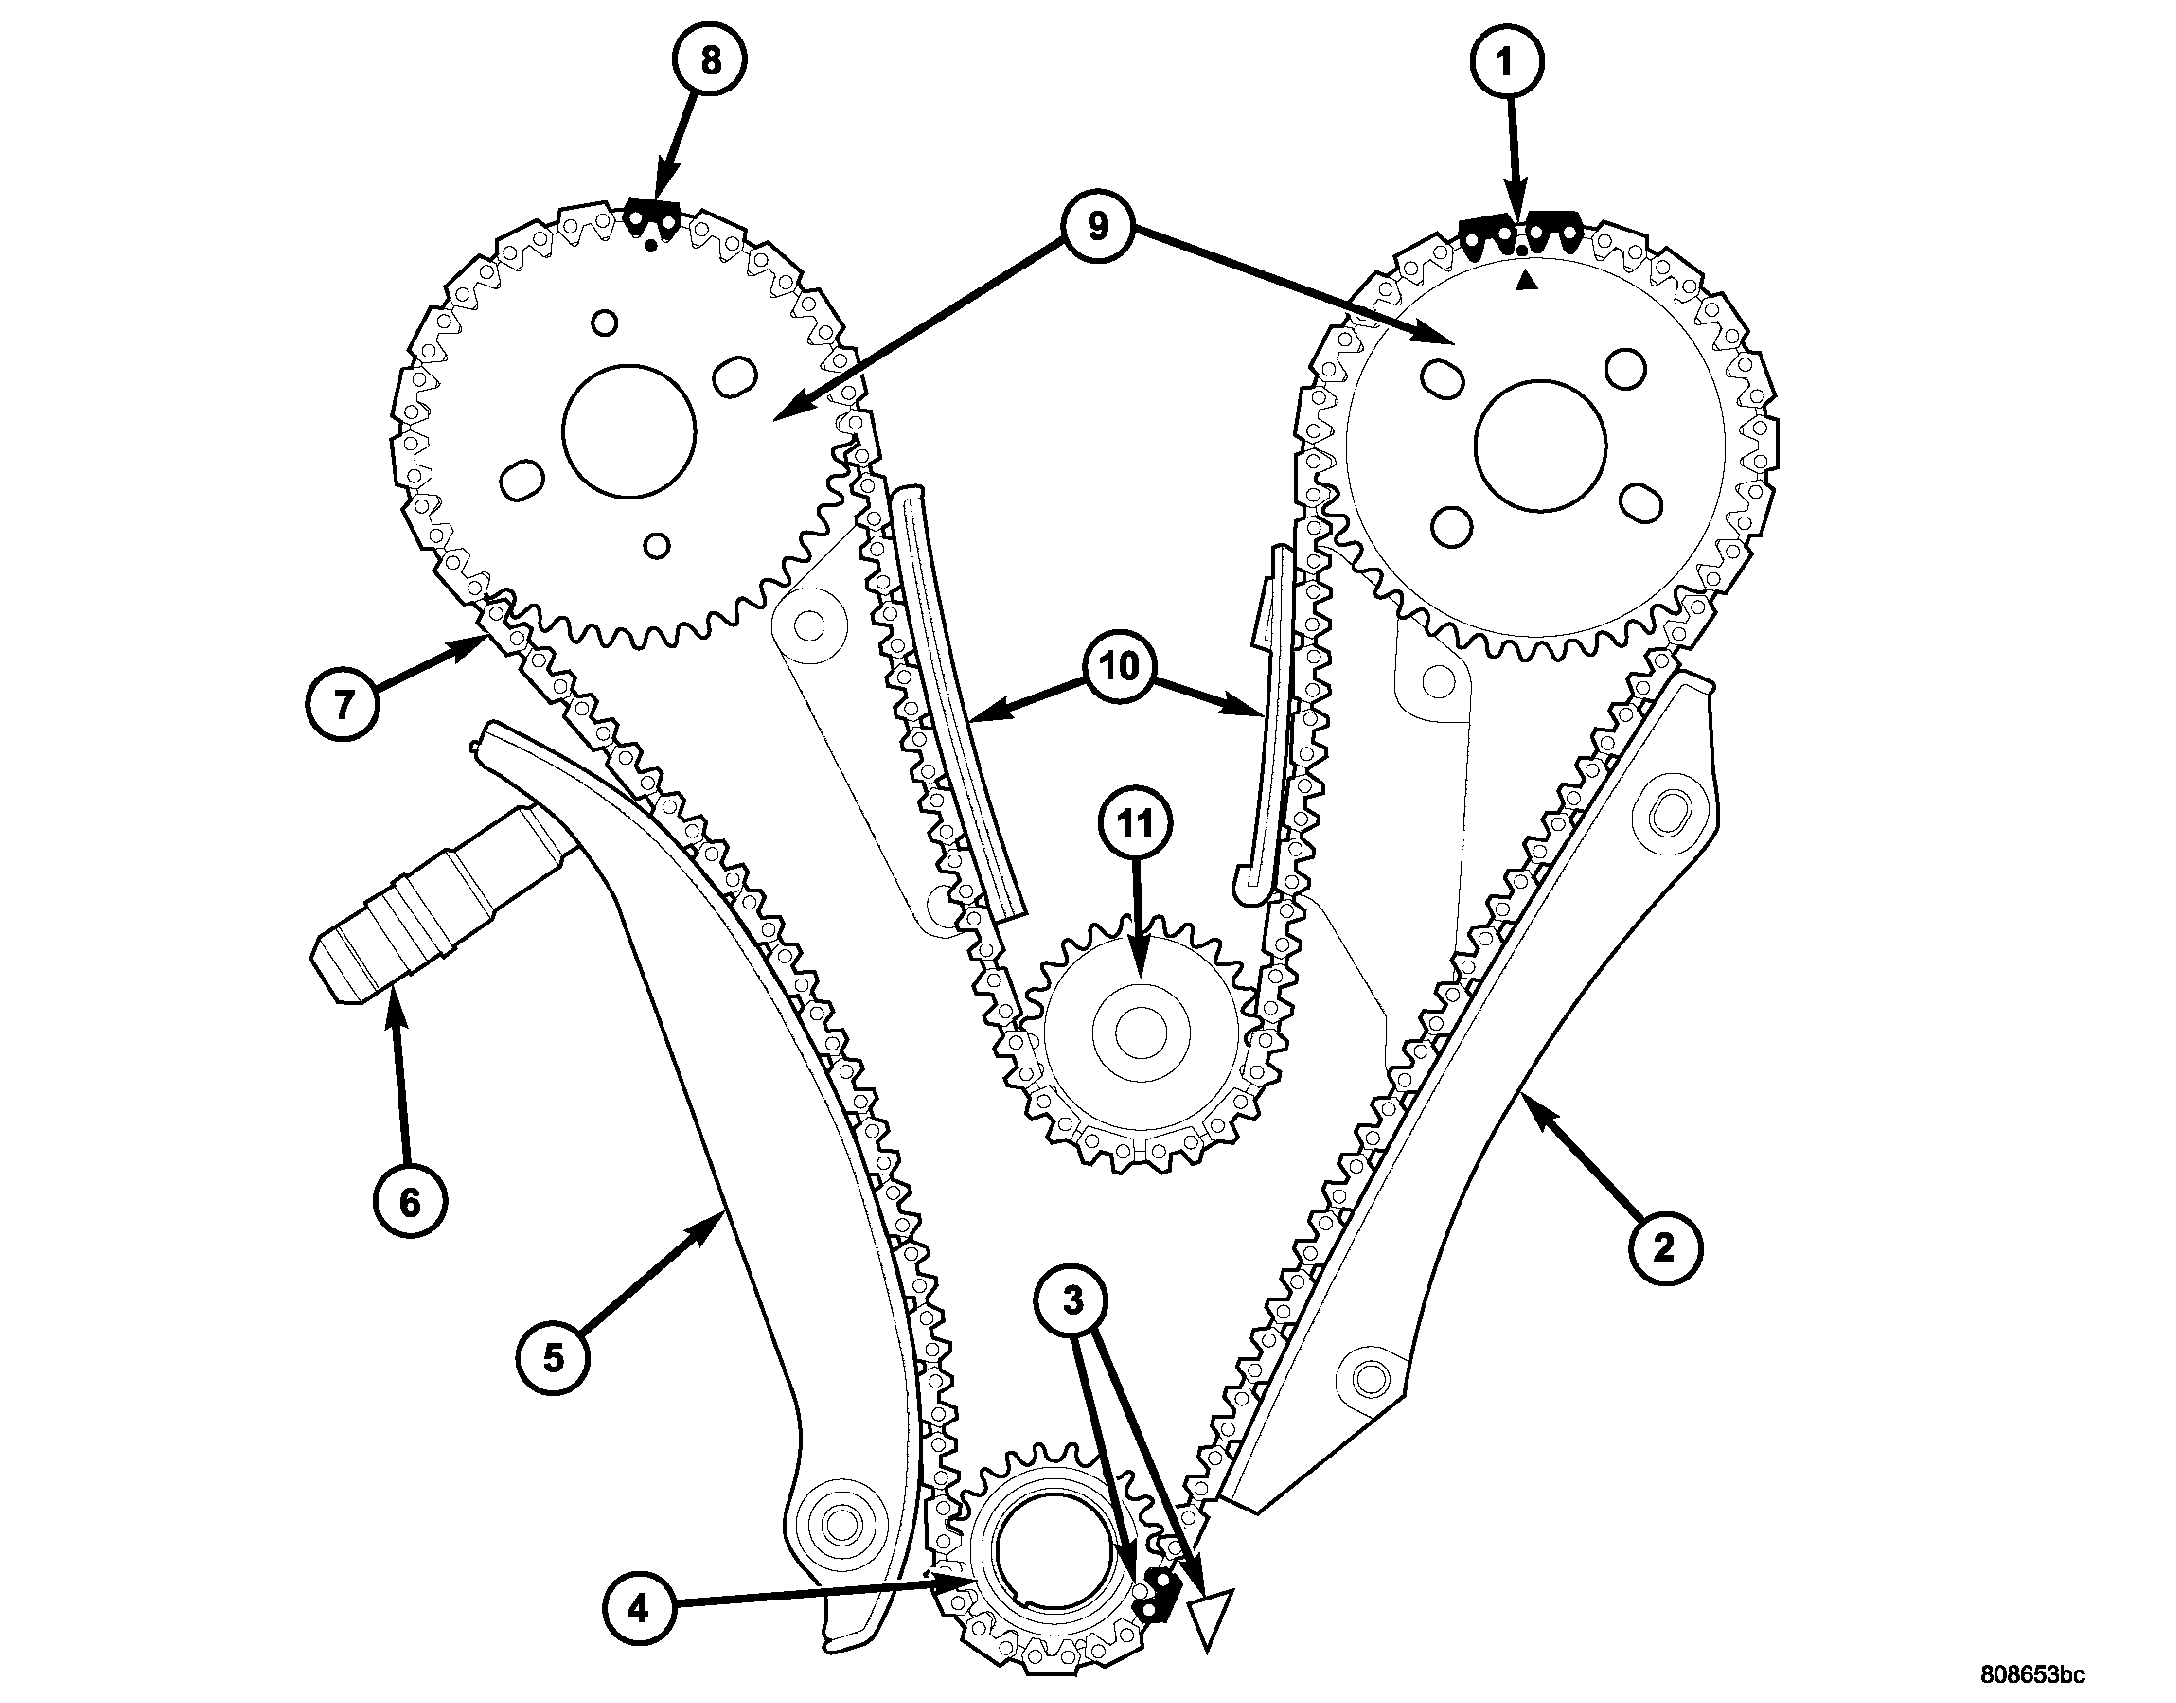
1. Inspect all sprockets (4,9,11) and chain guides (2,5,10). Replace if worn.
2. Install crankshaft sprocket.
3. If removed, install right and left side short chain guides (11). Tighten attaching bolts to 28 Nm (250 inch lbs.).
4. Align crankshaft sprocket timing mark to the mark on oil pump housing(3).

NOTE: Lubricate timing chain and guides with engine oil before installation.

5. Place left side primary chain sprocket onto the chain so that the timing mark is located in-between the two (plated) timing links (1).
6. Lower the primary chain with left side sprocket through the left cylinder head opening.

NOTE: The camshaft sprockets can be allowed to float on the camshaft hub during installation.

7. Loosely position left side camshaft sprocket over camshaft hub.
8. Align timing (plated) link to the crankshaft sprocket timing mark (3).
9. Position primary chain onto water pump drive sprocket (10).
10. Align right camshaft sprocket timing mark to the timing (plated) link on the timing chain (8) and loosely position over camshaft hub.
11. Verify that all chain timing (plated) links are properly aligned to the timing marks on all sprockets.
12. Install left side lower chain guide (2) and tensioner arm (5). Tighten attaching bolts to 28 Nm (250 inch lbs.).

NOTE: Inspect O-ring on chain guide access plugs before installing. Replace O-ring as necessary.

13. Install chain guide access plugs to cylinder heads. Tighten plugs to 20 Nm (15 ft. lbs.).

NOTE: To reset the primary timing chain tensioner, engine oil will first need to be purged from the tensioner.

14. Purge oil from timing chain tensioner using the following procedure:
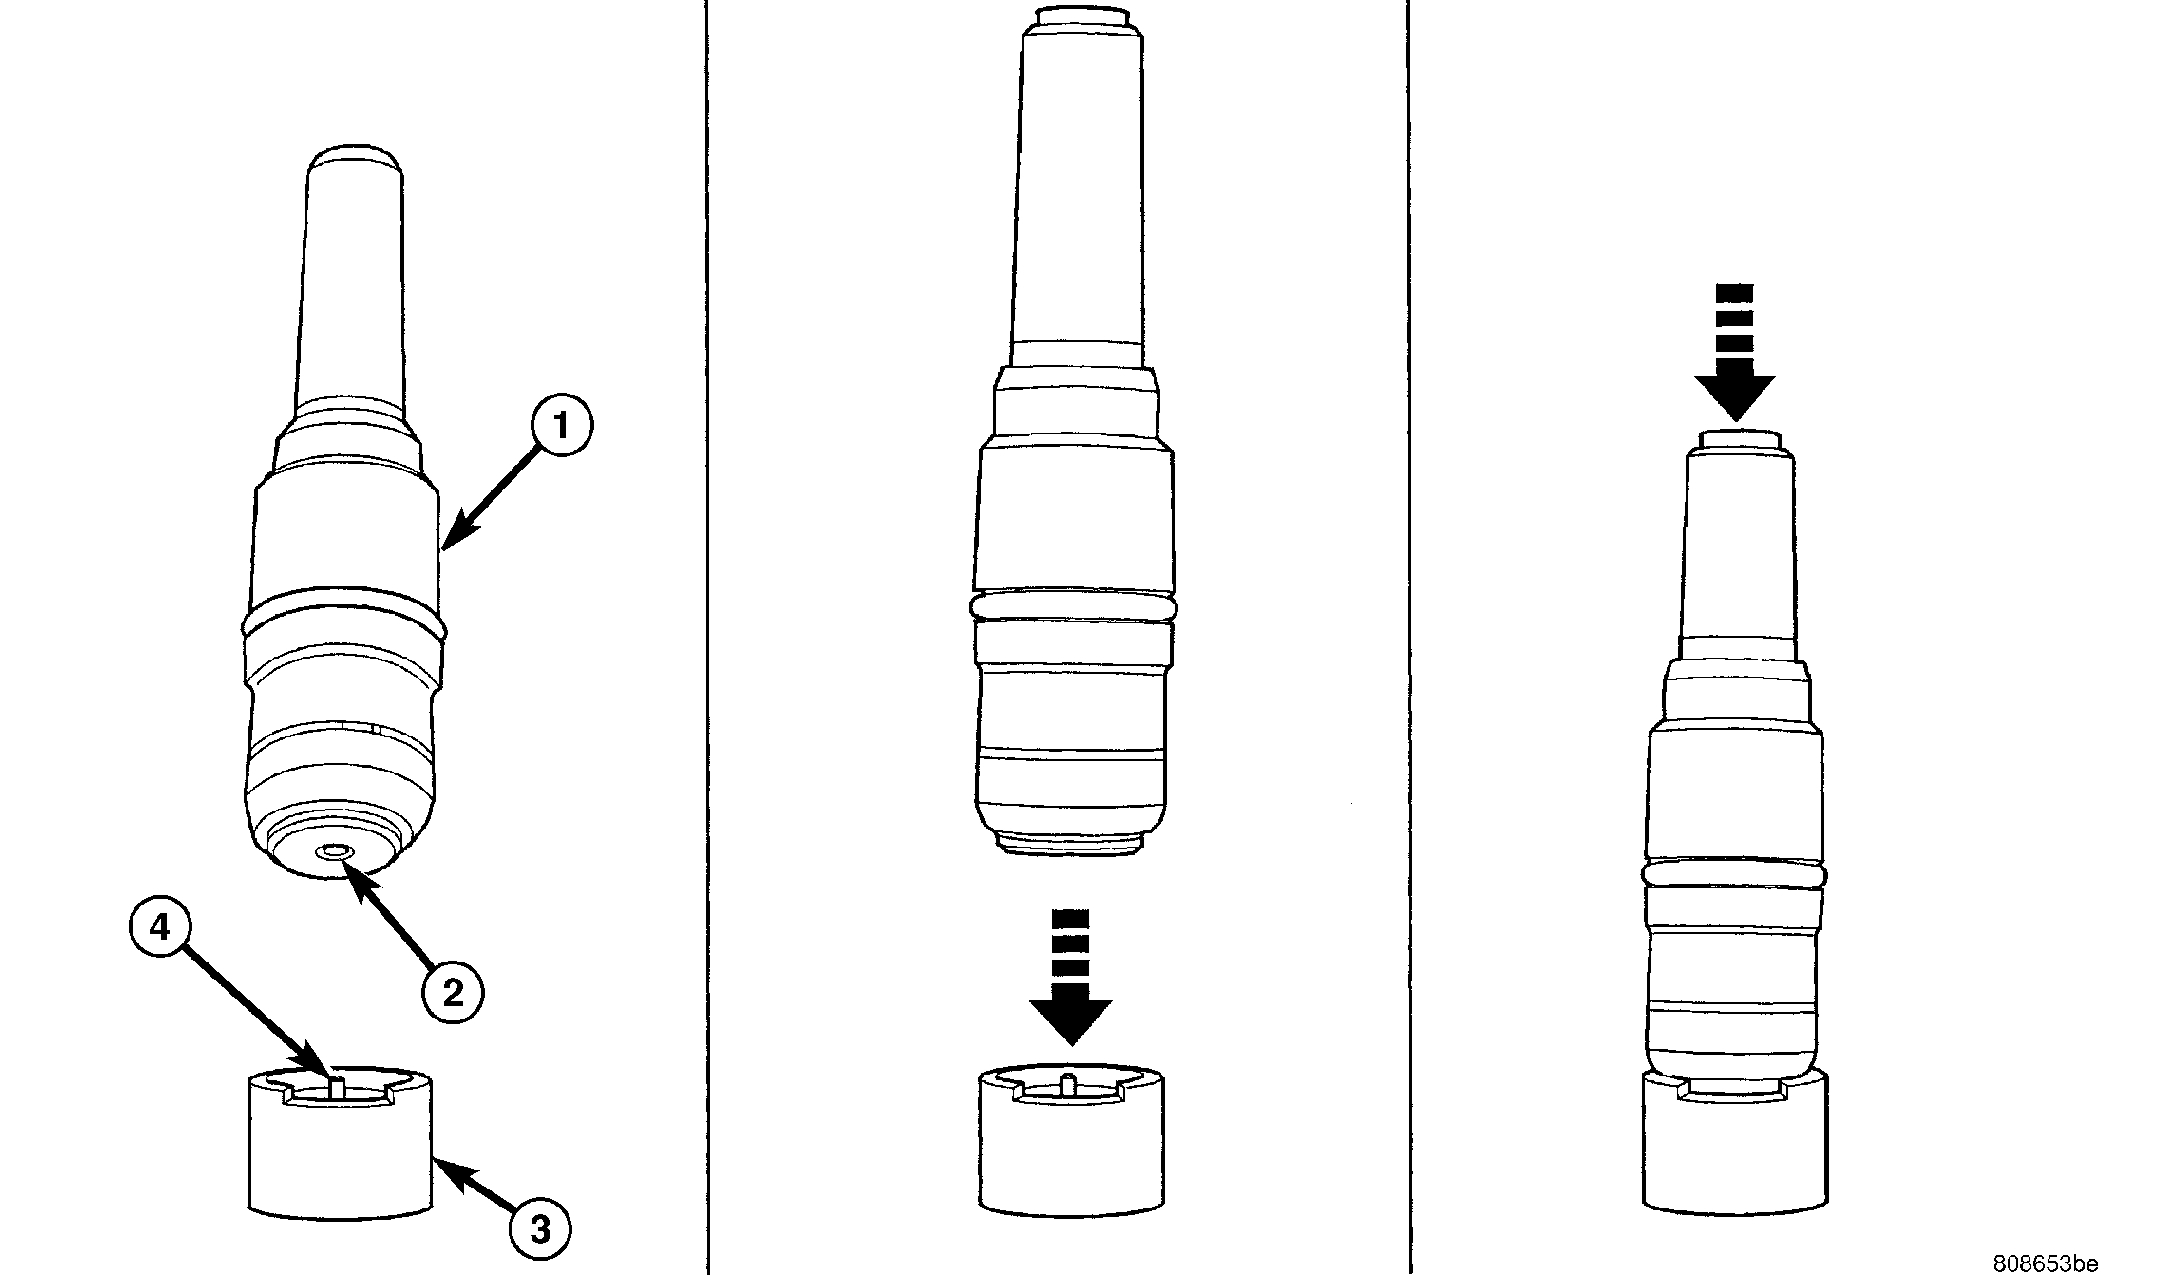
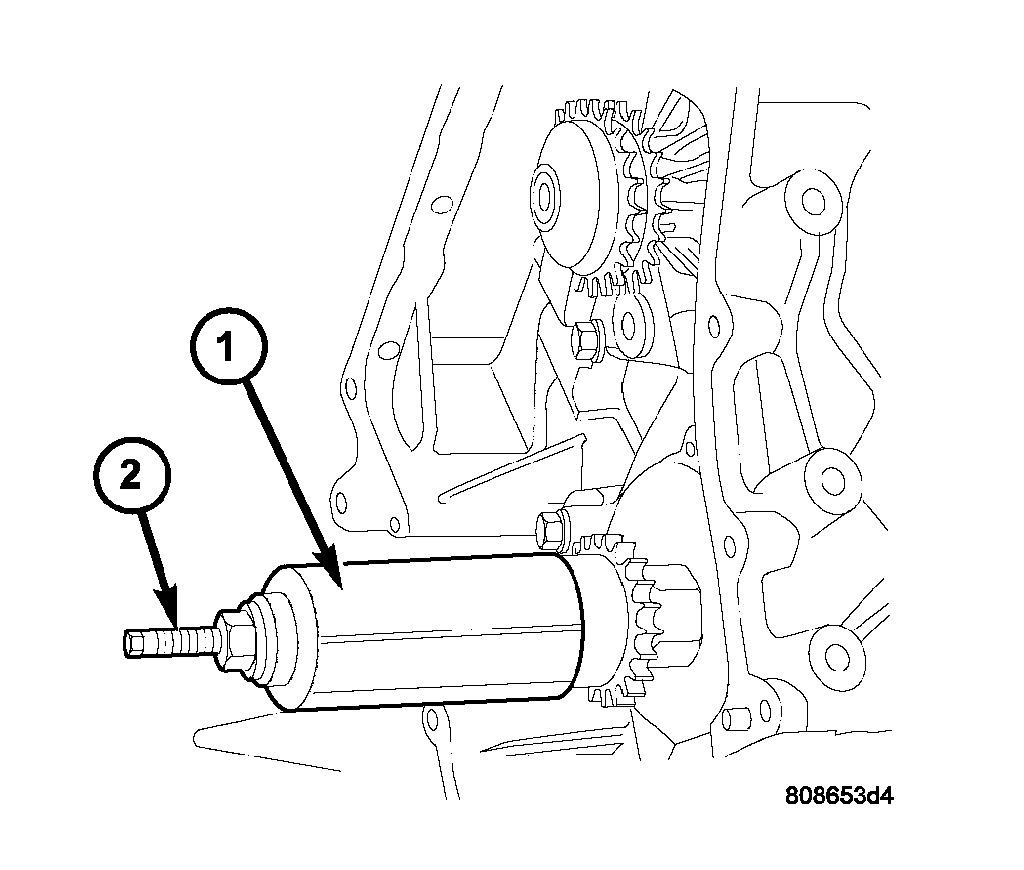
a. Place the check ball (2) end of tensioner into the shallow end of Special Tool 8186 (3).


b. Using hand pressure, slowly depress tensioner until oil is purged from tensioner.
15. Reset timing chain tensioner using the following procedure: a. Position cylinder plunger (4) into the deeper end of Special Tool 8186 (3). b. Apply a downward force until tensioner is reset.

NOTE: If oil was not first purged from the tensioner, use slight finger pressure to assist the center arm pin of Special Tool 8186 to unseat the tensioner's check ball.

CAUTION: Ensure the tensioner is properly reset. The tensioner body (4) must bottom against the top edge of Special Tool 8186 (3). Failure to properly perform the resetting procedure may cause tensioner jamming.

NOTE: Inspect the tensioner O-ring (2) for nicks or cuts and make sure the snap ring (1) is correctly installed, replace as necessary.


16. Install the reset chain tensioner (1) into the right cylinder head.
17. Position tensioner retaining plate (2) and tighten bolts (1) to 12 Nm (105 inch lbs.).


18. Starting at the right cylinder bank, first position the camshaft damper (1) (if equipped) on camshaft hub, then insert a 3/8" square drive extension with a breaker bar into intake camshaft drive hub. Rotate camshaft until the camshaft hub aligns to the camshaft sprocket and damper attaching holes. Install the sprocket attaching bolts and tighten to 28 Nm (250 inch lbs.).
19. Turn the left side camshaft by inserting a 3/8" square drive extension with a breaker bar into intake camshaft drive hub and rotate camshaft until the sprocket attaching bolts can be installed. Tighten sprocket bolts to 28 Nm (250 inch lbs.).
20. Rotate engine slightly clockwise to remove timing chain slack, if necessary.


21. Activate the timing chain tensioner by using a flat bladed pry tool to gently pry tensioner arm towards the tensioner slightly. Then release the tensioner arm. Verify the tensioner is activated (extends).

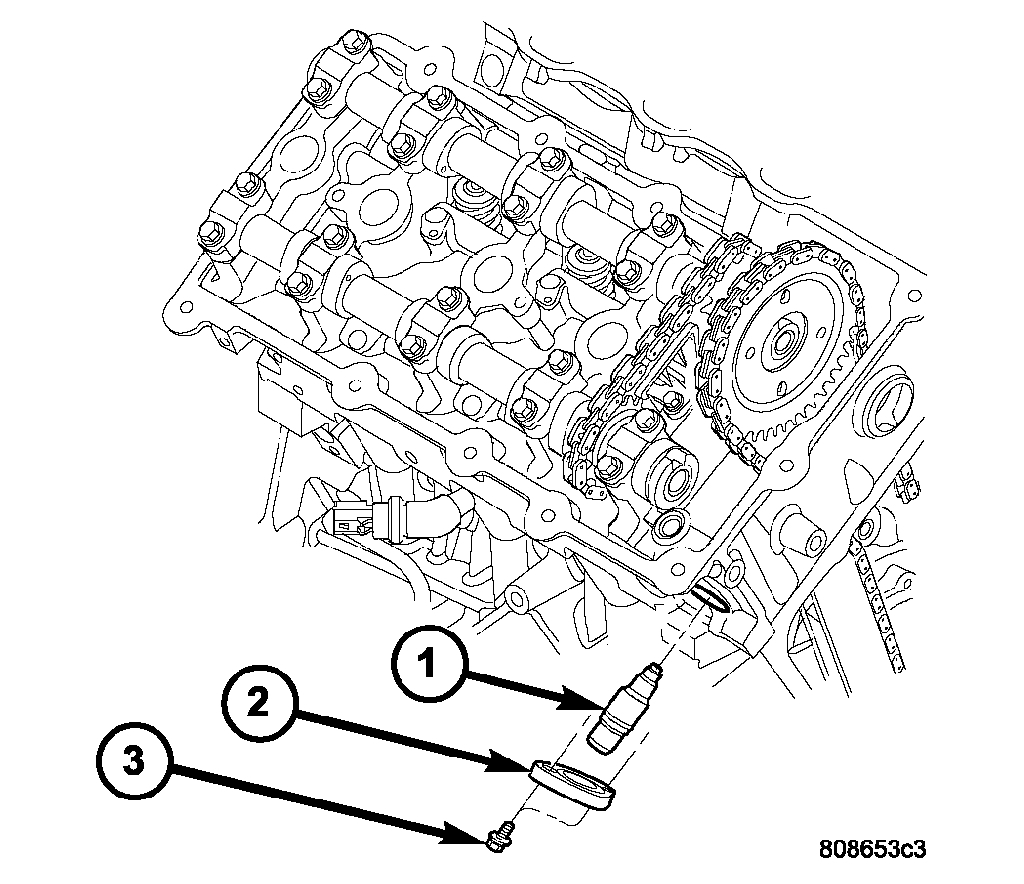
22. Install camshaft position sensor (2) and connect electrical connector.
23. Install the timing chain cover, crankshaft vibration damper, and cylinder head covers.
24. Install upper intake manifold.

NOTE: After installation of a reset tensioner, engine noise will occur after initial start-up. This noise will normally disappear within 5-10 seconds.

25. Fill cooling system.

26. Connect negative battery (1) cable.

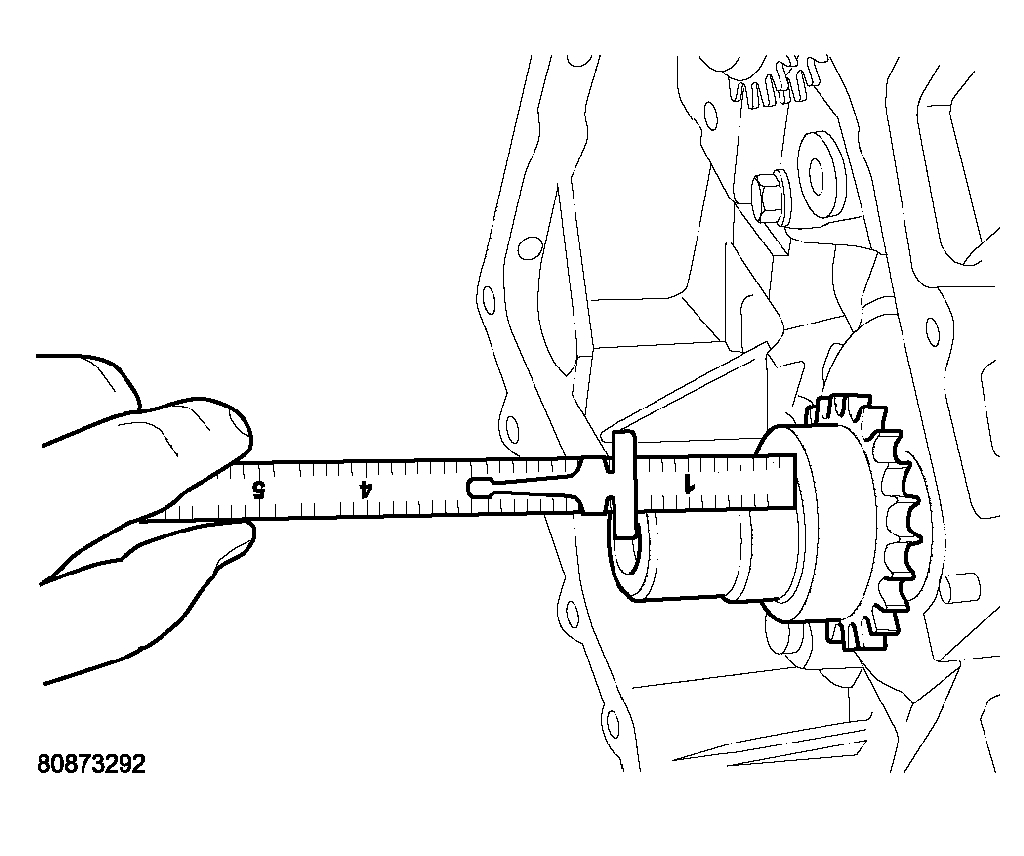
INSTALLATION - CRANKSHAFT SPROCKET


1. Install crankshaft sprocket using Special Tools 6780-1(1) and 8179 (2) until sprocket bottoms against crankshaft step flange. Use care not to rotate crankshaft.

2. Verify that crankshaft sprocket is installed to proper depth by measuring from sprocket outer face to end of crankshaft. Measurement should read: 39.05 ± 0.50 mm (1.5374 ± 0.020 inch).
3. Install primary timing chain.

Let me know how everything works out for you. I have to be honest, I'm not sure why the starter engaged when you did it manually, but not with the switch. That seems odd.

Joe
Aug 15, 2020 at 10:19 AM
Avatar
GHOST57
  • MEMBER
  • 1 POST
So I have the car listed above V8 Hemi. every time i am in a stop for even a minute the car shuts off. The oil pressure light, the electronic throttle light, and check engine light all come on in the stop and just shut me car off. I have to put it in park and try to turn it back on. It turns on but then when I am at another stop, the lights turn back on, and shut off the car again. I already did an oil change and put fuel cleanser on it. Any ideas what could be the issue?
Aug 15, 2020 at 10:22 AM (Merged)
Avatar
CARADIODOC
  • CERTIFIED EXPERT
  • 34,306 POSTS
This is real common after the battery has been disconnected for some other service. The Engine Computer has to relearn "minimum throttle" before it will know when it must be in control of idle speed. Until then, the engine may not start unless you hold the accelerator pedal down 1/4". You won't get the nice idle flare-up to 1,500 rpm's at start-up, and it will tend to stall at stop signs.

To meet the conditions for the relearn to take place, drive at highway speed with the engine warmed up, then coast for at least seven seconds without touching the pedals.
Aug 15, 2020 at 10:22 AM (Merged)
Avatar
JIMMITCHELL
  • MEMBER
  • 3 POSTS
Problem number two with my car is that on three occasions over the last year, while in motion between 15-55 mph, the engine completely shuts off along with all accessories, such as the radio. If I try to start it immediately, it won't start. But if I shut off all the accessories, pull the key out, and wait a minute or two, it will start. One one occasion, it shutdown at least three times over a mile stretch. However, it was only on those three occasions, what was different? The difference was I had just filled up the tank, and it happened within a close proximity of the gas station, and different ones. What in the world does filling the tank up have to do with the engine shutting down? A friend of mine at work, who does a lot of his own car work, researched it and he thinks that the Dodge Charger's gas tank had a flaw with the rollover sensor/mechanism that is in the tank. His rationale was that when the tank was full, the gas would swoosh back and forth and it is impacting some sensor/mechanism that makes the computer think the car has rolled over, so the computer shuts everything off. Oddly enough, with my other issue, the mechanic found error codes related to low fuel levels? I have the list of all the errors he found if you're interested in seeing those. Thanks much
Aug 15, 2020 at 10:22 AM (Merged)
Avatar
JIS001
  • CERTIFIED EXPERT
  • 3,412 POSTS
Hello and thank you for using 2CarPros. Can you give us the codes so we can see what the computer is trying to tell you? If you are having running to lean codes then I would recommend your mechanic drive the vehicle with a fuel pressure gauge and have them duplicate the concern to see if you are losing pressure.

If you are having running too rich codes then you maybe overfilling the tank? Do you stop at the click when filling or give it a few more clicks in there to top off? If that is the case then you most likely saturated the charcoal canister with raw fuel. When the evap starts purging then it is sucking in the extra fuel causing your vehicle to flood and stall.

Please get back to us with the codes to see if it is a fuel issue or you could have some electrical issue causing the whole thing to shut down especially if the accessories are shutting down also.
Aug 15, 2020 at 10:22 AM (Merged)
Avatar
SAWYER75
  • MEMBER
  • 7 POSTS
2006 charger r/t stalls after fueling up at the pump
Aug 15, 2020 at 10:22 AM (Merged)
Avatar
KHLOW2008
  • CERTIFIED EXPERT
  • 41,814 POSTS
Are you able to restart after it stalled?
Is there any indicators showing on dash prior to the stalling?
Aug 15, 2020 at 10:22 AM (Merged)
Avatar
SAWYER75
  • MEMBER
  • 7 POSTS
it takes a little bit after but yes the car restarts.i have restarted it rite after and revved it up to about 2000 rpms and the problem goes away.so far there are no indicators on the dash showing that is it stalls...i tried doing a key and key off three times after it stalls and no code appeared on the dash either.ive check the fuel pressure and it wasnt flucuating while running.i did hear alot of gurgling coming from the tank while i was fueling and i dont over fill.soon as it clicks off i pull the nozzle out and put it up...its been consistant every time i fuel up.
Aug 15, 2020 at 10:22 AM (Merged)
Avatar
KHLOW2008
  • CERTIFIED EXPERT
  • 41,814 POSTS
Symptoms indicates a possible fault with the EVAP system which would normally trigger trouble codes. Get a scan done to check if any trouble codes are stored.

It could be clogged EVAP lines, kinked hoses or faulty solenoids.
Aug 15, 2020 at 10:22 AM (Merged)
Avatar
SAWYER75
  • MEMBER
  • 7 POSTS
i did a scan on it and there were no trouble codes stored.sorry i didnt mention that.i did it at the same time i checked the fuel pressure...how would i checked clogged EVAP lines..would fuel system cleaners be able to unclog the line and how hard is it to replace or check solenoids...i did get underneith the car and could not find any kinks in the line...so far wwe havnt had any work on the car in that area..wait we did have to have some work done on the rear diff but i dont think that would affect anything would it...
Aug 15, 2020 at 10:22 AM (Merged)
Avatar
KHLOW2008
  • CERTIFIED EXPERT
  • 41,814 POSTS
If the rear differential was worked on, it could have affected the system if the lines are kinked or bent too much.

Check the areas around the fuel tank for any interference to EVAP lines.

When no trouble codes are present, it should not be a fault with solenoids or electrical components. The lines are for pressure release and fumes control and is usually dry. Cleaners might not work as the lines are from front of vehicle to rear so it could be quite long.

Aug 15, 2020 at 10:22 AM (Merged)
Avatar
JAMIE45
  • MEMBER
  • 1 POST
My dodge charger keeps stalling out when i am stopped at stop lights or when im rolling up to a stop light, also when i hit the gas it hesitates and kicks back in like 4-6 seconds, i changed the throttle body, but that didnt help. What do i do?
Aug 15, 2020 at 10:22 AM (Merged)
Avatar
SAWYER75
  • MEMBER
  • 7 POSTS
the rear diff had work on it over a year ago.the problem is recent.would it take that long for it to affect the lines.i will try and scan it again and see if anything pops up.i will also do another check on the lines and get back with you....
Aug 15, 2020 at 10:22 AM (Merged)
Avatar
RASMATAZ
  • CERTIFIED EXPERT
  • 75,992 POSTS
Go to this link: https://www.2carpros.com/articles/engine-stalls
Aug 15, 2020 at 10:22 AM (Merged)
Avatar
KHLOW2008
  • CERTIFIED EXPERT
  • 41,814 POSTS
If the lines wre slightly kinked or clogged, it would take some time before the clogging becomes to bad till pressure is not being released while refilling.

Aug 15, 2020 at 10:23 AM (Merged)
Avatar
SAWYER75
  • MEMBER
  • 7 POSTS
so after checking the evap lines and found nothing.i ran another check on the codes..it gave me a code of p1521.what exactly does this code mean
Aug 15, 2020 at 10:23 AM (Merged)
Avatar
KHLOW2008
  • CERTIFIED EXPERT
  • 41,814 POSTS
P1521-INCORRECT ENGINE OIL TYPE

When Monitored:

Engine Running.

Set Condition:

Using the oil pressure, oil temperature and other vital engine inputs the PCM can determine the engine oil viscosity. Incorrect viscosity will effect the operation of the MDS by delaying cylinder activation.

Possible Causes
INCORRECT ENGINE OIL TYPE
ENGINE OIL CONTAMINATION
ENGINE OIL

Always perform the PRE-DIAGNOSTIC TROUBLESHOOTING PROCEDURE before
proceeding.

Diagnostic Test

1) ACTIVE DTC

NOTE: Review the customers oil change history. Ensure the customers is using the correct engine oil viscosity. If the incorrect oil is being used, change the oil, using the correct engine oil viscosity.

Ignition on, engine off.
With the scan tool, read DTCs.
Is the DTC active at this time?
Yes
Go to 2).

No
Test Complete.

2) ENGINE OIL

NOTE: If set along with P1521, repair any engine oil pressure or temperature DTCs first before continuing.

The following conditions must be checked.
• OEM recommended oil viscosity is being used.
• Customer is following the oil change schedule.
• Check the engine oil for contamination. (i.e, fuel and/or engine coolant)
• Internal engine condition that may effect oil pressure.

Were any of the above conditions found?

Yes
Repair as necessary.
Perform POWERTRAIN VERIFICATION TEST.

No
Change the engine oil using the correct oil viscosity.
Perform POWERTRAIN VERIFICATION TEST.

© 2008 Mitchell Repair Information Co., LLC.
Aug 15, 2020 at 10:23 AM (Merged)
Avatar
THOMAS AUTOMOTIVE
  • MEMBER
  • 2 POSTS
Driver hit a stop sign , little damage "left head light bumper cover ect." now car starts and dies seconds later. ESP BAS light comes on and engine dies . have changed oil pressure switch, it was leaking. have tried desconnecting batt. and touching cables to reset comp.? jumped fuel pump relay harder to start but still dies.data cable shorted on solus pro blew scanner - on a different car - so unable to scan. clip on key remote that holds batt. in place is gone and batt. as well.
Aug 15, 2020 at 10:23 AM (Merged)
Avatar
JACOBANDNICKOLAS
  • CERTIFIED EXPERT
  • 110,175 POSTS
Have you checked the wiring under the power distribution box under the hood? The harness there is known for poor connections causing these lights to come on. An accident could have caused a loose connection.
Aug 15, 2020 at 10:23 AM (Merged)
Avatar
THOMAS AUTOMOTIVE
  • MEMBER
  • 2 POSTS
all connections seem to be good. the fuel pump shuts off after about 2 seconds and engine dies. it acts like security system, but has no light or light flashing. i changed the o.p. switch because it was leaking hoping it wasn,t making the circut when o.p. built up. will the ESP BAS cause this and keep car from running.
Aug 15, 2020 at 10:23 AM (Merged)