heater core replacement?

2006 CHEVROLET MALIBU
6 CYL • AUTOMATIC
Avatar
NONNIE_MARIE
  • MEMBER
  • 11 POSTS
how to replace a heater core on a 2006 chevy malibu i don't really know the name of some parts so please help me out? thank you i did take the dashboard out already and the panel with the radio and ac switches etc. and the stuff behind it too. do i have to remove the silver medal body frame to the car also?
May 20, 2014 at 7:21 PM
Advertisement
Avatar
HMAC300
  • CERTIFIED EXPERT
  • 48,601 POSTS

Here are the instructions on how to replace the heater core and if your car has AC this video will show how to vacuum down and recharge the system.

https://youtu.be/4EqdrBVb0sY


Remove the HVAC module assembly. Refer to HVAC Module Assembly Replacement.
Remove the lower center floor air outlet duct.
Remove the upper center floor air outlet duct screws.
Remove the upper center floor air outlet duct.
Fig. 211: View Of Upper Center Floor Air Outlet Duct And Screws
Drill out the heater core cover heat stakes.
Fig. 212: Removing Heater Core Cover
Remove the heater core cover screws.
Remove the heater core cover.
Fig. 213: Removing Heater Core
Remove the heater core.
the whole heater module has to come out to replace it. Check out the diagrams (Below). Please let us know if you need anything else to get the problem fixed.
May 21, 2014 at 3:04 PM
Avatar
NONNIE_MARIE
  • MEMBER
  • 11 POSTS
yeah the first picture that shows the two pieces remove i did that .... i'm stuck trying to get to the heater core of picture two
May 21, 2014 at 3:16 PM
Advertisement
Avatar
HMAC300
  • CERTIFIED EXPERT
  • 48,601 POSTS
if the hvac isn't out of the car you are stuck because it's going through the firewall an dthere maybe a screw holding it in. otherwise check for screws then pry up on it you are going to replac eit anyhow so if you damage who cares. then you can see what you bent.
May 21, 2014 at 3:30 PM
Avatar
NONNIE_MARIE
  • MEMBER
  • 11 POSTS
Yes I Think So... Here's Some Pictures Of Where I'm Stuck At
May 21, 2014 at 4:04 PM
Avatar
HMAC300
  • CERTIFIED EXPERT
  • 48,601 POSTS
you are trying to pull it out without having the module out it has to come out so the a/c charge has to be recycled as well. seepic these are in engine compartment you have to get the module out to get the heater core out.......
May 21, 2014 at 4:15 PM
Avatar
NONNIE_MARIE
  • MEMBER
  • 11 POSTS
Okay that did it got the job done thanks for your help I love this site.
May 21, 2014 at 4:37 PM
Avatar
HMAC300
  • CERTIFIED EXPERT
  • 48,601 POSTS
Use 2CarPros anytime, we are here to help. Please tell a friend.
May 21, 2014 at 4:38 PM
Avatar
TERRICOLE
  • MEMBER
  • 1 POST
how to replace a heater core in a 2006 chev malibu
Oct 27, 2020 at 1:37 PM (Merged)
Avatar
ERNEST CLARK
  • CERTIFIED EXPERT
  • 1,730 POSTS
Now if you would like to tackle this job anyway, I suggest you purchase a repair manual for your vehicle or subscribe to an on-line service such as "AllData" or "Mitchell 1".

These will give you detailed instructions as well as pictures, a list of hardware/tools required and helpful hints and tips.

The involved process I speak of must begin with the recovering of your a/c refrigerant. This means you have to empty your a/c system of R134a because your "Evaporator" is located in the same place as your "Heater Core", and the removal of the heater core requires the complete removal of your HVAC module assembly, which is located under your dashboard. This will require the removal of your upper dashboard, the a-pillar trim panels, the center console, passenger side kick panel, and a few more small but difficult items.

And all of this must be removed just to get to the HVAC module. Once you have the module removed from the car, there'll be several more pieces connected to the module that'll have to be removed before you can access the heater core.

This is why a shop will quote you an "astronomical" price to service this unit. The mechanics aren't lying to you when the say it'll be "EXPENSIVE"!!!

Here's the procedure you're looking for. Sorry I can't provide illustrations. (Buy that service manual)

HEATER CORE REPLACEMENT

REMOVAL PROCEDURE

Remove the HVAC module assembly.
Remove the lower center floor air outlet duct.
Remove the upper center floor air outlet duct screws.
Remove the upper center floor air outlet duct.

Drill out the heater core cover heat stakes.

Remove the heater core cover screws.
Remove the heater core cover.

Remove the heater core.

INSTALLATION PROCEDURE

Install the heater core.
Install the heater core cover.

Install the heater core cover screws. Tighten Tighten the screws to 1.5 N.m (13 lb in).
Install the upper center floor air outlet duct.

Install the upper center floor air outlet duct screws. Tighten Tighten the screws to 1.5 N.m (13 lb in).
Install the lower center floor air outlet duct.
Install the HVAC module assembly.
Oct 27, 2020 at 1:37 PM (Merged)
Avatar
ROBBIE R SHORE
  • MEMBER
  • 5 POSTS
is the housing mounted to the fire wall from the engine compartment?
Oct 27, 2020 at 1:37 PM (Merged)
Avatar
HARRY P
  • CERTIFIED EXPERT
  • 2,292 POSTS
Well Alldata and Prodemand make no specific mention of whether or not there are any bolts on the firewall that hold the HVAC or core in place, but it is entirely possible that there are some. I have seen it a few times. Of course the heater hoses are running up to the firewall, so they need to be taken off and can kind of hold things in place, almost like a nut or bolt would.

You will need to discharge the air conditioner when doing this job.

https://www.2carpros.com/articles/re-charge-an-air-conditioner-system

Here are some diagrams on how to do the job.

Check out the diagrams (Below)

Please let us know if you need anything else to get the problem fixed.
Oct 27, 2020 at 1:37 PM (Merged)
Avatar
ROBBIE R SHORE
  • MEMBER
  • 5 POSTS
so i have completed the heater core and put everything back together, but now i have no power steering and it only blows cold air. any ideas on what i did wrong?
Oct 27, 2020 at 1:37 PM (Merged)
Avatar
HARRY P
  • CERTIFIED EXPERT
  • 2,292 POSTS
You might check the fluid and such. And make sure that the steering and various column pieces are all tight, and that there is nothing interfering with the wheel's movement down under the dash.

As for the cold air, you probably left the blend door actuator unhooked/unplugged. Or maybe the control unit needs to be reset and go through the relearning process. Try disconnecting the battery for ten minutes and then reconnect it. Start the car, turn the heat on, and wait a few minutes. See how it feels then.

Also, be sure that you completely refilled the cooling system and got all of the air bled out of it. Because when you took to core out, a lot of air got into the system.
Oct 27, 2020 at 1:37 PM (Merged)
Avatar
ROBBIE R SHORE
  • MEMBER
  • 5 POSTS
Okay, i will try to reset it. because i could hear something when i adjusted the air temperature and i opened the bleeder and added about 1.25 gallons of antifreeze. but the relearning thing makes sense. thank you
Oct 27, 2020 at 1:37 PM (Merged)
Avatar
STRAILER
  • CERTIFIED EXPERT
  • 53,855 POSTS
Did you disconnect the steering column when you did the heater core removing the dash?
Oct 27, 2020 at 1:38 PM (Merged)
Avatar
2CP-ARCHIVES
  • MEMBER
  • 4,540 POSTS
How to remove and replace the heater core
Oct 27, 2020 at 1:38 PM (Merged)
Avatar
ASEMASTER6371
  • CERTIFIED EXPERT
  • 52,796 POSTS
HEATER CORE REPLACEMENT

REMOVAL PROCEDURE

Remove the HVAC module assembly. See: Housing Assembly HVAC\Service and Repair
Remove the lower center floor air outlet duct.
Remove the upper center floor air outlet duct screws.
Remove the upper center floor air outlet duct.


Drill out the heater core cover heat stakes.


Remove the heater core cover screws.
Remove the heater core cover.


Remove the heater core.

INSTALLATION PROCEDURE


Install the heater core.
Install the heater core cover.

NOTE: Refer to Fastener Notice in Service Precautions.


Install the heater core cover screws.

Tighten
Tighten the screws to 1.5 N.m (13 lb in).

Install the upper center floor air outlet duct.


Install the upper center floor air outlet duct screws.

Tighten
Tighten the screws to 1.5 N.m (13 lb in).

Install the lower center floor air outlet duct.
Install the HVAC module assembly.

huge job for at home

Roy
Oct 27, 2020 at 1:38 PM (Merged)
Avatar
ROBBIE R SHORE
  • MEMBER
  • 5 POSTS
i did n i connect a wires b4 i bolted steel bracing to firewall but i disconnected it to tighten bolts. so that was my problem easy fix just forgot to plug back in. and reseting the battery for my heat also fixed it. so now its running and all is well thank you very much for ur help. amd if ever i have another issue ill b back to this site
Oct 27, 2020 at 1:38 PM (Merged)
Avatar
HARRY P
  • CERTIFIED EXPERT
  • 2,292 POSTS
Hey that's great to see! Please do come back any time you need to. And send your friends too.
Oct 27, 2020 at 1:38 PM (Merged)
Avatar
ROBBIE R SHORE
  • MEMBER
  • 5 POSTS
i will indeed
Oct 27, 2020 at 1:38 PM (Merged)
Avatar
GK09
  • MEMBER
  • 1 POST
Alright, My mom's car was leaking coolant BAD, I'm talking 2 inches of coolant in the passenger side floor. So I replaced the heater core. Problem is that when it did leak before I replaced it, coolant was coming out of the dash on the passenger side by the glove box on the passenger door side, how could it get over there? I mean did the blower possibly blow some coolant through the duct work? I suppose its possible, but everything got soaked, the inside of the dash was soaked when I had it all dismantled. Now she drove it to work (40 mins away) and there was coolant trickling down the side panel right next to the passenger door, could that be just the foam and stuff drying out? She said she had to put some coolant in since it was a little low, BUT I had to drain the coolant and didn't measure out the exact 6.9 quarts you know. Any advice on where to start would be great. Thanks
Oct 27, 2020 at 1:39 PM (Merged)
Avatar
BLUELIGHTNIN6
  • CERTIFIED EXPERT
  • 16,542 POSTS
if it was leaking coolant that bad then i wouldn't be surprised at all if everything in that dash is soaked with it. will take some time for that to evaporate and dry up completely. it can definitely be blown out of the vents as well.
Oct 27, 2020 at 1:39 PM (Merged)
Avatar
CLERMA16
  • MEMBER
  • 2 POSTS
How do you replace a heater core, how much does it run?
Oct 27, 2020 at 1:40 PM (Merged)
Avatar
BLUELIGHTNIN6
  • CERTIFIED EXPERT
  • 16,542 POSTS
Remove the HVAC module assembly Remove the heater core case cover Remove the heater core bracket and screw Remove the heater core


https://www.2carpros.com/forum/automotive_pictures/261618_Noname_626.jpg

Oct 27, 2020 at 1:40 PM (Merged)
Avatar
HJ72
  • MEMBER
  • 23 POSTS
how to change heater core?
Oct 27, 2020 at 1:40 PM (Merged)
Avatar
BLUELIGHTNIN6
  • CERTIFIED EXPERT
  • 16,542 POSTS
1.Disable the air bag by performing the following procedure:
A.Place the front wheel in the straight-ahead position.
B.Turn the ignition switch to the LOCK position.
C.Remove the air bag fuse from the fuse block.
D.At the left side, remove the sound insulator.
E.At the driver-s side, disconnect the Connector Position Assurance (CPA) and the yellow 2-way electrical connectors and the lead to the passenger-s side SIR module.


2.Disconnect the negative battery cable.
3.Drain the cooling system into a clean container for reuse.
4.Disconnect the heater hoses from the heater core and remove the drain tube from the heater/air conditioning housing.
5.Remove the steering wheel by removing or disconnecting the following:

CAUTION
Place the SIR module in a safe place with the front facing upward.


2 SIR module-to-steering wheel screws (located at the rear of the steering wheel), and the module
SIR module and disconnect the electrical connector and remove the SIR module


Horn and cruise control electrical connectors
Steering wheel-to-steering column nut
Steering wheel from the steering column


6.Remove the console by removing or disconnecting the following:


Front seats
Fold the console compartment upward
Console trim plate
Rear cup holder
Console-to-chassis screws and the console


7.Remove the instrument panel by removing or disconnecting the following:

NOTE
There is a screw located in the recess in the center of the cover.


Defroster grille
Instrument panel valance screws and the valance
Instrument panel end caps from both sides
Screws located under the instrument panel end caps
Instrument panel compartment
Steering column covers
Steering column stalks
Instrument cluster and accessory trim plates
Instrument cluster fasteners, disconnect the electrical connectors and remove the cluster
Heater/air conditioning control assembly
Stereo/tape deck assembly
Ignition switch
Upper windshield side garnish molding
Loosen the center console, pull it rearward to disengage it from the instrument panel
Instrument panel-to-tie bar screws
Instrument panel
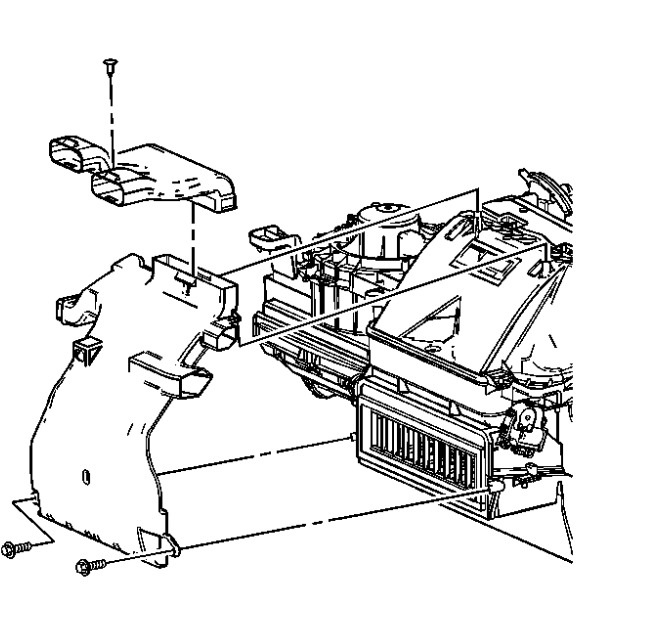
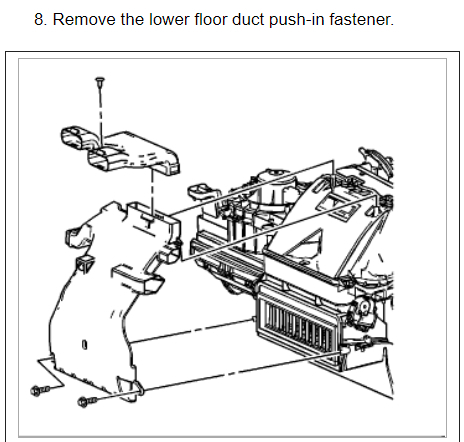
Outlet from the heater/air conditioning housing
Heater core cover-to-heater/air conditioning housing


Heater core-to-heater/air conditioning housing clamps
Heater core


To install:

1.Install or connect the following:

NOTE
There is a screw located in the recess in the center of the cover.


Heater core
Heater core-to-heater/air conditioning housing clamps
Heater core cover-to-heater/air conditioning housing


Outlet to the heater/air conditioning housing


2.Install the instrument panel by installing or connecting the following:


Instrument panel
Instrument panel-to-tie bar screws
Move the center console forward and engage it to the instrument panel
Upper windshield side garnish molding
Ignition switch
Stereo/tape deck assembly
Heater/air conditioning control assembly
Instrument cluster, connect the electrical connectors and install the cluster fasteners
Instrument cluster accessory trim plates
Steering column stalks
Steering column covers
Instrument panel compartment
Instrument panel end caps, install the screws
Instrument panel end caps on both sides
Instrument panel valance and the valance screws
Defroster grille


3.Install the console by installing or connecting the following:


Console and the console-to-chassis screws
Rear cup holder
Console trim plate
Front seats


4.Install the steering wheel by installing or connecting the following:


Steering wheel to the steering column
Steering wheel-to-steering column nut and torque to 30 ft. lbs. (41 Nm)
Horn and cruise control electrical connectors
SIR module and connect the electrical connector
SIR module and torque the 2 module-to-steering wheel screws to 89 inch lbs. (10 Nm)
Heater hoses to the heater core and install the drain tube to the heater/air conditioning housing


5.Refill the cooling system.
6.Connect the negative battery cable.
7.Enable the SIR or air bag by installing or connecting the following:


Connector Position Assurance (CPA), the yellow 2-way electrical connectors and the lead to the passenger-s side SIR module (located on the drivers- side)
Sound insulator, located on the left side
Air bag fuse to the fuse block


A.Turn the ignition switch to RUN and verify that the Air Bag Warning light flashes 7-9 times and turns OFF.

NOTE
If the SIR system does not operate as described, perform the SIR diagnostic system check.


8.Operate the engine to normal operating temperatures; then, check the climate control operation and check for leaks.
Oct 27, 2020 at 1:40 PM (Merged)
Avatar
TEETAW259
  • MEMBER
  • 1 POST
A few months ago I had the same problem with my Malibu, 01, v6. I looked in a repair manual with the thought of doing it myself, but after reading that you had to pull the steering wheel, the center console and seems like they recommended removing the front seats, I decided I didn't want to undertake it, even though I was ASE certified years ago in several areas. I contacted one shop that quoted me $425.00 for the repair. I called another local mechanic who had done some good work for me in the past, and he quoted $80. for the job PARTS AND LABOR! I was sure there must be some mistake, so I asked him to verify that was for parts AND labor. He did. I took the car to him and went back after it in a couple of hours. He showed me the old core and apologized because he said he was going to have to charge me a little more than originally stated. I thought "here it comes". He charged me $5.00 more because the price of the core had gone up that much. So total bill...$85.00.

Bottom line....the core can be replaced from the bottom of the dash without pulling everything the manual says you must pull. Seems that is often the case. I think it actually took him 30 or 45 minutes to do the job.

Check it out before you start tearing apart your car for no reason. Good luck, and if you're near Dallas I'll give you the guy's name that repaired mine.
Oct 27, 2020 at 1:40 PM (Merged)
Avatar
VICEMAN46
  • MEMBER
  • 2 POSTS
can you contact me and give me the number of the mechanic that replaced your heater core. My email address is [email protected].

Tommy Vice
Oct 27, 2020 at 1:40 PM (Merged)
Avatar
HJ72
  • MEMBER
  • 23 POSTS
dose any one have a pictrue of r/r of heater core?
Oct 27, 2020 at 1:40 PM (Merged)
Avatar
BASSTECH
  • MEMBER
  • 236 POSTS
Don't have a picture of the heater core replacement, but I can tell you that you have to remove the entire dash assy. and everything attached to it, then you can remove the HVAC module to gain access to the heater core.
Any questions let me know.
Oct 27, 2020 at 1:40 PM (Merged)
Avatar
MUDD74
  • MEMBER
  • 2 POSTS
I just need to know if the airbags would be disabled with the battery disconnected so that I can remove and replace the heater core.
Oct 27, 2020 at 1:40 PM (Merged)
Avatar
JACOBANDNICKOLAS
  • CERTIFIED EXPERT
  • 110,175 POSTS
Yes, disconnect the battery and allow the vehicle to sit for at least 20 minutes before you start working on it.
Oct 27, 2020 at 1:40 PM (Merged)
Avatar
MUDD74
  • MEMBER
  • 2 POSTS
Thank you.


Oct 27, 2020 at 1:40 PM (Merged)