You are correct about DIY, as anything to do with the restraint system should be handled by trained technicians.
Start by disablng the SRS system before any wokr on the system is performed.
DISABLING & ACTIVATING AIR BAG SYSTEM
WARNING:
Wait one minute after disabling SRS before working on vehicle. Back-up power supply holds a deployment charge for approximately one minute after positive battery cable is disconnected. Servicing SRS before one minute may cause accidental air bag deployment and possible personal injury.
CAUTION:When battery is disconnected, vehicle computer and memory systems may lose memory data. Driveability problems may exist until computer systems have completed a relearn cycle.
DISABLING SYSTEM
NOTE:
Following disabling procedure should be used for component replacement purposes only. If vehicle was involved in a collision and air bag did not deploy or if SRS is not functioning properly, and vehicle needs to be driven, complete system deactivation is required. See COMPLETE SYSTEM DEACTIVATION .
Disconnect negative and then positive battery cables. Shield both cables. SRS contains a back-up power supply built into air bag diagnostic monitor. Wait at least one minute before servicing any air bag components. System is now disabled. To activate SRS, see ACTIVATING SYSTEM .
ACTIVATING SYSTEM
Connect positive and then negative battery cables. System is now activated. From outside of vehicle (driver-side), turn ignition switch to RUN position. Check AIR BAG warning light for system fault codes. Perform system operation check to ensure SRS is functioning properly. See SYSTEM OPERATION CHECK .
COMPLETE SYSTEM DEACTIVATION
WARNING:
Back-up power supply will hold a deployment charge for approximately one minute after positive battery cable is disconnected. Servicing SRS before one minute may cause accidental air bag deployment and possible personal injury. Always deactivate driver-side and passenger-side air bag modules before attempting any service procedures.
NOTE:
Complete system deactivation sequence is required for following situations:
• Vehicle was involved in a collision, air bags did not deploy, and vehicle needs to be driven.
• SRS is not functioning properly, and vehicle needs to be driven.
• Diagnosis and testing purposes.
1. Disconnect ground battery cable. Wait at least one minute to deplete charge in back-up power supply. Remove driver-side air bag module.
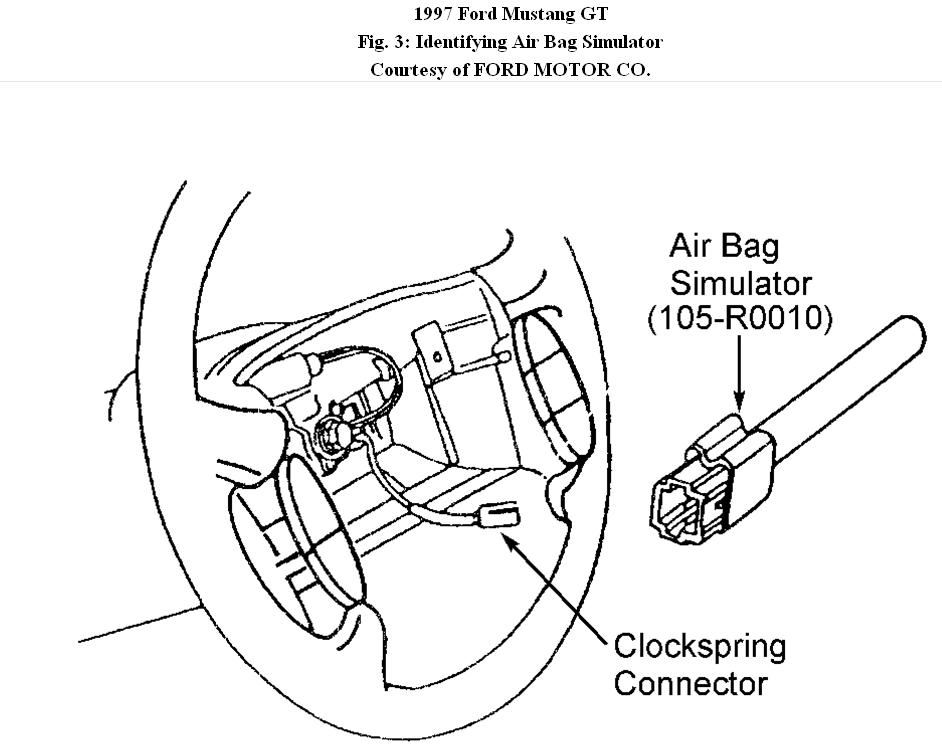
2. Connect Air Bag Simulator (105-R0010) to clockspring. See Fig. 3 . Remove passenger-side air bag module. Connect Air Bag Simulator (105-R0010) to passenger-side air bag vehicle harness connector. Connect ground battery cable. To reactivate SRS, see COMPLETE SYSTEM REACTIVATION .
COMPLETE SYSTEM REACTIVATION
Disconnect ground battery cable. Remove Air Bag Simulator (105-R0010) from clockspring connector. Remove Air Bag Simulator from passenger-side air bag vehicle harness connector. Install driver-side air bag module.
2. Install passenger-side air bag module. Reconnect ground battery cable. System is now reactivated. Perform system operation check to ensure SRS is functioning properly. See SYSTEM OPERATION CHECK .
SYSTEM OPERATION CHECK
1. When checking SRS operation, and upon completion of each diagnostic test, check for faults in SRS. To check system, turn ignition switch to RUN position. If AIR BAG warning light glows for 4-8 seconds and then goes out, SRS is functioning properly and no fault codes exist.
2. If a fault code is detected in SRS during initial system check, AIR BAG warning light will either fail to light, stay on continuously, or flash a code sequence. If AIR BAG warning light flashes, indicating a fault in system, count number of flashes after fault code has cycled twice. Number of flashes represents a code number used to diagnose SRS.
3. If a system fault exists and AIR BAG warning light fails to light, an audible tone will be heard, indicating AIR BAG warning light is out and service is required.
You need to remove the vents to get at the module. If there are no other errors in system the SRS light should go off when the module is replaced.
DIAGNOSTIC MONITOR ( Control Module )
Removal
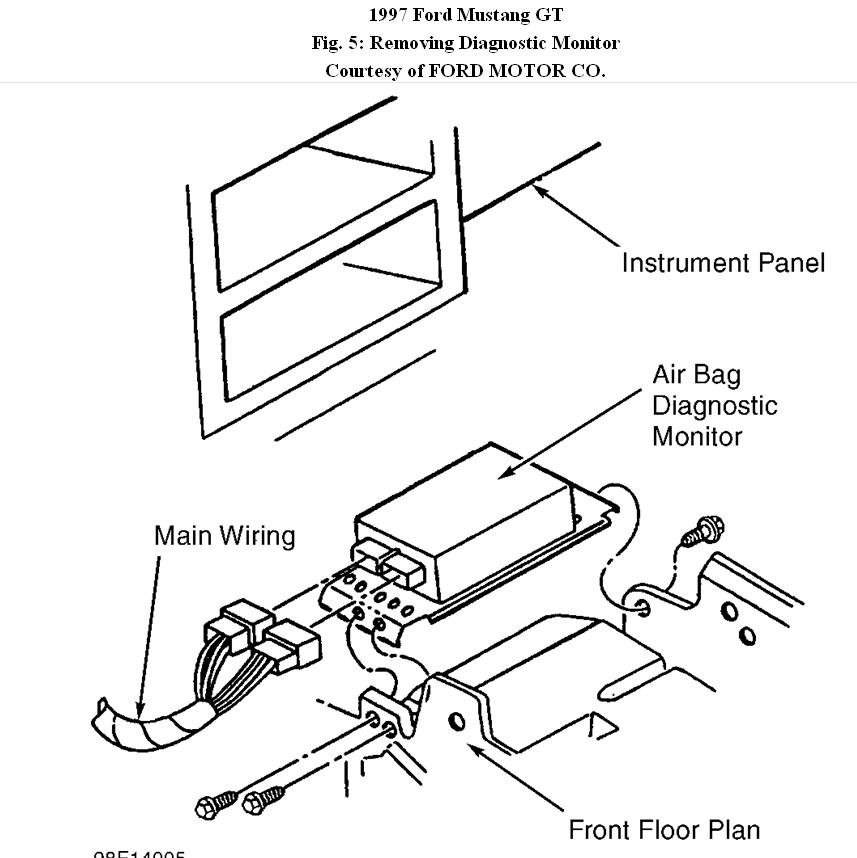
1. Diagnostic monitor is Blue box with two connectors mounted below climate control assembly. Disconnect diagnostic monitor electrical connectors.
2. Remove screws retaining air bag diagnostic monitor and bracket to instrument panel brace and remove diagnostic monitor and bracket. See
Fig. 5 .
Installation
To install, reverse removal procedure. Activate SRS. Check AIR BAG warning light to ensure system is functioning properly. See SYSTEM OPERATION CHECK .
Images (Click to enlarge)
Apr 15, 2011 at 8:17 PM