car wont start

1995 CADILLAC DEVILLE
125,000 MILES • V8 • FWD • AUTOMATIC
Avatar
BADBOYMARCUS
  • MEMBER
  • 71 POSTS
the car started and stayed on running for 10 to 15 mins and turned off.Try to start and it wont it cranks..what you think it is need help.
Aug 17, 2012 at 1:39 PM
Advertisement
Avatar
ASEMASTER6371
  • CERTIFIED EXPERT
  • 52,796 POSTS
do you have an alarm system?? ids the security light on??

Roy
Aug 17, 2012 at 2:10 PM
Avatar
KHLOW2008
  • CERTIFIED EXPERT
  • 41,814 POSTS
Did you test the battery and charging system?
Aug 17, 2012 at 2:51 PM
Advertisement
Avatar
BADBOYMARCUS
  • MEMBER
  • 71 POSTS
To me it may be the fuel pump it would stall sometimes.its got a new battery.can you sent me a diagram how to take down the gas tank and how to take out fuel pump.
Aug 17, 2012 at 5:45 PM
Avatar
KHLOW2008
  • CERTIFIED EXPERT
  • 41,814 POSTS
Not cranking and cranking but won't fire up are two different things so which is the correct condition?
Aug 17, 2012 at 6:19 PM
Avatar
BADBOYMARCUS
  • MEMBER
  • 71 POSTS
cranking but wont fire up
Aug 17, 2012 at 10:40 PM
Avatar
KHLOW2008
  • CERTIFIED EXPERT
  • 41,814 POSTS
https://www.2carpros.com/topics/engine-performance/cranks-but-wont-start

Above link explains what to look for so have you gone through them and confirmed the fuel pump is at fault? Testing of fuel pump operations can be done via the Fuel Pump Test/Prime Connector on left inner fender panel.

Guessing and changing components without testing and confirming can be a waste of time and money.

FUEL PUMP

Removal & Installation

1. Disconnect negative battery cable. Relieve fuel pressure. Remove filler neck. Lower fuel tank. Disconnect fuel lines and electrical connection.

2. Remove fuel level sending unit and fuel pump retaining bolts or cam lock ring. Lift assembly from fuel tank and remove fuel pump from sending unit.

3. Pull fuel pump upward while pulling away from bottom support. Use care not to damage rubber insulator and strainer. To install, reverse removal procedure using NEW "O" ring and gasket.


Aug 18, 2012 at 6:54 AM
Avatar
BADBOYMARCUS
  • MEMBER
  • 71 POSTS
ok i replace fuel pump and fuel filter and wont start.what can be the probluem.
Aug 18, 2012 at 8:52 PM
Avatar
KHLOW2008
  • CERTIFIED EXPERT
  • 41,814 POSTS
Have you checked what is missing from the link I provided?
Aug 18, 2012 at 10:16 PM
Avatar
CADIEMAN
  • CERTIFIED EXPERT
  • 3,544 POSTS
try starting fluid does it start?have u checked the voltage at the fuel pump or injecter fuses?stop throwing parts on hoping it works.
Aug 18, 2012 at 11:01 PM
Avatar
BADBOYMARCUS
  • MEMBER
  • 71 POSTS
yea i tryed the link still nothing.and use starting fluid and checked all fuses are good.
Aug 19, 2012 at 12:09 AM
Avatar
KHLOW2008
  • CERTIFIED EXPERT
  • 41,814 POSTS
The link is to find out what is missing. After trying out the link, what did you find out is missing? Ignition sparks, fuel pressure or what?

You had been warned against replacing components without any testing.
Aug 19, 2012 at 6:26 AM
Avatar
BADBOYMARCUS
  • MEMBER
  • 71 POSTS
i did what it says in the link i know i put everything the same way i took it off.i got spark and getting fuel though fuel injecters.where can i get the fuel pump/prime connecter
Aug 19, 2012 at 1:46 PM
Avatar
KHLOW2008
  • CERTIFIED EXPERT
  • 41,814 POSTS
If you are having fuel and sparks, why did you replace the pump?
If you have fuel pressure, there is no need to test the fuel pump any further.
Have you tested the compression?
Aug 19, 2012 at 4:18 PM
Avatar
BADBOYMARCUS
  • MEMBER
  • 71 POSTS
thats what a mechanic said that was out.so i replace it i guess i can put the old one back on and take back the new one and get my money back..
Aug 19, 2012 at 5:32 PM
Avatar
KHLOW2008
  • CERTIFIED EXPERT
  • 41,814 POSTS
With fuel pressure, injectors firing and ignition sparks, the next step would be to test the compression.
Aug 19, 2012 at 5:39 PM
Avatar
BADBOYMARCUS
  • MEMBER
  • 71 POSTS
how or where do you test the compression.
Aug 19, 2012 at 6:40 PM
Avatar
BADBOYMARCUS
  • MEMBER
  • 71 POSTS
what do these codes mean p052 and i052 and pcm?
Aug 19, 2012 at 7:00 PM
Avatar
KHLOW2008
  • CERTIFIED EXPERT
  • 41,814 POSTS
P052 means the battery had been disconnected. I can't find any reference to i052.

PCM is the engine computer.

You would need a conmpression tester to check the compression.

https://www.2carpros.com/articles/how-to-test-engine-compression

Follow the above link.
Aug 19, 2012 at 7:11 PM
Avatar
BADBOYMARCUS
  • MEMBER
  • 71 POSTS
Had to replace the whole distubuer.Thanks for helping me out.
Sep 2, 2012 at 7:44 PM
Avatar
BADBOYMARCUS
  • MEMBER
  • 71 POSTS
Need help again smelling gas under the hood.On the left fender right on the corner by the headlight theres a canister looks like a coffe can thats where it smells gas.and you hear air coming out to when car is off.
Sep 2, 2012 at 7:49 PM
Avatar
BADBOYMARCUS
  • MEMBER
  • 71 POSTS
I replace the fuel pump.When car is on you can hear the fuel pump but its kinda loud.the orignal that on there you could not even hear it.It was quiet what do you think is wrong with it.Should i take it out and replace it with another one.it might be defective part.
Sep 2, 2012 at 7:55 PM
Avatar
KHLOW2008
  • CERTIFIED EXPERT
  • 41,814 POSTS
That is the charcoal cannister and is for emission control.

There could be too much pressure build-up in the fuel tank due to problems with the EVAP system.

Release the fuel tank cap to see if there are excessive pressure. Close cap tightly and turn engine on. Check for trouble codes.
Sep 2, 2012 at 8:00 PM
Avatar
KHLOW2008
  • CERTIFIED EXPERT
  • 41,814 POSTS
Yes, the fuel pump could be bad or you have not installed it correctly resulting in vibrations being transferred to the housing and body. You need to recheck it.
Sep 2, 2012 at 8:03 PM
Avatar
BADBOYMARCUS
  • MEMBER
  • 71 POSTS
Ok ill release the pressure.Does the charcoal canister need to be replace.And ill recheck the fuel pump and codes.Thanks ill let you know.
Sep 2, 2012 at 9:24 PM
Avatar
KHLOW2008
  • CERTIFIED EXPERT
  • 41,814 POSTS
If it is full of fuel, you might need to replace it but don't replace first. Take it out pour away all the fule inside it. Test first to confirm that you do not have any problem. We don't want to waste a canister if fuel is still being dumped into it.
Sep 2, 2012 at 9:36 PM
Avatar
CADIEMAN
  • CERTIFIED EXPERT
  • 3,544 POSTS
if u got spark and it wont run on spray.does this have dis or a distributer khlow2008?im so darn old i cant remember.u will need to ck. the engine timing to see if the timing chain has broken
Sep 3, 2012 at 2:11 AM
Avatar
KHLOW2008
  • CERTIFIED EXPERT
  • 41,814 POSTS
cadieman, he just replaced the distributor and is able to start but the charcoal canister is flooding out, a new problem.
Sep 3, 2012 at 1:42 PM
Avatar
BADBOYMARCUS
  • MEMBER
  • 71 POSTS
What do these codes mean I039,T072,T077,I052 How do you clear theses codes.
Sep 3, 2012 at 4:56 PM
Avatar
BADBOYMARCUS
  • MEMBER
  • 71 POSTS
Hey KHLow2008 did you get my question.
Sep 3, 2012 at 6:47 PM
Avatar
KHLOW2008
  • CERTIFIED EXPERT
  • 41,814 POSTS
Sorry for the delay. Sorry I could not find any references in our database for the codes you have posted.

How did you get the codes and are they correct as posted?
Sep 4, 2012 at 11:26 AM
Avatar
KHLOW2008
  • CERTIFIED EXPERT
  • 41,814 POSTS
After some digging I came across the following.

Those are Instrument Panel Cluster (IPC) codes but some are not listed.

Code I052-Keep Alive Memory Error

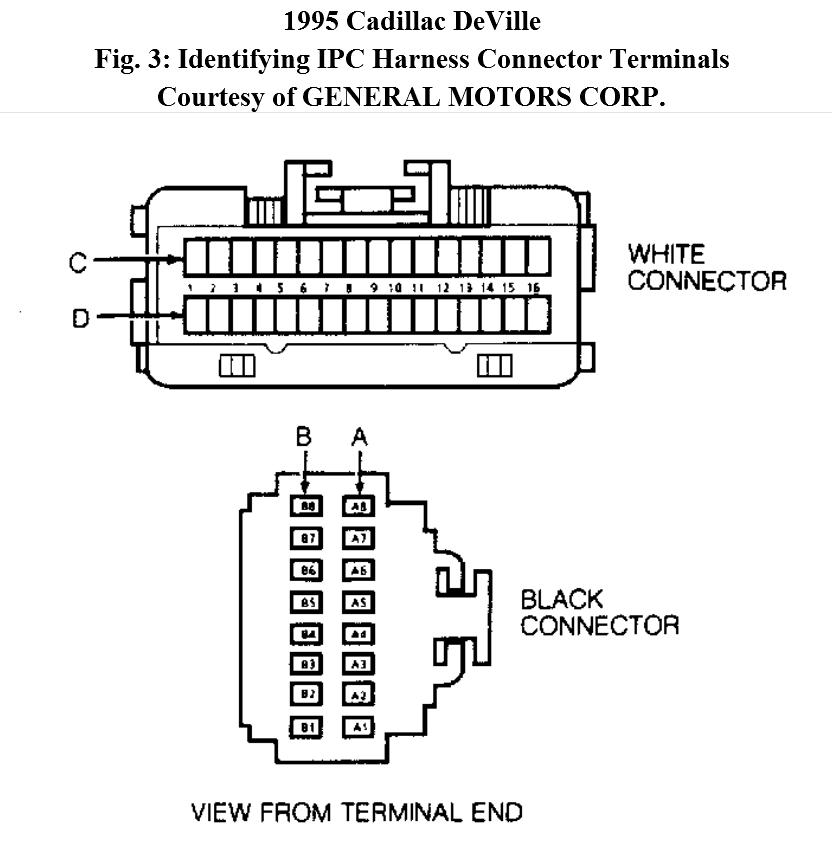
A Code I052 indicates "keep alive" or "long term" memory in IPC has been reset. This code will set anytime battery is disconnected. When code is set, IPC memory resets itself to initial values, eliminating any driver-desired changes. If Code I052 sets and it is known that the battery has not been disconnected, check contacts at IPC connector terminals A1 and C12. Also check ground continuity of terminals A5 and C16. See Fig. 3.


Multiple Data Communication Codes (4.6L)

1. Ensure Data Link Connector (DLC) cover is properly seated to DLC. If it is, go to step 3). If it is not, clear all codes, install DLC cover properly and test drive vehicle for more than 10 miles. Enter self-diagnostics and recheck for trouble codes.

2. DLC cover contains a serial data line jumper connection. When DLC cover is in place, this jumper connects DLC terminals "M" and "L" to complete the serial data line communication link between all computer systems.

3. Ensure DLC cover is properly positioned. Enter self-diagnostics and record all trouble codes. If both Codes I033 and I037 are set, repair open in Tan wire between DERM and IPC or between ACP and PCM. Diagnostic Energy Reserve Module (DERM) is located directly above brake pedal. DERM has Yellow connector and wiring harness. A/C Programmer (ACP) is located left of PCM, behind glove box. If both Codes I034 and I037 are set, repair open in Tan wire between IPC and PCM or between ACP and DERM.

4. If both Codes I034 and E052 are set, PCM has lost power. Diagnose as per PCM Code P052. If Codes I032 or I032 and I034 are set, diagnose as per IPC Code I032. If both Codes I034 and E047 are set, IPC has lost communications with PCM. Diagnose as per IPC Code I034. If both Codes I037 and A037 are set, IPC has lost communications with ACP. Diagnose as per IPC Code I037.

5. If Codes A037, P047 and T072 are set (I052 may also be set), there is serial data line communication link break down. Diagnose as per IPC Code I052. If Codes I039 and T072 are set, there is a loss of Road Sensing Suspension (RSS) data. Diagnose as per IPC Code I039.

6. If Codes I032, I033, I034 and I037 are all set, and these are current ("C") codes, go to next step. If these are history ("H") codes, check the following and repair as needed:

a) Check for poor connections at IPC terminals C1 and C2. See Fig. 3.

b) Check for intermittent short to ground or short to battery voltage anywhere in Tan wire circuit.

c) Check for intermittent open in Tan wire circuit between IPC and DERM and between IPC and PCM.

d) Check each computer component along Tan wire circuit to be holding serial data line at a constant voltage.

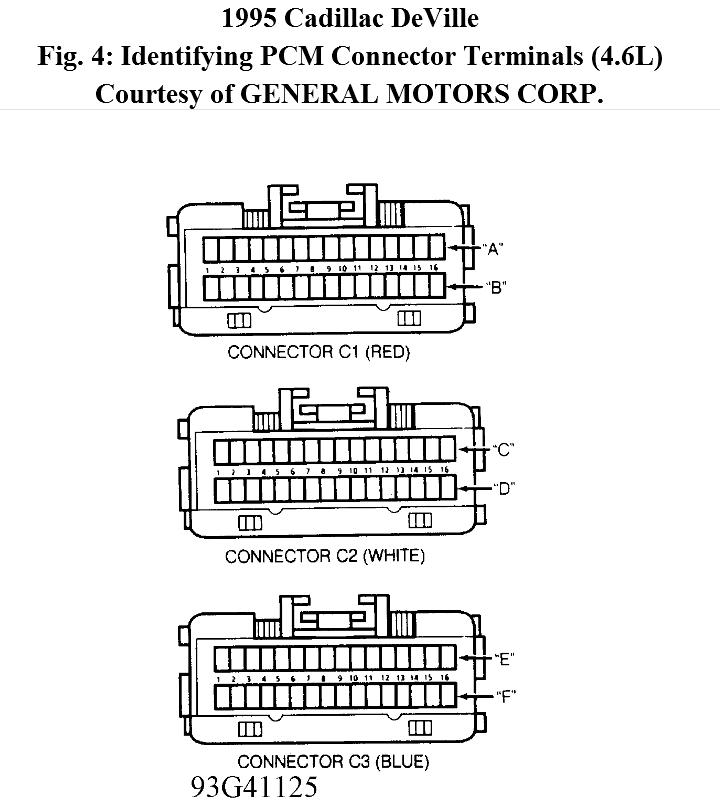
7. Disconnect PCM connector C2. See Fig. 4. PCM is located on right kick panel. Remove DLC cover. Using DVOM, measure voltage at DLC terminal "M". If voltage does not fluctuate between 3 and 5 volts, go to step 14). If voltage fluctuates between 3 and 5 volts, disconnect ACP connector and reconnect PCM connector C2. ACP is left of PCM. Using DVOM, measure voltage at DLC terminal "M".

8. If voltage is fluctuating between 3 and 5 volts, go to step 10). If voltage is not fluctuating between 3 and 5 volts, disconnect PCM connectors. Using jumper wire, connect PCM harness connector C2, terminals 2C12 and 2C13. See Fig. 4.

9. Using DVOM, measure voltage at DLC terminal "M". If voltage is fluctuating between 3 and 5 volts, check PCM MEM-CAL for good connection into PCM, and check PCM connectors for good connections. If no connection problems exist, replace PCM. If voltage is not fluctuating between 3 and 5 volts at terminal "M", repair short in Tan wire circuit between ACP and PCM.

10. Disconnect Road Sensing Suspension (RSS) module mounted on board in electronics bay on right side of trunk. Reconnect ACP. Using DVOM, measure voltage at DLC terminal "M". If voltage is fluctuating between 3 and 5 volts, go to step 12). If voltage is not fluctuating between 3 and 5 volts, go to next step.

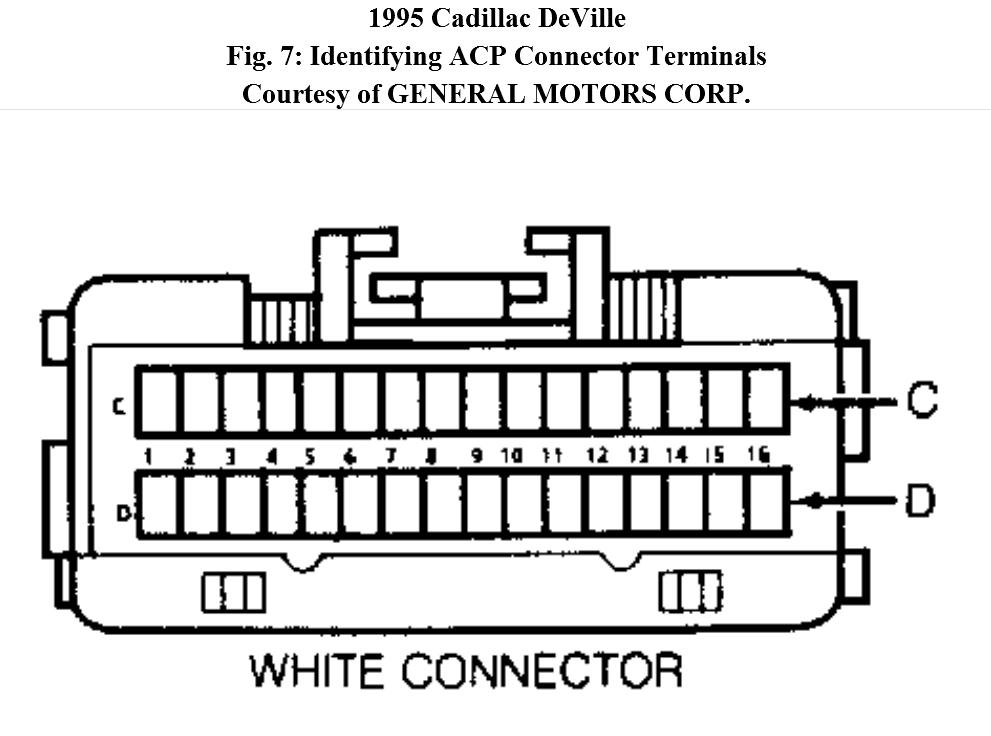
11. Disconnect ACP. Connect a jumper wire between ACP connector terminals C10 and C11. See Fig. 7. Using DVOM, measure voltage at DLC terminal "M". If voltage is fluctuating between 3 and 5 volts, repair short in Tan wire between ACP and RSS module. If voltage is not fluctuating between 3 and 5 volts, ensure proper MEM-CAL insertion in ACP and proper terminal contact at ACP. If no
problems are found, replace ACP.

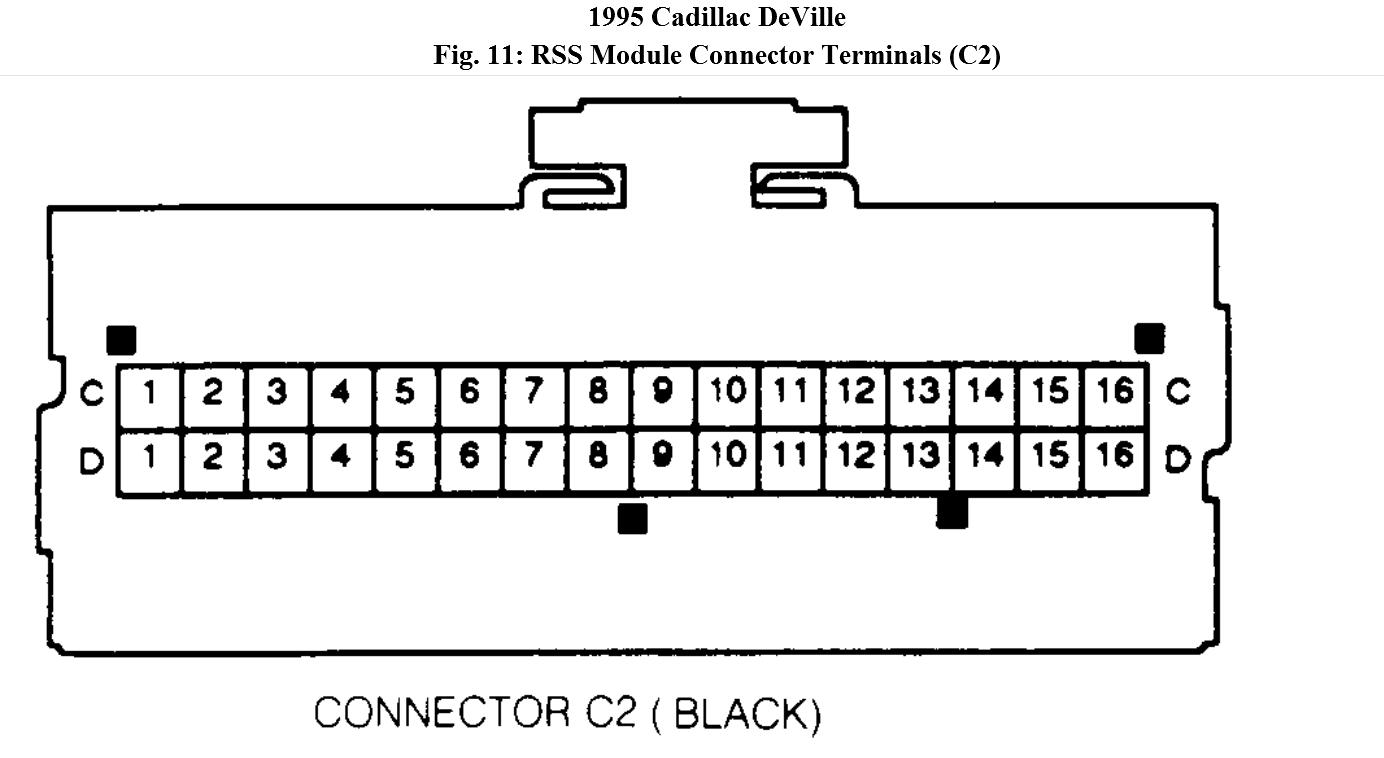
12. Connect a jumper wire between RSS C2 (Green) connector terminals D8 and D9. See Fig. 11 . Using DVOM, measure voltage at DLC terminal "M". If voltage is not fluctuating between 3 and 5 volts, go to next step. If voltage is fluctuating between 3 and 5 volts, check for proper terminal contact at RSS connector. If terminal contact is okay, replace RSS module.

13. Disconnect Electronic Brake Control Module (EBCM) connector. EBCM is mounted to center of cross brace behind rear seat and is accessible from trunk. Using DVOM, measure voltage at DLC terminal "M". If voltage fluctuates between 3 and 5 volts, replace EBCM. If voltage does not fluctuate between 3 and 5 volts, repair short in Tan wire between ACP and DLC terminal "L".

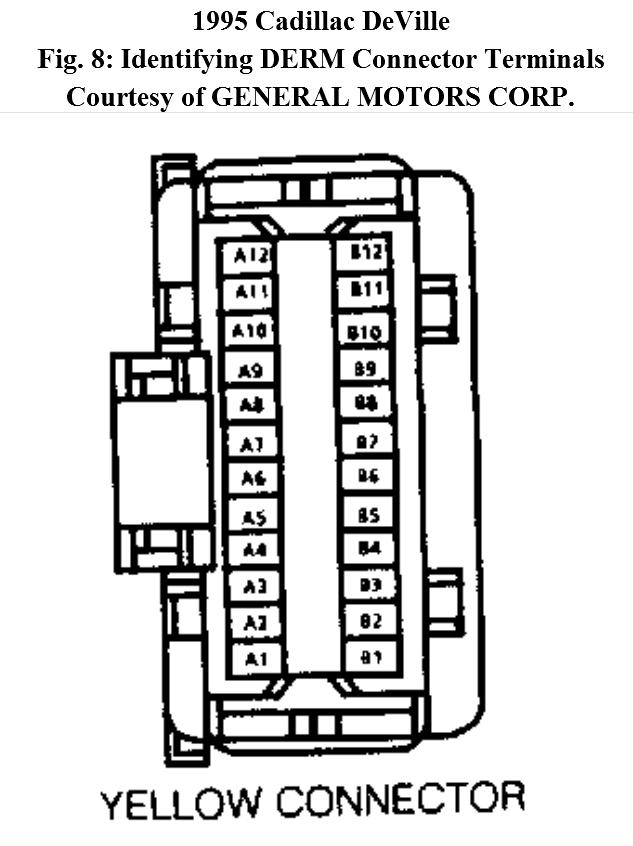
14. Ensure PCM connector and DLC cover are still disconnected. Disconnect Yellow DERM connector. DERM is mounted behind instrument panel above brake pedal. Using DVOM, measure voltage at DERM harness connector terminal A11. See Fig. 8 . If voltage is not fluctuating between 3 and 5 volts, go to step 16). If voltage is fluctuating between 3 and 5 volts, use jumper wire to connect DERM harness connector terminals A11 and B11. Measure voltage at DLC terminal "M".

15. If voltage fluctuates between 3 and 5 volts at DLC terminal "M", check connections at DERM terminals. If connections are good, replace DERM. If voltage does not fluctuate between 3 and 5 volts at DLC terminal "M", repair short in Tan wire circuit between DERM and DLC terminal "M".

16. Turn ignition off. Disconnect IPC connectors. Leave DERM disconnected. Using DVOM, measure resistance to ground from IPC harness connector terminal C1. See Fig. 3 . If resistance is 2000 ohms or less, repair short in Tan wire circuit between DERM and IPC.

17. If resistance is greater than 2000 ohms, connect jumper wire from DERM harness connector terminal A11 to ground. Measure resistance to ground from IPC harness connector terminal C1. If resistance is more than 2000 ohms, repair open in Tan wire circuit between IPC and DERM.

18. If resistance is 2000 ohms or less, ensure PCM is still disconnected. Measure resistance from ground to IPC harness connector terminal C2. If resistance is more than 2000 ohms and terminal connections are good at IPC connectors, replace IPC.

19. If resistance is now 2000 ohms or less, repair short in Tan wire circuit between IPC and PCM. After all repairs are completed, clear all codes and verify correct operation.


Sep 4, 2012 at 11:54 AM
Avatar
BADBOYMARCUS
  • MEMBER
  • 71 POSTS
I pushed off and the heat button and it showed me all those codes.Thats alot to do just to clear them out.How do you test the charcoal canister if it is bad or good.Is it going to hurt anything if i disconnect vacum hoses.
Sep 5, 2012 at 12:09 AM
Avatar
CADIEMAN
  • CERTIFIED EXPERT
  • 3,544 POSTS
did u clear all the cpus. and drive it 10miles.then rechecked the codes and gave us all the current codes yes or no.we are tired of pussyfooting around here.we can only help you with you doing what we ask.#1 remove your battery cables and ck.them for corrosion that builds up on the cables.because delco batterys leak fluid at the posts.u will need to clean them or replace them.then u will need to ck. the voltage to the positive wire to the starter and alt.if the battery reads 12.8 it should read the same at the alt.and str. as the battery.this can cause the 52 CODES
Sep 5, 2012 at 2:55 AM
Avatar
CADIEMAN
  • CERTIFIED EXPERT
  • 3,544 POSTS
the t codes are traction control codes.
Sep 5, 2012 at 3:12 AM