Fuel/Temperature gauges

1985 JEEP CJ7
275,000 MILES • 6 CYL • 4WD • MANUAL
Avatar
KD7BUJ
  • MEMBER
  • 5 POSTS
Is there a way to use the factory Fuel/Temp gauges without using that blasted resistive link?
Jan 6, 2011 at 6:48 PM
Advertisement
Avatar
CJ MEDEVAC
  • CERTIFIED EXPERT
  • 11,004 POSTS
I really do not think that is "resistive" are we speaking of the jumper between the gauges?

What is your final goal or intension's here (with the gauges)?

The pic below is my original '77 cluster (rear view) registers 90 mph....the one i have now is a newer version--wrong pic in the middle, that's "willy"-----3rd pic is my 2nd newer type cluster (about $125 when i got it) it registers 85 mph.

The Medic
Jan 6, 2011 at 7:26 PM
Avatar
KD7BUJ
  • MEMBER
  • 5 POSTS
Yes I am refering to the jumper. Goal is to have working Fuel/Temp guages.
Have installed new fuel tank and sending unit as well as guages. It's just that I somehow suspect the jumper. But...got new jumper with guages. Seems that I have tried both Crown and Omix. This has been an ongoing battle for a few years now.
Jan 6, 2011 at 11:40 PM
Advertisement
Avatar
CJ MEDEVAC
  • CERTIFIED EXPERT
  • 11,004 POSTS
kd7buj, you been on here before?

I've had many problems with mine too

Eventually it led me to install a 2nd, mechanical TEMP Gauge....the sender is Mid-Engine-Block, and the Gauge usually reads about 20 degrees cooler than the Actual 195 in the top of the head. But I can tell when its getting TOO HOT, It will start climbing above 175, On the secondary gauge

It really puzzles me about the original in the speedometer.....I can go out to the sender and ground the wire, the Temp Gauge "Tops Out".....I've tried 8 senders, some were from other MFGs, I get nothing!

The Fuel Gauge works fine!

I have the 1979 AMC Service Manual, which shows testing and the values you should have between "S"--"I"--"A"--"GROUND"......along with resistance readings when gauges are at Beginning-mid-end of their band

All of my testing shows that MY SYSTEM IS FINE...I thought maybe I was tightening the TEMP SENDER too tight.....The Boiling water test shows the sender good.....So I'm at Wits End with my Speedometer TEMP GAUGE!!!!

As far as what you need to know, I too have been looking for a solution (not real hard!)

Seems the Gauges run on REDUCED VOLTAGE...that is, on a CJ, the Fuel gauge has a CONSTANT VOLTAGE REGULATOR ("CVR")built in to it. My INTERPRETATION is BOTH the TEMP and FUEL Gauges use it (thus the jumper, over to the Temp Gauge)....Thats why I was asking what your intentions were.

The CVR somewhat works like a FORD ALTERNATOR Voltage Regulator---(Its NOT a TRANSFORMER) thats why the needles Pulsate on the gauges

I have also KINDA-SORTA been looking at the possibility using some sorta Transformer

The AMC Manual says the CVR puts out about 5 Volts

So I kinda figgered that if you got rid of the Jumper and the 12 Volt feed into the Fuel Gauge (Feed into "I")-------Maybe if a 5 VOLT Transformer could feed "A" on both Gauges and "S" go out to each ones "Sender" (as normal)

Is this Deeper than what you thought was going on, or did you already know some of this stuff?

The Medic


Jan 7, 2011 at 2:00 AM
Avatar
KD7BUJ
  • MEMBER
  • 5 POSTS
The separate supply voltage does have a nice ring to it. I found on another site/forum that ohms on fuel guage= 73 empty, 23 half, 10 full. This backs up my thoughts on a variable resistance. I'd like to find a spare jumper and peal that shrink tubing off to see what's inside. You might be close with the 5v. I had one electronics expert tell me it might be closer to 7.3v. I do have the factory service manual but I seem to have a tendency to get lost or sidetracked when trying to follow the diagnostics matrix.
Being a ham radio operator I should be able to figure this out but I keep getting sidetracked.
As far as deep goes...I like it as long as I get results.
Ken - KD7BUJ
Independence, OR
Jan 7, 2011 at 3:23 AM
Avatar
CJ MEDEVAC
  • CERTIFIED EXPERT
  • 11,004 POSTS
If I get a chance tomorrow, I will attempt to get a KEY ON, Voltage Reading on the JUMPER (both ends).....if its still alive!

My manual does say "ABOUT 5 VOLTS"

I cannot see the FUEL GAUGE working, unless it were.

The Jumper is just that...a Jumper

The CVR is in the FUEL GAUGE on a CJ-------But in the other '79 Models, according to the AMC manual is in the TEMP GAUGE

May be possible to have separate Gauges (No Jumper) If you use the TEMP gauge out of lets say.......a 1979 CHEROKEE

I need to investigate the Looks of that one in the Manual, to see if its comparable

But still I like the Idea of a 12VDC to 5VDC Transformer---the needles would hold steady (and maybe move quicker and truer, because it would not be a HIGH LIMIT-Off----LOW LIMIT-On Regulator, as it is now.

Any Ideas for a DECENT RELIABLE Transformer?

The Medic
Jan 7, 2011 at 4:37 AM
Avatar
KD7BUJ
  • MEMBER
  • 5 POSTS
Auto salvage yard or electronics wharehouse? You could always get a toroidal core(magnet material shaped like a donut)and wind your own transformer. I think it's Palomar Electronics in southern CA that carries cores. They probably would also have the magnet wire and the info on how many turns of wire.
Would a temp guage from a '79 Cherokee fit in the speedo cluster?
Jan 7, 2011 at 6:51 AM
Avatar
CJ7DAVEH
  • MEMBER
  • 1 POST
I don't mean to be a buttinsky...Sounds like I have a simular problem that is driving me a lil nuts. My fuel gauge works fine but temp gauge dosn't work, at zero. The shop manual, M. R. 252 vol one page c-112 is about the only page where I get any help---it say replace CVR, and point to the wire between fuel and temp on the back--- could you clarifiy---is the CVR on a '85 CJ7 inside the fuel gauage? Or is it the wire its self. Thanks, Dave
Feb 3, 2011 at 5:24 PM
Avatar
CJ MEDEVAC
  • CERTIFIED EXPERT
  • 11,004 POSTS
Well, I'm glad ya'll have come up with something a lot better than I could have!

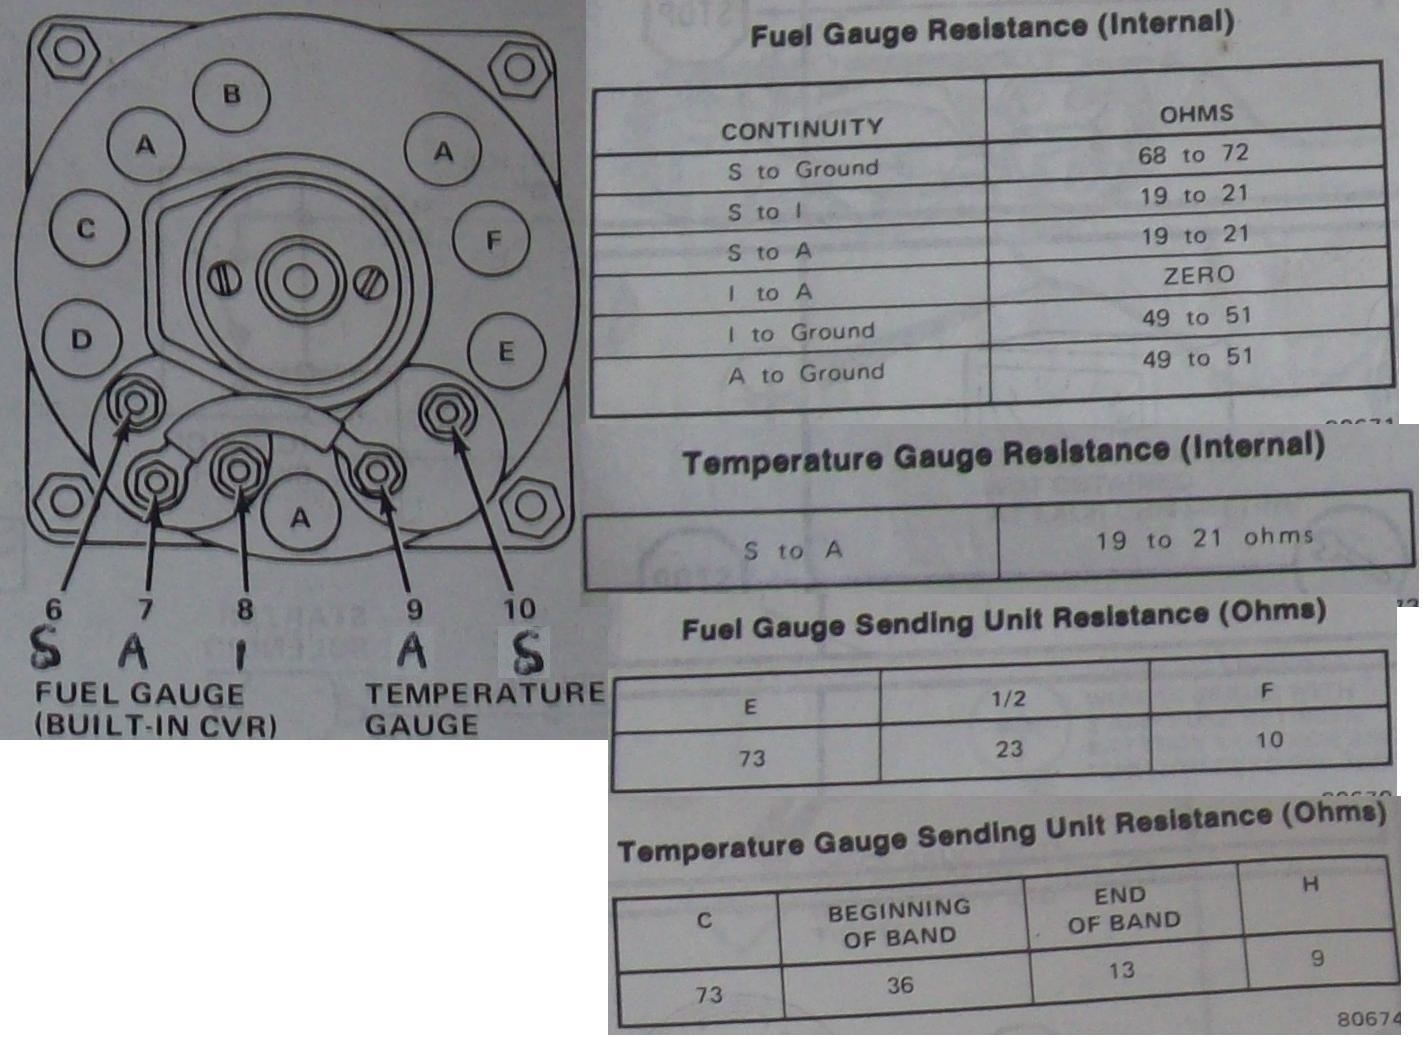
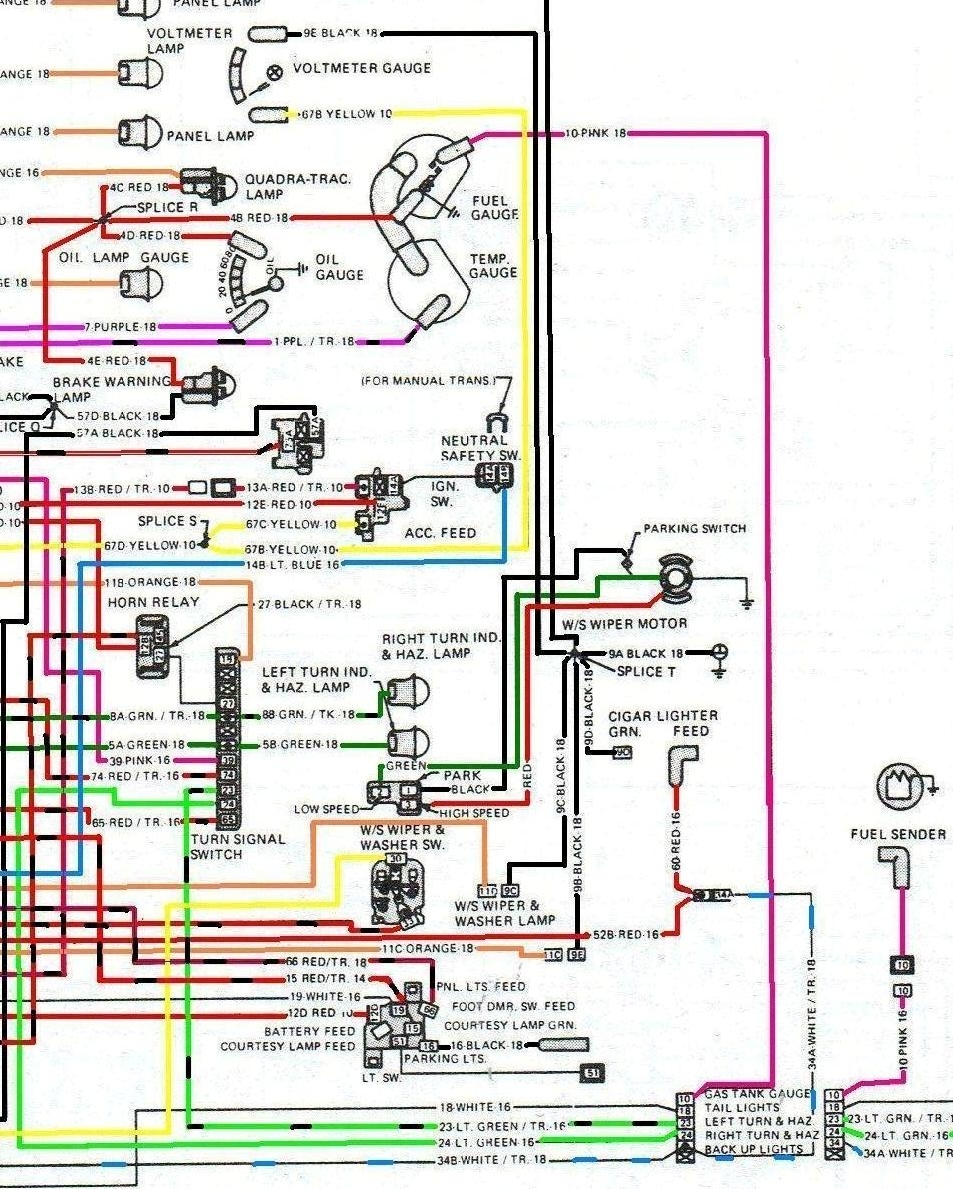
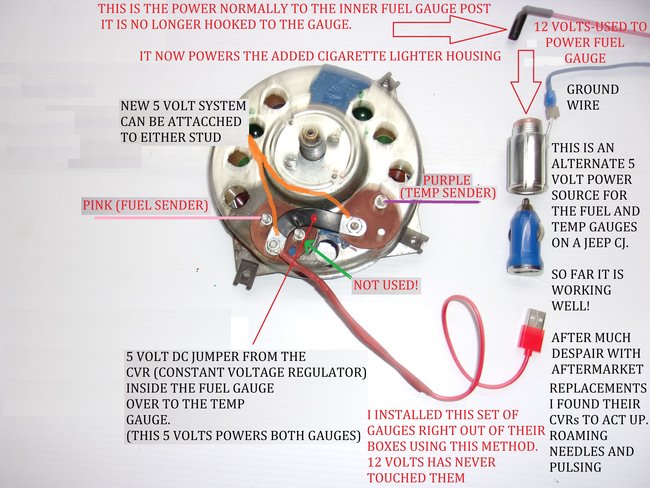
I did find that the CVR is in the fuel gauge on a CJ.

My Fuel gauge works just fine.

My temp gauge pegs out, if I ground the sender wire. It has worked a few times using different sending units, I bet I have bought 20 trying to get it to work consistantly

I have a Mechanical installed Mid-block, where a thermal vacuum switch once was. I have just sorta gotten used to it running Normal at about 9 O'clock (160 Degrees) using a 195 Degree stat. Just using it as a guide, since mid-block temp is about 35 degrees cooler than the top of the head. I really stay on top of mine, and I have not had a overheat yet. (knock on wood!)

I really want my stuff to work correctly too! These links will help me greatly, especially the testing of the sending unit, with real resistance values to go by.

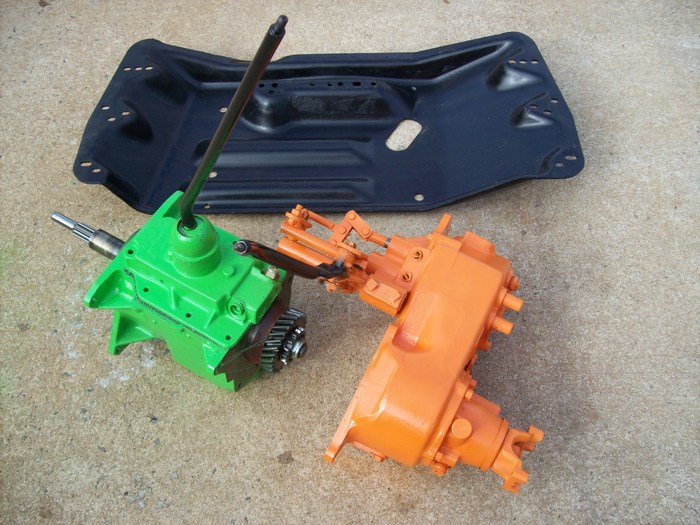
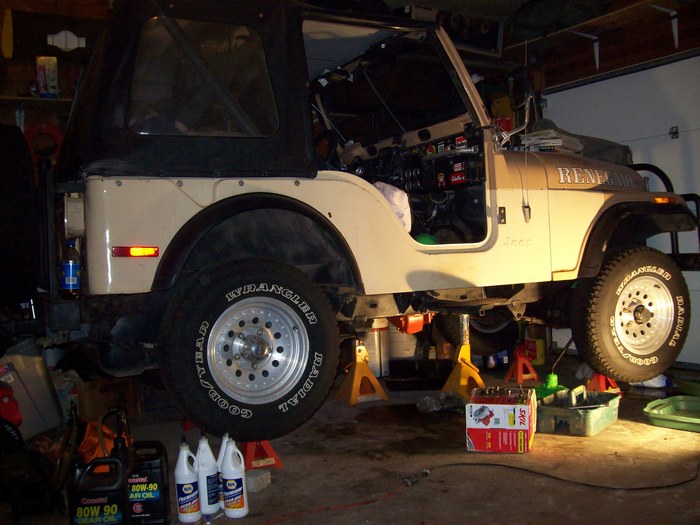
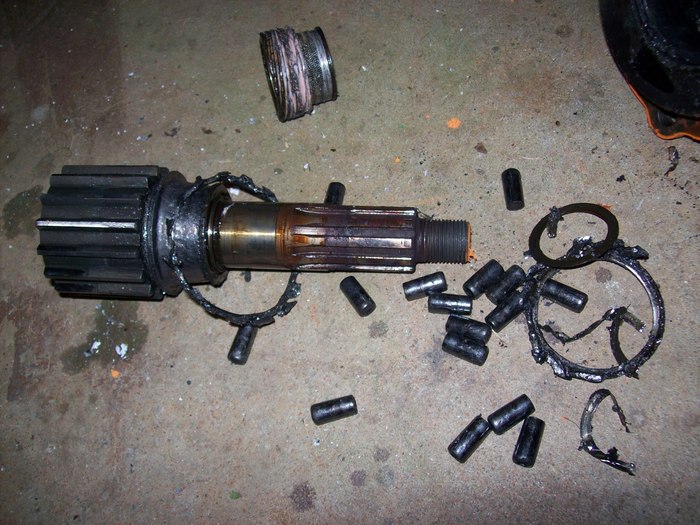
I have had a major Transmission (total rebuild, I put everything new in it!) then not many miles later my transfer case locked up and busted the case, near rollover at 55 MPH (still investigating cause of no oil getting into tail-housing).........Got another and sorta went thru it a little, it seemed to be in really good shape, .........I'm on the road again with less than 200 miles, VERY GUN-SHY!

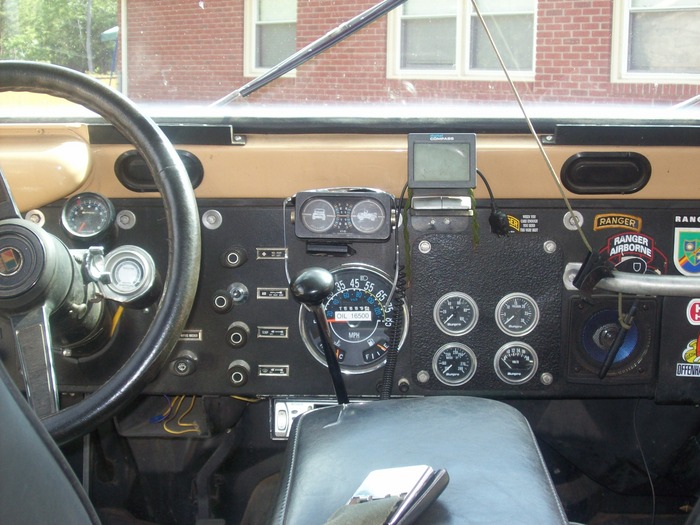
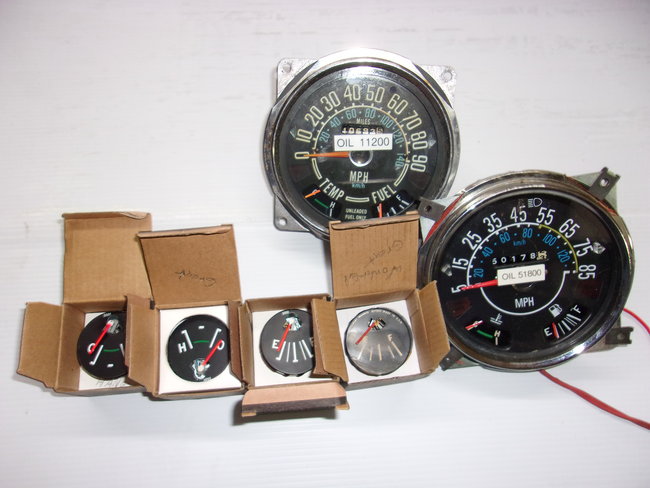
The cool thing about testing my Speedo-gauges is, I made a Boo-Boo installing my extra 2 gauges on the dash, I hole-sawed out above the Oil and Voltmeter......I found I was all into the Defrost Ducting. So I sawed out the dash, placed all of the gauges on a Removable Plate, which let me place the 2 extra gauges in the radio space, and then I moved the radio below the speedo, in a Homemade Slide housing to accommodate the Newer Style Slide in radios-----All I have to do now is FLOP my plate forward (4 stainle********) An I can EZ access the speedometers back and all bulbs, without removing it or the gauges...........(See Pic at the top of this post)

Thank you for the links you found kd7buj, I did have to copy and paste them on a new tab (now in favorites)----This site has been revamped recently and some things are not completed yet, "Linking" started failing about a week ago, but should be capable real soon as they fix the glitches.....It's been a difficult transition for me, I'm already Cyber-Stupid, and was just getting the hang of the "OLD SITE" when they changed, I cannot find a lot of posts that I have been dealing with much at all.

Any more info, I would appreciate it if you would throw it on here!

I've got the longest running 2 car feller post ever! (so they say), still running, I will attempt a link to it, and see if it works for me.

https://www.2carpros.com/questions/1980-jeep-cj7-timingtuning-problem-with-a

Keep info coming!

The Medic
Feb 4, 2011 at 4:26 AM
Avatar
KD7BUJ
  • MEMBER
  • 5 POSTS
This is where I got the links...seems to be a well behaved well informed group. Very knoledgable.
KD7BUJ
Feb 4, 2011 at 6:51 AM
Avatar
CJ MEDEVAC
  • CERTIFIED EXPERT
  • 11,004 POSTS
I just got done with this modification.

Maybe you are still interested?

Pics below

The Medic
Nov 6, 2018 at 8:45 PM
Avatar
MAAMENT
  • MEMBER
  • 16 POSTS
Hi Medic,

Just came across this post as I'm having similar issues on my 79 CJ 5. I'm planning on trying the 5v modifcation you list above. Just wondering how it's been working for you?
Jun 15, 2021 at 8:41 AM
Avatar
CJ MEDEVAC
  • CERTIFIED EXPERT
  • 11,004 POSTS
This works so well!

Wish I had figured this out years ago, at least 4 locals have done this.

As a note--if you have the cluster removed,do not power it up!

Without a good/permanent ground to it you will fry the internals.

My fuel and temperature gauges are working perfectly.

Any other issues, just ask, things are slower for me with the cyber vehicles taking over.

The Medic
Jun 15, 2021 at 11:02 AM
Avatar
MAAMENT
  • MEMBER
  • 16 POSTS
Excellent news! I've till rewired my CJ completely and the fuel gauge is the last thing that doesn't work. I have a set of new temp and fuel gauges coming. And a 12v to 5v step down from ebay (pictured below). I plan to put it together this weekend and post an update when done. Thanks for the tip about not powering until grounded. Also, I will follow the suggestion to never put 12v to the gauges.
Jun 15, 2021 at 2:18 PM
Avatar
CJ MEDEVAC
  • CERTIFIED EXPERT
  • 11,004 POSTS
I saw the regulator (or similar) after making mine.

Either way you go, I think it will be a success!

Return with good news after you get it all back together!

The Medic
Jun 15, 2021 at 9:56 PM
Avatar
MAAMENT
  • MEMBER
  • 16 POSTS
Hi there again. So, I've done the install. The brand new fuel gauge is working perfectly. But the brand new temperature gauge is running all the way left to beyond "cold" when it's powered on. I've got 5 volts to both (through the jumper). Do you have any idea why that would be and what the fix could be? Could it possibly be that one of the temp gauge posts is touching the metal of the speedo cluster and causing this result? Any ideas appreciated. I don't really want to remove the dash for a fourth time in 3 weeks. :) Thanks
Jun 19, 2021 at 7:16 PM
Avatar
MAAMENT
  • MEMBER
  • 16 POSTS
So I went ahead and switched the sender and the 5v wires on the back of the temperature gauge and lo and behold it worked. It is reading hotter than it should (based on the old gauge that was in there and working fine previously). Maybe that's just a function of the low quality of these replacement gauges. At least the 5v solution is working well!
Jun 19, 2021 at 8:08 PM
Avatar
CJ MEDEVAC
  • CERTIFIED EXPERT
  • 11,004 POSTS
Over the years, I have swapped temperature senders, same and different brands searching for one that had "higher" results.

Never a change!

I am running a 195 degree thermostat and it seems "cold" on the gauge.

I have come to accept that "195" on the "H--C" gauge is when the needle reaches the "Green Line" on the gauge----anything reading more is actually hotter than 195. (Mine consistently stays on the green line--which seems cooler than you think it should be--but it's not)

----The Medic
Jun 19, 2021 at 9:50 PM
Avatar
MAAMENT
  • MEMBER
  • 16 POSTS
Thanks. I'm going to go with it now. So happy the fuel gauge works well! And I can live with the temperature gauge fluctuations. :)
Jun 20, 2021 at 8:20 PM
Avatar
CJ MEDEVAC
  • CERTIFIED EXPERT
  • 11,004 POSTS
I hope it all works out for you. Return if we can help you with this or anything else!

------The Medic
Jun 23, 2021 at 6:30 PM
Avatar
WOODSHAVINGS70
  • MEMBER
  • 1 POST
MAAMENT,
Is the 12v to 5v converter still working? How did you wire it up I see 2 wires going in and coming out of converter in ebay sale ad you posted...On CJ MEDEVAC he is using usb plug but only one wire (which is pretty nifty I must say). Would like to keep mine concealed behind dash and i assuming that is the way you have yours. This is the 2nd set of gauges for my CJ7 and decided to do some more researching. Plan on grounding better too after reading several post in here...thanks CJ MEDEVAC you a some great info.
Jul 21, 2021 at 5:08 PM
Avatar
JACOBANDNICKOLAS
  • CERTIFIED EXPERT
  • 110,175 POSTS
Hi,

I noticed it has been a couple of days since we heard from you. Has any progress been made? We are interested in knowing.

Take care and let us know if we can help.

Joe
Jul 23, 2021 at 7:46 PM
Avatar
MAAMENT
  • MEMBER
  • 16 POSTS
So, this solution seems really not to work for me. I thought it was working okay before I took my Jeep in for a Rear Main seal last month. Now, I see the following: the fuel gauge stays always at just under 1/2 a tank. No matter how much gas is in it. The temp gauge starts at about 1/3 warm and then goes way up when the jeep heats up. My mechanic checked the actual temp and it's fine. Any ideas of what could be messed up here? Possibly need a better ground? Since both gauges are acting up, I'm curious for input. Thanks. Mark
Sep 13, 2021 at 10:50 AM
Avatar
CJ MEDEVAC
  • CERTIFIED EXPERT
  • 11,004 POSTS
We are assuming things are hooked where they should be.

Lets unclip the wire on number 6, it should be a pink wire. Is it pink?

(it is the sender, all the way from the tank)

Gear shift in neutral wheels chocked

Turn on the key to "on"

Did the fuel gauge do anything?

With an alligator clip jumper, clip onto the female of the wire you just removed. Ground the other end of jumper to a good ground

The fuel gauge should rise to the top. Does it?

Fix everything back

While we are at it do the same for number 10, the temp gauge sender

This wire should be purple. Is it?

Let's ground that wire too, the gauge should rise to, and maybe past the top.

Okay, put everything back and post your results.

Depending on your results, I may be able to focus on a direction to continue on with.

I'm not exhausted yet!

2nd diagram upper right side displays the wiring to the speedometer gauges. the rest of this diagram is for a 1979 some may not apply to your year. The dashes I place on wires denotes that it has a tracer stripe the stripe colors were not denoted in the legend

The Medic
Sep 13, 2021 at 2:31 PM
Avatar
MAAMENT
  • MEMBER
  • 16 POSTS
Took me a while to get back to this. But I did finally get the dash off again. I got some strange results. I verified that the gauges peg properly when power is applied. Then, i rewired them properly with the 5v transformer and tested and both seemed to work just fine. The only thing is that the battery of the car was nearly drained out since it had sat for over a month. Anyway, got the battery charged and the Jeep started up and the gauges worked momentarily then both went way down to the left. I'm guessing that the transformer I got is not putting out the right Voltage. I'm going to try a different one and see if that makes any difference. Will update here once I do that.
Nov 9, 2021 at 10:30 AM
Avatar
CJ MEDEVAC
  • CERTIFIED EXPERT
  • 11,004 POSTS
Here's my Blob---goes behind the Dash.

Not sure how you hooked yours up,

Any kind of oops!!! might be fatal to the gauges!

If you are unsure of something, before you just "Go for it", Maybe I

can explain better or a different way.

The Medic
Nov 9, 2021 at 4:53 PM
Avatar
CJ MEDEVAC
  • CERTIFIED EXPERT
  • 11,004 POSTS
I just read back through

Temp gauge runs backwards?

See how I introduce 5V to the fuel gauge---jumps to the voltmeter with the original jumper.

The Fuel gauge sender wire is pink

The temp gauge is Purple.

Over the years, the gauges may have been changed to aftermarket stuff

Here's 2 of mine, like the originals, the "zero" for both gauges is all the way to the left---the ones in the boxes too (one is upside down)

Some aftermarket stuff the "zero" is the the right---they travel backwards from the way the originals do (cold and Empty are on the right)(Hot and Full are on the left).

I have not ever installed those types----Without their instruction sheet to go by, they might have the posts reversed in their back side.

Experimenting by playing "Musical Wires" with any of your gauges (even for a split second) most likely will leave you with a sad face!

The Medic
Nov 9, 2021 at 5:15 PM