Jeep CJ7

1984 JEEP CHEROKEE
V8 • 4WD • MANUAL
Avatar
CFENGINEER
  • MEMBER
  • 20 POSTS
Jeep Cj with 304, have to replace ignition coil often. What is causing this problem?
Feb 12, 2011 at 6:31 PM
Advertisement
Avatar
CJ MEDEVAC
  • CERTIFIED EXPERT
  • 11,004 POSTS
Tell me this: Do you have 12 Volts at the POSITIVE SIDE of the COIL, while it's running?.....What do you have there?

I can help you with this and any other CJ problem you have, if you'll hang with me!

I have answered MOST of the CJ5 and 7 Questions for the last 2 years.

Keep replying here at this Post (any CJ Question you have....I do not know everything!...But I do try hard, and with personal pics) I will continue to reply (forever, I presently have the largest---on-going Car (CJ) Answer going at this site's history,....still going!)

I will link you there, when you reply here, Lot's of good CJ info in it!

Waitin' on you Buddy

The Medic
Feb 12, 2011 at 7:46 PM
Avatar
CFENGINEER
  • MEMBER
  • 20 POSTS
Well it won't start unless I go buy another coil, so I'll have to get that tomorrow, but I can tell you with the key on, it is getting 11volts. This is my fourth coil and I have replaced the ignition module once already back in December. Cranked up fine a couple of weeks ago and I let it run for 20 mins or so then shut it off. Came back about an hour later and it started right up again but died shortly there after and won't hit a lick. I put an old coil back in it today and it started up fine but ran for about a minute and then died again. I appreciate any advice you have!!
Feb 12, 2011 at 8:33 PM
Advertisement
Avatar
CJ MEDEVAC
  • CERTIFIED EXPERT
  • 11,004 POSTS
Ok this time, insure you get the coil that states: FOR USE WITH EXTERNAL RESISTOR!!!

We will get into that DEEPER, when I get back from the store!

Is your rig stock, or has it been Scavenged over, and "Rigged" over the years---This is important for me to know, so that we can get you back right.

Any other Non-Stock Modifications?

I'm here for the long haul!

Don't run it if you do not have to, till we get you straight!

Your Turn....Wifey hurrying me along now!

The Medic
Feb 12, 2011 at 11:39 PM
Avatar
CJ MEDEVAC
  • CERTIFIED EXPERT
  • 11,004 POSTS
2nd thought, do not get the coil till I find out about possible Mods!

The Medic
Feb 12, 2011 at 11:42 PM
Avatar
CFENGINEER
  • MEMBER
  • 20 POSTS
Yes this is a complete rebuild. Though the engine had been rebuilt prior to my ownership. This is a 84 cj7 and that year did not offer a v8 engine. So nothing is necessarily stock. I am not at home either but almost certain the coil had text on the side indicating use of external wire resistor...... but will check again. This is a toy, so I only drive it on the weekends weather permitting.
Feb 13, 2011 at 12:12 AM
Avatar
CJ MEDEVAC
  • CERTIFIED EXPERT
  • 11,004 POSTS
Thanks for the Update---Does change things............Just a little!

Get something straight--- JEEP NOT = TOY......JEEP = The Biggest Mechanical Break-Thru, Man Has Ever Devised!

Gonna Send 2 answers....to keep stuff separated....Don't jump in, till I send second!

1st Sounds as though you are getting full Battery Voltage to the Coil Continuously--WRONG!!!

Originally you had a RESISTANCE WIRE that Reduced Coil Voltage....for LONGEVITY!.......NOW YOU DO NOT.

There are 2 things we need to FIX

1) Reduce Voltage to the coil, when Jeep is running---No Problem!

2) Install a device to do this task.

3) Get FULL BATTERY VOLTAGE TO COIL, when Starting only......This may still be intact on yours--if not, we will run another wire to solve that issue too!

I need to know if your Jeep Operates Correctly (Starting and running) With your Key Switch?

OK, 1st pic----My '77 CJ 5 running (This may vary slightly)---Voltage to Coil....Continued....
Feb 13, 2011 at 3:16 AM
Avatar
CJ MEDEVAC
  • CERTIFIED EXPERT
  • 11,004 POSTS
OK--The resistance wire looks just like a wire, if it's just been "SNIPPED" and spliced onto....It still has a little resistance---WE DO NOT WANT THAT!

If this is the case--the POSITIVE wire to your coil, needs to be traced back toward the Key---NOT THE "I" Terminal of the SOLENOID (If it still goes to the solenoid--THAT IS GOOD!) <<
As you follow this wire, ORIGINALLY it will splice into Maybe 2 other wires------That is our starting Point (the other wires are not resistors), to run a.....Let's say 16 Gauge wire, back to the coil>>>>>>Except we are gonna install a "BALLAST RESISTOR"....somewhere in that line---IT REDUCES VOLTAGE!!!

If you are not already voltage of battery (due to Your Modifications)-----Test your "NEW"starting point against battery voltage, at the battery----KEY ON--JEEP OFF

Let me know how this works out---We are FLEXIBLE!--Can change!

We must select a good place for it---It get HOT!--MUST BREATH!---OUT OF THE WAY!...Its ceramic with a wire coil in it, and FRAGILE!

This too, can go bad!....If it does, you can simply connect or jumper across the wires (Giving full voltage once again, to LIMP back in!........Basically what you have NOW!)

The Wire Coil in this thing is fragile, since it gets HOT sorta in one spot.....Thats why they went to the Long Resistance wire, in order to spread out the "Warmth", throughout the entire wire.

JUST REMEMBER YOU HAVE THIS INSTALLED!.....KEEP IT IN PLAIN SIGHT!....SO YOU CAN BYPASS IT IF NEED BE!

This is my 1946 WILLYS JEEP (this pic), HIS NAME IS "WILLY"....Manly names for manly vehicles!......'77 is "Mr. Jeep".......No "Sissy" Stuff around here!

IN THIS PIC, I converted (Rather wired completely from nothing, As I threw the entire Original body away [shot], and installed a fiberglass one) It was 6 Volts---Now 12 Volts!...Still got points in the distributor.

We will discuss "I" Terminal next!

Your Turn

The Medic
Feb 13, 2011 at 3:47 AM
Avatar
CJ MEDEVAC
  • CERTIFIED EXPERT
  • 11,004 POSTS
All Righty Then

You ain't come back yet.....I got time to hunt and peck awhile...It's 2 in the morning here.

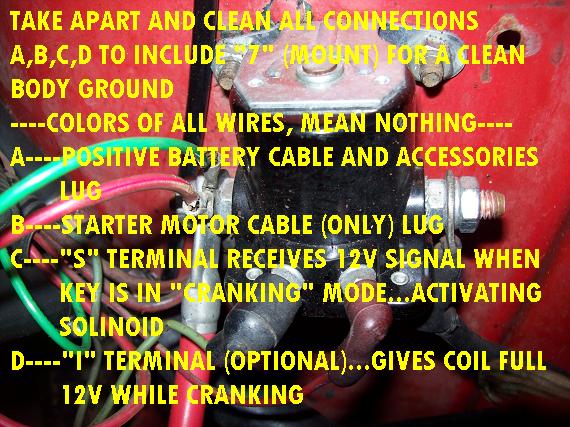
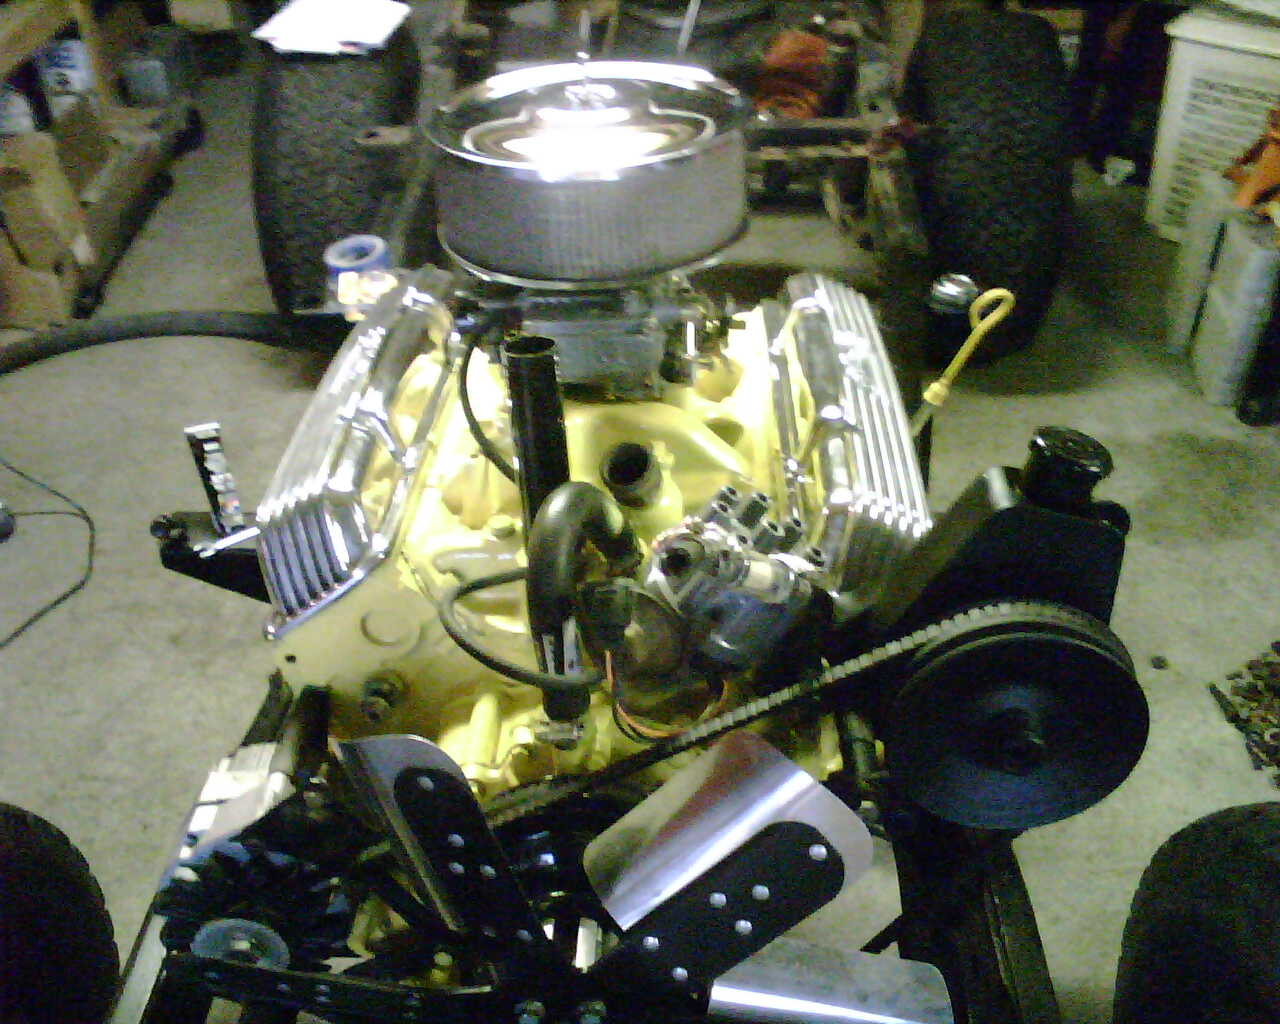
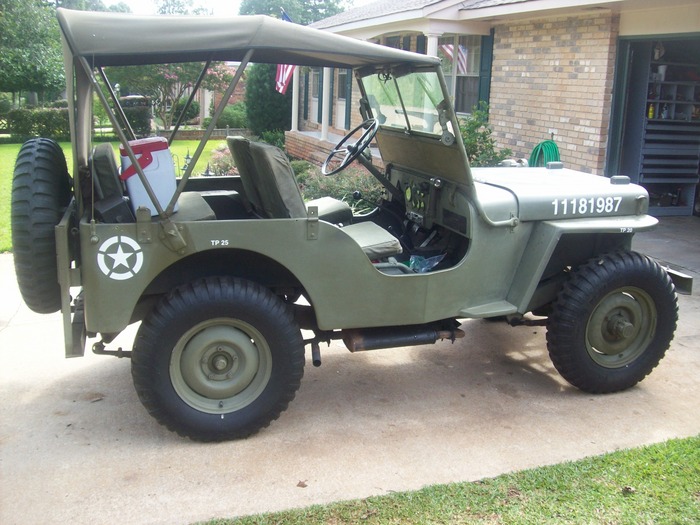
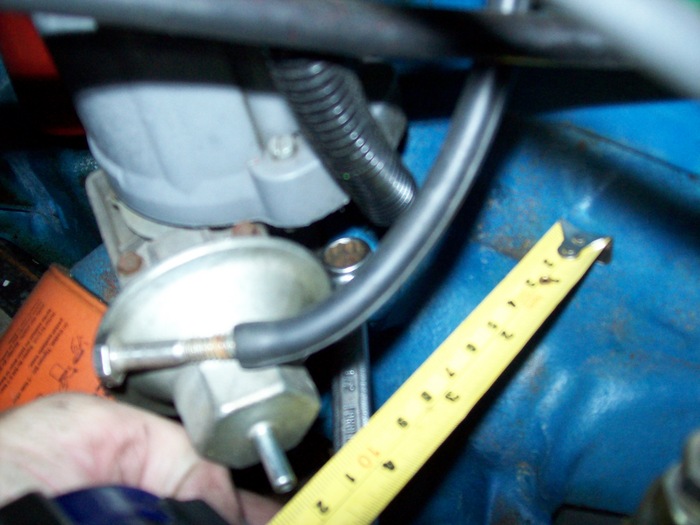
I'm gonna throw in explanations of your solenoid...This is gonna be a pick of Mr. Jeep's with YELLOW writing on it........Also one with Willy's solenoid with Numbers and letters on it.

Both are connected IDENTICAL, 'cept Willy's may have fewer accessory wires on the POSITIVE BATTERY CABLE SIDE of it.

I CAN SEND YOU A SIMPLIFIED WIRE DIAGRAM (THAT I CONSTRUCTED) OF WHAT YOU ARE DEALING WITH....IF YOU DESIRE.

YOU MAY SEE IT BETTER IN YOUR E-MAIL....SO IF YOU WANT TO, CLICK ON MY NAME AND SEND ME A MESSAGE CONTAINING IT (IN MESSAGES, IT WILL NOT BE BROADCAST WORLDWIDE!)

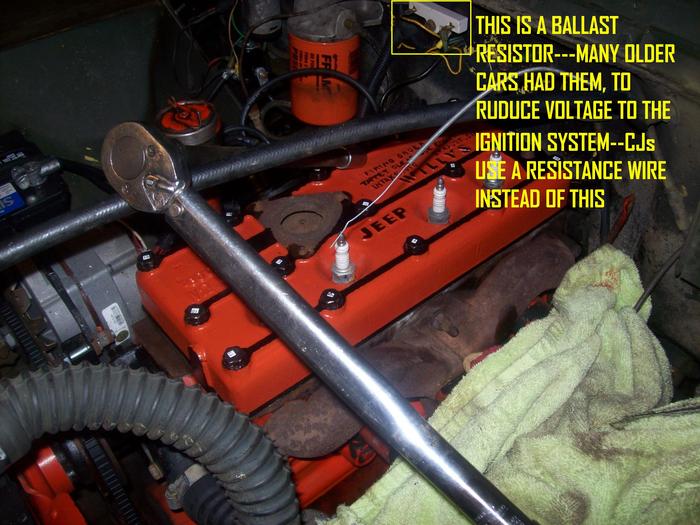
THE BIG REASON I DO NOT WANT YOU TO JUST CHANGE TO A DIFFERENT COIL IS, LATER YOU WILL FORGET (OR SOMEONE ELSE WILL) AND YOU WILL BE BACK IN THE SAME BOAT!.....'CORSE THAT COULD HAPPEN WITH THE BALLAST RESISTOR TOO! THAT'S WHY I SAID KEEP IT IN PLAIN SIGHT! SOME "COIL HOLDERS" HAVE A TAB WITH A HOLE STICKING OUT FROM THEM, YOU CAN BOLT IT ON,RIGHT BESIDE THE COIL, IF YOURS HAS ONE.

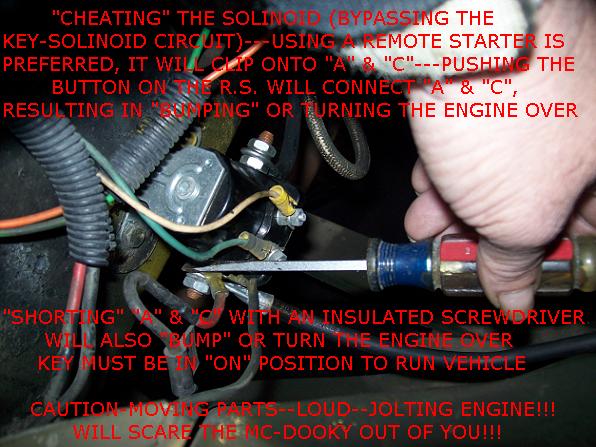
THE PICKS AND EXPLANATIONS WILL EXPLAIN WHAT THE STUFF IS ON THE SOLENOID...AND IF HOOKED UP EXACTLY AS MINE, YOU CAN "REMOTE START" OR "CHEAT THE START CIRCUIT" OR "BUMP THE ENGINE"....USING A SCREWDRIVER. ACTUAL STARTING REQUIRES THE KEY TO BE IN THE "ON POSITION".

BUMPING, THE KEY NEEDS TO BE OFF AND THE "COIL TO DISTRIBUTOR CAP HIGH TENSION WIRE" REMOVED, TO PREVENT ACCIDENTAL STARTING.....INSURE YOU ARE IN "NEUTRAL" OR "PARK" WITH THE TRANSMISSION.

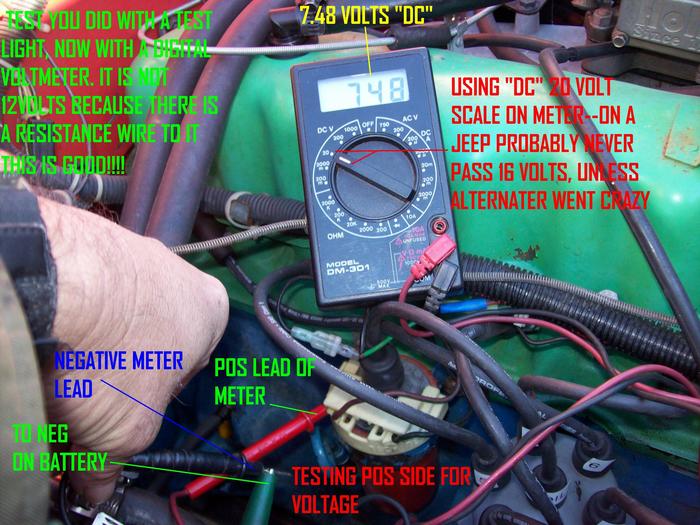
AT LEAST YOU WILL KNOW WHAT EVERYTHING DOES....and WHEN AND NOT WHEN, IT SHOULD HAVE VOLTAGE.


I went back to another answer to get this. I Copied, Pasted, and put the pics back in!........'Cause I hunt and peck slowly, and try to proofread several times before I submit.

IT WAS SORTA INTENDED FOR SOMEONE WITH A "NO START ISSUE"....SOME OF THIS AT THE BEGINNING, IS FOR OTHER VEHICLES (NEWER TYPE)......WHAT YOU NEED IS TOWARD THE END.


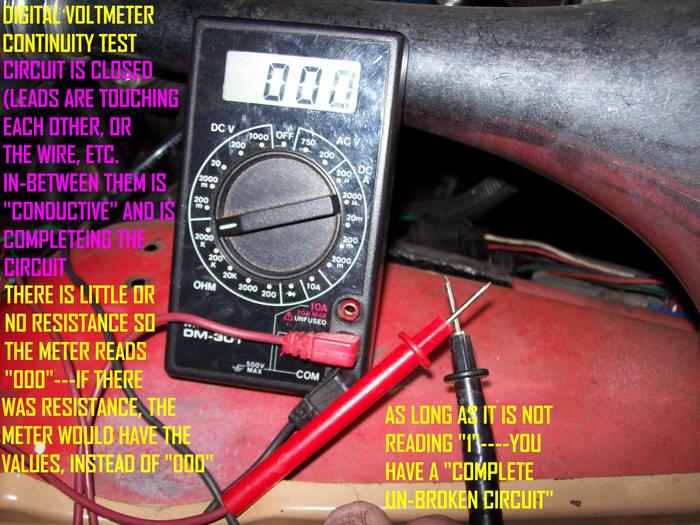
LOOK AT AND UNDERSTAND "I" TERMINAL---IT IS IMPORTANT AT START-UP!


OK the 1st part was sorta for other applications, but you will see what I intended for a CJ......Ask me questions, CJ fixin' is my Crusade at this site! I will assist you on a more personal, "HOLD YOUR HAND THRU IT ALL!" level, than some of the other fellers.......See other CJ5 & 7 questions in the forums, you will see the extent I go to assist CJs!......THERE IS GOOD INFO YOU MIGHT NEED IN THERE, TOO!

CHECK YOUR FUSES!!!---YOUR OWNERS MANUAL MAY SHOW YOU LOCATIONS THAT YOU KNEW NOTHING ABOUT!

REMOVE AND REPLACE "SUSPECT" FUSES SEVERAL TIMES--THIS MAY SCRAPE OFF CORROSION AND GIVE THEM BETTER CONTACT!

THIS WILL WORK FOR YOU, PROVIDED THAT YOUR BATTERY IS GOOD---OR YOU CAN BE JUMPED OFF!!!

REMEMBER "NEW STUFF" CAN BE BAD TOO!

YOUR STARTER MAY BE BAD!

YOUR SOLENOID MAY BE BAD!

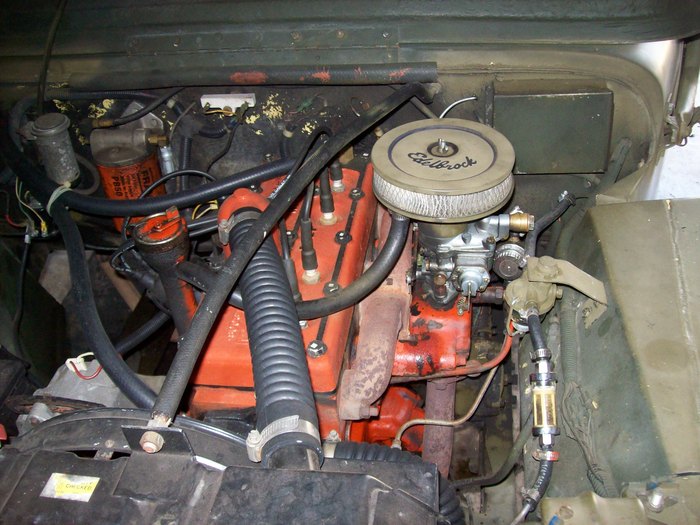
Try the stuff below (actions), Even if this isn't your system.

Yours may not look like this, but TAKE STUFF LOOSE-----CLEAN-----TIGHTEN WELL-----DO NOT JUST PASS IT OFF AS, "IT LOOKS GOOD".

Do not leave off where the Battery cables connect to the Battery clamps! (not the posts, the "squeeze connections" on the wire) Do them too!

While you are at it, Both ends of Pos cable, Both ends of NEG cable.

If you still have the problem. Follow Battery Positive cable to find the Solenoid.

Clean and tighten the starter connection!

My stuff may be OVERKILL, but at least you will know what everything is and does.

Like my newly made "NELSOMATIC" stuff? I am cyber stupid, and did that! Keeps me from hunt and pecking so much!


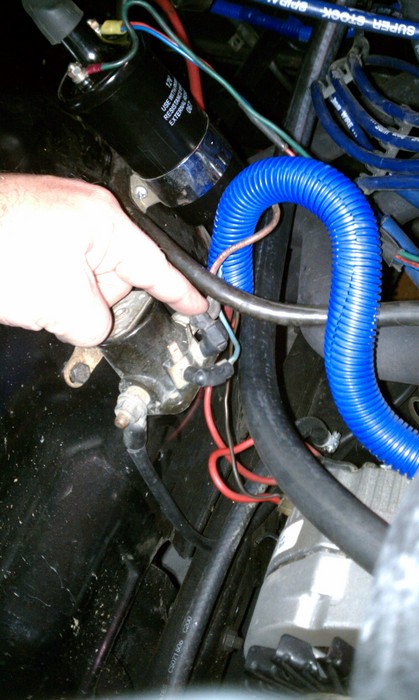
Follow POS BATT CABLE, It will end up at MR. SOLENOID, yours may look different, but function is the same

Insure you are hooked up correctly and tight.....

Make sure "S" WIRE is attached to the Solenoid


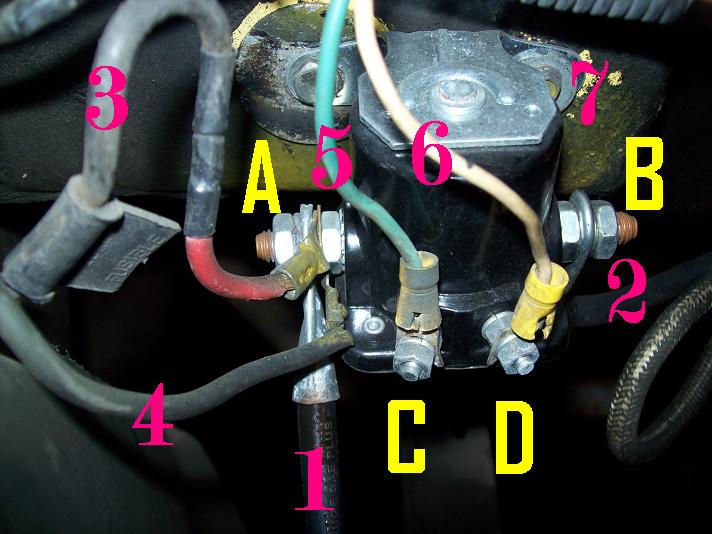
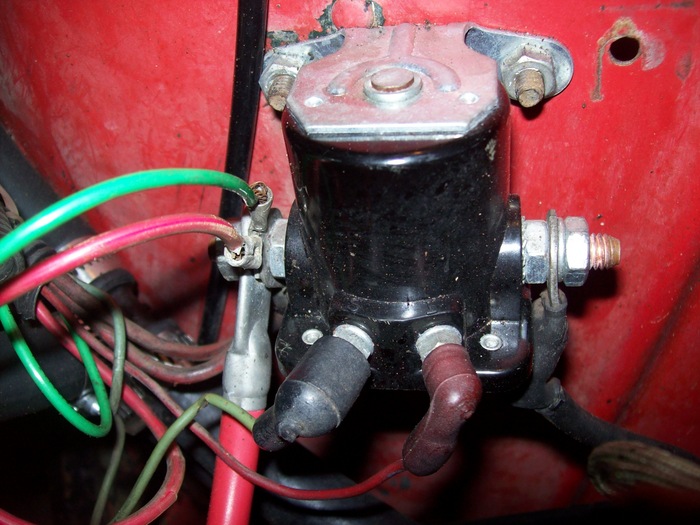
"OLD FORD TYPE" SOLENOID SYSTEM, YOUR ACCES., MAY VARY (This was really intended for Jeep CJ People!)

1) POSITIVE CABLE FROM BATTERY

2) OUT TO STARTER MOTOR

3) ON MY JEEP, THIS GOES TO THE ALTERNATOR

4) THIS FEEDS MY FUSEBOX (ALL OF MY ACCESSORIES)

5) "S" WIRE IS FROM KEY, 12V ONLY WHILE YOU ARE "CRANKING"

THIS WIRE ACTIVATES THE SOLENOID'S ELECTROMAGNET, WHICH IN TURN, CONNECTS---A and B INTERNALLY (ONLY THE 2 LARGE GAUGE CABLES CAN HANDLE THE AMPERAGE THE STARTER "PULLS").

WHEN THE SOLENOID IS ACTIVATED, IT THROWS 12V TO STARTER USING THE LARGE GAUGE CABLES (1) POS FROM BATT--THRU SOLENOID INTERNAL CONNECTION--(2) TO THE STARTER, WHILE KEY IS IN "CRANKING" MODE.

THIS IS THE TOTAL REASON FOR A SOLENOID, BECAUSE IT WOULD NOT BE PRACTICAL, TO RUN THE HEAVY CABLES TO AND FROM YOUR KEY SWITCH.

6)"I" WIRE, FEEDS COIL "FULL 12V", ONLY WHILE "CRANKING", AFTER YOU RELEASE THE KEY, THE COIL REVERTS BACK TO REDUCED VOLTAGE (resistor wire), SUPPLIED BY YOUR KEY IN THE "RUN" POSITION....."I" DIES, when you release the key.

7) "SOLENOID MOUNT" [BODY GROUND], UNIT MUST HAVE A GOOD GROUND (BATT. TO ENGINE, ENGINE TO FRAME, FRAME TO BODY [ALL MUST CONNECT, SOMEHOW......but BATTERY to ENGINE 1st!] )

(3 and 4, ON MY 1946 WILLYS JEEP) ARE FUSABLE LINKS, ALL ARE NOT MARKED, MY #3----- IS, #4----- IS NOT....ITS SORT OF A "WIRE" FUSE.

IF THEY ARE GOOD, TUGGING ON THEM WILL BE JUST LIKE A WIRE, WHEN THEY ARE "BURNED UP", THEY WILL STRETCH OUT LKE A RUBBER BAND.


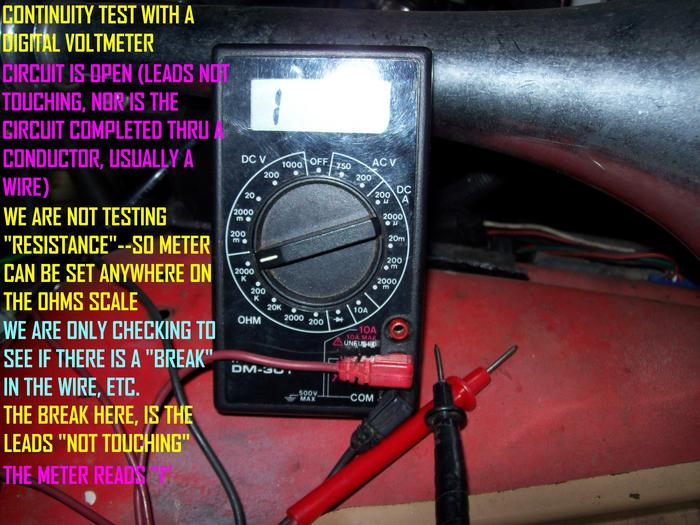
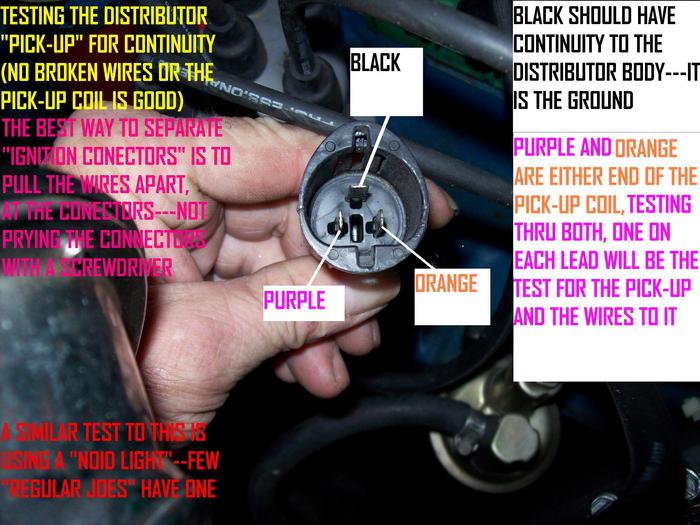
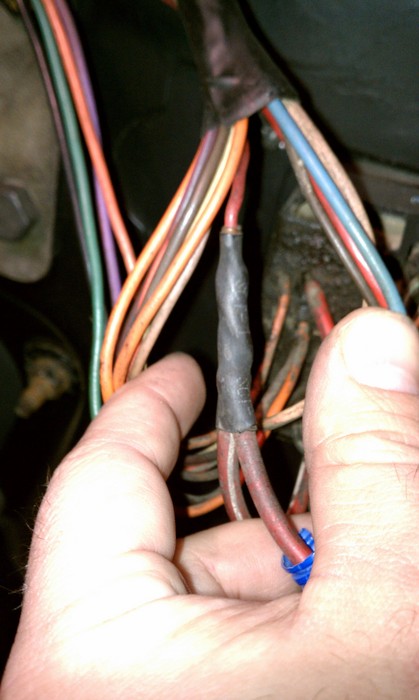
If your SOLENOID is good---Just not getting a "Signal" from the Key--We can test that too! (then you will know which direction to chase this problem....Toward the key! [ignition switch])

"S" is the wire that activates the Solenoid----we can sorta cheat it!

Regardless what you do to cheat it, You are suppling 12 VOLTS to the "S"('s) terminal on the solenoid....this is momentary as if you are cranking with the key

STAY CLEAR OF MOVING PARTS!!!!!!-----IN PARK--OR EMERGENCY BRAKE ON!!!!

I prefer a "Remote Starter Switch"

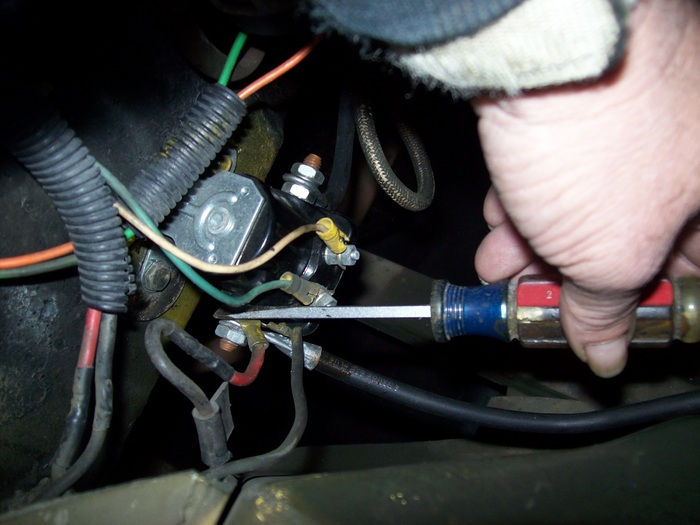
A Jumper wire momentarily touched or a Screwdriver touching POS BATTERY or POS BATTERY CABLE to the "S" terminal will by-pass the wire from the key

This will for sure let you know whether its a Solenoid problem or a Key ( ignition switch not delivering 12 Volts)

This will start your rig if your key is in the "ON" Position

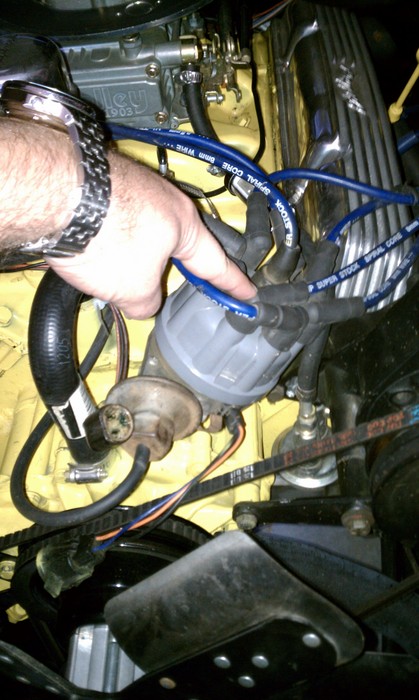
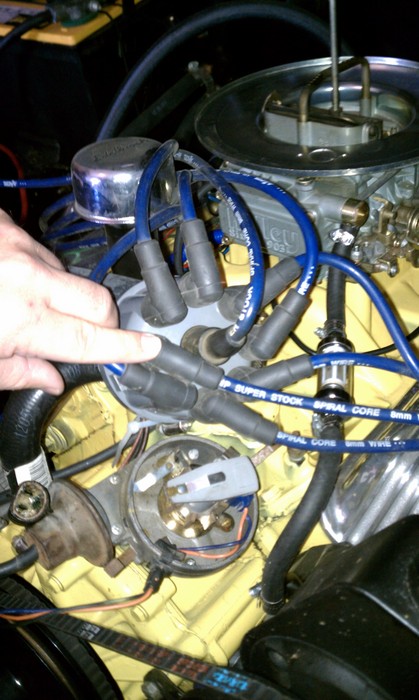
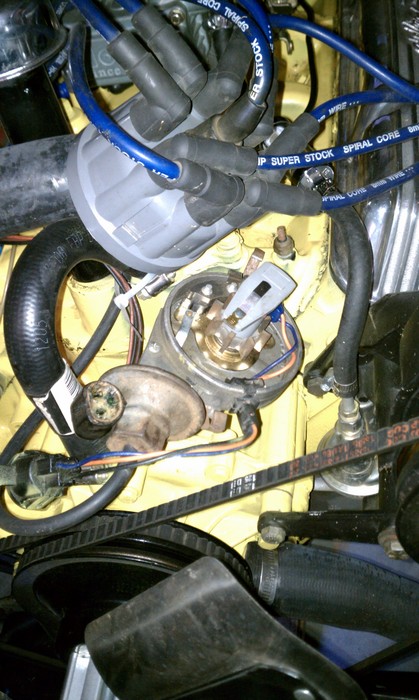
IF YOU HAVE A CJ 5 OR CJ 7---YOUR WIRES SHOULD BE HOOKED UP, EXACTLY AS MINE ARE, IN THE PICS!!!

JEEP CJ GUYS!--If you changed your coil and did not get the one that says, "FOR USE WITH EXTERNAL RESISTOR ONLY"...You NEED TO GET THAT ONE! You have just "DOUBLED" your resistance (w/ one with a internal resistor), and DO NOT HAVE ENOUGH VOLTS TO MAKE IT FIRE!!!! (your resistor is a "RESISTANCE WIRE" going to the coil already!)


Please Reply, Good or Bad

I WILL RE-EXPLAIN ANYTHING, DIFFERENTLY, IF YOU WANT ME TOO!

I'M HERE TO HELP, THIS IS MY HOBBY, I AM A MEMBER HERE, JUST LIKE YOU!

YOUR TURN.......Now it's 3 in the morning!

THE MEDIC
Feb 13, 2011 at 7:56 AM
Avatar
CFENGINEER
  • MEMBER
  • 20 POSTS
ok I'm back. I have checked on a few things that you asked about and tracked some of the wires from the coil. First things first, the coil I have does require and external resister. With that said I tracked the positive side, one red and one blue wire. the red leads back to a splice in which those wires run to the ignition module and the other through the fire wall. The blue leads back to a lead on the carburator. Now please be aware I know just enough about all of this to be dangerous!! I put all of this back together just as the previous owner had it, so I am not sure if he/they had it right. With that said the negative side of the coil has a green wire and it also leads back to the firewall. On the solenoid, the "I" terminal has nothing on it. Note, all wires seem to be intact and do not appear to have any shorts ir bare places in them.

From your reply, if i understand correctly i need to go purchase an external ballast resister?? Is this correct? Also, i am beginning to understand that a full 12volts at the coil is what is causing them to go bad, correct?
Feb 13, 2011 at 6:15 PM
Avatar
CFENGINEER
  • MEMBER
  • 20 POSTS
Ok.... I went and got a new coil and ballast resister. I put the new coil on and nothing..... In the past a new coil would solve the problem for a lttile bit. Anyway.... disconnected the coil again and checked volts on both coil leads again without them connected to the coil. The red/blue wires that feed the positive side read 12 volts. The green wire hooked to the negative side read 4.5 volts....??? Is that normal??

Things that I know:
The plugs were changed last spring
New coil
New dist. cap
new ignition module
Getting Gas(fresh gas)
Started fine three weeks ago

What I don't know.....
Why this dang thing won't start and what the next step is......

Look forward to more advice.....
Feb 13, 2011 at 8:24 PM
Avatar
CJ MEDEVAC
  • CERTIFIED EXPERT
  • 11,004 POSTS
SO FAR........YOU DONE GOOD!

OTHER ISSUE, WE CAN WORK OUT!

YES, ALL YOU HAVE INQUIRED ABOUT, IS PROBABLY YOUR COILS' SHORT LIVED LIVES....WE'RE GONNA FIX THAT!

RIGHT NOW, LETS FIND OUT IF YOU HAVE FIRE......OR NO FUEL, IN YOUR CYLINDERS!

THE EZist, THING TO DO IS HOOK EVERYTHING BACK UP, AS YOU WERE.....BEFORE YOU CAME TO THIS SITE...........THEN GIVE THE CARB A SLIGHT DOUSE OF FUEL...NOT MUCH, MAYBE 4 CAP FULLS OF GAS (THAT'S A 2 LITER SODA BOTTLE CAP!)

CRANK IT DOES IT SPIT AND SPUTTER AND TRY?......OR IS IT DRY, OVER AND OVER ROTATIONS?

IF IT'S THE LATTER, SNATCH A PLUG, GROUND IT AND SEE IF THERE IS SPARK THERE, WHILE CRANKING.


I KNOW IN YOUR MIND, WHEN YOU BEGAN THIS---"IT HAS TO BE THE COIL AGAIN"


MAYBE NOT THIS TIME....BUT WE STILL NEED TO GET EVERYTHING RIGHT ANYWAY!

GIVE ME YOUR RESULTS FOR THE FUEL/ SPARK TESTS, SO WE KNOW WHICH DIRECTION TO CONTINUE IN.

WE'LL DO THE BALLAST AND "I", JUST AS SOON AS WE CAN MAKE IT RUN.

WE DO NOT WANT TO MANY NEW VARIABLES, IN THE STEW POT YET!

I SHOULD BE PREPARED FOR ALMOST ANYTHING WE COULD RUN INTO (GOT MANY PRE-MADE PICS IN RESERVE!).....SHY OF A "WIRE ISSUE" THAT GETS OVERLOOKED ON YOUR END.....I WILL HANG WITH YOU AS LONG AS IT TAKES!......I KNOW YOU ARE SAD, WHEN YOUR PAL IS SICK!

I'M PRESENTLY CUSTOMIZING YOU A WIRE DIAGRAM....I DO NOT HAVE THAT COMPUTER ON-LINE, THROW YOU OUT SOMETHING PRE-MADE, AS THESE CERTIFIED MECHANIC GUYS SUBSCRIBE TO......I HAVE TO MAKE MY STUFF FROM SCRATCH!......YOU WILL LOVE IT!......IT WILL BE PERSONALIZED TO YOUR PROBLEM, AND A 1ST GRADER, SHOULD HAVE NO PROBLEM UNDERSTANDING IT.

YOU DO KNOW I AM A PLUMBER, WITH 30 YEARS OF EVERYDAY, HANDS ON, CJ EXPERIENCE....1987 WAS THE LAST TIME ANY OF MY CJs WENT TO A SHOP, EXCEPT FOR WHEEL ALIGNMENTS.

WHAT ARE YOUR TEST RESULTS?

THE MEDIC

Feb 13, 2011 at 10:43 PM
Avatar
CFENGINEER
  • MEMBER
  • 20 POSTS
Well i tried the fuel test this afternoon and nothing happen. I just tried the spark test and no spark at all. So whats next?
Feb 13, 2011 at 11:59 PM
Avatar
CJ MEDEVAC
  • CERTIFIED EXPERT
  • 11,004 POSTS
I'M HERE--JUST BUSY, MAKING THIS EZ FOR YOU.

THE MEDIC
Feb 14, 2011 at 1:19 AM
Avatar
CJ MEDEVAC
  • CERTIFIED EXPERT
  • 11,004 POSTS
ALL RIGHTY THEN---LONG TIME MAKE PICS AND MODIFY--SHORT TIME FOR YOU TO TEST.

WHILE WE ARE AT THIS, LOOK AROUND AND MAKE SURE, YOU AIN'T JUST LEFT SOMETHING LOOSE OR DISCONNECTED....

MAKE SURE YOUR ROTOR BUTTON ROTATES WHILE CRANKING HIM OVER

MAKE SURE YOUR EVIL BUDDY DIDN'T LAY YOUR ROTOR BUTTON ON THE SHELF!

JUST LOOK AROUND!

THIS NEXT TEST CAN BE DONE BY YOUR WIFE OR A KINDERGARTEN STUDENT----YES!....WHO'S THE MAN!

THIS TEST HAS ALWAYS WORKED FOR ME, OTHERS INSIST ON A "NOID" (I DON'T HAVE ONE EITHER!)

SORTA LET ME KNOW HOW I'M COMING ACROSS

I ALREADY KNOW THE SLOW, HILLBILLY, REDNECK PART

WE WILL CONTINUE....TOWARD SOMETHING...WHEN YOU COME BACK

DON'T JUMP AHEAD, IF YOU FIND SOMETHING....BECAUSE, YES I WILL SHOW YOU THE EZ WAY TO DO IT........AND YOU WON'T GET ALL MESSED UP, LIKE THE OTHER GUY I AM STILL ASSISTING......HE JUST SNATCHED OUT HIS DISTRIBUTOR, GOT ANOTHER............AND IT TOOK FOREVER TO GET HIS BACK IN RIGHT!

YOU DID SAY YOU HAD VOLTAGE TO THE POSITIVE SIDE OF THE COIL?

I'M STILL WORKING ON YOUR PARTIAL WIRING DIAGRAM

YOUR TURN

THE MEDIC
Feb 14, 2011 at 2:53 AM
Avatar
CFENGINEER
  • MEMBER
  • 20 POSTS
Ok, I understand what you want me to do. I will go home for lunch today and perform this test and will get back with you. Thanks....
Feb 14, 2011 at 1:50 PM
Avatar
CJ MEDEVAC
  • CERTIFIED EXPERT
  • 11,004 POSTS
OK-READY TO GO!

LET ME KNOW WHATS BEEN DONE THUS FAR

I CAN HELP GET DISTRIBUTOR BACK IN---IF YOU DID, SNATCH IT OUT!

THIS DIAGRAM MAY LOOK BETTER IN YOUR E-MAIL---GO TO MY MESSAGES, AND LEAVE YOUR THERE (IF YOU WANT THIS AND ANYTHING ELSE, I WILL GLADLY SEND MY "MODIFICATION PICS" TOO [CLICK MY USER NAME AND READ])! IF YOU WANT THIS AND ALSO THE REST OF IT (UNALTERED, AS THIS IS ALTERED NOW)

REMEMBER, THIS IS A 1979 DIAGRAM, MUCH OF IT APPLIES TO OTHER YEARS....THIS IS THE ONLY YEAR (THUS FAR) THAT I HAVE COLORED THE WIRING. YOU CAN ACTUALLY QUICKLY FOLLOW THEM, AND I USED AS MUCH OF THE CORRECT COLORS, THAT I COULD, TO CORRESPOND WITH THE JEEP.

IF WE STILL ARE HAVING AN ISSUE NOT CRANKING....LETS CHECK THAT MODULE AGAIN....THIS TIME YOU MIGHT EVEN TAKE IT TO A DIFFERENT PLACE (AUTOZONE AND ADVANCE AUTO, BOTH TEST 'EM FOR FREE!)

I KNOW THIS IS AN INCONVENIENCE, BUT LOOKA HERE, I'M DOIN THIS FOR FREE TOO...DIS IS MY HOBBY!

THIS TIME, LETS WATCH AND SEE IF THEY HOOK UP RIGHT....THEN TEST 5-8 TIMES (THIS WILL WARM IT UP) SHOULD IT FAIL THE LAST FEW

WHAT? YES, REPLACE IT!

AS YOU PUT YOU HAND ON THEIR DOOR HANDLE TO LEAVE, WITH YOUR NEW ONE............

TURN YOUR BUTT RIGHT AROUND, GO BACK TO THE COUNTER, AND HAVE THEM TEST "THEIR" NEW ONE 5-8 TIMES.

THERE'S NOTHING LIKE TEARING YOUR ENTIRE JEEP DOWN (EVEN THE WIRING) FOR 2 DAYS.........BECAUSE IT, >>>>WILL NOT START!!!<<<<, THEN YOU TAKE THE BRAND NEW>>>UNTESTED MODULE,>>>BACK TO THE STORE, ONLY TO FIND OUT, >>>IT TOO!!!<<
SEE HOW MY PERSONAL---"BAD CHAPTERS"---MAY BENEFIT YOU, PROBABLY BETTER THAN THE OTHER MECHANIC FELLERS PASTIN' STUFF IN (THEY ARE GOOD IN WHAT THEY DO) BUT MANY HAVE NO ACTUAL WITH NO HANDS ON JEEP CJ EXPERIENCE, LIKE MY 30 YEARS OF HARD KNOCKS DRIVING AND REPAIRING, OUT OF PURE NECESSITY!!!------I TRY TO CRAWL UNDER THE HOOD WITH YOU!......SAY? ....YOU WANT ME TO HAND YOU THAT VOLTMETER, OVER THERE?!


ARE YOU ABLE TO FOLLOW MY COUNTRY-FIED TECHNICAL TURBULENCE?...IF NOT LET ME KNOW

WAITIN' ON YOU

THE MEDIC
Feb 14, 2011 at 3:05 PM
Avatar
CFENGINEER
  • MEMBER
  • 20 POSTS
Ok, Rotor button intact and everything in it correct place. The ground lead had continuity, but what you call the purple and orange do not have continuity. Thats what I got so far....... my email is [email protected] if you can send the photos there as well.
Feb 14, 2011 at 6:36 PM
Avatar
CJ MEDEVAC
  • CERTIFIED EXPERT
  • 11,004 POSTS
ROGER ON THAT,

YOUR CONNECTOR WAS JUST LIKE MINE???...ONLY THE COLORED WIRES (FROM THE DISTRIBUTOR END) LEADING INTO EACH "PRONG" WERE A DIFFERENT COLOR?......TRYING TO VERIFY YOU HAVE A STOCK DISTRIBUTOR OR NOT!

I CANNOT MAKE A LINK--BUT YOU CAN COPY AND PASTE THIS ONTO A NEW TAB...LOOK IT OVER WELL,, LET ME KNOW IF THIS IS YOU!...HAD TO USE 1981 FOR THE JEEP YEAR TO GET A 304...
DID YOUR PAL TRY IT, AND GET THE SAME RESULTS? (2ND OPINION)

THE DISTRIBUTOR HAS "8" MAGNETS, ON 8 ARMS, ON A "STAR", BELOW YOUR ROTOR BUTTON.....AS EACH MAGNET PASSES THE PICK-UP COIL...IT SENDS OUT A PULSE--TO TELL MR. IGNITION MODULE WHEN TO "MAKE" MR.COIL SHOOT A SPARK.............BROKE PICK-UP = NO SPARK.

LOOKS LIKE WE NEED A NEW DISTRIBUTOR THEN!

IT'S SORTA WAY TOO MUCH TROUBLE TO REBUILD YOURS.....BESIDES YOU GET A LIFETIME WARRANTY WITH THE OTHER!

HERE'S THE PLAN:

LEAVE YOURS ON THERE---AND GO TO ADVANCE AUTO OR AUTO ZONE, GET A RE-MANUFACTURED ONE, FOR AROUND $50 + A CORE CHARGE.

THE FELLER IN THE OTHER POST, TURNED HIS IN AT PURCHASE, THE ONE THAT WAS SOLD TO HIM WOULD NOT WORK, NOR THE NEXT COUPLE THEY GAVE HIM.............AND THE WORST THING WAS, HIS ORIGINAL WAS GONE!....SO THEY COULD NOT LOOK AT "CASTING NUMBERS" TO LOCATE THE CORRECT ONE!

SO, GET YOUR CORE $$$ BACK AFTER YOU ARE RUNNING!

VERIFY MY INTERROGATION QUESTIONS AND LET ME KNOW WHEN YOU ARE READY TO REMOVE THE OLD AND INSTALL THE RE-MANUFACTURED ONE

BEFORE YOU EVEN TOUCH THE OLD ONE (MUST DO SOME STUFF BEFORE IT'S ROTATED OR TAKEN OUT), I WILL SEND YOU "NELSOMATIC" PERSONAL INSTRUCTIONS, SO THAT WE WILL NOT HAVE TO GO THRU THE HASSLE OF FINDING TOP DEAD CENTER....AND THIS WILL GO IN SMOOTHLY AND EZily!

NEXT QUESTION--IS YOUR >>>CAP<<< MARKED WITH A "1" UNDER ONE OF PLUG WIRE POSTS?

DOES IT TRACE ON OUT TO THE NUMBER 1 SPARK PLUG (CYLINDER)? IT COULD BE THAT IT DOESN'T.....IT REALLY DOES NOT MATTER WHERE "1" IS, AS LONG AS FIRING ORDER STARTS ON THAT POST!

IF THATS THE CASE, WE WILL GET IT THERE, THAT WOULD MAKE IT TEXTBOOK PERFECT!........BUT I GOTTA KNOW, JUST SO WE CAN ADD THAT INTO THE "NELSOMATIC" PROCEDURE.

I KNOW YOU ARE FOLLOWING MY DIRECTIONS (I HOPE) BUT WERE YOU ALREADY CAPABLE OF DOING THIS STUFF WITHOUT ME?.....I GUESS WHAT I MEAN IS, ARE YOU AUTO MECHANICAL ALREADY, IN THIS DEEP?......DID YOU KNOW ANY OF THESE PROCEDURES ALREADY?

AM I EZ TO FOLLOW OR TOO "HICK-A-FIED"?

YOUR TURN

THE MEDIC
Feb 14, 2011 at 10:46 PM
Avatar
CFENGINEER
  • MEMBER
  • 20 POSTS
Yes, the distributor looks exactly like the one in the Autozone link. I will pick one up today and get everything ready for the swap.

I know enough of this to be really dangerous, so you have been a great help. I know all the major parts and functions and mainly learned everything I know from just tearing into this project. I started four years ago after I bought this jeep and it started leaking gas onto the intake....NOT A GOOD THING! So I pulled it in my basement and before I knew it I had it stripped all the way down to the frame. Its just been a slow learning process since then and an expensive one. I have attached a few photos...... Anyway thanks for all the help so far, I hope to get it running and running more consistantly!!!
Feb 15, 2011 at 2:02 PM
Avatar
CFENGINEER
  • MEMBER
  • 20 POSTS
By the way, what is your opinion on Unified Ignition Distributors? Would it make sence to convert at this point in the game?
Feb 15, 2011 at 2:30 PM
Avatar
CJ MEDEVAC
  • CERTIFIED EXPERT
  • 11,004 POSTS
Very Impressive!

You too, are hooked, no doubt!

I never made it to the "Tear The Body Off Of My Own, Point" until 1991 When "Willy" became part of the family. Then it was systematically, go thru nearly everything (new bearings and seals, and much, much more!)

It was a 2 year project, I gave $100 for him initially and.....now?...Well, we will not even discuss that!

$$$ was the biggest issue, even though labor was Free, I started out in life with Nothing, and I still have most of it left!

I Completely wired him from scratch and to meet my Modified Special Wants and needs (he is far from original, but still has the "Right Look"), I installed a new body (glass, had to run a separate ground to everything. I drove him several years...a quart of oil every 7 miles! The town was glad when I broke down and rebuilt an engine and new clutch assembly. I created SEVERE SMOKE SCREENS everywhere we ventured!

I have no pics from back then, but I do have a VHS Video that I took here and there as I progressed in the beginning. (Now if I can figure out a way to make it digital and snag some pics from it). I am mostly Cyber-Stupid, I ever touched one till I broke my foot and had complications for a year and a half....Now here I am, finally over it--I did it at work, now they say, they do not need me......Their Loss!...Someone soon, will have the Best Plumbing Service Technician, This side of the Mississippi!

Did you get my Mostly Modification Albums? (Mega Pics and Explanations)

If you have explored the CJ 5 & 7 Forums you have seen other pics of mine. Heres a few.

1) My daughter in "Willy" (1946 Willys CJ2A L-134 Engine), age 3 (my apprentice, her birth-date is my hood number), It's now roadworthy, and lays a Smokescreen...needs engine

2) Years later, new paint, 1943 "MB" Front grill and soft top

3) Rear

4) Recent--I was sold this 1953 Sears "Allstate" aluminum hard top in '93, unassembled still in the box!....Yep, the only top I had for a while (Just went and got it out of the woods at my Parents house, Now my winter top!), I gave $50 for it!---Pup likes being warm too

5) Now at Christmas--Same Daughter in 1st pic, visits from Arkansas (Away from her Evil other parent) This is my Apprentice and my Grandson.

6) When she visited for the Summer(s), she began learning at age 8, was as proficient as I at age 10. This is the way we sometimes save an Electric Cranking for future use (and impress people too!) This is about age 10.....She thinks she is "Bad" now that she can drive, but cannot be licensed for 5 more years!

7) Cruisin' Mode

8) Mr. Rebuilt Engine L-4 134 CID---No more smokin'--lots more power--it too modified to "MY SPECS", under the hood to make things User-Friendlier

YOU AND I KNOW THE REAL MEANING OF "JEEP DEDICATION", OTHERS JUST THINK THEY DO, AND HAVE NO REAL CONTEMPLATION OF WHAT HOURS AND HOURS OF "FOCUS" REALLY IS........THEY JUST WANT YOU TO TAKE 'EM FOR A, "LETS TRASH OUT AND DESTROY 'YOUR JEEP', MUDDING EXPERIENCE."----KINDA LIKE THE "CSI GUY" AND HIS BASEMENT SAILBOAT!

YOUR TURN

THE MEDIC
Feb 15, 2011 at 3:39 PM
Avatar
CJ MEDEVAC
  • CERTIFIED EXPERT
  • 11,004 POSTS
I WAS A SLOW PECKIN' TO YO WHEN YOU SENT LAST RESPONSE!

I KNOW LITTLE ABOUT THE "HIGH TECH" STUFF--STOCK WORKS JUST FINE FOR ME, AND EZ TO GET PARTS FOR, WHEN NEEDED IN A HURRY.......I DO NOT RACE OR NEED SPLIT SECOND IMPROVEMENTS!

HERE TO GET YOU WHAT YOU WANT!

IF IT WILL FIT IN THERE....WE'LL DO IT!

JUST TELL ME WHATS SPECIAL ABOUT IT????????

OR "ATTEMPT A LINK" SO I CAN SEE WHAT IT REQUIRES (COIL ETC.)

UP TO YOU!

THE MEDIC
Feb 15, 2011 at 3:50 PM
Avatar
CFENGINEER
  • MEMBER
  • 20 POSTS
Willy looks good!!

Yes I agree, though it looks like it can tear up an offroad trail, I garauntee I will not be Mudding in thsi rig. Too much investment!!! Anyway,as far as the unified distributor, I would rather just keep it simple and easy to repair. The one-piece system is about $300.00 and only would go that direction if was worth it and more reliable. I'd hate to have to replace that peice several times!!! I'll holla back when I get the distributor this evening. Thanks..........
Feb 15, 2011 at 4:04 PM
Avatar
CFENGINEER
  • MEMBER
  • 20 POSTS
Ok, had to order the distributor and will be here in the morning. Is there anything i can do to prep before i install the new one?
Feb 15, 2011 at 10:31 PM
Avatar
CJ MEDEVAC
  • CERTIFIED EXPERT
  • 11,004 POSTS
Yes,.....Answer previous questions about location of #1 plug wire in relation to Distributor cap????

Did you get my MANY ALBUMS?... All 3 wire diagrams?.....If not, I can resend

Lifetime warranty on newer one?


If so, that would mean the coil is the only thing you will ever have to buy....Ever! Compared to the Other one with a short lived warranty.

The Medic
Feb 15, 2011 at 10:52 PM
Avatar
CFENGINEER
  • MEMBER
  • 20 POSTS
OK, I didn't have a chance to check for the Embossed "1" more thoroughly. It did not jump out at me, but i will look again. The setup does match the "1" position on the cap and the plug "1" in relation to the vacuum port. I will send a picture at lunch to verify what I am thinking or saying to be true. I will take pics of the new distributor and the existing setup and send them to you also so you can see what i am seeing. Thanks....
Feb 16, 2011 at 2:18 PM
Avatar
CFENGINEER
  • MEMBER
  • 20 POSTS
OK, i have attached the photos of the distributor. As far as i can tell "1" is in the correct location on both the cap and the cylinder. I am picking up the new distributor after work today.
Feb 16, 2011 at 7:38 PM
Avatar
CJ MEDEVAC
  • CERTIFIED EXPERT
  • 11,004 POSTS
Allrighty,

The 2 pics you sent via my Email, tells me we can do the change-out without going thru the hassle of finding TDC (Top Dead Center) I f you had pulled the distributor without references to where thing were positioned......We would be pulling a plug, finding the compression stroke, moving the crank by hand, lining up the timing marks (without overshooting the compression stroke), and picking the distributor up and down, until the rotor button pointed toward # 1 wire on the cap-----Then we would probably had to move the distributor until it would start up---then time it.


SO.......THIS IS WHAT WE DO INSTEAD---IT SHOULD BE EZ, IF YOU READ IT A FEW TIMES THEN START......LET ME KNOW IF YOU HAVE A PROBLEM OR NEED AN EXPLANATION.........I DO GET CARRIED AWAY AND EXCITED, WHEN I FIX A JEEP!!!

BY THE WAY, DO YA'LL EAT OFF OF THAT INTAKE????!!

HERE IT IS:


Rotor Button position will not matter, when we do this----------We will however, Mark the place that the TIP is pointing---------Not on the Distributor Body, Cause its a coming out!

We will find a point as PERPENDICULAR to the button---Then measure to the tip from a UNMOVABLE OBJECT on the engine. As Insurance, Look straight down on it and put a Mark on your Block (INTAKE), below it.

If nothing is lining up to measure from----You can bump the engine around till something does!

After Bumping into place-----HIDE YOUR KEYS--WE CANNOT MOVE THE CRANK AGAIN, UNTIL WE PUT THE NEW ONE IN!!!!!!!!!

We will also measure the Vacuum connection from another UNMOVABLE OBJECT (This will keep the timing close to what it was originally, so it will start and run, you will have to time it anyway, because of slight differences between the two distributors)

DO NOT LOSE YOUR MEASUREMENTS---DO NOT MOVE THE ENGINE-----Our GOAL IS TO PLACE THE NEW ONE BACK IN, IN THE SAME POSITIONS.

You will have to completely remove the hold down clamp (Since we have the measurement of the vacuum "tit"---The body rotating as you lift it out will not matter now)

As you lift it out------Do it slow--slow moottttiiiooon!---The button will rotate as you lift up------The second it stops rotating---it just came out of the CAM GEAR--MENTALLY NOTE ABOUT WHERE THAT OCCURRED!

When you start the new one back in, try to start at the point the old one came out-----It will rotate the other direction going in------If all was Perfect--The button will be REALLY REALLY close to the measurement

If not, Pick it back up and rotate the button 1 Tooth, and drop it back in, YOU WILL FINALLY GET THE HANG OF THIS!!!!!--------Is it right yet????

NOW AT THE SAME TIME, IT MUST--MUST--MUST, SEAT ALL THE WAY DOWN.....NO FORCING IT---WHATS WRONG IS---THE OIL PUMP DRIVE IS NOT LINED UP---YOU MUST MOVE IT SLIGHTLY---VERY SLIGHTLY!!, SO THAT WHEN THE DISTRIBUTOR DROPS IN------IT TOO, WILL DROP INTO PLACE!!!!

IT'S A LITTLE FRUSTRATING, BUT ALL WILL FINALLY GO IN, AND MEASURE RIGHT!!!

AT LEAST WE WILL NOT HAVE TO GO THRU THE "FIND TDC PROCESS"!!!!

VERY LAST, INSTALL YOUR CLAMP LOOSE ENOUGH SO YOU CAN MEASURE THE VACUUM "TIT" BACK INTO IT'S PREVIOUS TIMED POSITION, AS THE OLD ONE WAS.

DOUBLE CHECK THE POSITIONS AND INSURE IT IS SEATED, JUST LIKE IT IS NOW!

PUT THE CAP ON

CONNECT THE WIRE, AND HE SHOULD BE READY CRANK

XXXXXXXXXXXXXXXXXXXXXXXXXXXXXXXXXXXXXXXXXXXXXXXXXXXXXXXXXXXXXXXXXXXXXXXXXXXXXXXXXXXXXXXXXXXXXXXXXXXXXXXXXXXXXXXXXXXXXXXXXXXXXXXXXXXXXXXX

THE 1ST THING YOOOOU DOOOOO!!!!---IS VERIFY YOU HAVE OIL PRESSURE!!!!!

XXXXXXXXXXXXXXXXXXXXXXXXXXXXXXXXXXXXXXXXXXXXXXXXXXXXXXXXXXXXXXXXXXXXXXXXXXXXXXXXXXXXXXXXXXXXXXXXXXXXXXXXXXXXXXXXXXXXXXXXXXXXXXXXXXXXXXXX

LET ME KNOW IF ANY OF THIS, DOES NOT MAKE SENSE BEFORE YOU START!

DO YOU KNOW HOW TO PROPERLY TIME IT---HERE AGAIN, I CAN TALK YOU THRU THAT TOO.......and I do not mind!

TOOLS?....DWELL/ TACH AND A TIMING LIGHT (I PREFER THE PLAIN JANE, INEXPENSIVE NON-ADJUSTABLE TYPE)

THIS PIC IS MY 6 CYLINDER, MEASURING THE VAC TIT-------I HAVE NO PIC OF MEASURING THE BUTTON.

2ND PIC--AVAILABLE AT "HARBOR FREIGHT", LESS THAN $40, ALL YOU NEED KEPT TOGETHER IN A REALLY SMALL COMPACT ABS CASE......PERFECT FOR A "ONCE IN A WHILE", DO IT YOUR-SELFER

AWAITING SURGERY RESULTS, IN THE WAITING ROOM...........

THE MEDIC


Feb 16, 2011 at 11:57 PM
Avatar
CFENGINEER
  • MEMBER
  • 20 POSTS
ok, before i dive off into this I have a couple of questions or statements. I noticed on the new distributor the air gap was very close, maybe a business card could slide between there. On the existing distributor the air gap is better than a 1/16 of an inch. Is there an adustment for that and if so I don't see and obvious way to do it. Second, I think i performed the ohm test incorrectly, yes i know....... how could I do that!!!, well i think i out smarted myself. Anyway the meter still read 0.67. So before I dive off into this head first, have I missed a step?
Feb 17, 2011 at 12:46 AM
Avatar
CJ MEDEVAC
  • CERTIFIED EXPERT
  • 11,004 POSTS
I do not understand "Air Gap"

Do you mean this one sits down further than the old one, in the intake?

Do you have calipers and can compare their machined surfaces?

If it is: Sitting on the intake deeper.....Did you install a gasket, one should have come with the unit. If not, make one from gasket material. Or make one from the "Fruity Pebbles Box", that you emptied this morning.

Other than that, if the new one is deeper in, and looks identical to the other..........I say, Let's go for it!

Explain if that was not the issue.

As for the test---You have continuity present with both units?

Are the values the same?

Correct me, if I'm not on track!!!I really do not want to mess you up!

The Medic
Feb 17, 2011 at 2:32 AM
Avatar
CFENGINEER
  • MEMBER
  • 20 POSTS
What I refer to as the air gap is between the pickup coil and the reluctor (both shown in pictures below). The third picture shows the inside of the distributor, the gap between the reluctor and the pickup coil in this picture is almost not even noticeable, on mine that gap is greater than 1/16th of an inch, its probably 3/32 of and inch. So there enlies my question. Does that "air gap" adjust or can I just purchase a new pickup coil ir reluctor instead of replacing the entire distributor and messing with the timing and such? Or is it just as easy to replace the distributor in the long run and just get it over with?

Your thoughts?
Feb 17, 2011 at 1:43 PM
Avatar
CJ MEDEVAC
  • CERTIFIED EXPERT
  • 11,004 POSTS
You are like me----Really into this stuff!

I do not know if you have investigated other CJ 5, CJ 7, and even a CJ 8 Scrambler........Answers I have given in the past.

I sorta really get a "Wad" of info from my AMC 1979 Jeep Service Manual.......It covers every Jeep Vehicle in that year.

It was accidentally left in my 2nd Jeep when I purchased it used in 1983, (my 2nd Jeep was a '79 CJ 5)

The Book was "Brand New" and I did not take care of it for maybe the 1st 5 years--Then I realized it was like owning "Sacred Scrolls"!

This same manual has been reproduced (it may be a smaller book now) And there again I will get another soon, As soon as I crack down and get off of my "Donkey" and do it....(I found this on the internet)

It tears the entire Jeep 6 or 8 cylinder, 5 or 7, Cherokee or Truck into nothing-ness! Every test imaginable, and explains in pretty much understandable terms. Diagrams and Pics.........Most Tragically, I am missing both covers and the 1st few pages on either end of the book........Yes, I Whine Too!....Should have my Butt Kicked!

I just looked for adjusting of the Pick-up coil against the Trigger Wheel-----IT SHOWS NONE!, It shows installing the parts, but no mention of the GAP.......I'm guessing that is preset?...The 2 screws (hex) shown in your pic, can they be loosened and it be slid over?

As long as it doesn't hit now, or with a little future wear or wobble of the shaft I see no problem with it being closer!

NOW FOR A "NELSOMATIC" COMMENTARY!!!----Buying the parts you displayed, and installing them........$$$ for parts...Labor is Free, Warranty on parts? (I would guess, 1 year max)----VS----$50 Distributor, New bearings/ bushings, new sensor assembly...LIFETIME WARRANTY ('round here, they honor the lifetime deal, I have a entire binder of them for EACH of my Jeeps) I will take pics of that soon, and show you, nearly all of my Engine Compartment, less engine itself, is Lifetime....Includes Headers and Radiator!......It's coming soon! Just Hang around!

Lets Review a little!

1) Jeep drove OK....Then Died

2) YOU DID NOT REMOVE THE DISTRIBUTOR?

3) You have no spark...Fuel down carb did nothing

4) Replaced IGNITION MODULE...Had new one tested before you lest store---BACK UP HERE, MAYBE I DID NOT TELL YOU THIS NEXT PART!!!! Test any MODULE, 5-8 Times on the Autozone or Advance Auto Machine, (Watch'em, make sure they connect them up correctly!) This will sorta warm a module up! If it does not pass last couple of times, GET A NEW ONE......If you get another one, TEST IT TOO, before you leave the store!!!!!-------IT MATTERS NOT, IF THEY GET MAD, THIS IS THEIR JOB, ASK THEM IF THEY WILL HELP DIAGNOSE YOUR JEEP FOR 2 DAYS....OR....TOW YOU IN, IF THE NEW MODULE IS BAD!!!.........That "little mess up", that I did not do, had me chasing my tail for 2 days, looking for a Different Problem.

5) We do have voltage to the POS side of the coil

6) We did try POS BATTERY to POS COIL using a Jumper Wire?

7) We may soon get around to installing a Ballast Resistor, because your Resistance Wire, has been Compromised, During an engine swap--258 to 304, This will be done as soon as we can get you cranked up this time!

8) Gimme a quick list of new stuff, and what has been checked by you---No need for super deetail!

Anything you want me to send Email, let me know.......I do have a scanner!

The Medic
Feb 17, 2011 at 5:38 PM
Avatar
CFENGINEER
  • MEMBER
  • 20 POSTS
There is no visible sign of a manner of adjustment to the pickup coil, so no go there. Of your items above we have not done 4 or 6. Item 4, I replaced the iginetion module this past fall, but have not tested it or replaced it sice we have began dialogue. I can do that maybe friday, if not will have to be Sunday, I have to go out of town Friday and Saturday. I'll get'r tested before we go further! I still question this gap on the existing pickup coul though, it just doesnt look right!
Feb 17, 2011 at 7:16 PM
Avatar
CJ MEDEVAC
  • CERTIFIED EXPERT
  • 11,004 POSTS
Here's my personal "REAL/ TRUE OWNERS MANUAL"

PIC 1) This is my Daily/ Whenever Log....I have neglected here lately, At the time I was doing this part, I was attempting to TUNE a Weber DGEV, or was that DEGV?....I don't remember, I like my Holley 390 4 bbl on my 258 6 cylinder better.............I kept up with the Weber a LOOOOOONG Time!......Attempting to do what "EVERYBODY" said was not working, I tried the Holley and doing "Plug Cuts" was not working for me either....I Reckon' I wasn't cut out, to READ PLUG colors to INSTALL CORRECT JETS.....When within the right few Jets, I saw no difference in the Colors.

I INSTALLED a O2 Sensor, and a AIR/ FUEL GAUGE and also used a Voltmeter set on "MILLIVOLTS" This Method works wonders in Quick Jet Selections (No more pulling the spark plugs out constantly).....I wish I had done that before the Weber, I liked it's Progression from using only one bbl to the progression to using the 2nd bbl (I was mad at it and gave it away!)....I like the Holley very much anyway

PIC 2) Any thing that is installed on my Jeep, is in here (a lot not shown)

PIC 3) This is some of the stuff, from when I rebuilt the engine...part #s are valuable, along with exactly what did get installed, like Push-rod lengths, ETC

PIC 4) THE NEXT FEW PAGES ARE LIFETIME STUFF----There are about 8 pages front and back of these!

PIC 5) If the receipt was on Thermal Paper, I copied it and stapled the "Disappearing" Original to it......No Doubt, it's theirs!

PIC 6) More receipts, even the 1 year ones, They do not pull "JUNK" on me any more, Like: Our Stores are not Connected, We cannot find you in here........My Fuel pump went out in Kentucky, Many miles from South Carolina........After they hit me with all of the Excuses, why they could not "Find" me in the system.....I threw the Ole Nelsomatic catalog up on the counter, And got my $20 or so, Lifetime warranty. Since then, I do keep a Fuel Pump, Coil and a Module on Board....I ain't needed 'em yet, But I did do well, repairing 2 other jeeps on the roadside....One was the Fuel Pump, the other was the Module......You can also make a Killin' with A 5 Gallon Fuel Can on the back of your rig. $50 got me to pour the contents into other cars on the roadside (I may have to go up now that it costs me more!)

PIC 7) Other Receipts

PIC 8) My oldest "KEPT" receipt, From "Zone" For the alternator, I have replaced it 5-6 times...........At no cost to me!, It's from 1991....They have tried to "Keep it" at various stores, but I wouldn't let them.....This is "MY WARRANTY" for life, unless they give me the same back, I KEEP THE ORIGINAL!!!

So, to give you an idea of some of what I have.......Alternator, Starter, Distributor, Water pump, Headers, Master Cylinder, Brake shoes (both axles), Radiator, Ignition Module, heater core (2, one in my back-up heater) Blower motors (2, same as last), Squirrel cage fans (2, same as previous), Fuel Pump, Ignition wires......I have spent little on Normal Replacements, since I made my book!!!......That's a good chunk of $$$

PIC 9) Fuel can, air compressor (for my horns, but I do have a air chuck for tires from it too!).....I keep tire plugs on board too!.....I do it all!!!!!

The Medic
Feb 17, 2011 at 8:25 PM
Avatar
CFENGINEER
  • MEMBER
  • 20 POSTS
Ok i was able to make some progress today. I replaced the distributor and hooked everything back up. I followed all of your instructions and it dropped right in and lined back up exactly like the original one. I hope i was supposed to test it because I did, and after a couple of rough turns of the engine it started. Obvioulsy sounds like the timing is off a little. While it was running I was able to test the positive side of the coil and it was reading over 12 volts. I am assuming the ballast resister will now come into play here, but I will wait for further instructions. Waiting on you........
Feb 20, 2011 at 10:02 PM
Avatar
CJ MEDEVAC
  • CERTIFIED EXPERT
  • 11,004 POSTS
SOUNDS GREAT SO FAR!

NOW, HOW ARE WE UNDERSTANDING, FOLLOWING YOUR POSITIVE COIL FEED WIRE BACK TO THE "SPLICE" SHOWN IN THE DIAGRAM I SENT. "SPLICE" MEANING MORE THAN ONE WIRE JOINS IN.....NOT, JUST A COUPLER OR BUTT SPLICE IN THE LINE.

IS THE SPLICE THERE? WAS IT REMOVED IN THE ENGINE SWAP.

WHAT I "DON'T" WANT DO IS LEAVE PART OF THE ORIGINAL RESISTANCE WIRE IN THE SYSTEM. (THE POSSIBILITY IS, THEY JUST CUT IT SOME WHERE, AND SPLICED REGULAR WIRE ONTO IT)

SO, LET ME KNOW IF YOU CAN START AT THE ORIGINAL SPLICE LOCATION AND RUN A REGULAR WIRE (MAYBE 16 GAUGE) OVER TO THE COIL, KEEP IN MIND, YOU MUST PUT THE BALLAST RESISTOR IN THAT LINE....IT SHOULD BE IN A READILY SEEN SPOT, AWAY FROM ANYTHING THAT IT MIGHT MELT, AND NOTHING CAN HIT THE BACKSIDE, BREAKING IT'S RESISTANCE COIL...........WEAVE IT ANY WAY YOU WANT TO, TO KEEP IT IN YOUR WIRE LOOMS AND "PERTTY"!

THE BALLAST, YOU ACQUIRED, PROBABLY DOES NOT MATTER WHICH WAY YOU RUN THRU IT...........IF IT EVER GOES BAD, YOU CAN JUST TIE THE 2 WIRES TOGETHER (OR JUMPER OVER THE BALLAST) TO MAKE IT IN.

AFTER YOU GET THAT IN, YOU MIGHT LEAVE A CONNECTOR, CLOSE TO THE POSITIVE COIL---UN-SQUISHED/ UN-CRIMPED......."I" TERMINALS WIRE (FROM THE SOLENOID) WILL JOIN IN/ TIE IN THERE, TO PROVIDE "FULL BATTERY VOLTAGE" ONLY WHILE STARTING UP, THEN "I" TERMINAL DIES, WHEN YOU RELEASE THE KEY. AT THAT POINT YOUR BALLAST WIRE WILL TAKE OVER, FEEDING THE COIL.

SURELY, YOU CAN SEE THAT "I" IS A STRAIGHT SHOT TO THE COIL, IN THE DIAGRAM........HIT A SALVAGE YARD TO GET THE LITTLE "PUSH ON" ANGLE CONNECTORS FOR THE SOLENOID. THEY ARE ABOUT THE ONLY THING THAT WILL STAY ON, UNLESS YOU CAN NUT 'EM ON. A SPECIAL ORDER, NEW ONE WAS $18 AT ADVANCE AUTO...........THEY ARE LIKE CANDY ON '70s AND '80s FORDS AND JEEPS, COMMON BEHIND THE INSTRUMENTS AND DASH, AND THE SOLENOID......CLIP YOU OFF A HANDFUL!!!

REMEMBER "S" TERMINAL GOES TO YOU KEY, "I" IS THE OTHER LITTLE ONE, MOST OF THE TIME, THEY ARE MARKED ON THE SOLENOID

ARE WE UP TO SNUFF ON THE WIRING?, YOU KNOW I'M HERE IF YOU DO NOT!

SOON AS YOU TELL ME IT RUNS WITH THIS SET-UP....WE WILL TIME IT, DO YOU HAVE A PLAIN JANE TIMING LIGHT AND A DWELL/ TACH METER TO GET RPM RIGHT????

LIKE TO KNOW IF YOU USED A DIAGRAM TO RUN THE VACUUM LINES........IF NOT, WOULD ALSO LIKE TO KNOW WHERE YOUR VACUUM LINES START AND END, WHICH ONES ARE DRAWING "MANIFOLD VACUUM" (S.UCKING ALL THE TIME) WHICH HAVE "PORTED VACUUM" (S.UCK ONLY WHEN YOU CRACK THE THROTTLE)......KEEP IN MIND IF THEY RUN THRU SWITCHES AND SUCH, THERE MAY BE NO VACUUM TILL THE SWITCH TURNS ON. SOME GOOD PICS WOULD BE NICE TO TALK ABOUT.

DO THEY TEST YOUR EMISSIONS IN YOUR REGION?

CAN YOU HANDLE THIS?....ANSWER MY QUESTIONS!

THE MEDIC
Feb 20, 2011 at 11:10 PM
Avatar
CFENGINEER
  • MEMBER
  • 20 POSTS
Ok, in the first pick below you can see the original splice still intact. The heavier gauge wires come from the fire wall and to the ignition coil. This wire is a 16 gauge wire or so and is intact all the way to the coil. There are no other splices on that wire. In the second pitcure you can see my fingure on the solenoid "I" terminal. It has a push wire on it but has been cut all the way to the knub. So if I understand correctly I can splice the coil wire and install the ballast resister, or do you want me to splice in new wire at the original splice and install the resister on that new wire? Also, install a short wire from the "I" terminal over to the "plus" side of the coil?

I do not own a timing light or tach meter, I will have to pick that up tomorrow.

Explain the vaccum hoses to me...... the hose off of the vaccum port on the distributor goes to the carburator (small hose). A larger hose connects the carb to the break booster. Thats pretty much it. We don't have to check emissions here.......
Feb 21, 2011 at 1:19 AM
Avatar
CJ MEDEVAC
  • CERTIFIED EXPERT
  • 11,004 POSTS
I JUST REVIEWED YOUR WIRES, HERE AND FURTHER BACK ON THE POST, EVERYTHING SEEMS TO BE IN ORDER.

AS FAR AS THE BALLAST GOES, I THINK YOU GRASPED HOW IT SHOULD BE INSTALLED ALONG THE WIRE FEEDING THE POS COIL SIDE....AND HOW "I" WILL CONNECT IN EITHER RIGHT AT THE "OUTPUT" TERMINAL OF MR. BALLAST RESISTOR OR ANYWHERE FROM THAT POINT ON, TILL YOU REACH THE COIL..........CONNECTING TO THE "INPUT" SIDE OF MR. BALLAST RESISTOR---TOTALLY DEFEATS THE PURPOSE OF "I" (WE ALREADY HAVE REDUCED VOLTAGE, WHY SEND IT THRU THE RESISTOR AGAIN???!!)....WE WANT TEMPORARY FULL VOLTAGE FOR INITIAL START UP...........I KNOW YOU CAUGHT ON, VIA OUR PHONE COMMO, I JUST WANTED TO CATCH ANYBODY ELSE UP, READING THIS!

BE PROUD OF YOURSELF WITH THE DISTRIBUTOR INSTALLATION--THAT IS A SCARY TASK IF YOU HAVE NEVER DONE SOMETHING LIKE THAT!!! YOU WANT THINGS INEXPENSIVE--YOU WANT TO FULLY UNDERSTAND YOUR MACHINE--BUT YOU WANT IT CORRECT AND NOT SHELLING OUT ALSO! THAT'S HOW I APPROACH THINGS TOO, FIND OUT ALL I CAN--MAYBE SEVERAL SOURCES!--THEN YOU JUST GOTTA GO FOR IT!!!

LET ME KNOW WHEN YOU ARE READY, WE WE START THE TIMING PROCESS

IF YOU WILL, TAKE THE VACUUM LINE LOOSE AT THE DISTRIBUTOR, USING A VACUUM GAUGE, WHATS THE READING (EX: 20 INCHES OF MERCURY) AT IDLE (WARM)----DOES IT INCREASE IF YOU CRACK THE THROTTLE?....EXPLAIN RESULTS

THE MEDIC
Feb 21, 2011 at 3:36 PM
Avatar
CJ MEDEVAC
  • CERTIFIED EXPERT
  • 11,004 POSTS
OK, Heres my "GOES NO WHERE, WIRE LOOP"

I cut into NEGATIVE COIL WIRE well above the Coil Connector

It's Only use is to connect my Dwell/ Tach Meter to it when tuning.

It keeps me from stabbing a screwdriver, nail, paper-clip into my coil connector. It's also a much better connection to my meter.

Achieved by cutting the NEG COIL WIRE--then splicing it back together with a Butt Spice, but adding a loop of wire on either end of the splice (sounds dumb!) Then cut the loop and add a Male and Female Insulated Spade Connector to the 2 new ends.

This allows it to be connected together, keeping it clean and from grounding out.

Pulling it apart, I can alligator clip my meter to the male spade

Or I can test the coil

The Medic
Feb 23, 2011 at 4:50 AM
Avatar
CFENGINEER
  • MEMBER
  • 20 POSTS
Medic,
Thanks for all the tips and the step by step instructions for getting my CJ7 "Beast" back up an running. The pics and mods that you have come up with are great for understanding what is going on and how to fix and/or improve performance/operation. I also appreciate you taking time to talk me through and teach me the "timing" process and being available on the weekend to walk me through it.

Thanks Again Medic!!!
Feb 28, 2011 at 2:17 PM